
Scrap Journal Sketch Saturday #1
Scrap Journal Sketch Saturday. New scrapbook page sketch designed for the Creative Memories Scrap Journal posted on the last Saturday of each month. This month featuring the Weathered Indigo paper collection from Creative Memories.
Today’s post is a heads up on a new series that I am starting on my YouTube channel, It is called Scrap Journal Sketch Saturday (SJSS for short). I know that’s a mouth full but I wanted to create a series to help people who have photos and paper and the desire to capture the magic of that moment in time but have no idea where to start. I want you to see how a sketch can give you the confidence to make that first cut into the paper you’ve been staring at for inspiration. You can use the cutting instructions to create exactly what I have done or make some changes to make it your own. You got this and I want to help you realize it. Check my website/YouTube channel on the last Saturday of each month for the next sketch…here’s the first video in the new series!
My first post/video is a single page sketch that features the Weathered Indigo collection from Creative Memories and the Square Link Chain Border Maker Cartridge (use of this cartridge required the Border Maker System). If you do purchase any of the items from my online store, as a Creative Memories Independent Advisor, I will make a small commission. But none of these items is required. Use what you already have in the colors and style that represents you. Here’s a look at this month’s sketch.


Here’s a look at the finished one-page layout.

I hope you enjoy this sketch and my layout. Keep it scrappy my friends!


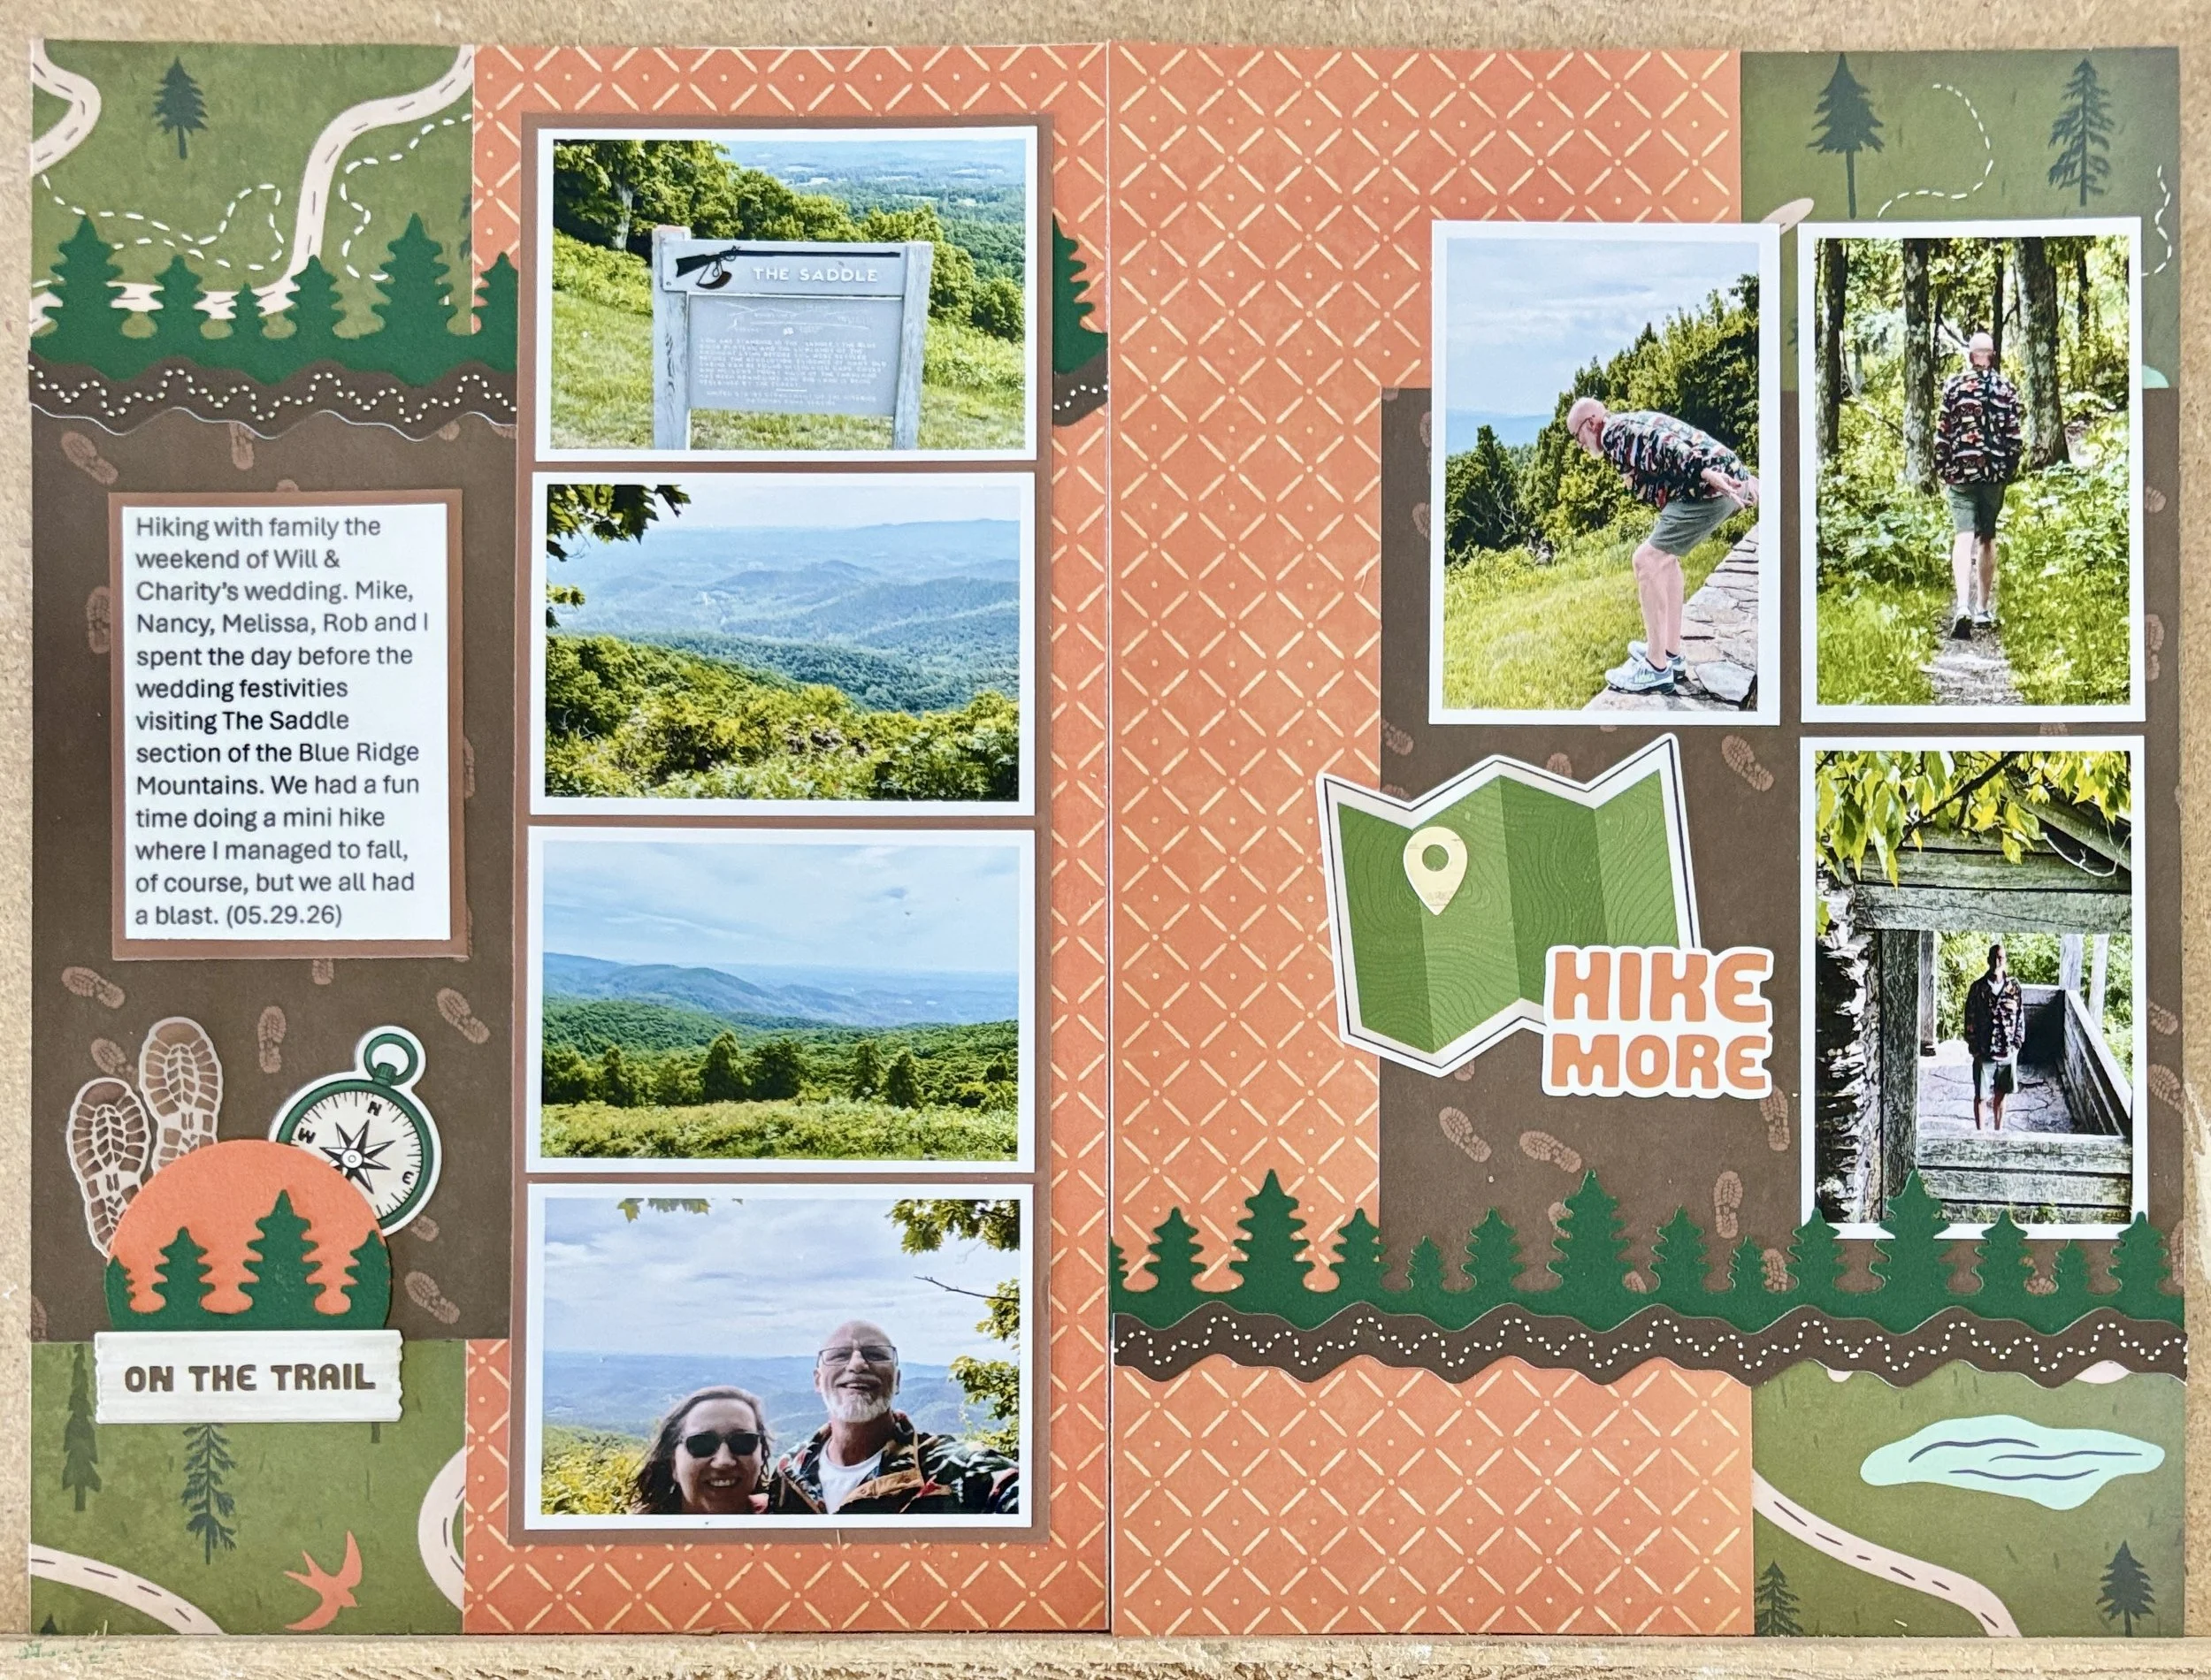
Hike More
Two-page Scrap Journal layout featuring Creative Memories’ Hiking Memories paper, stickers, border maker cartridge and circle punch.
Another thing we did while up in Virginia for Will and Charity’s wedding was explore some of the Blue Ridge Mountain Scenic Highway. We stopped off at The Saddle and hiked around. Rob was goofing off pretending to jump of “the saddle” and was hanging out in one of the shelters on the trail.
I used my Creative Memories Hiking Memories collection and a pine tree border maker cartridge (both no longer available) to document our adventure. I hope you enjoy my two-page spread!


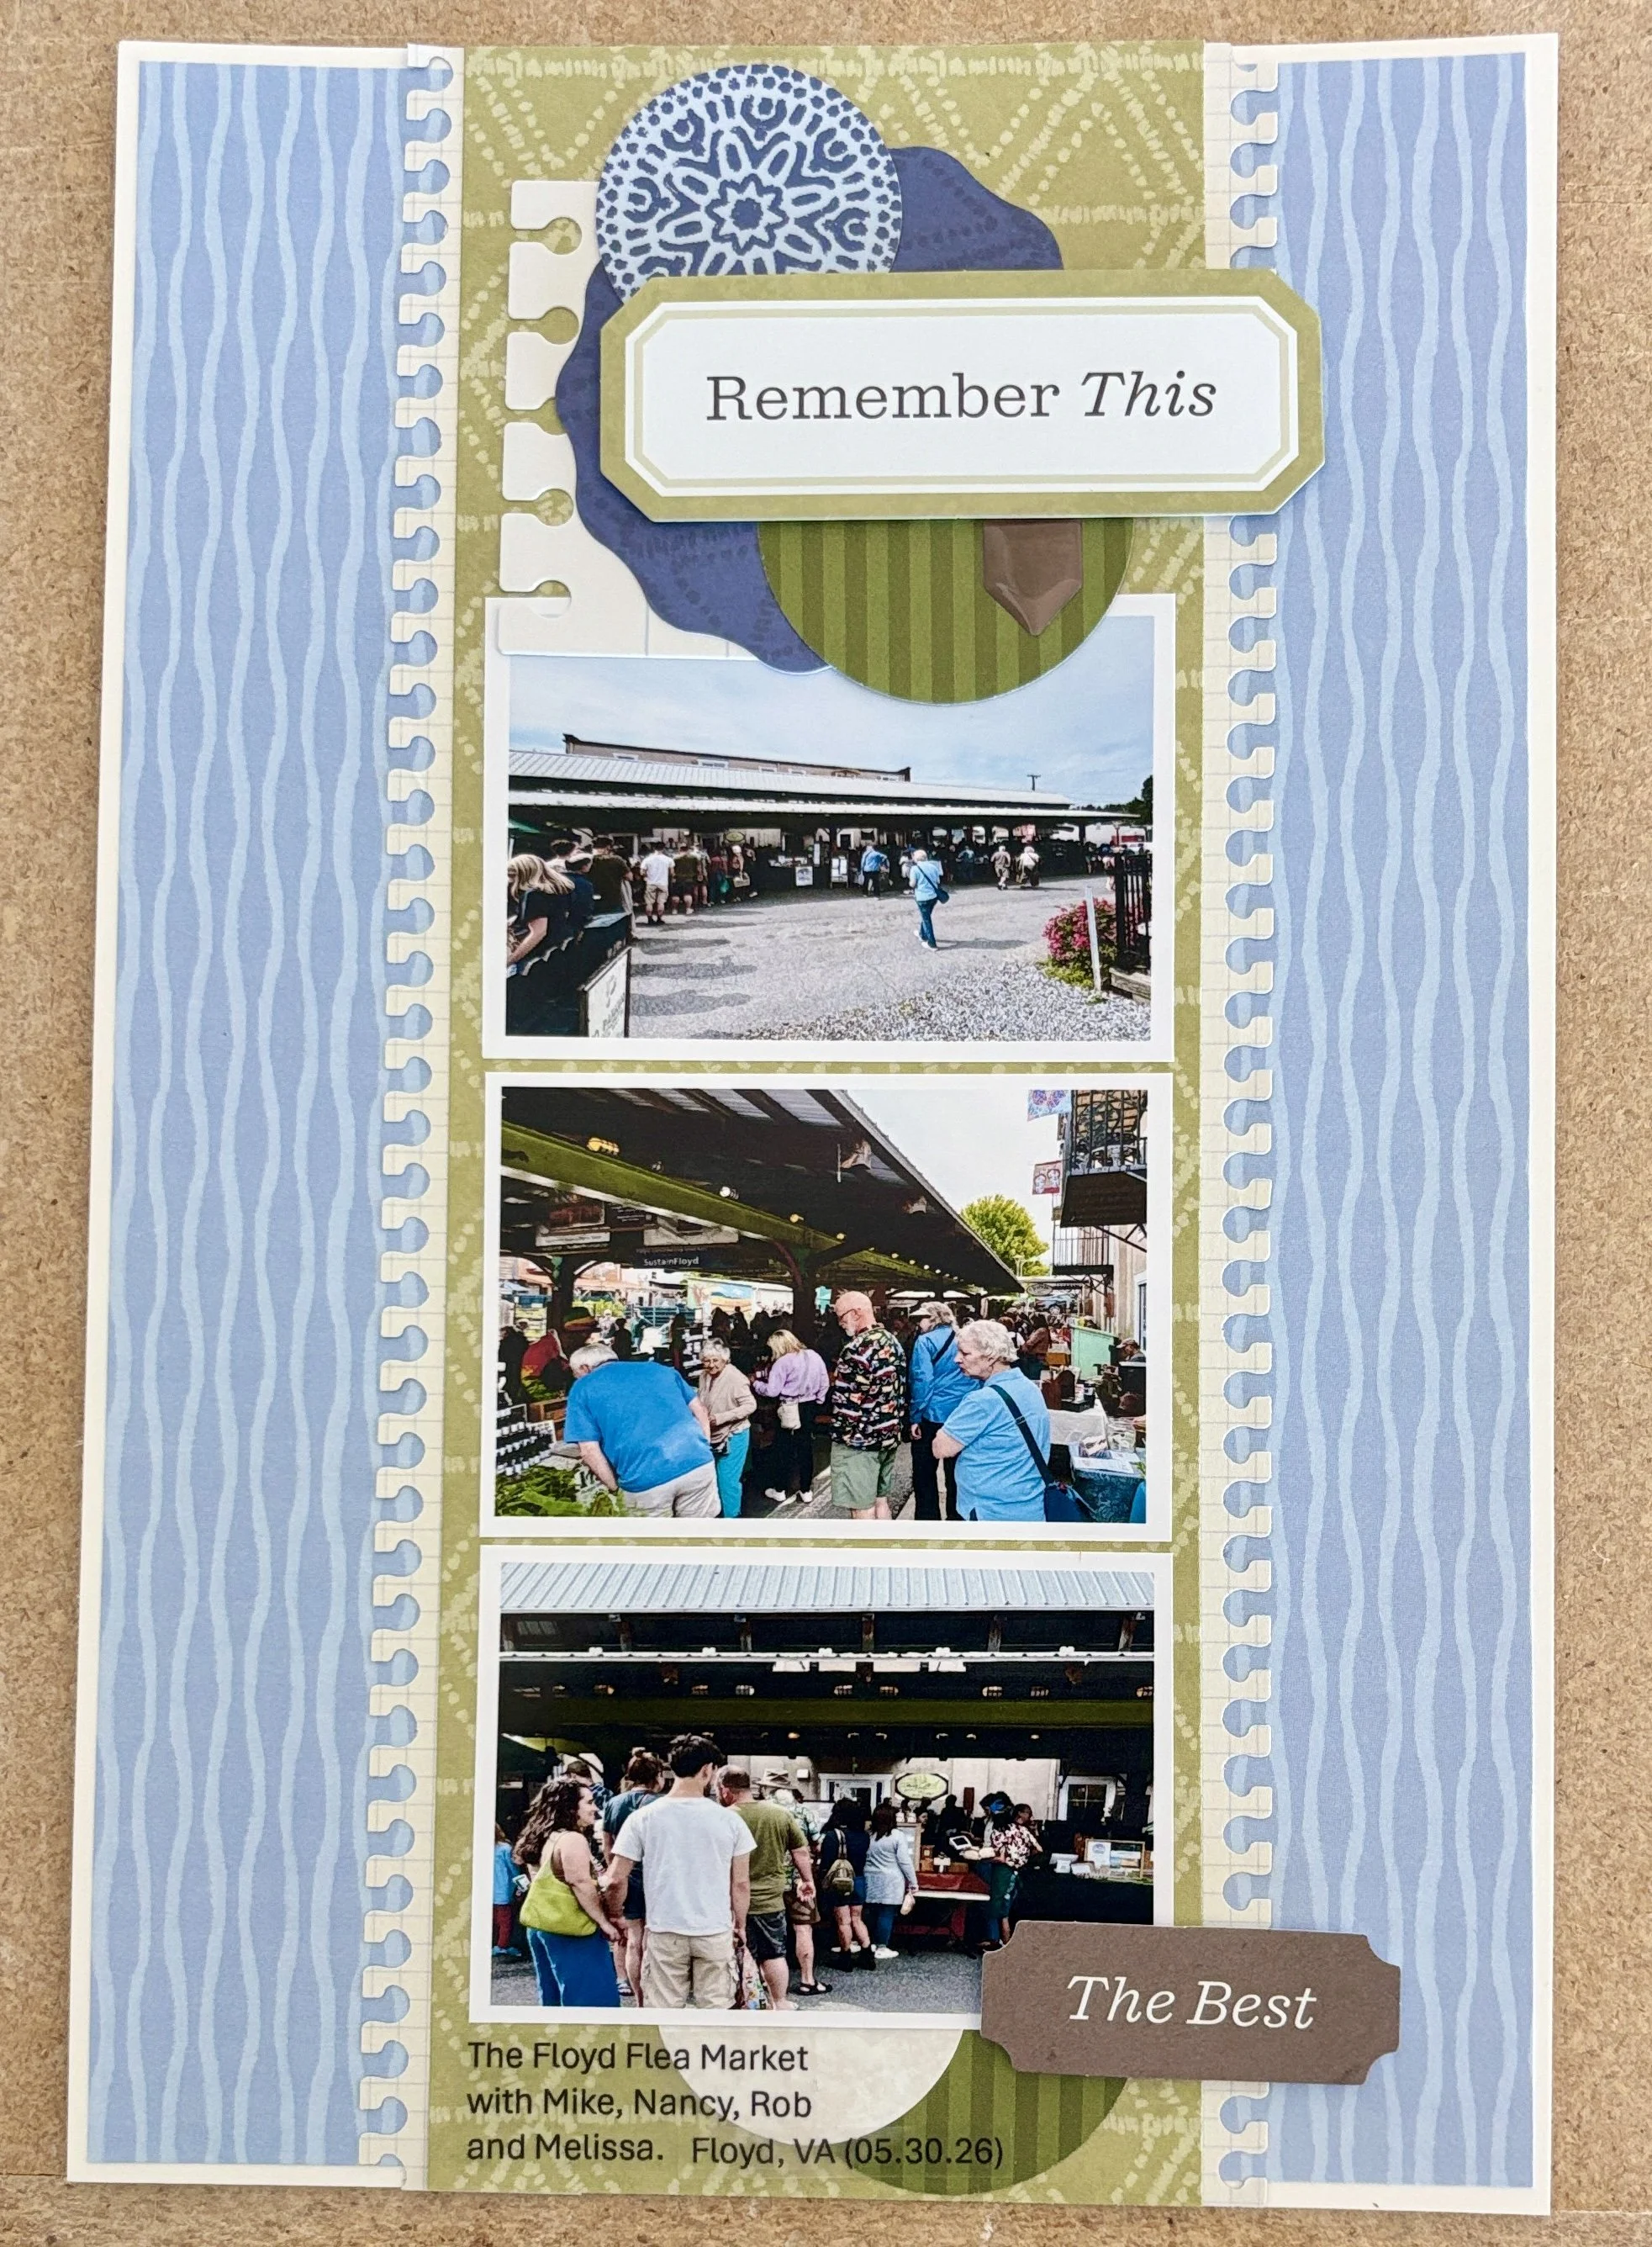
Remember this…the Floyd Flea Market!
A day at the Floyd Flea Market captured in my Scrap Journal using Creative Memories’ Natural Beginnings paper, stickers and embellishments as well as the Notebook Edge Border Maker Cartridge.
The weekend of Will and Charity’s wedding, the family took a drive and found ourselves at the Flea Market in Floyd, Virginia. As I always preach to scrappers, “capture the everyday and not just the holidays”. This is a prime example of that practice. Rob and I were adventuring in the areas near the wedding venue and came across a flea market. Melissa, Nancy and Mike joined us and we toodled about enjoying the local wares for sale. It was a lovely visit and an absolutely gorgeous afternoon.
I captured the event using Creative Memories’ Natural Beginnings collection including the paper, stickers and embellishments. I also used one of my favorite Border Maker Cartridges for the edging…the Notebook Edge Border. I hope you like this single page spread. I tried to keep it simple and balanced for those who like a linear layout.
I hope everyone had a wonderful 4th of July! And, as always, keep it scrappy my friends!


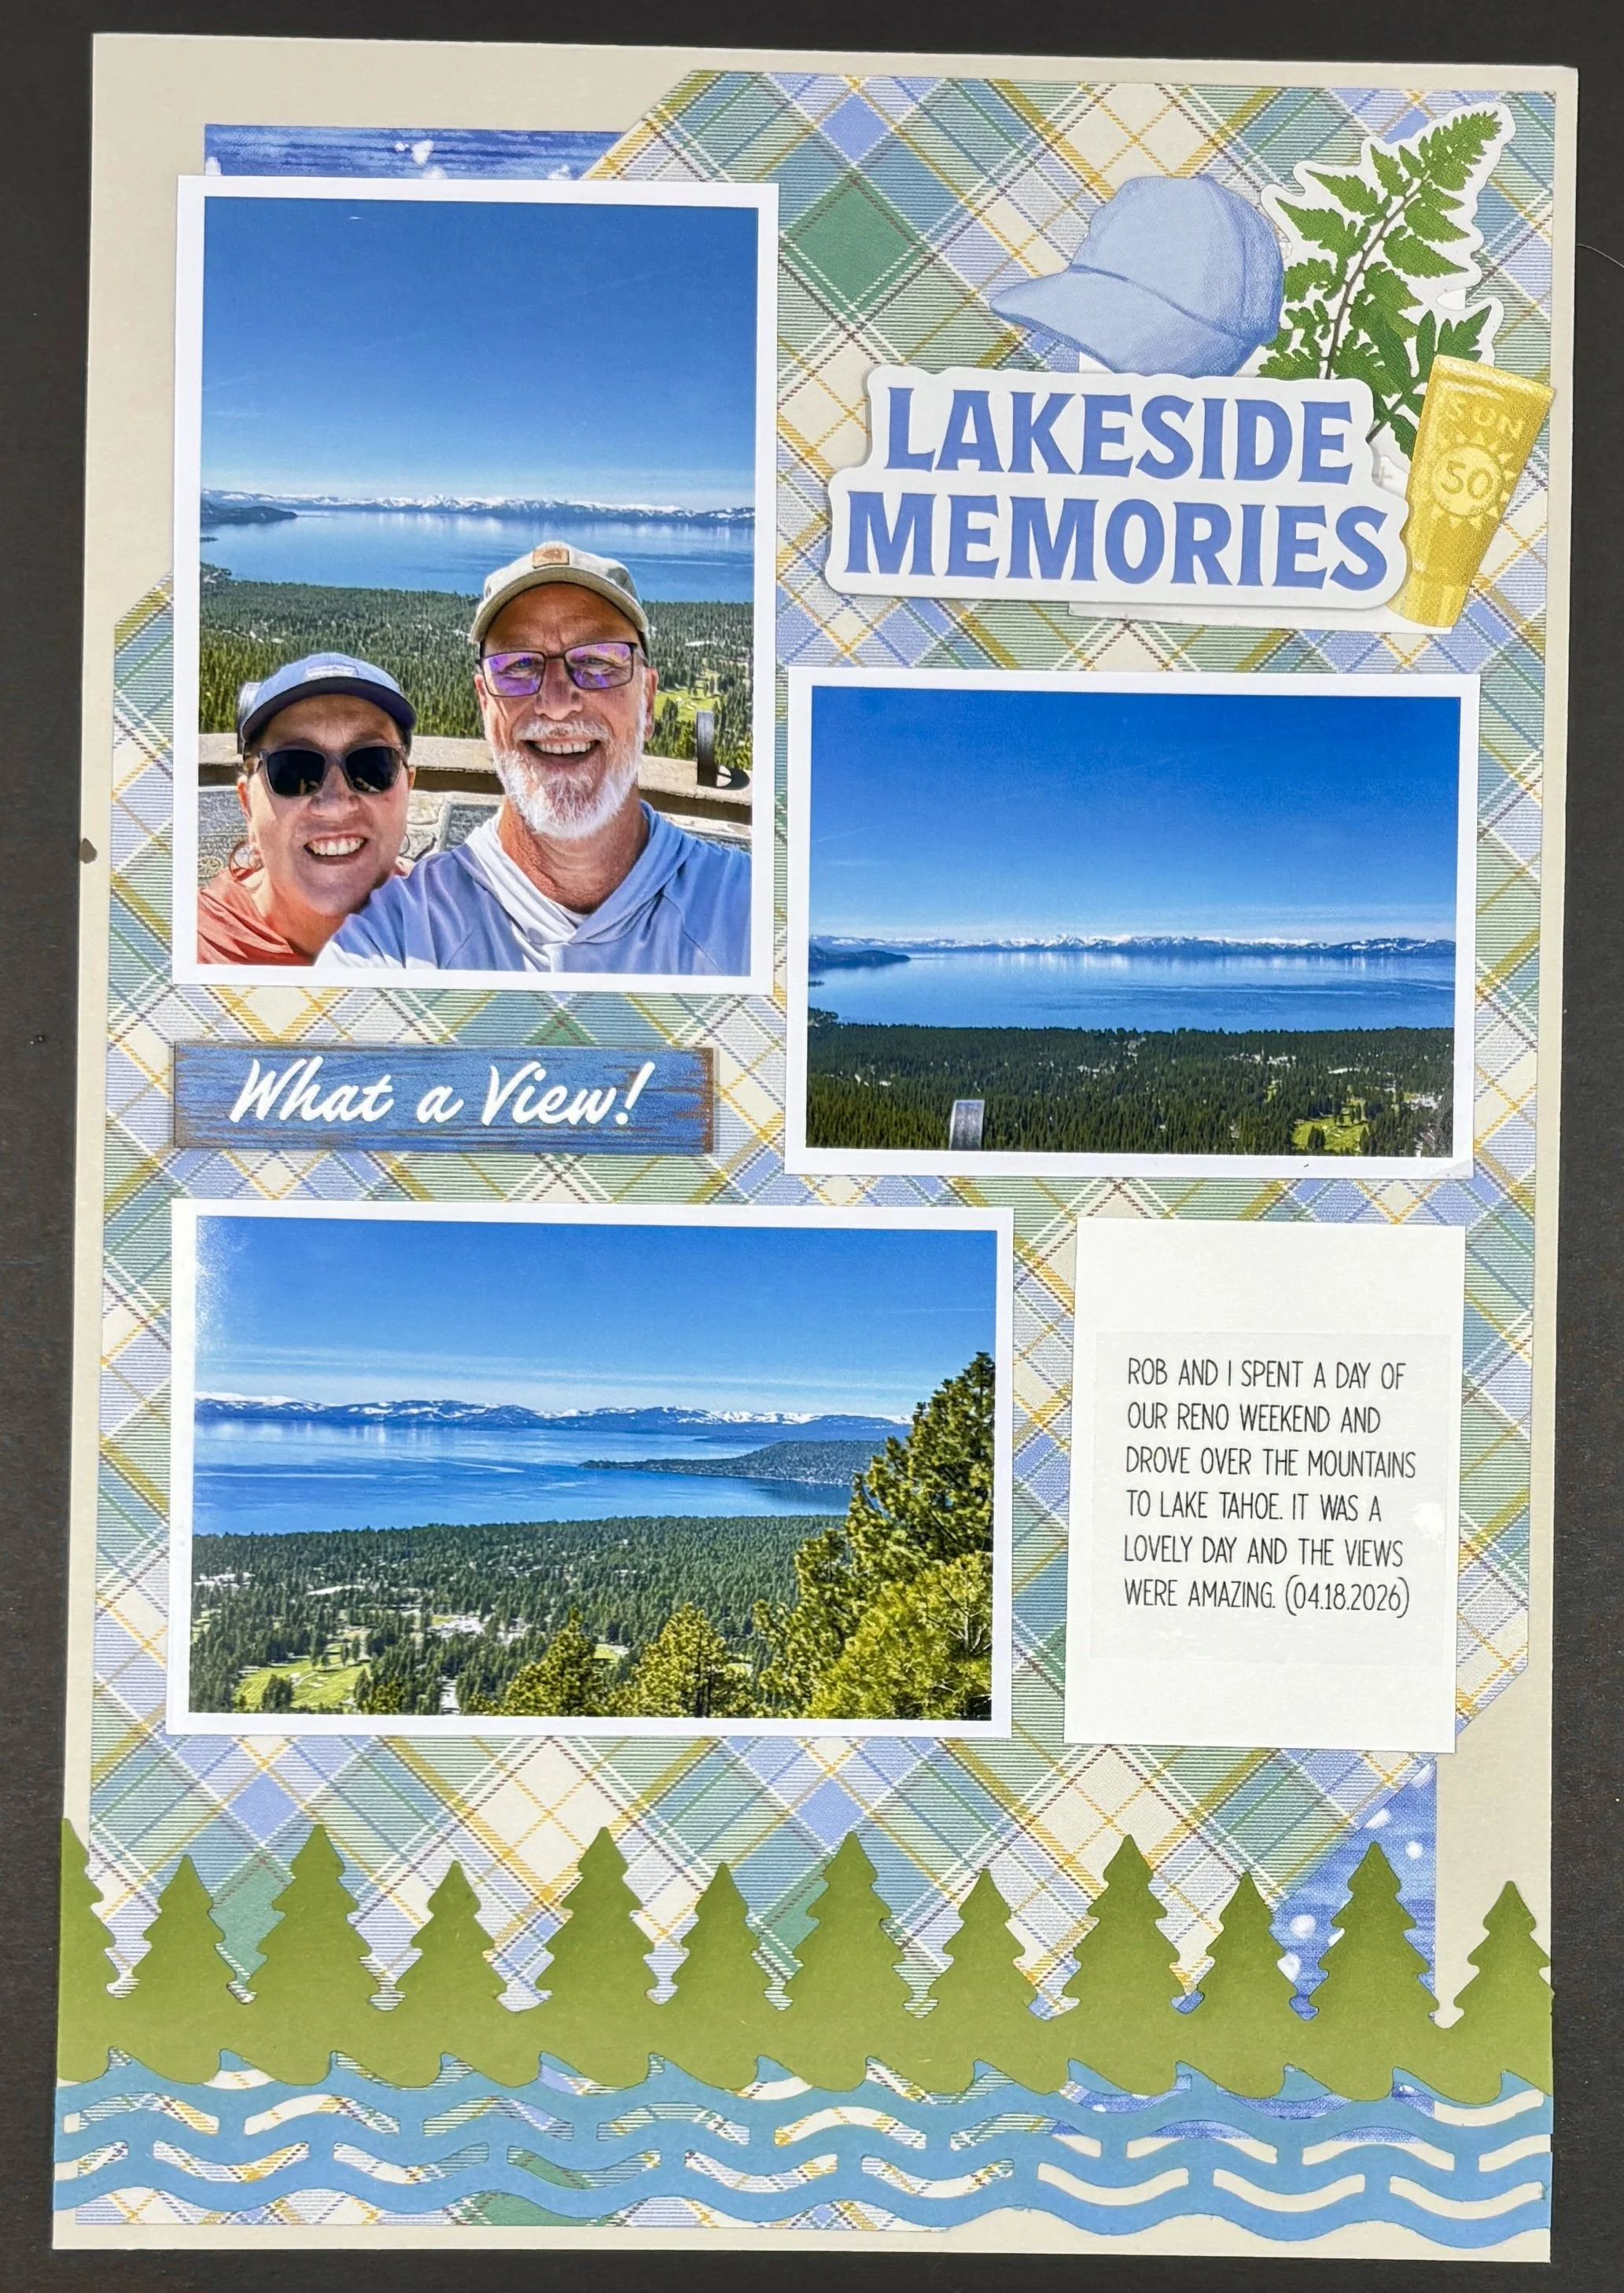
Lakeside Memories
A Scrap Journal layout using Creative Memories Lakeside Memories paper, stickers and embellishments to highlight a day at Lake Tahoe.
Here’s a single page layout for my Scrap Journal where I use the Lakeside Memories collection from Creative Memories to capture a day trip for the hubs (aka Rob) and I to Lake Tahoe. It was a glorious day to enjoy views of the lake. I used a couple of retired punches from Creative Memories from a special hiking and fishing collection as well as the Lakeside Memories paper, stickers and embellishments. Enjoy the layout!
If you are still here…are you interested in taking a fun trip and scrapbook while enjoying a vacation with your significant other, family or friends? If so, check out our Miles to Memories Mexican Riviera Cruise scheduled for January 8-15, 2027 out of Los Angeles. This will be a 7 day cruise out of Los Angeles hitting 3 ports in Mexico with 3 days at sea. While at sea we have all kinds of fun and creative projects and classes for you to enjoy. Check out the link for more information: https://www.cruiseandcrop.com/MilestoMemories.html

Creative Memories Layout Studio is here!
Check out the latest release from Creative Memories. It’s the Layout Studio and this tool is a game changer for scrappers everywhere! #layoutstudio
Hello my crafty friends. For those of you that are scrapbookers, Creative Memories has released a new product that is a legit game changer for scrappers. It is the Layout Studio and I recommend it to EVERY scrapper I know. I’ve created a Haul Video (see video below) and I show off the new product. I’ve also thrown in some photos of me using it at a crop this weekend.
This Layout Studio gives back soooo much space on my work surface. I can spread out paper and embellishments and not lose track of where I am in the layout. Oh my word. You’re gonna want this…
Ack! This is so amazing. Here’s my full layout ready for me to stick everything down. To see this Layout Studio in action, check out my latest haul video below.
As always, keep it crafty my friends!

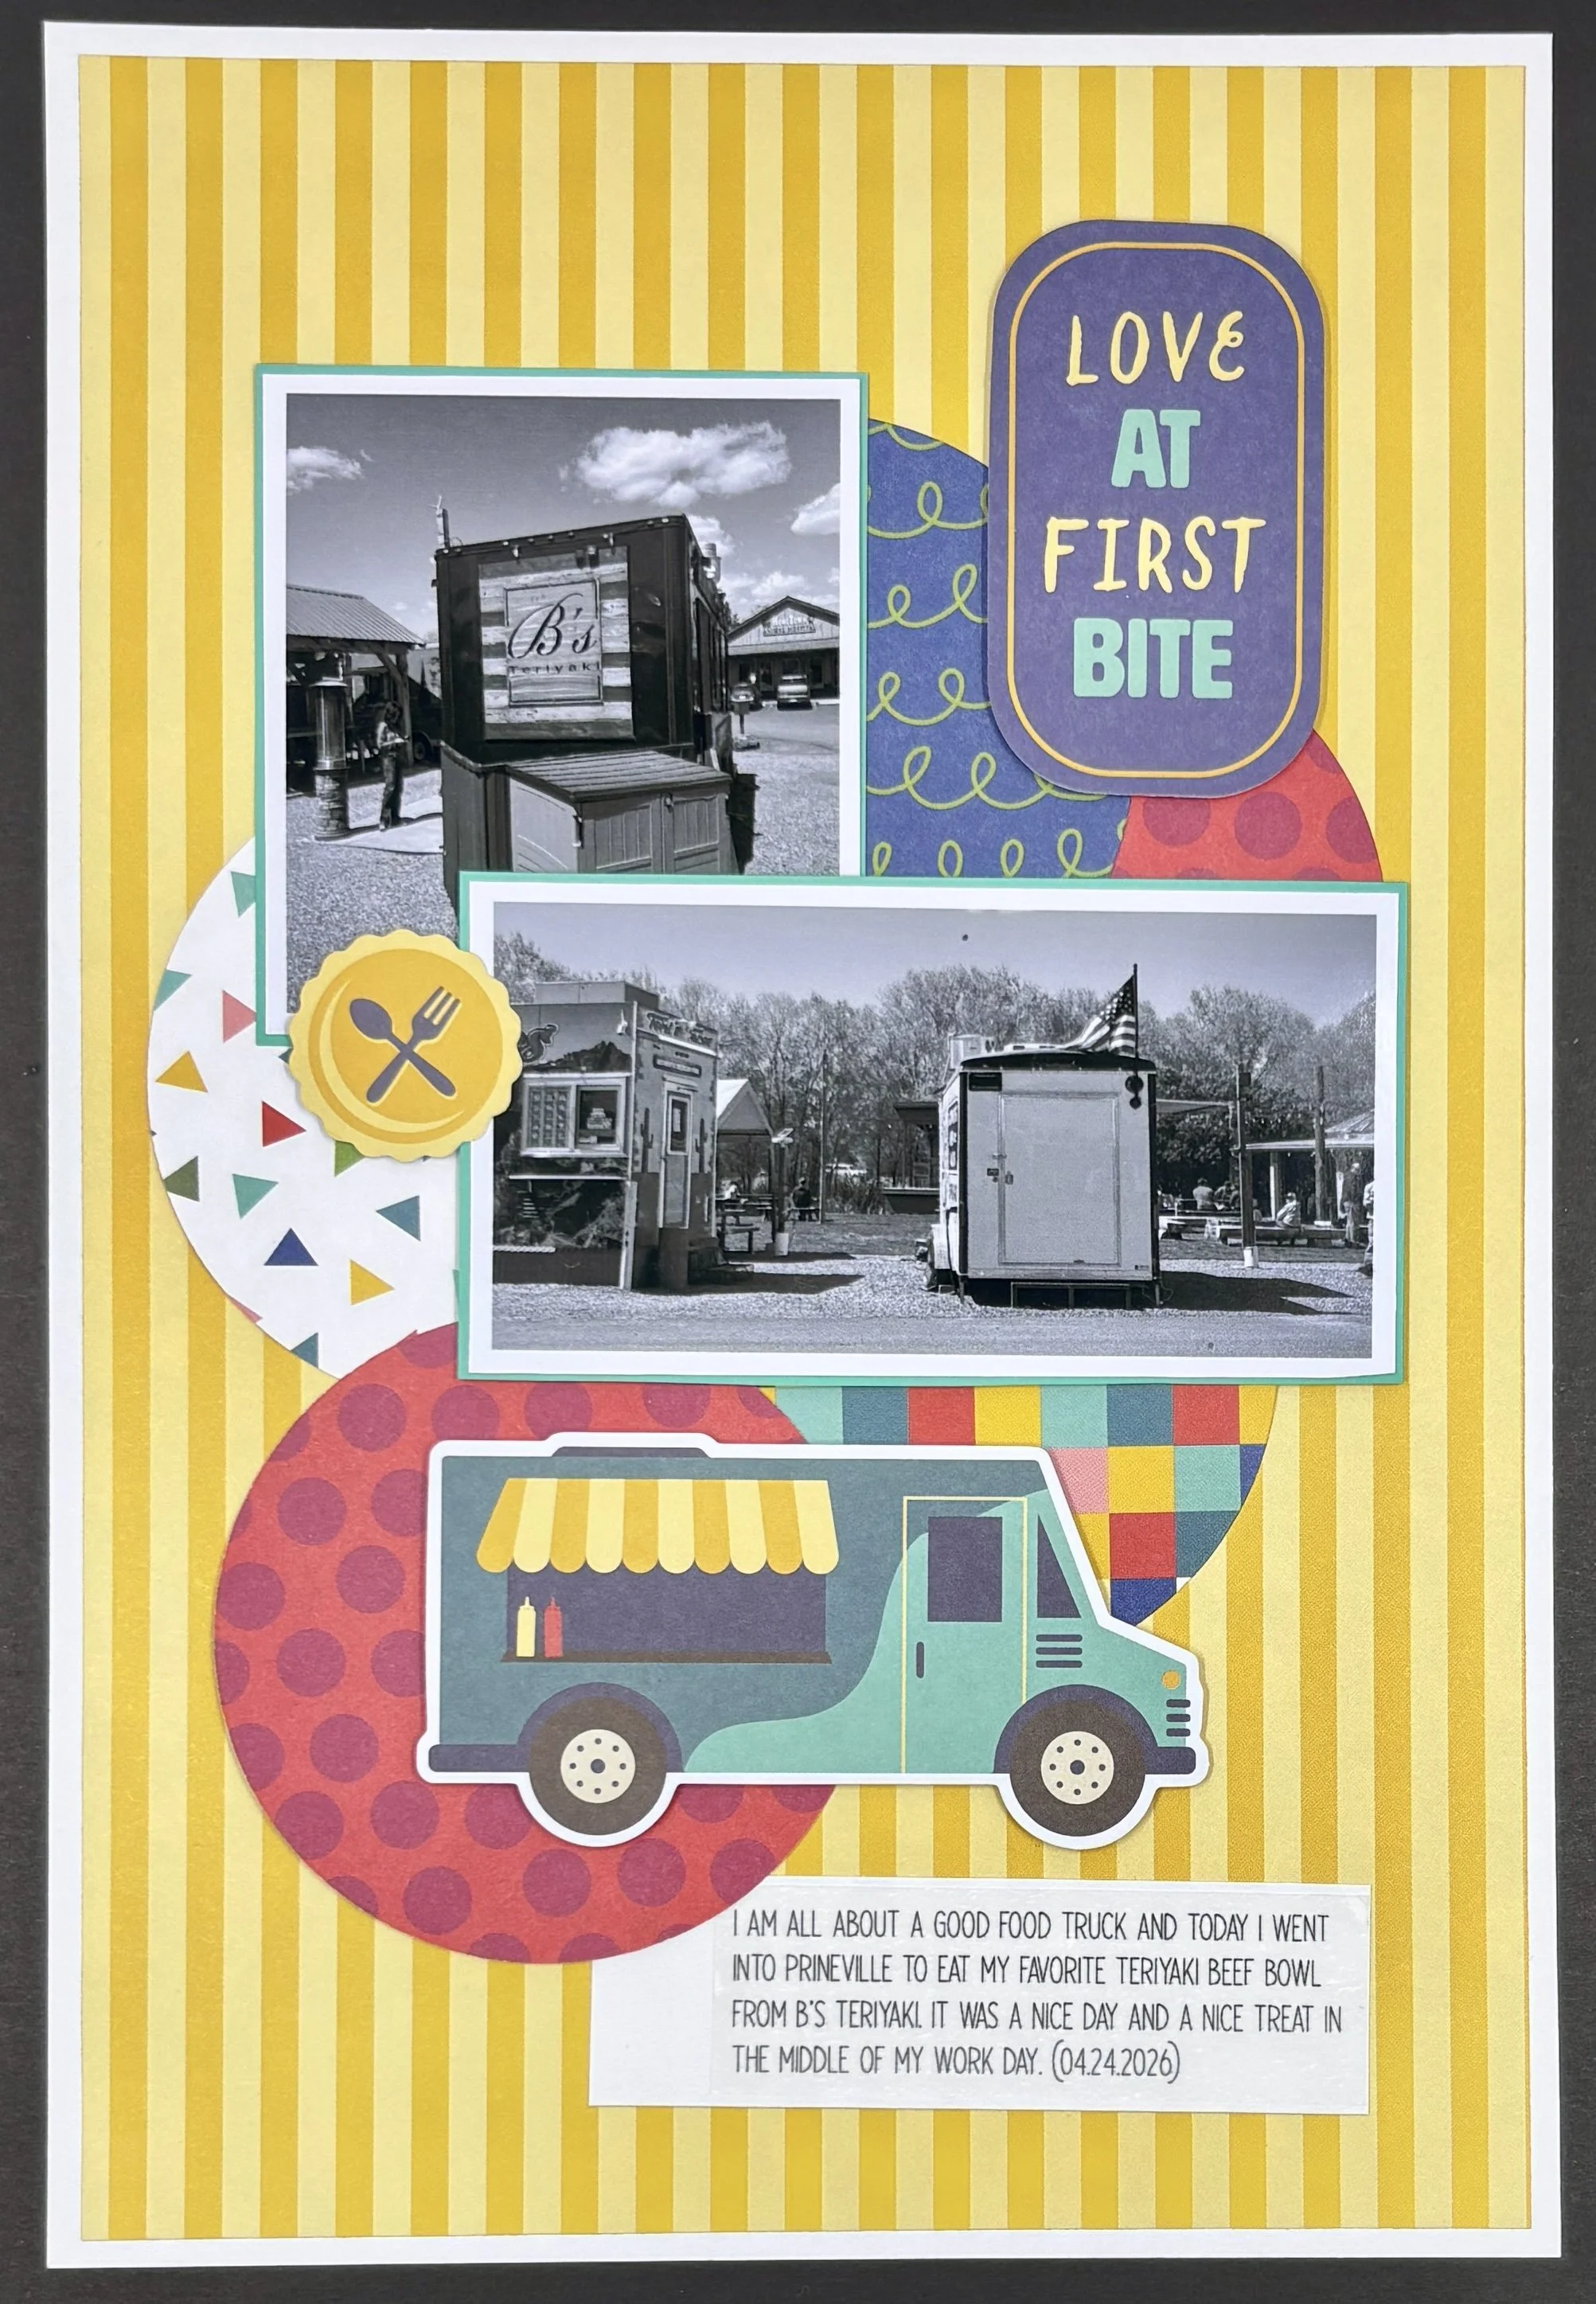
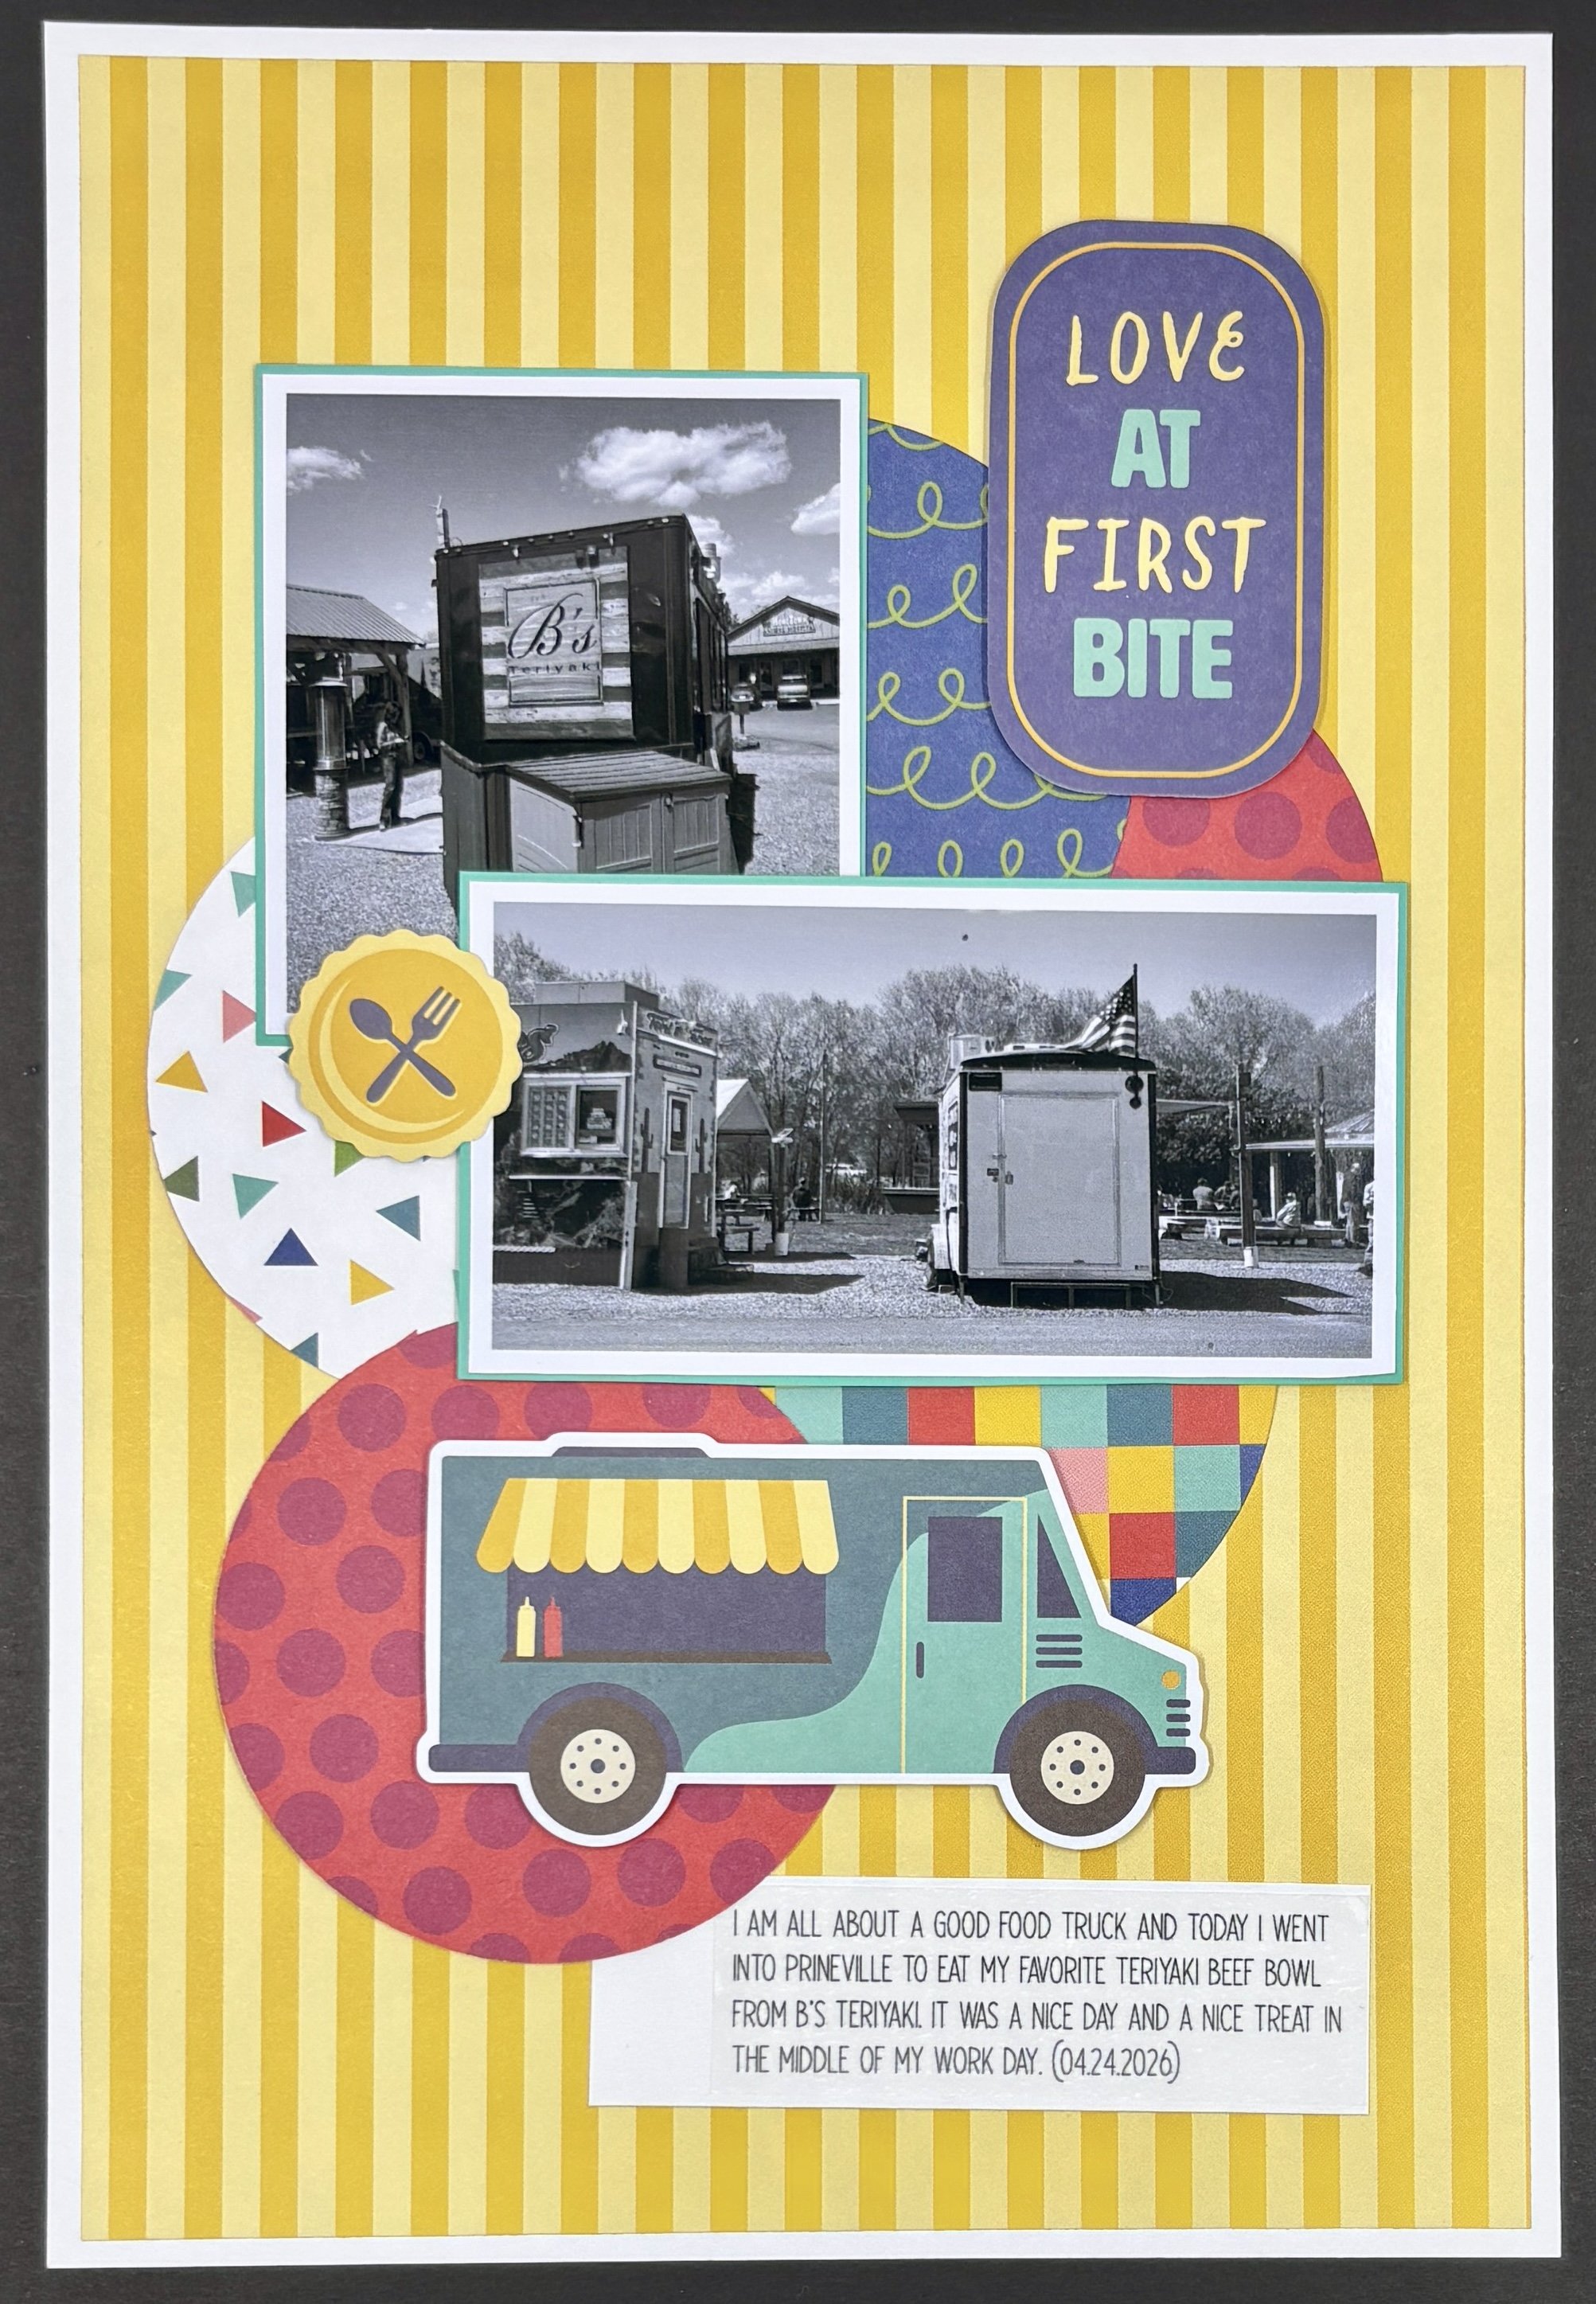
Love at first bite
A wonderful lunch at Teriyaki B’s Food Truck captured in my scrap journal with Creative Memories Food Truck Fun paper collection.
Today’s single page Scrap Journal layout is about my visit to Teriyaki B’s food truck in Prineville, Oregon. I love their Beef Bowls! I used my Food Truck Fun paper collection and embellishments from Creative Memories. This layout uses layered die cut circles as a foundation for my photos and embellishments. It’s like a big embellishment cluster with photos. Bright and fun. Note that I decided to use black and white photos because I didn’t want the colors of the photos to compete with the fun and colorful paper. I hope you enjoy it!
If you are still here…are you interested in taking a fun trip and scrapbook while enjoying a vacation with your significant other, family or friends? If so, check out our Miles to Memories Mexican Riviera Cruise scheduled for January 8-15, 2027 out of Los Angeles. This will be a 7 day cruise out of Los Angeles hitting 3 ports in Mexico with 3 days at sea. While at sea we have all kinds of fun and creative projects and classes for you to enjoy. Check out the link for more information: https://www.cruiseandcrop.com/MilestoMemories.html
I dreamt a layout and then I made it.
Dreaming about a layout and bringing it to life using Creative Memories Perfect Match collection.
I woke up with the image below in my head. Not much to look at but I used it as a jumping off point for more. Follow below for more photos of the transition.
I needed a way to figure out how to convert a 12×12 scrapbook page into a smaller Scrap Journal layout…

This was a good start but I wanted more so I added the extras that really make a huge difference…

Once I have a solid layout, I got to add all the pretties! Here’s my final layout!

If you want to see the full process from start to finish, check out my YouTube video below.
Dreaming about a layout and bringing it to life using Creative Memories Perfect Match collection.
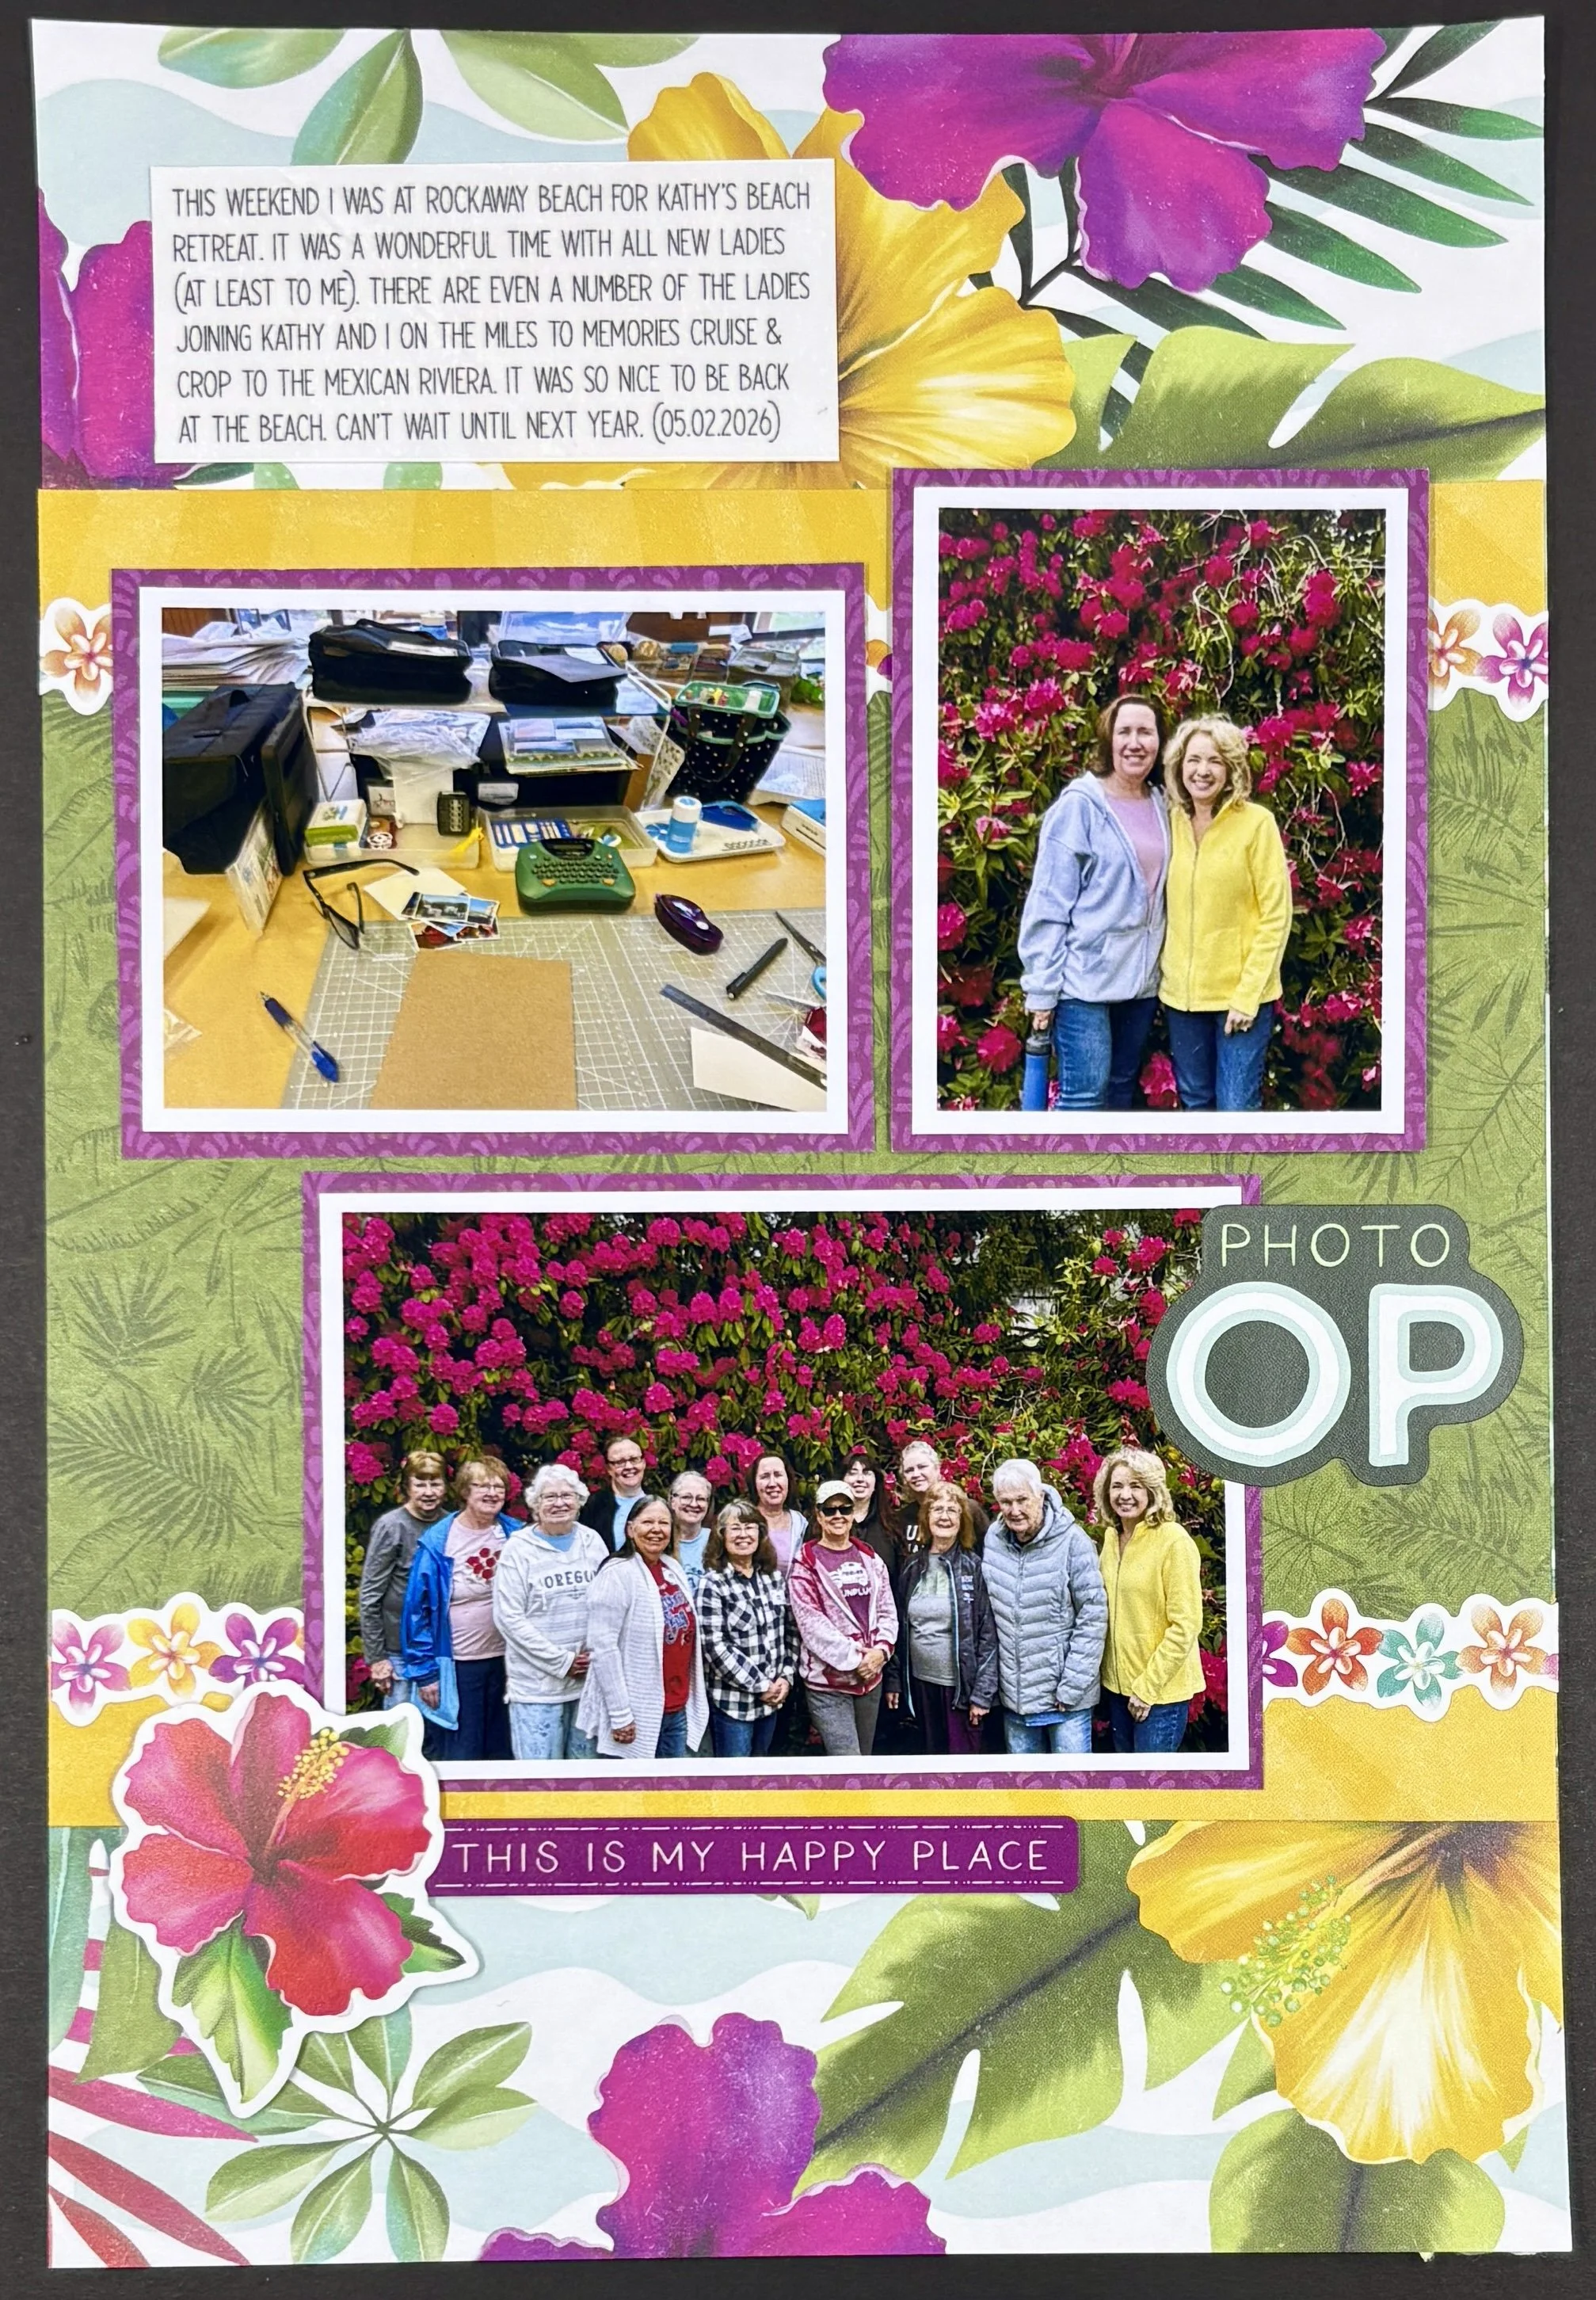
PHOTO OP
Crafting at the Coast using Creative Memories’ Tropical Garden Collection to create a single page layout for my Scrap Journal.
Hello Crafty Friends! I’m back with another 1 page Scrap Journal layout celebrating a crafting weekend with some friends. My dear friend, Kathy Smith, hosted her annual Craft at the Coast event in Rockaway Beach, OR. About 15 of us joyfully hauled our craft supplies to the beach for 4 days of creative fun. We had such a lovely time that I felt I needed to capture it with a layout. If you are interested in a crafty trip check out my links and information below the photo.
For those interested, I used the Tropical Garden Collection from Creative Memories because the flowers in the background were a perfect match for the collection. I used some of the paper, stickers and embellishments. I hope you enjoy the layout below and, as always, keep it scrappy!

Are you interested in taking a fun trip and scrapbook while enjoying a vacation with your significant other, family or friends? If so, check out our Miles to Memories Mexican Riviera Cruise scheduled for January 8-15, 2027 out of Los Angeles. This will be a 7 day cruise out of Los Angeles hitting 3 ports in Mexico with 3 days at sea. While at sea we have all kinds of fun and creative projects and classes for you to enjoy. Check out the link for more information: https://www.cruiseandcrop.com/MilestoMemories.html

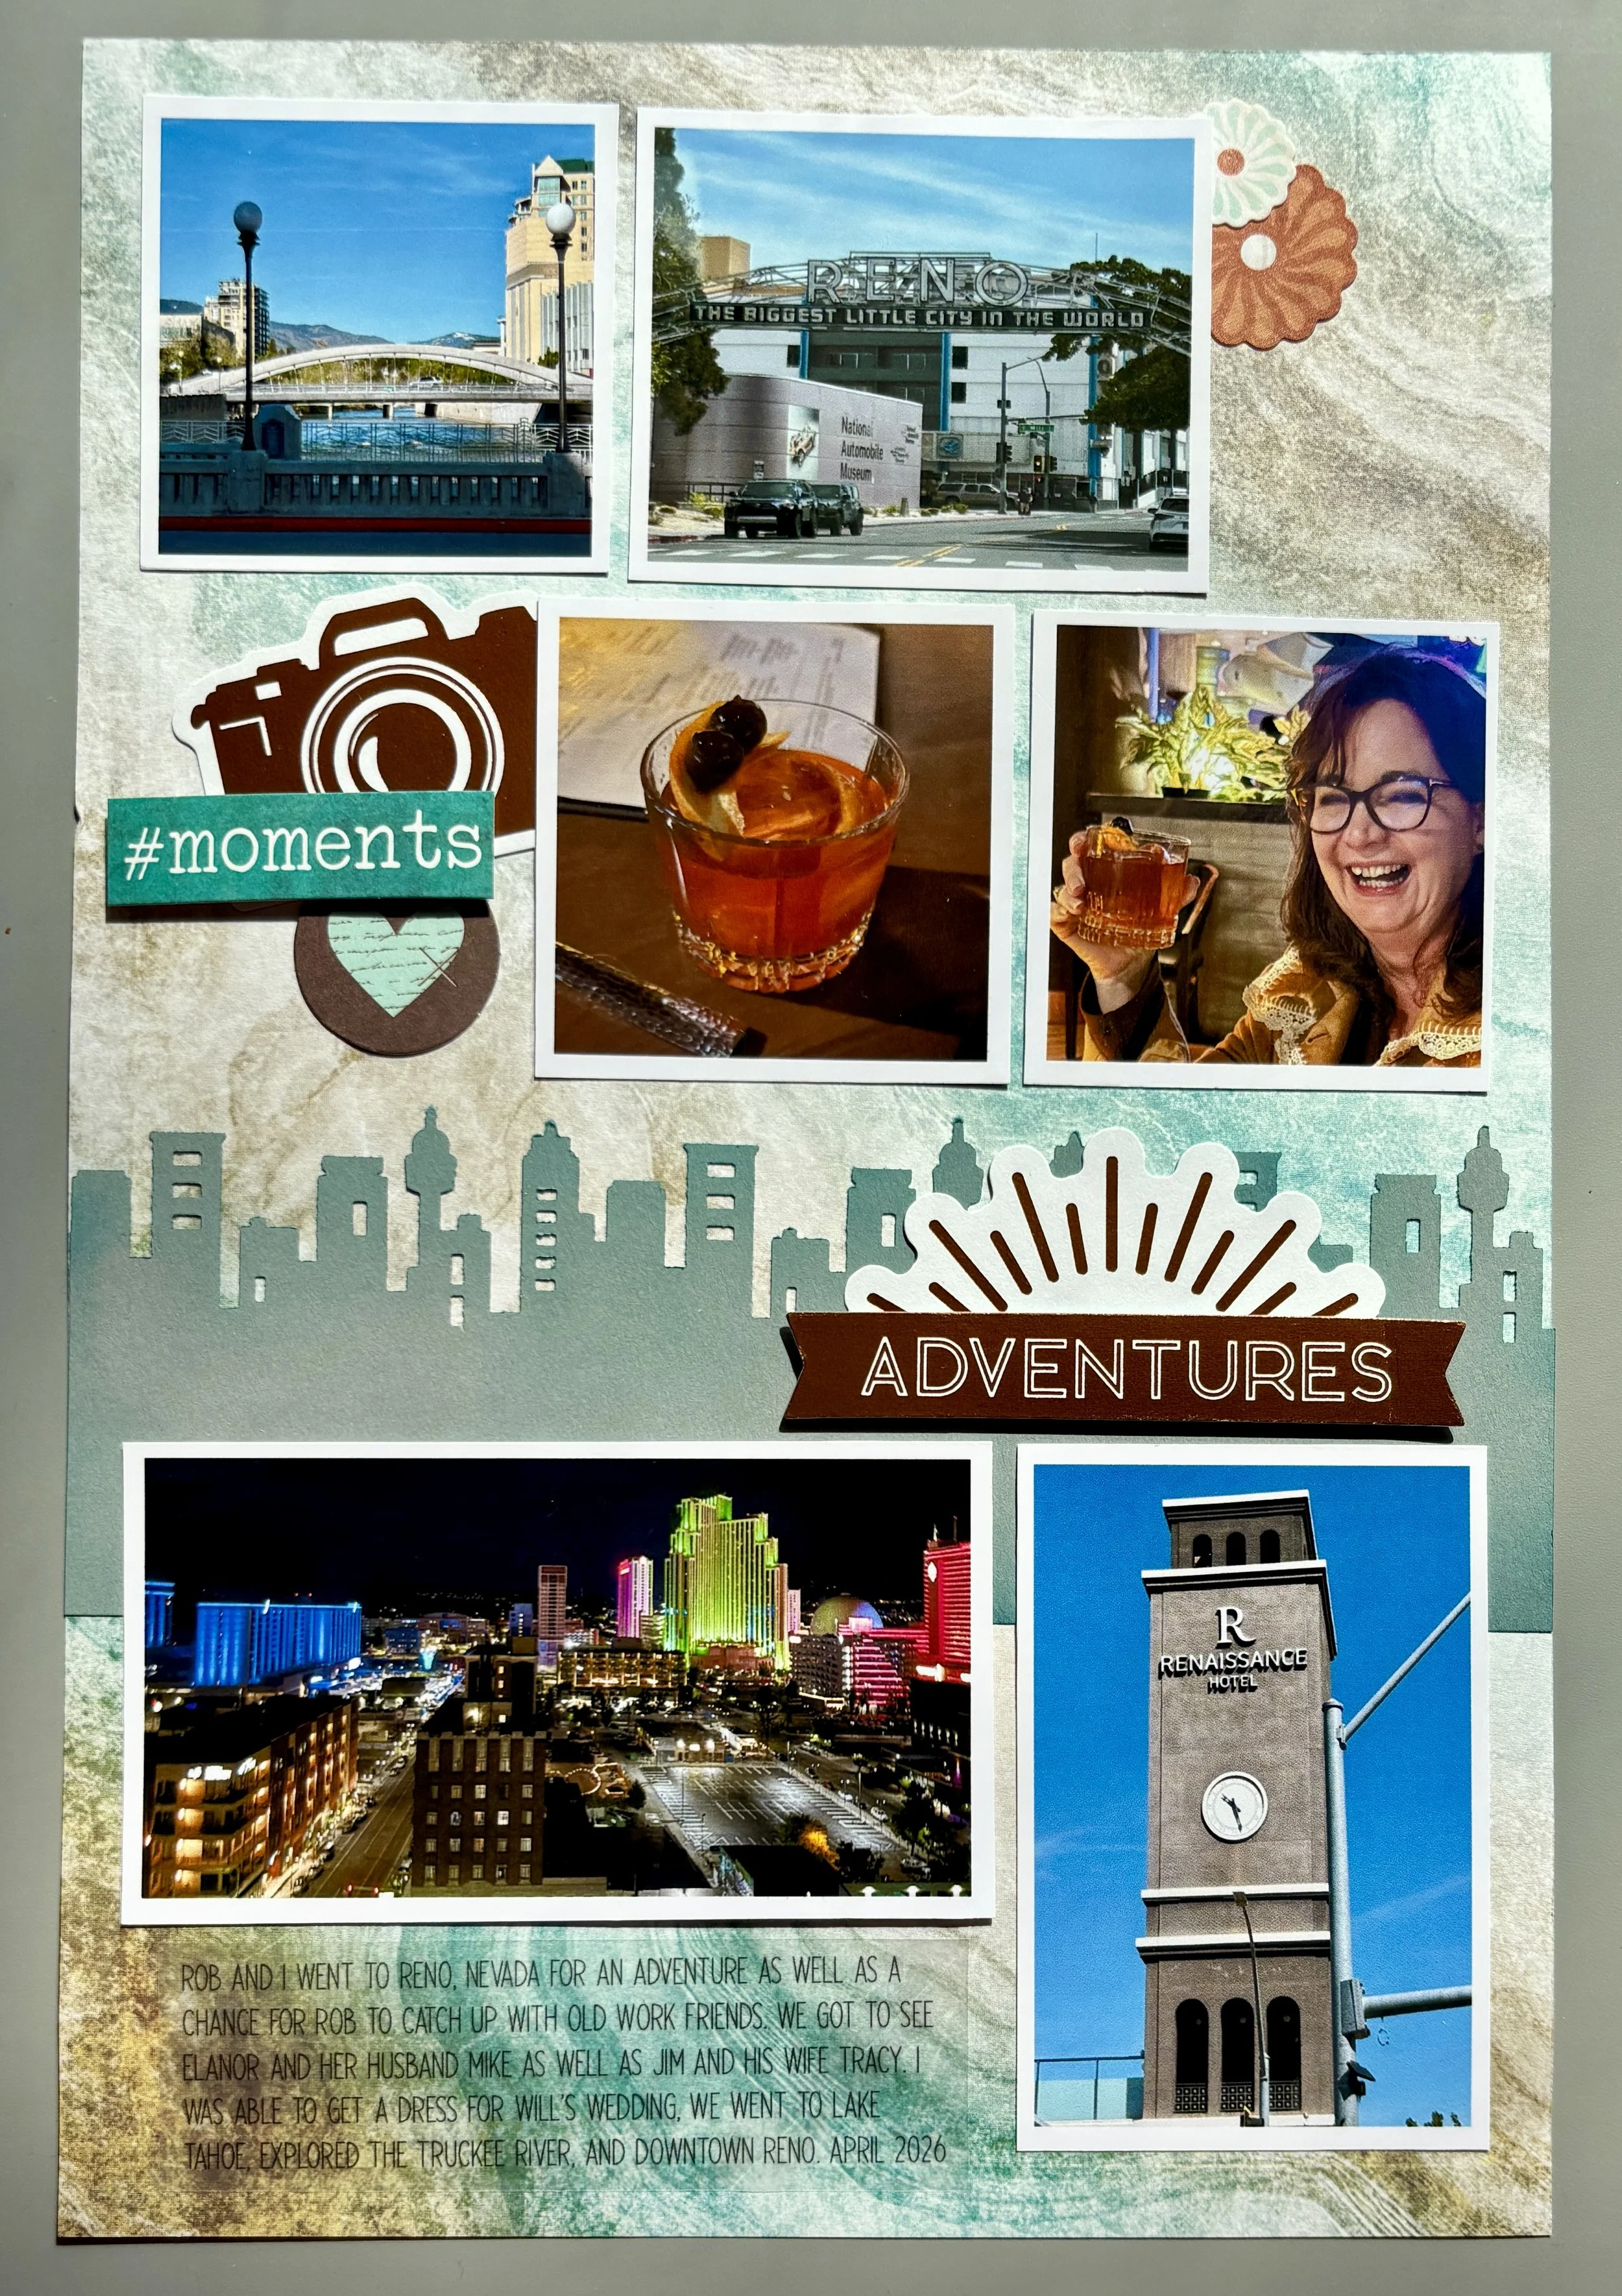
Adventures in Reno!
Hanging out in Reno, Nevada for a weekend of fun. Captured the memory in a single page Scrap Journal layout using supplies from Creative Memories and my stash!
Rob and I had a 4 day weekend in Reno, Nevada. We visited the area and spent time with old friends. We had a blast. To commemorate the event I created a single page Scrap Journal layout. I used the designer paper, embellishments and stickers from the Copper Canyon 2 collection from Creative Memories. I also use a retired Skyline punch. Love everything about this layout, EXCEPT, if I could do it over again…I would distress the skyline punch. It looks too neat.

I hope you enjoyed what I created. If you’re interested in purchasing some of the supplies I used in this layout check out the links here…Copper Canyon 2 designer paper and embellishments. As always, keep it crafty my friends!

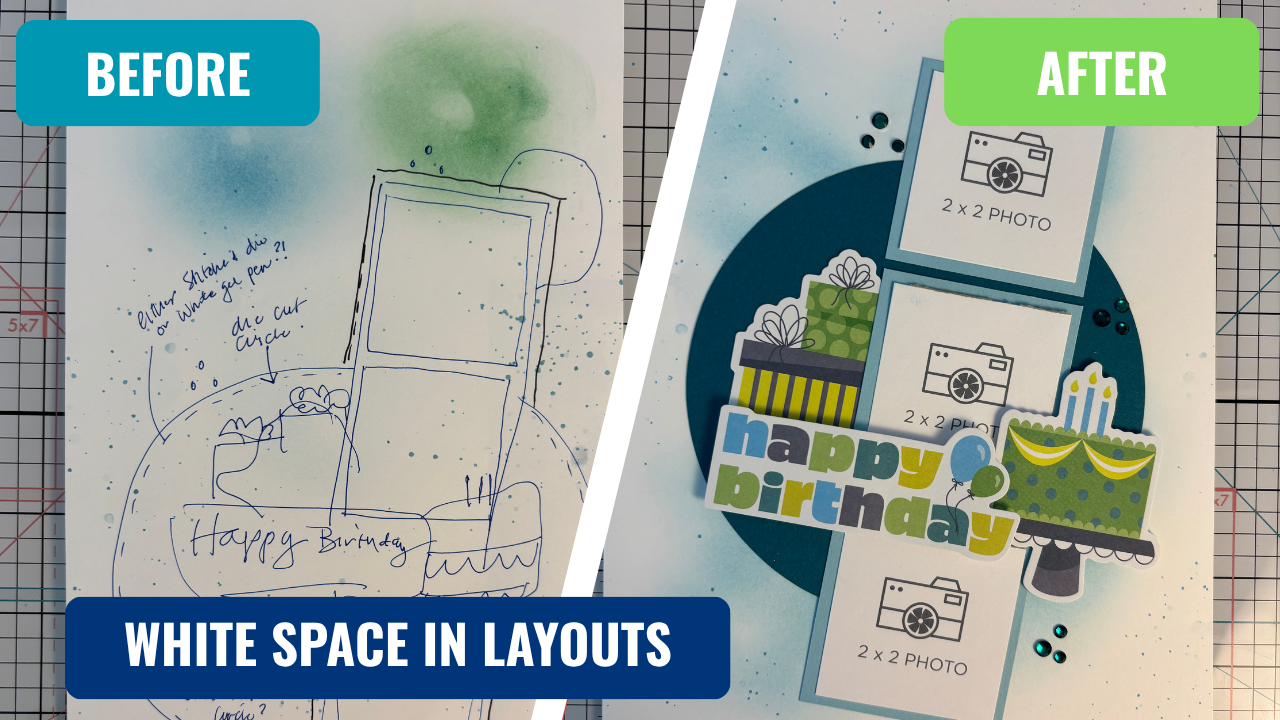
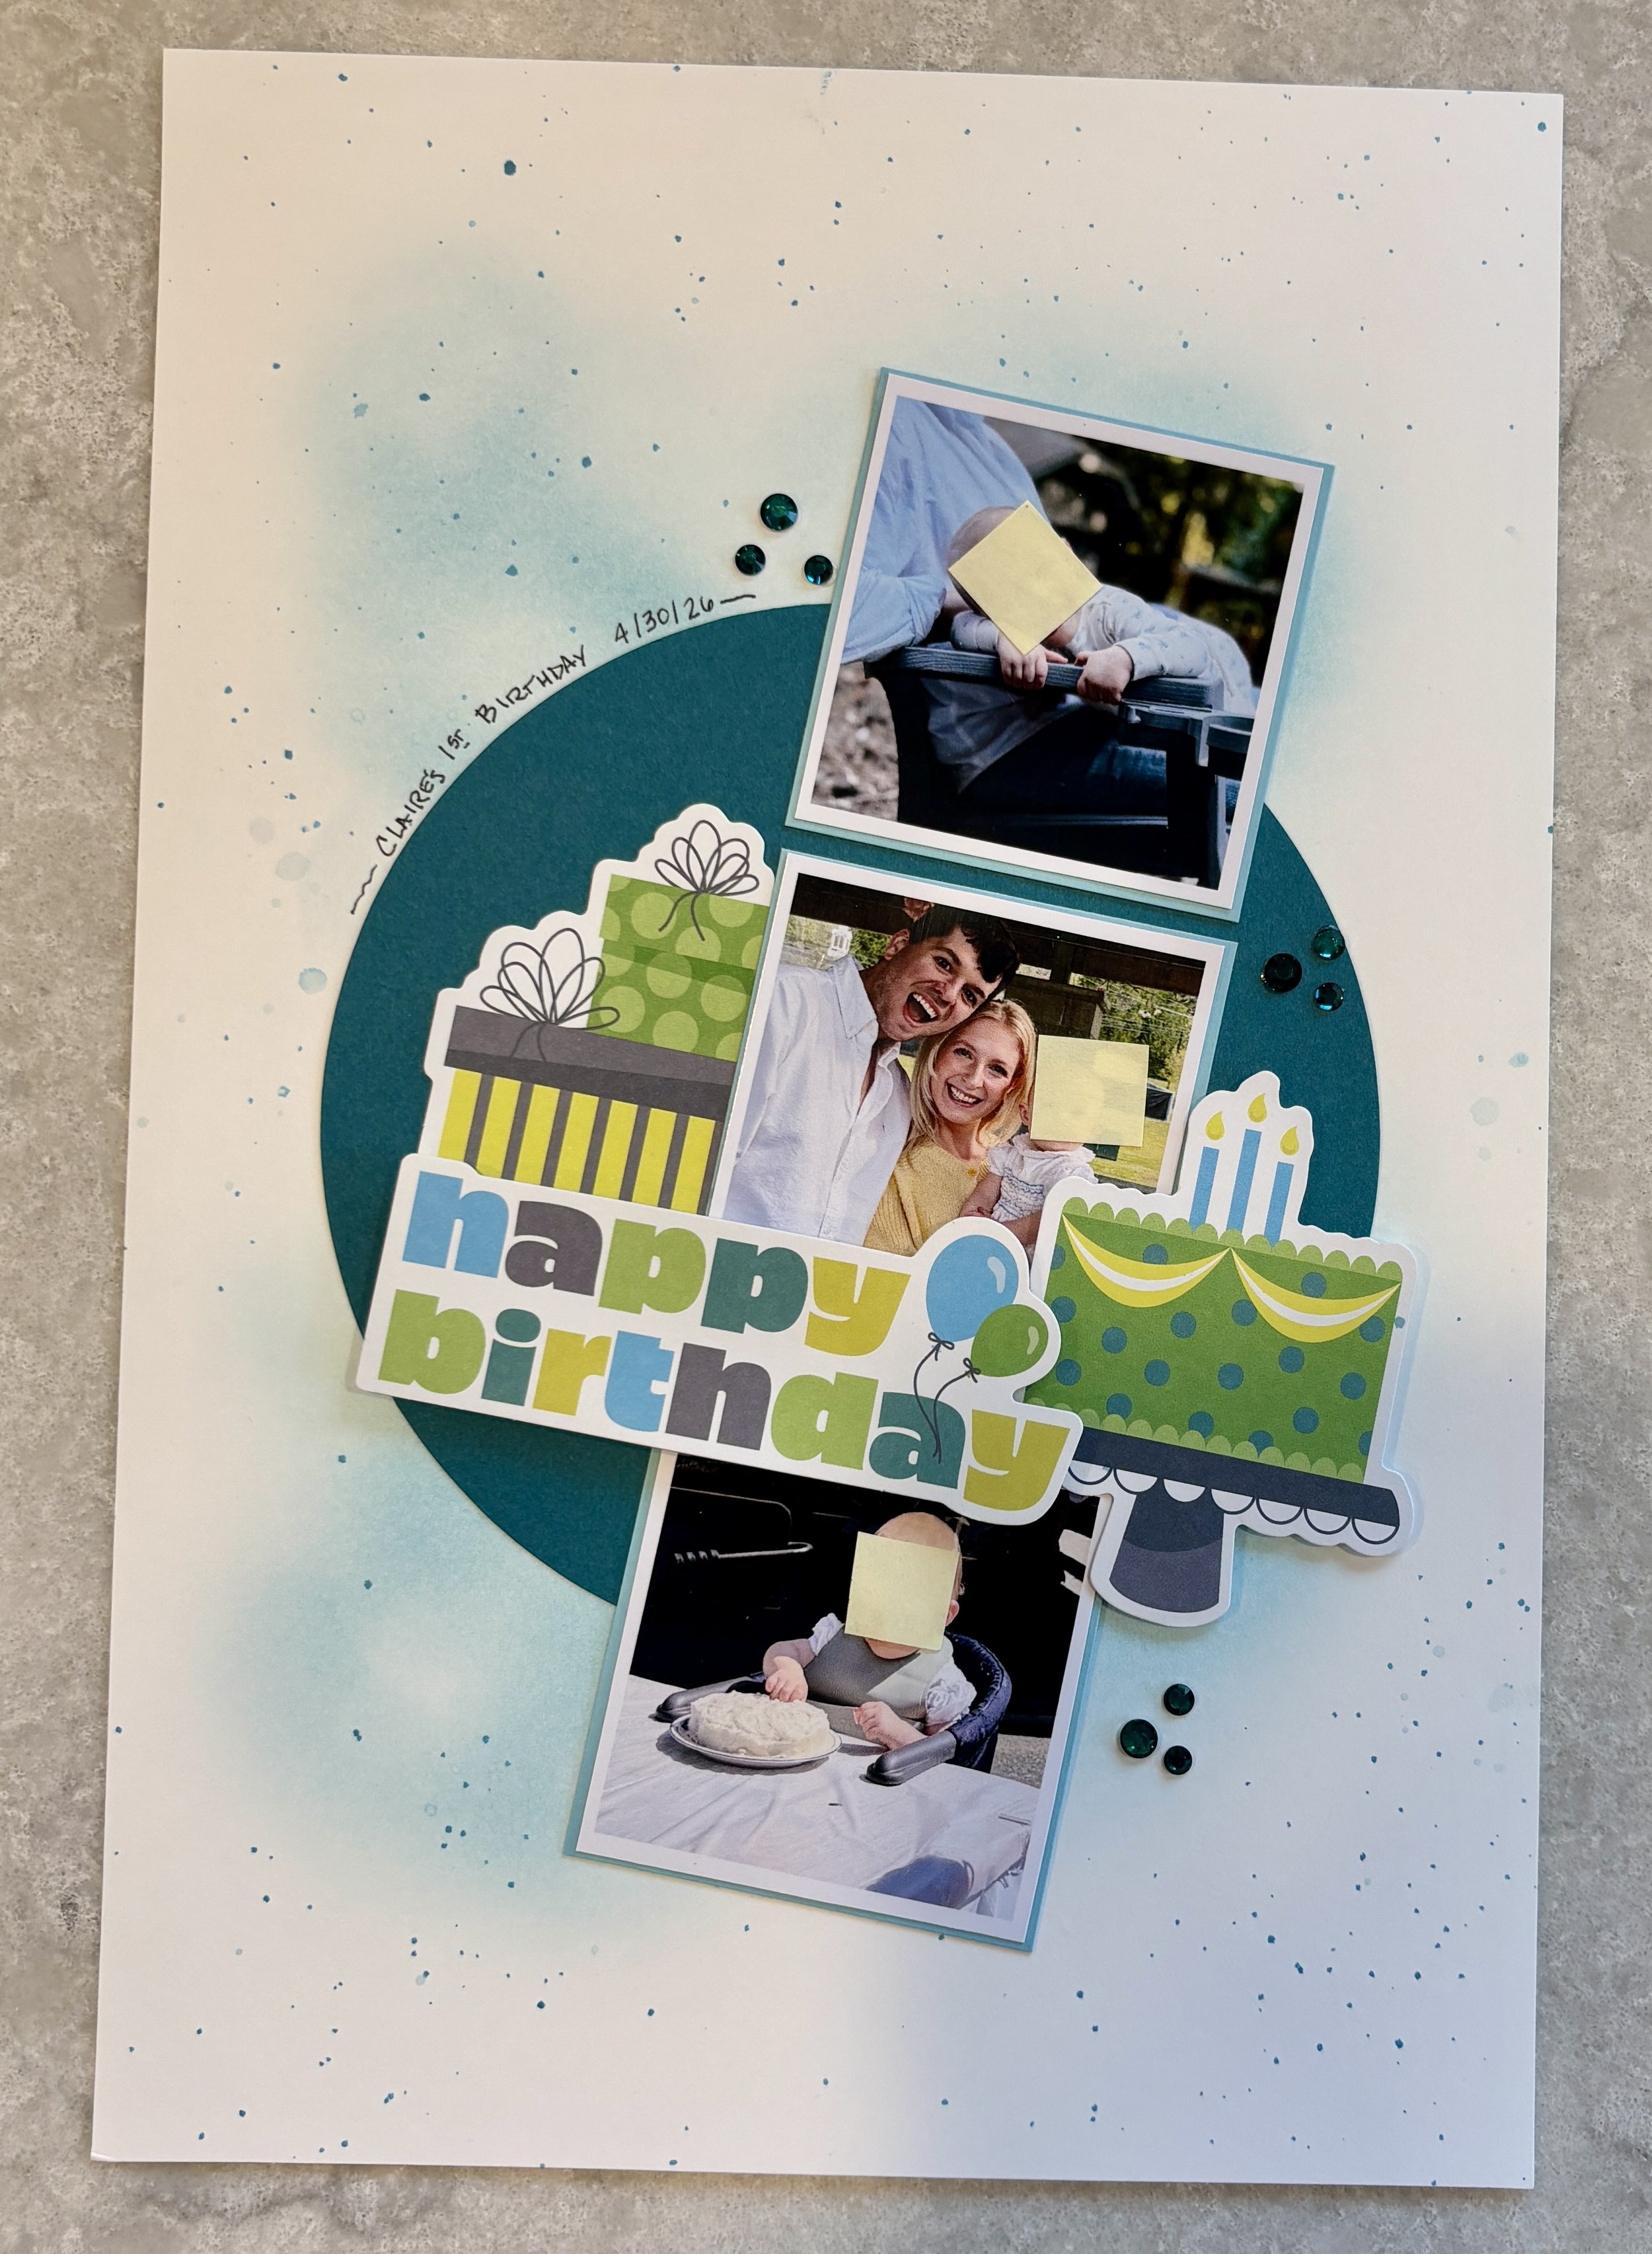
Before & After: How do you handle white space in a scrapbook layout? Ink & Water!
How do you handle white space in a scrapbook layout? You use a Creative Memories Dark Sea Green ink pad and a blending brush plus a waterbrush for good measure! You blend and splatter ink. See how I did it here.
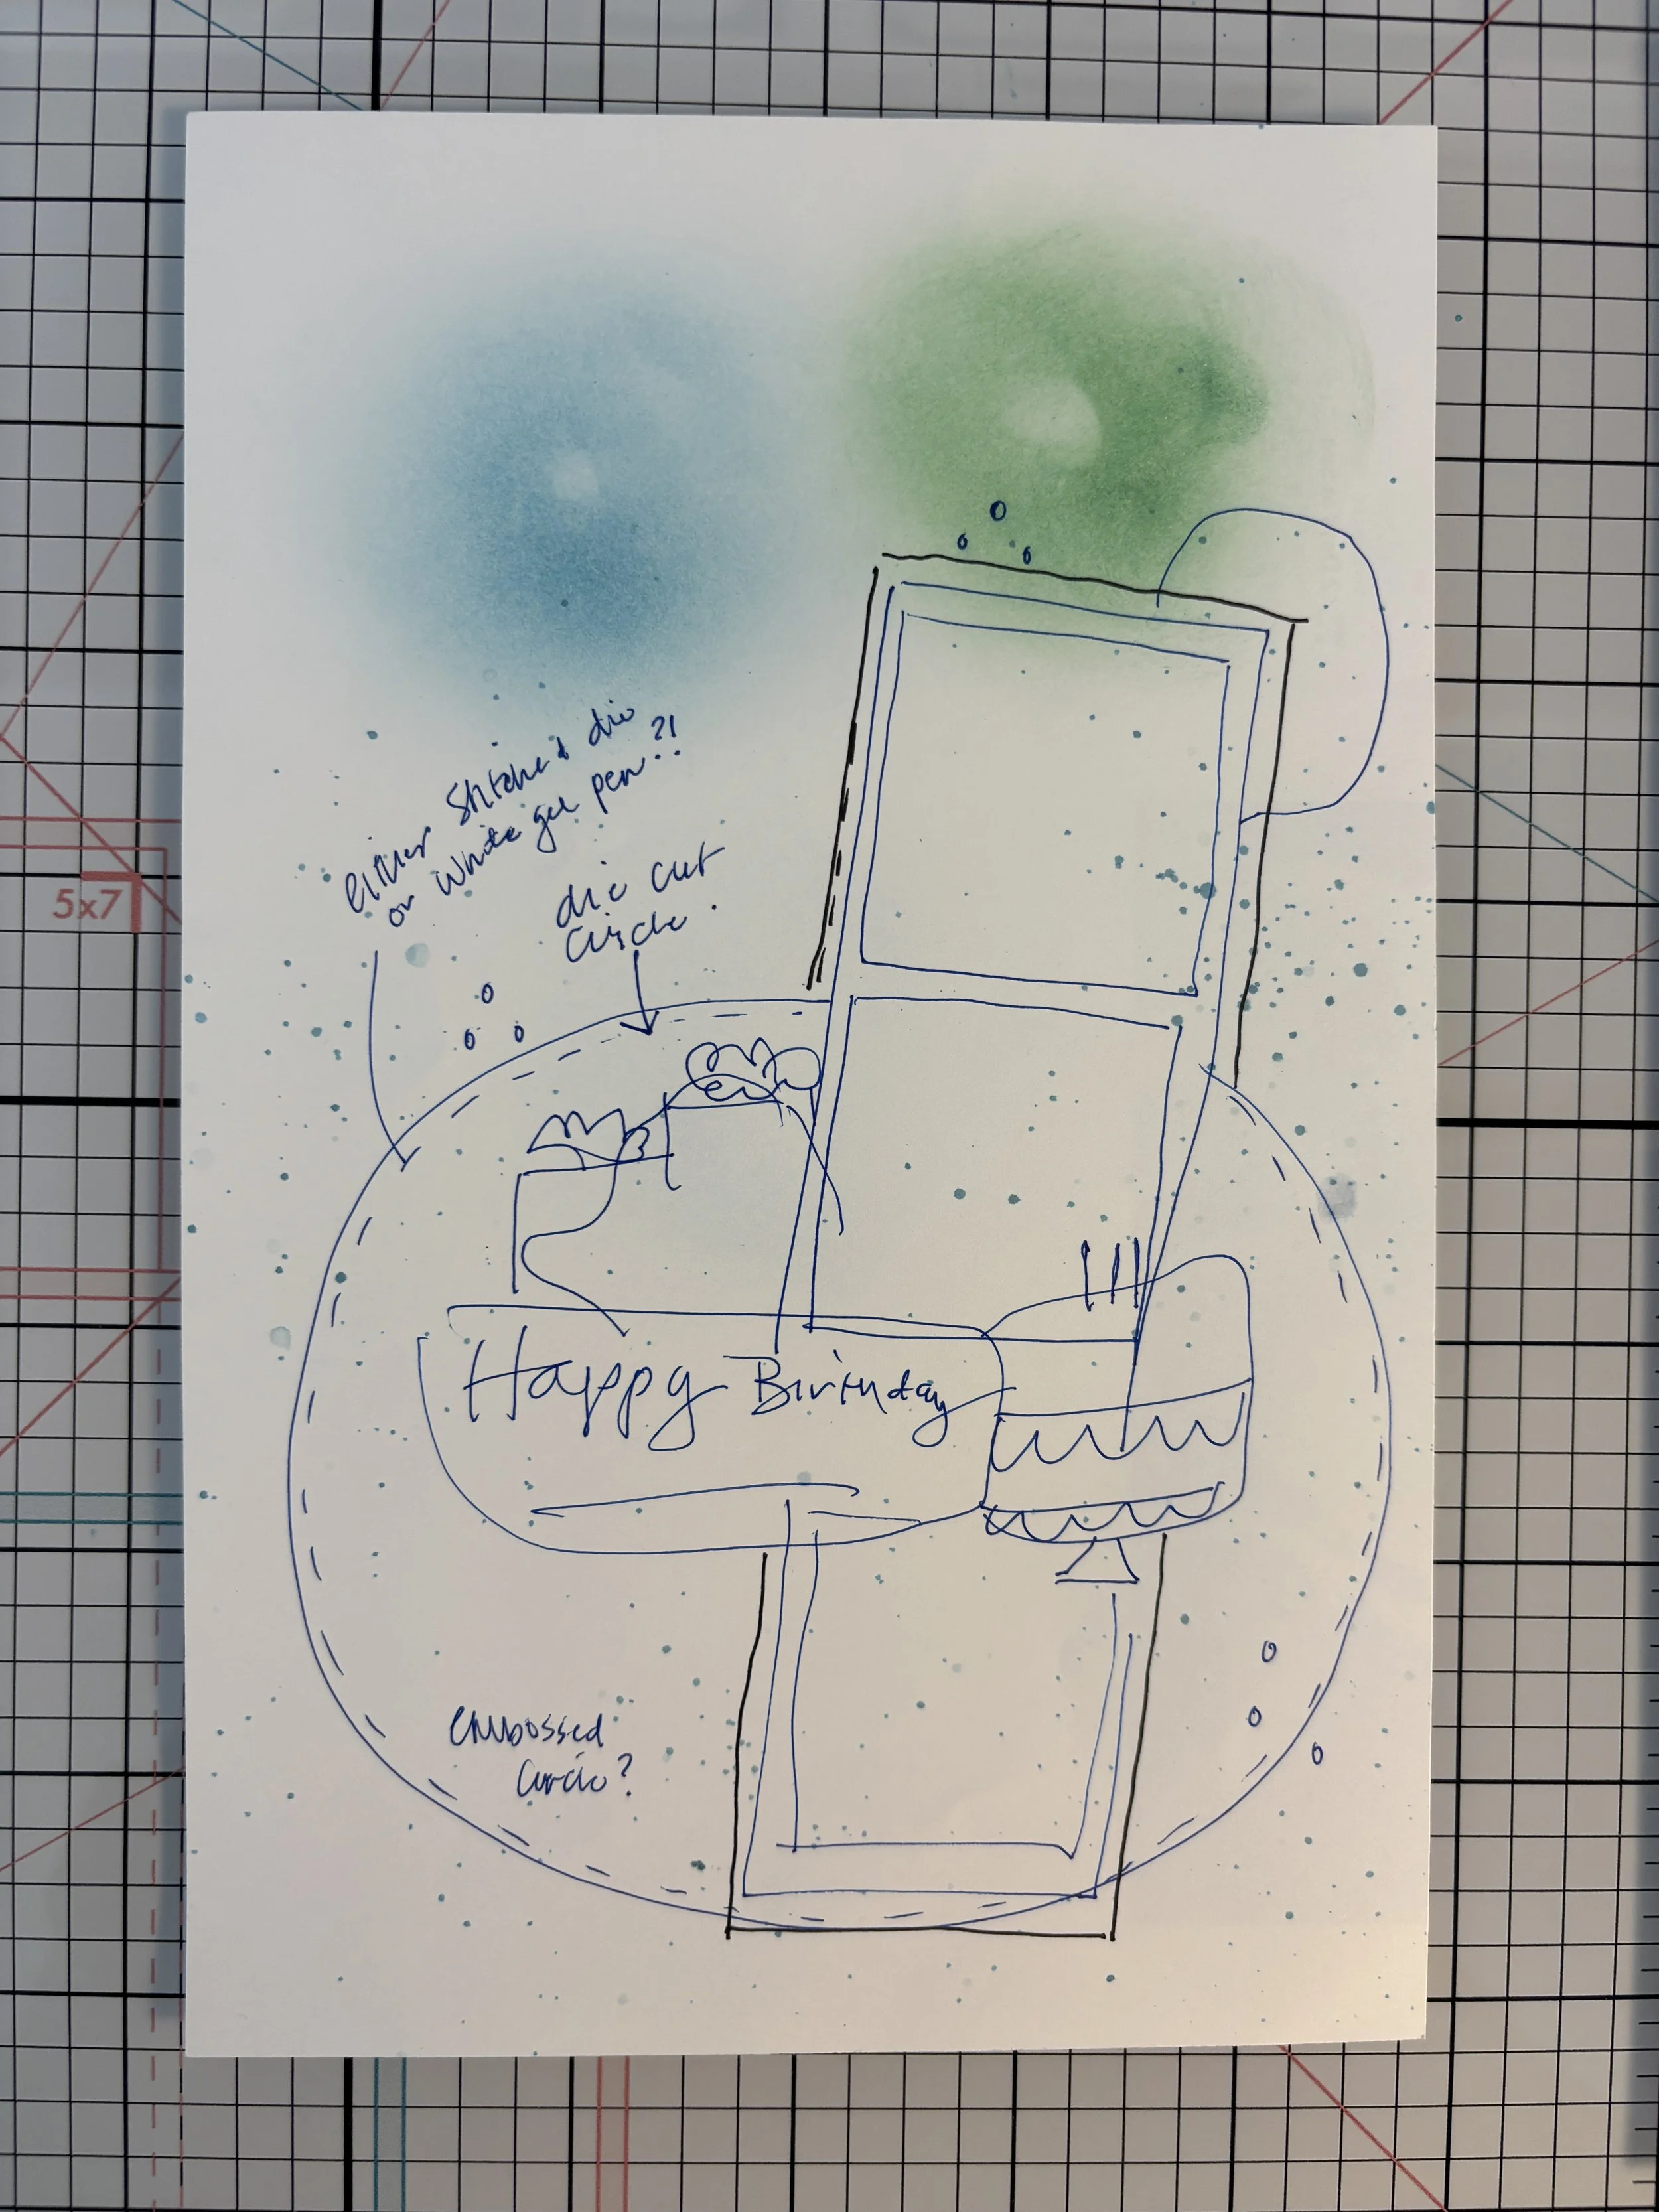
My latest YouTube video explores how you can work with white space in a layout, specifically, I show you a couple of techniques to add interest and avoid the dreaded blank space! Here’s the “before” sketch I came up with in my head…looks a little rough but it is the foundation for the “after”.
If you watched the video, then you know that the “after” includes photos of my niece. As she’s just a year old, I’ve covered her face for privacy but I think you can enjoy the results regardless. I think it looks pretty close to the sketch.
To grab some of the Creative Memories products I used, check out these links: Circle Cutter, Dark Sea Green ink pad by Memento, and the Dark Sea Green blending brush. Keep it crafty!

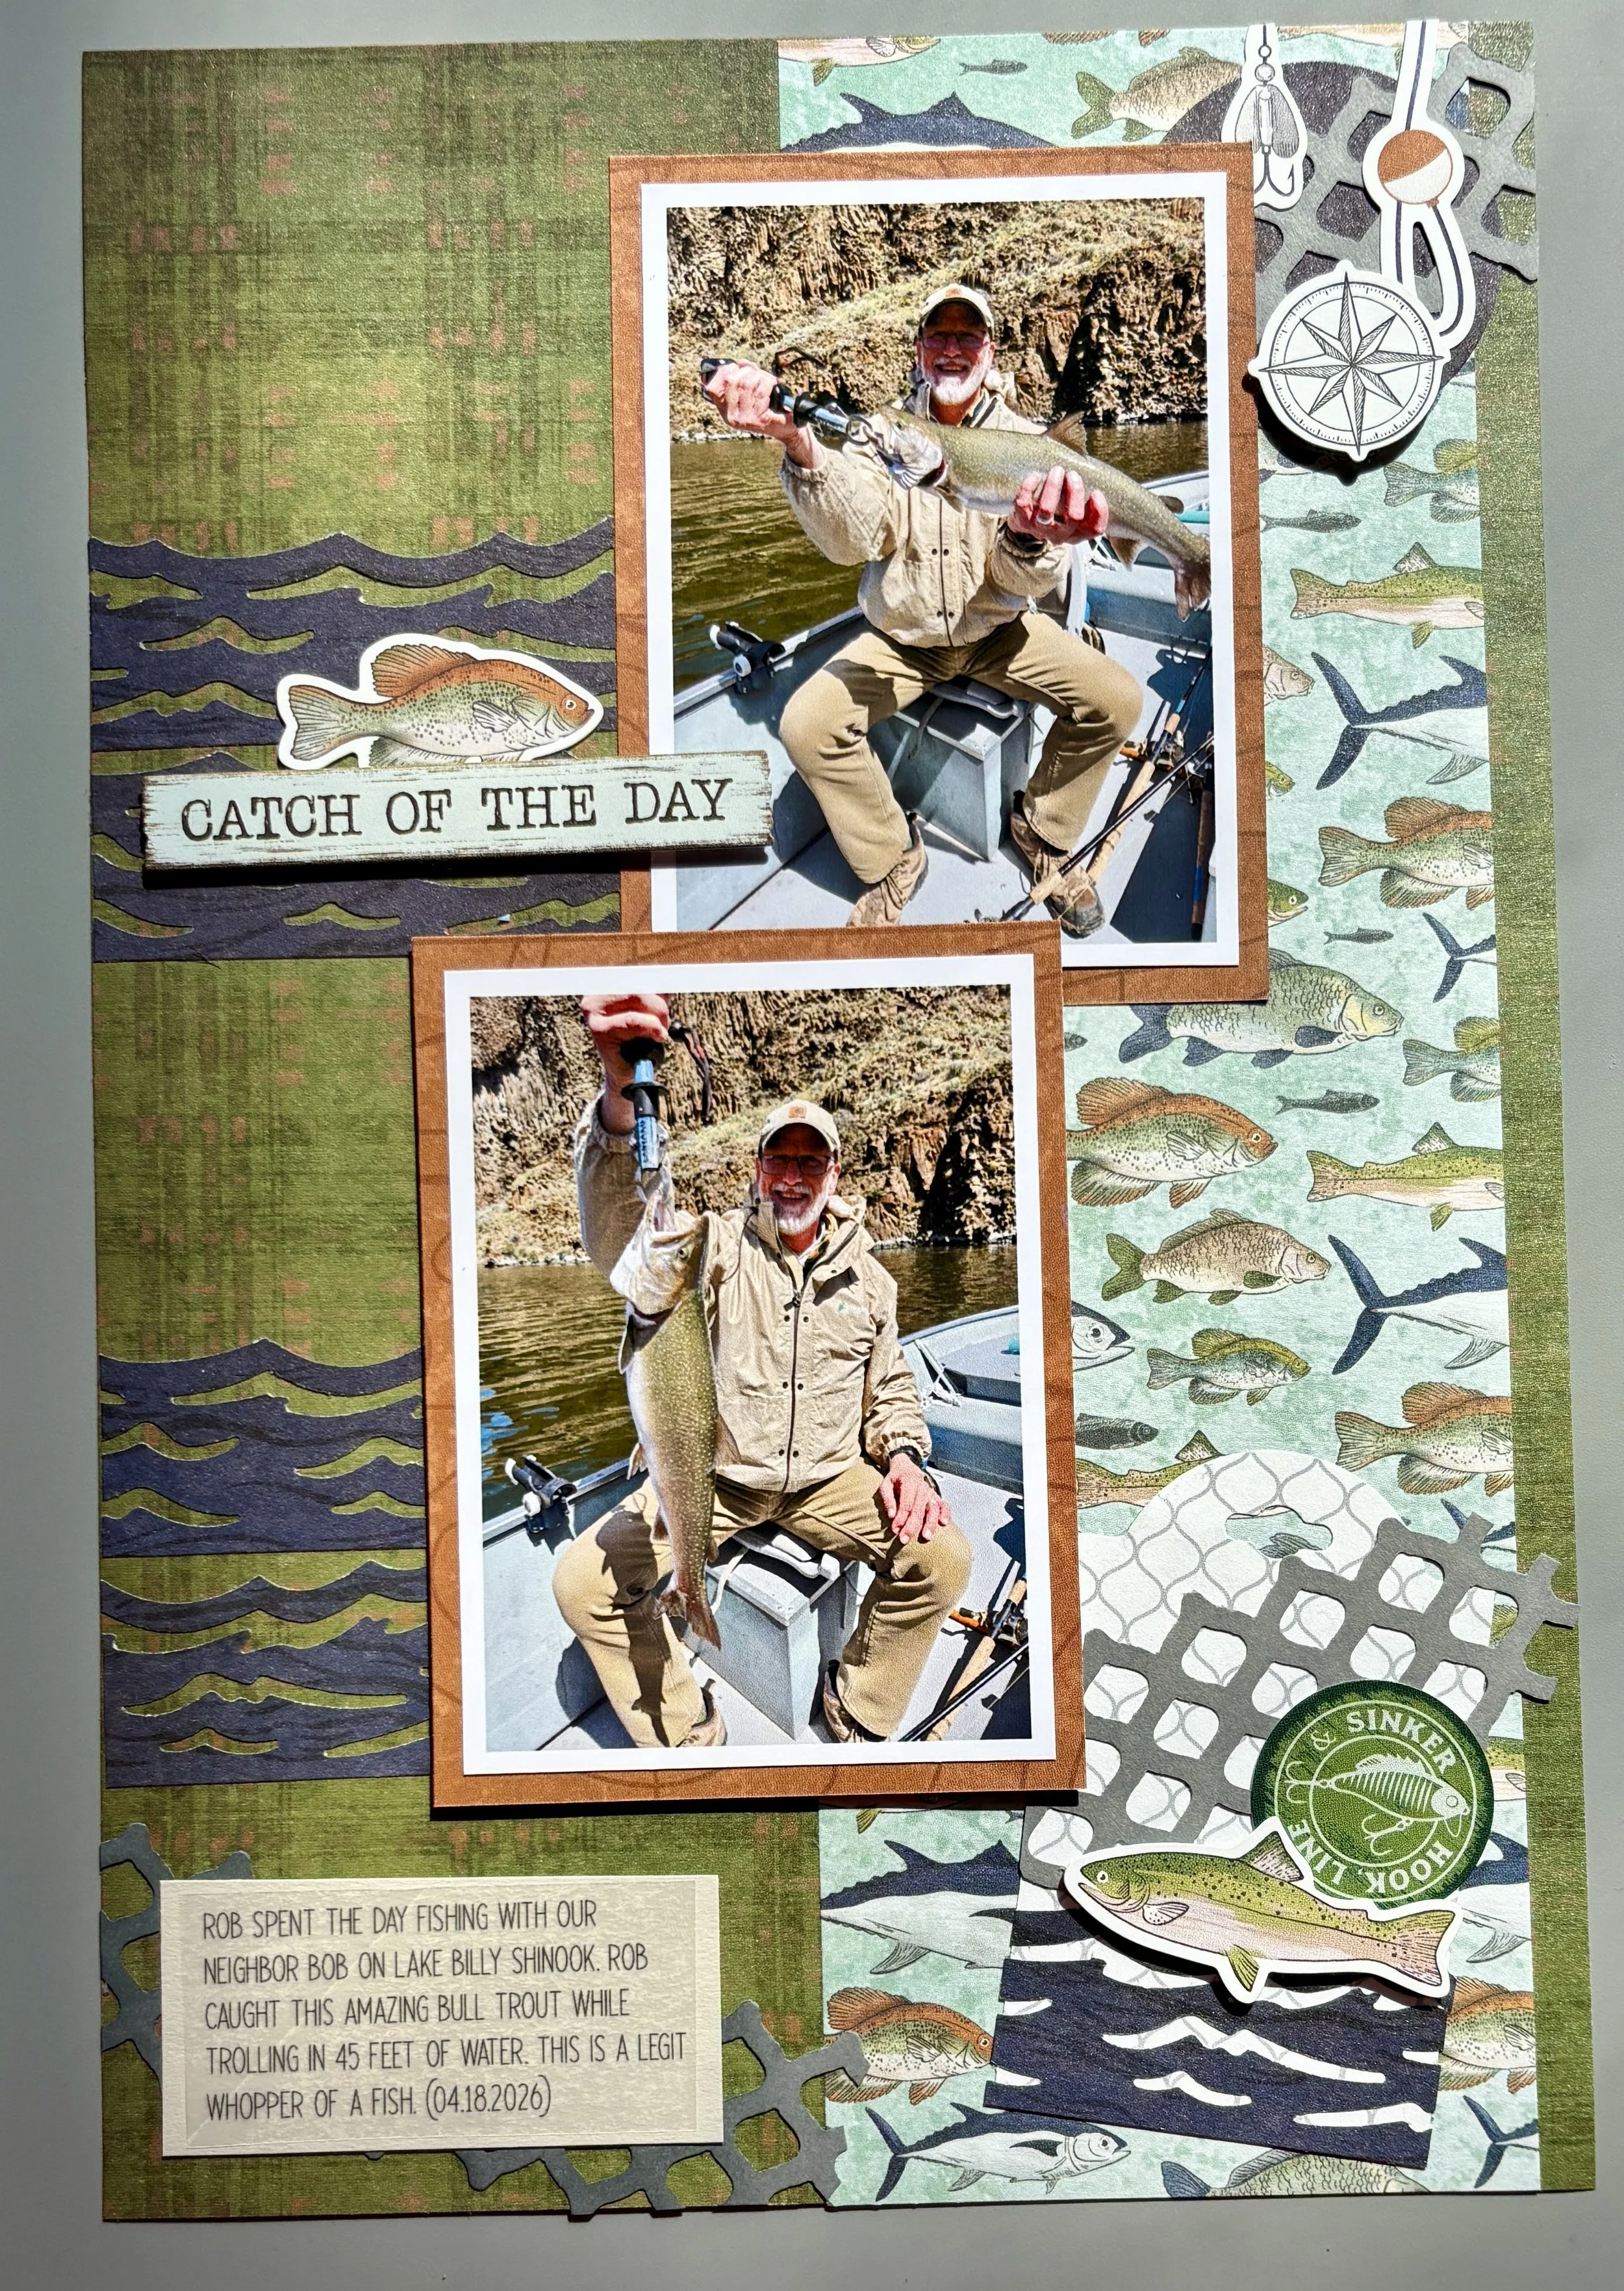
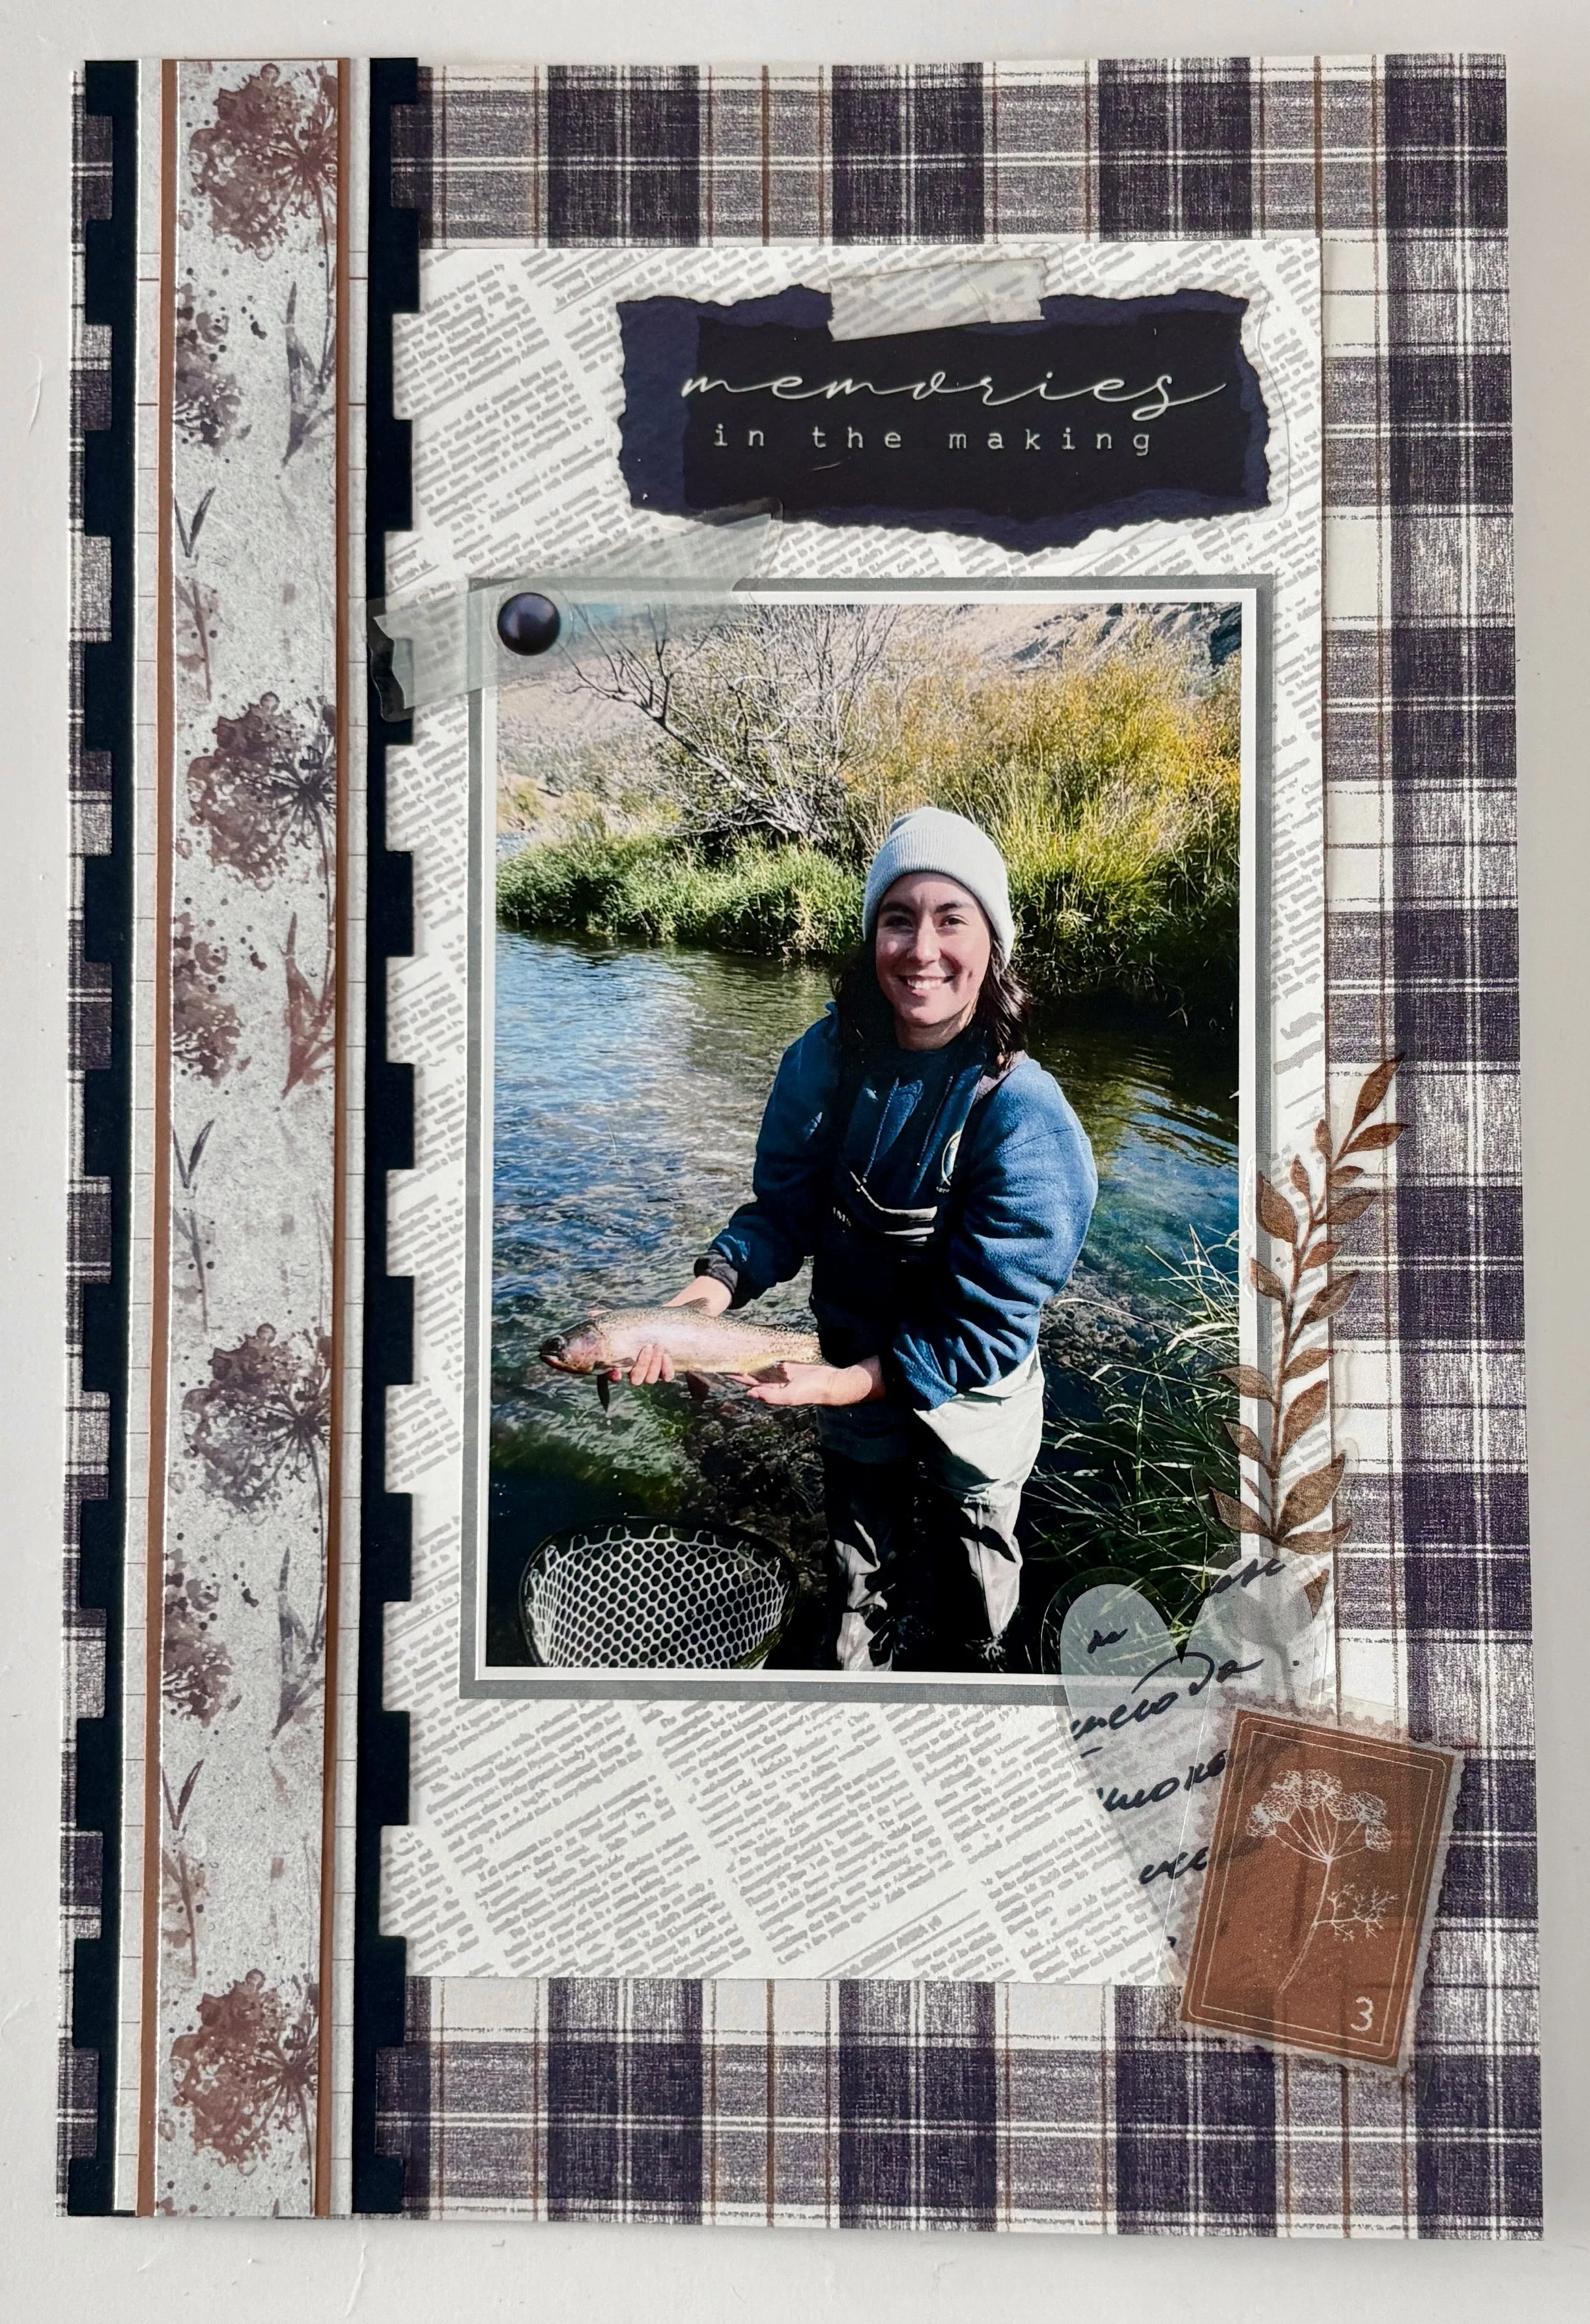
(Rob’s) Catch of the Day!
Documenting the everyday of Rob catching a bull trout in my Creative Memories Scrap Journal.
Documenting the everyday…of Rob catching a bull trout on Lake Billy Shinook. You can tell by the smile on his face that he was so proud. While this particular paper pack (Fishing Memories) is no longer available, Creative Memories does have a comparable collection called Lakeside Memories. I hope you enjoyed this layout my crafty friends. Remember, there is no wrong way to be creative. Go out and capture a moment of joy and put it down on paper.

Keep it scrappy my friends!


Walking Fiona…
Documenting the everyday and not just the holidays in my Creative Memories Scrap Journal.
Documenting the everyday…this week’s post is a Scrap Journal page of a family walk with Fiona, our 12+ year old dog. She is still as sassy and active as she was 10 years ago. I’m using the Ruffin’ It paper and stickers from Creative Memories. I also used my favorite new CM punch that makes every border a little more whimsical…the whimsical scallop border punch! I hope you enjoy my layout!
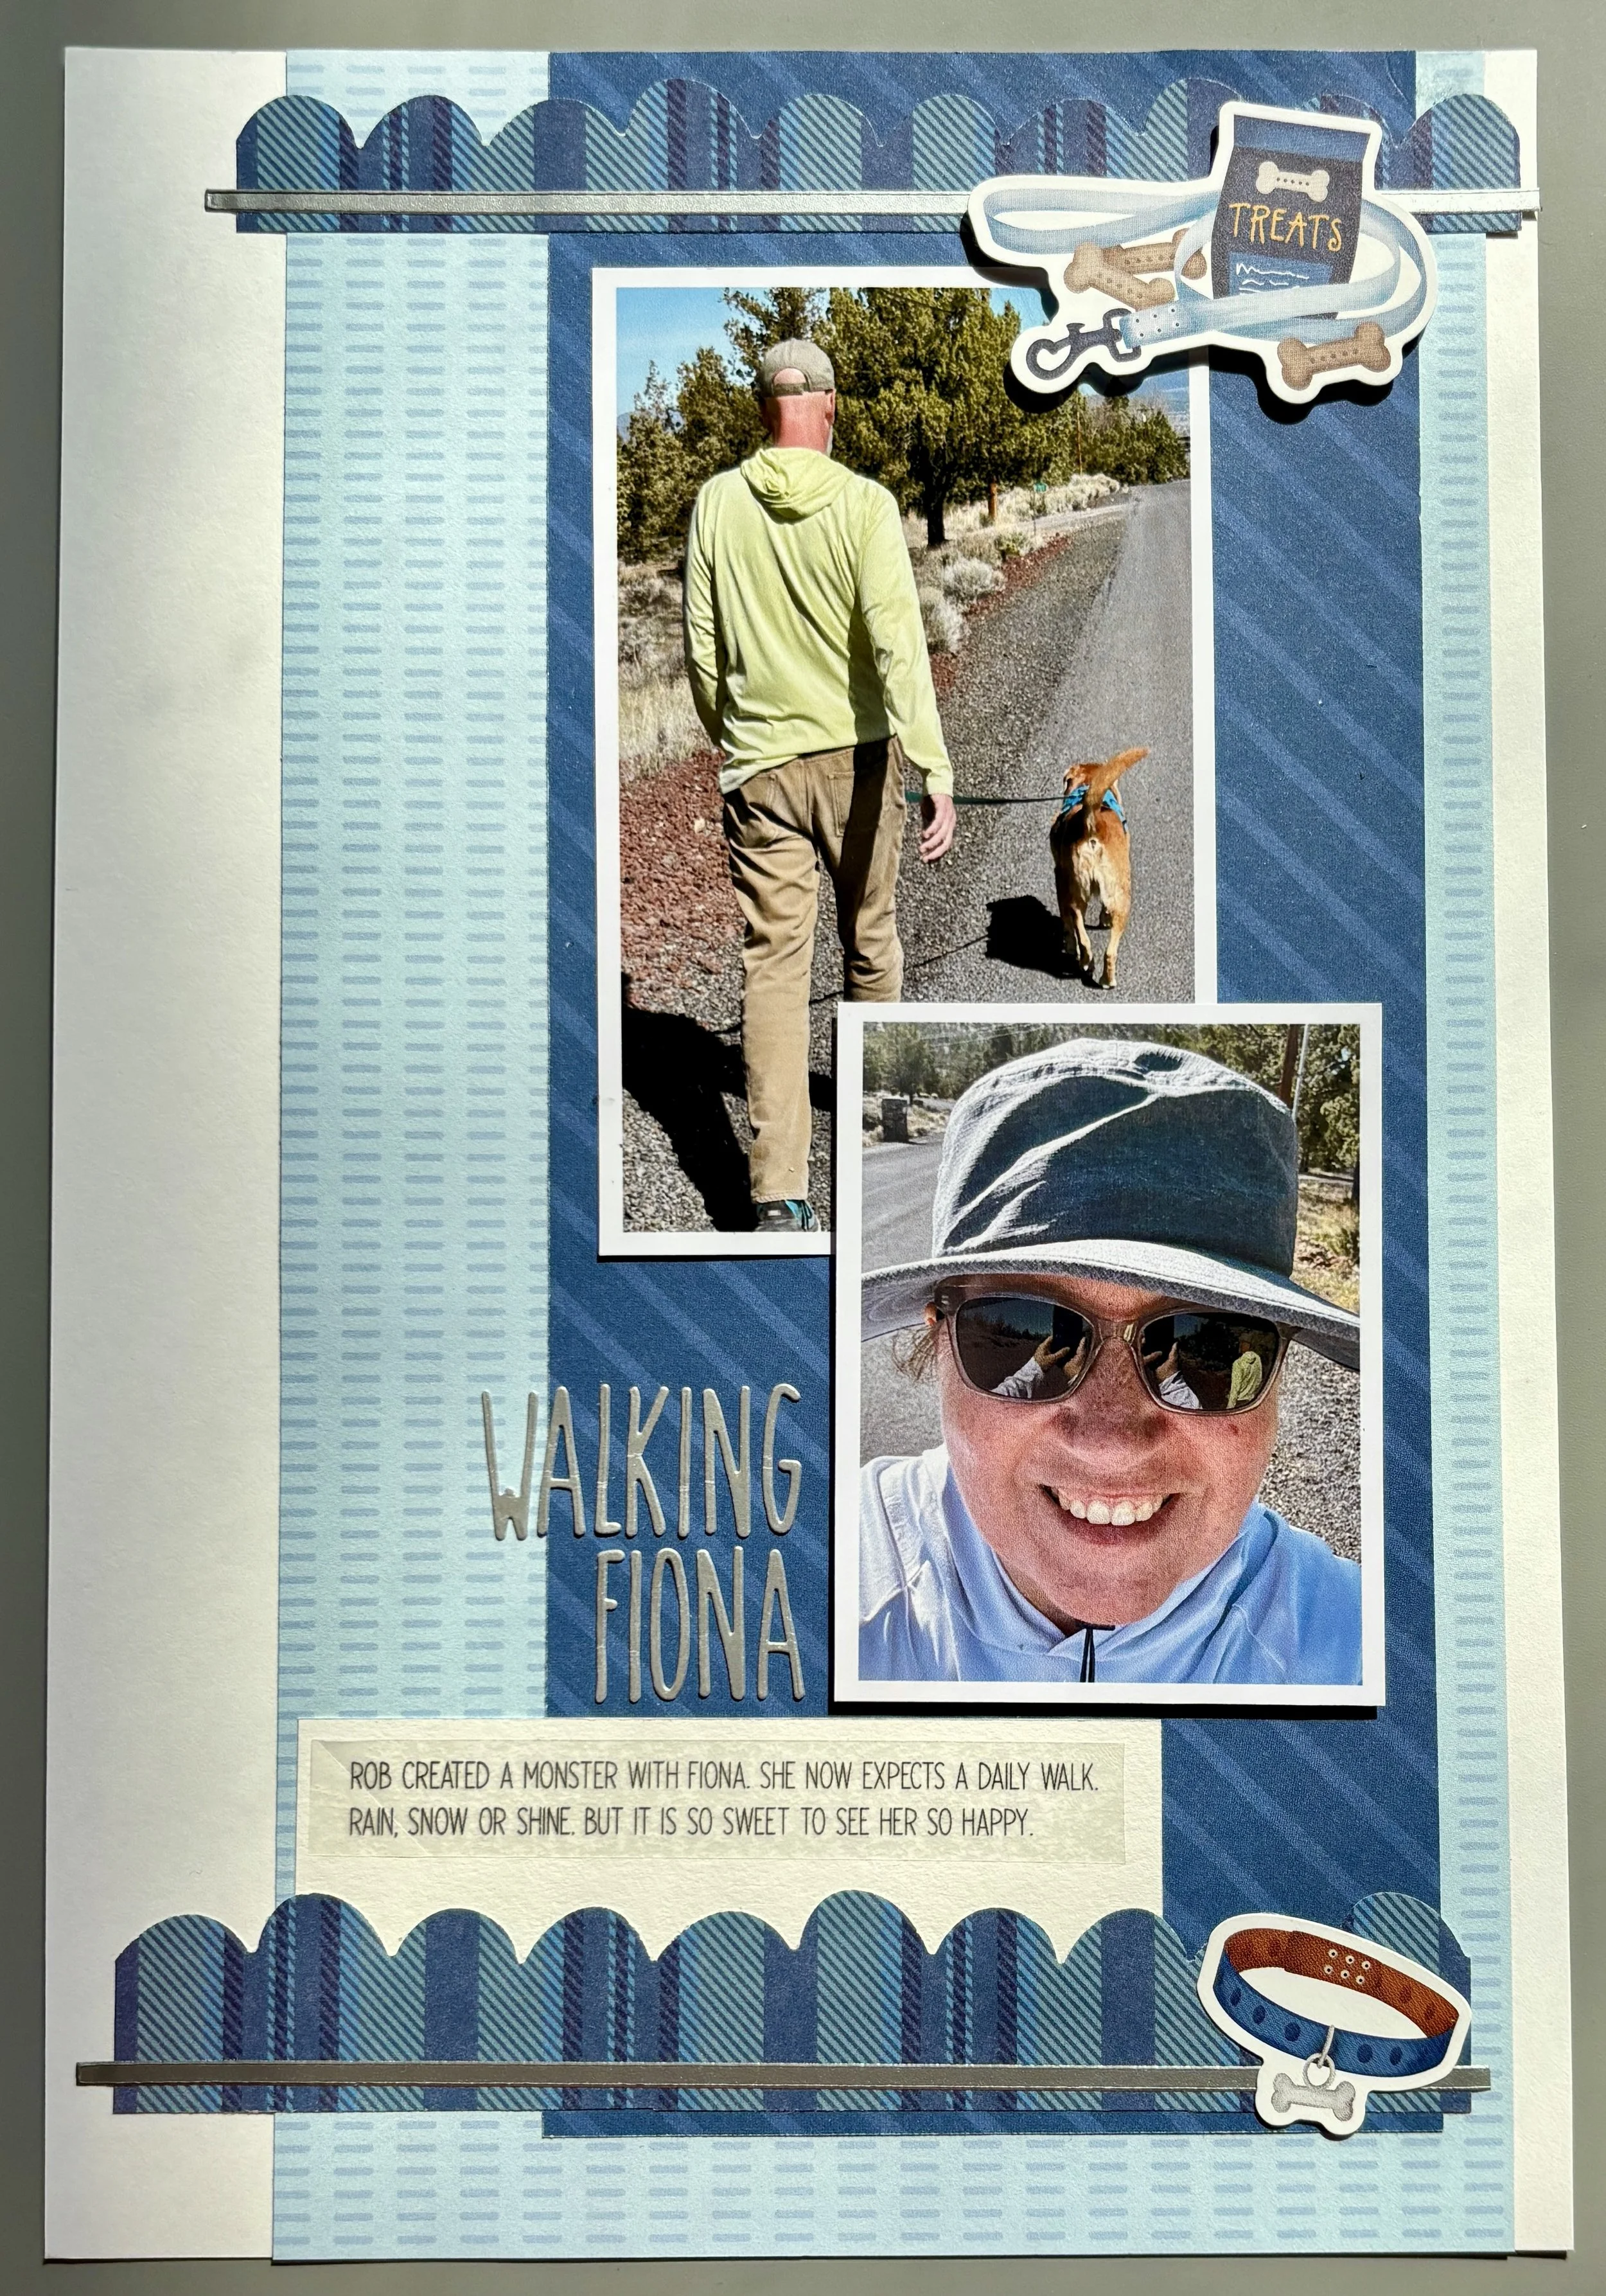
Keep it scrappy my friends!

Road trip to Maupin, Oregon
Scrapping the everyday and not just the holidays with my 2026 Scrap Journal from Creative Memories featuring the Hitting the Road paper and embellishments.
Hello my scrappy peeps. Today’s layout is celebrating the everyday and not just the holidays in my 2026 Creative Memories Scrap Journal. This was a quick day trip all about Rob showing me where he likes to fly fish. It’s on the Deschutes River that runs through a small town called Maupin in central Oregon. This single page layout features Creative Memories Hit the Road paper pack with embellishments. The collection also comes with some really cute stickers. I will definitely be using this set more in the coming weeks…keep your eyes peeled for an upcoming weekend road trip to Reno!
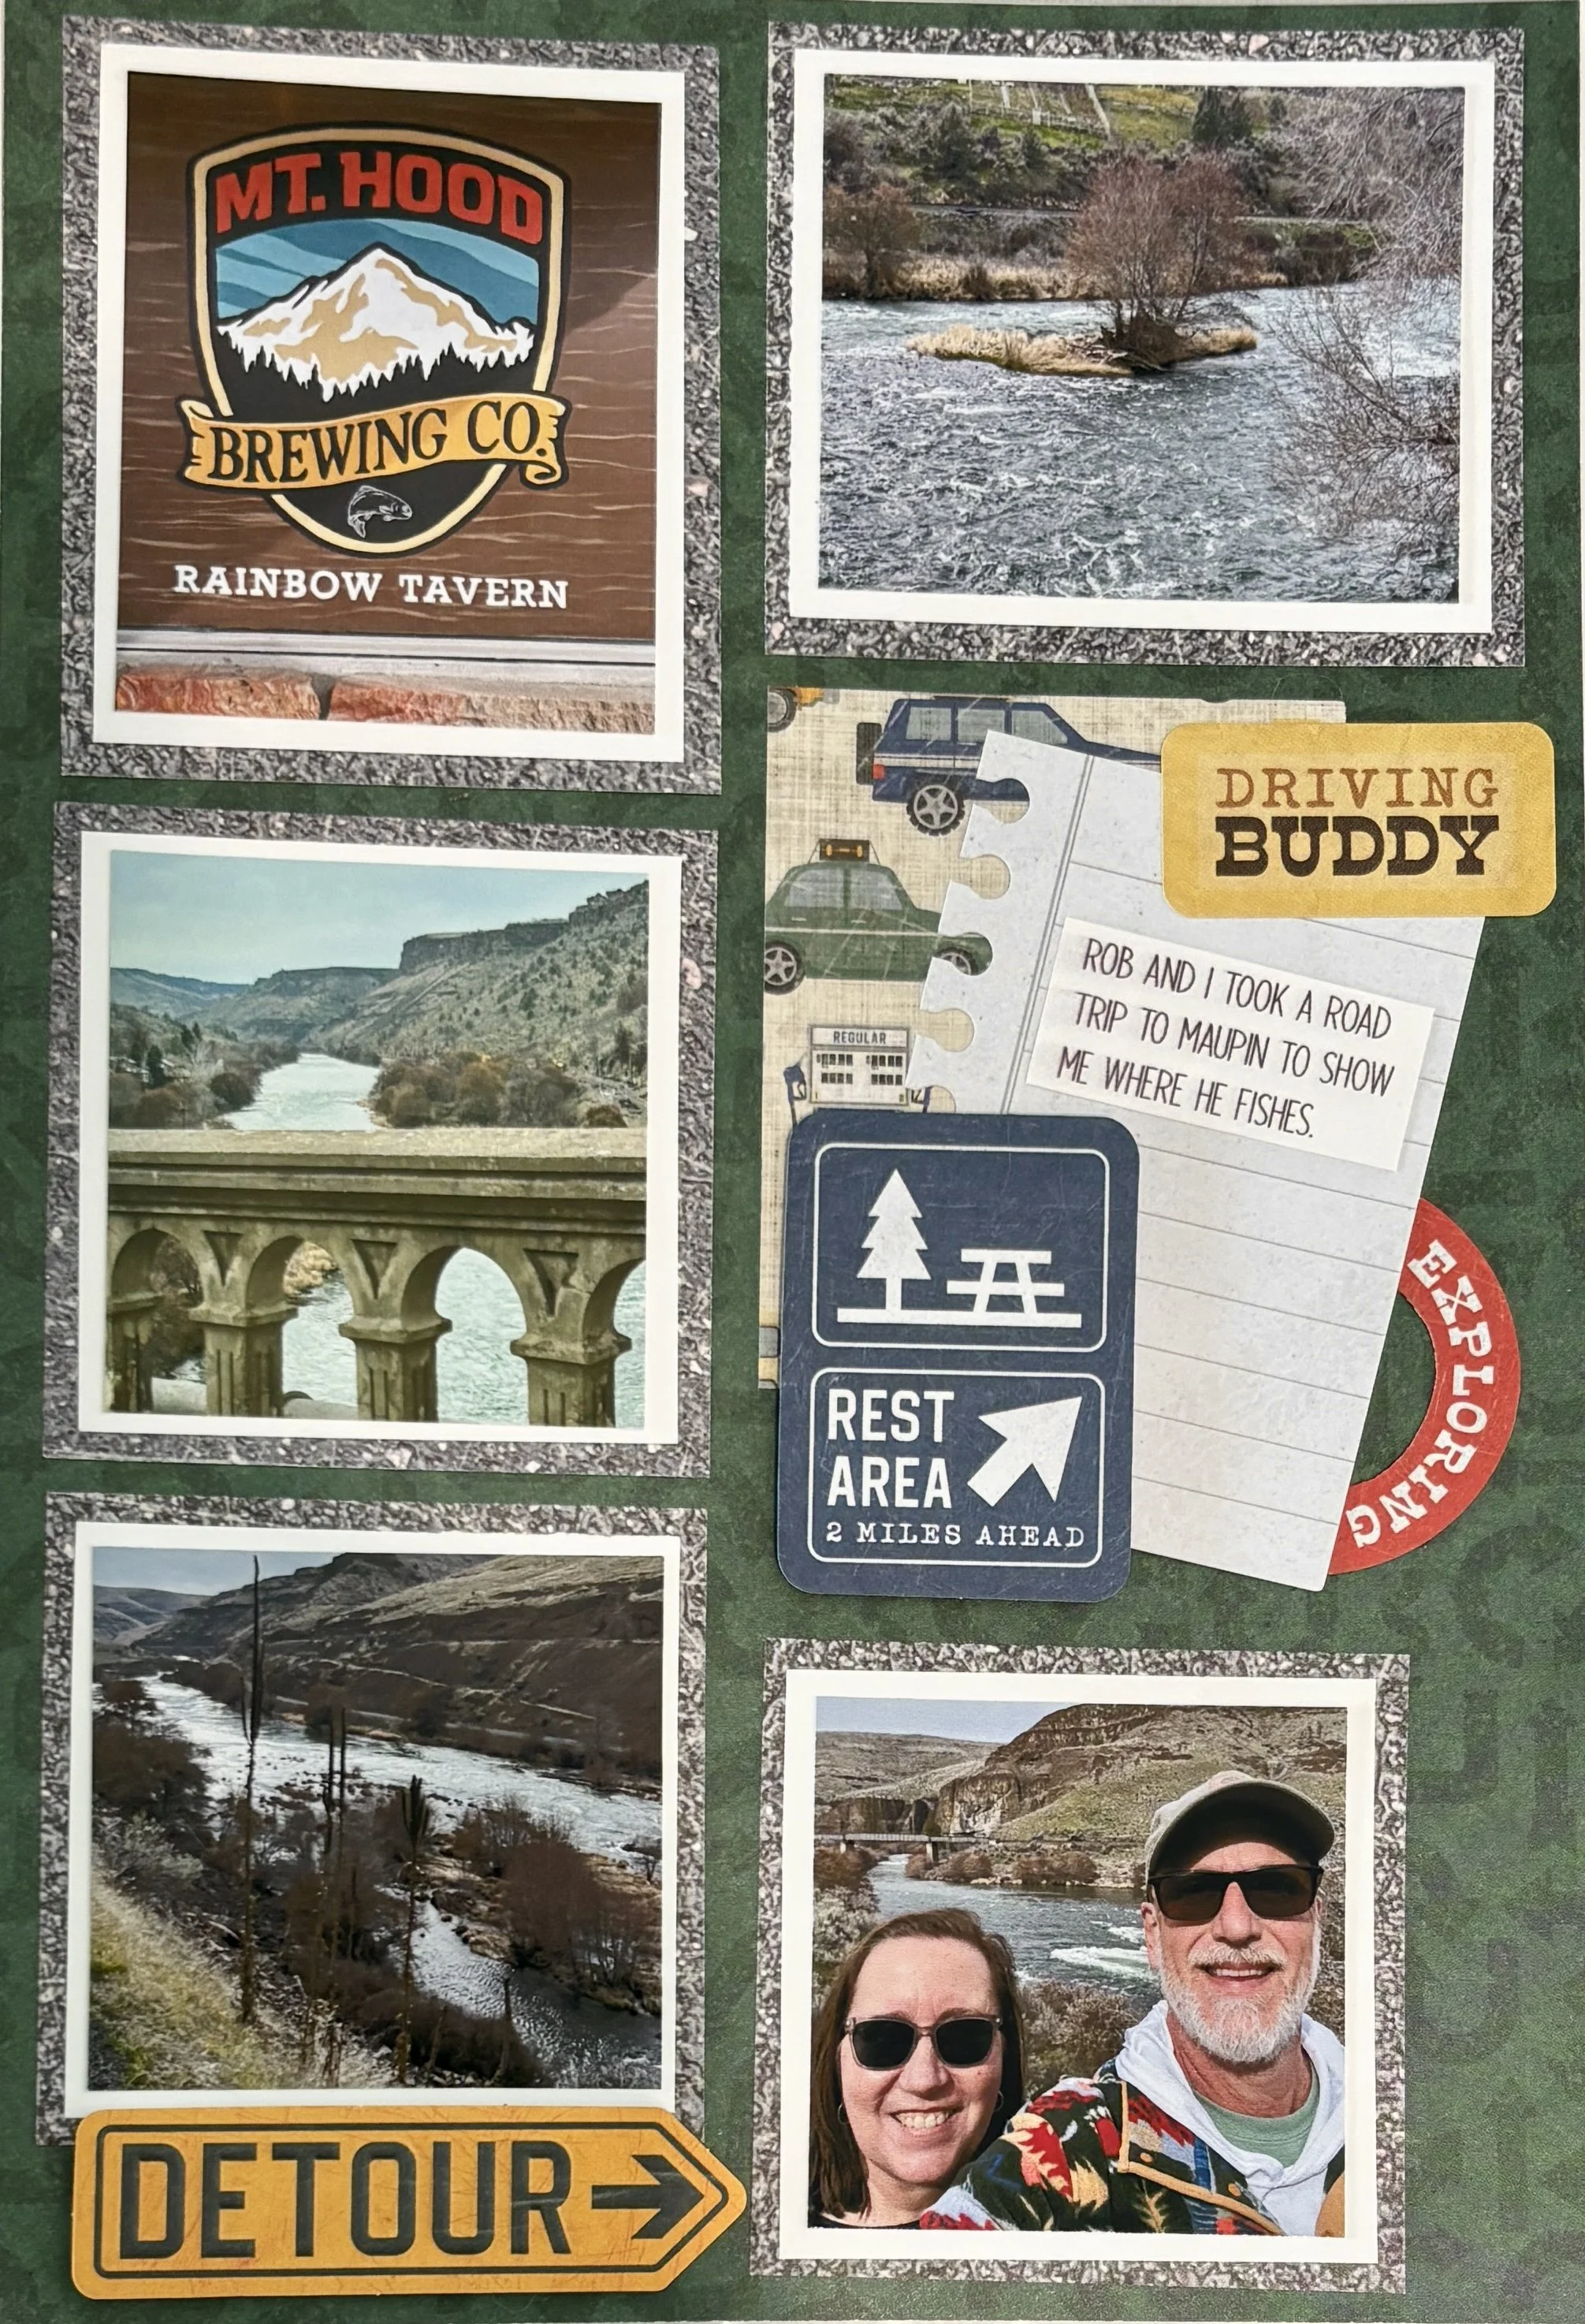
I hope you enjoyed this layout my crafty friends and remember, keep it scrappy!

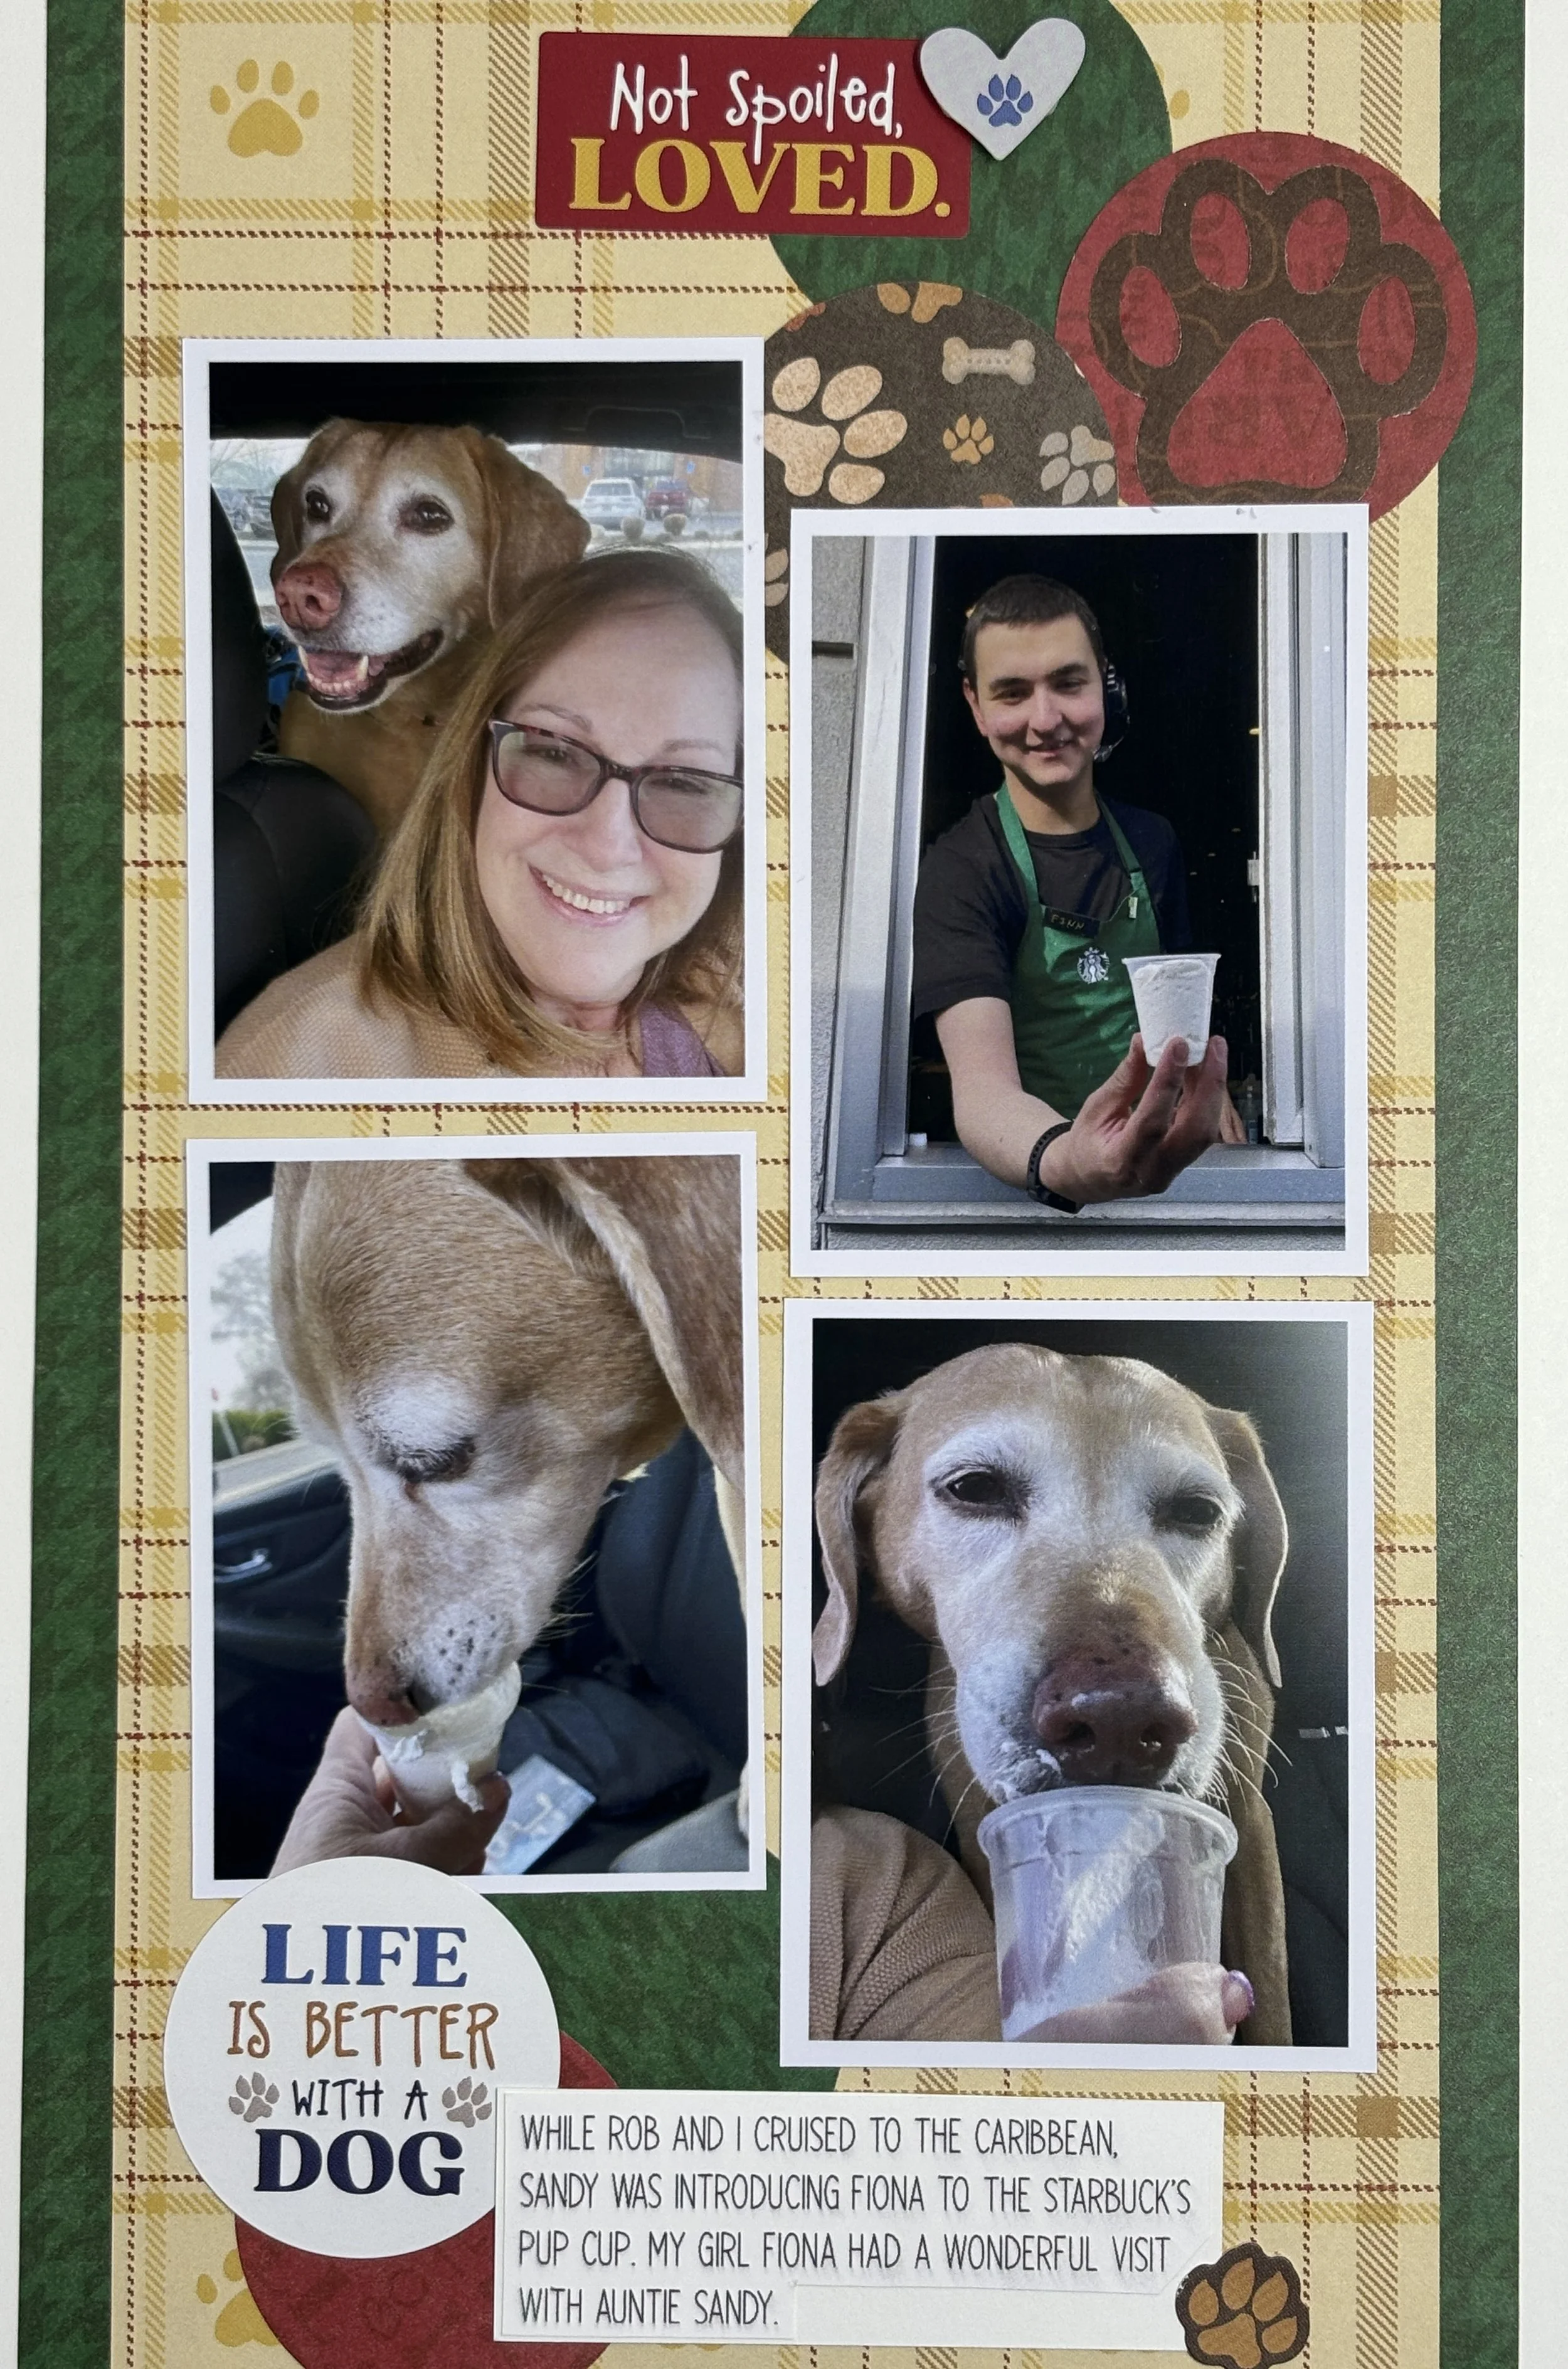
Fiona gets her first pup cup!
Scrapping the everyday and not just the holiday in my 2026 Creative Memories Scrap Journal featuring the Ruffin’ It paper pack and embellishments.
While Rob and I were cruising the Western Caribbean, my best friend (Sandy) was introducing Fiona to the Starbuck’s Pup Cup. We must be horrible dog-parents as we’ve never taken her before. To be fair, I don’t drink coffee and Rob would never pay for Starbuck’s coffee when he can make it at home. That said, Fiona loves them now. This single page spread in my 2026 Scrap Journal from Creative Memories uses the Ruffin’ It paper pack, the embellishments, the footprint punch and the circle punch. Even the barista seemed to enjoy meeting Fiona.

I hope this layout inspired you to start capturing life’s simpler moments in your scrapbooking. Remember to scrap the everyday and not just the holiday.If you would like to know more about how I scrap in my Scrap Journal just let me know! Keep it scrappy friends!

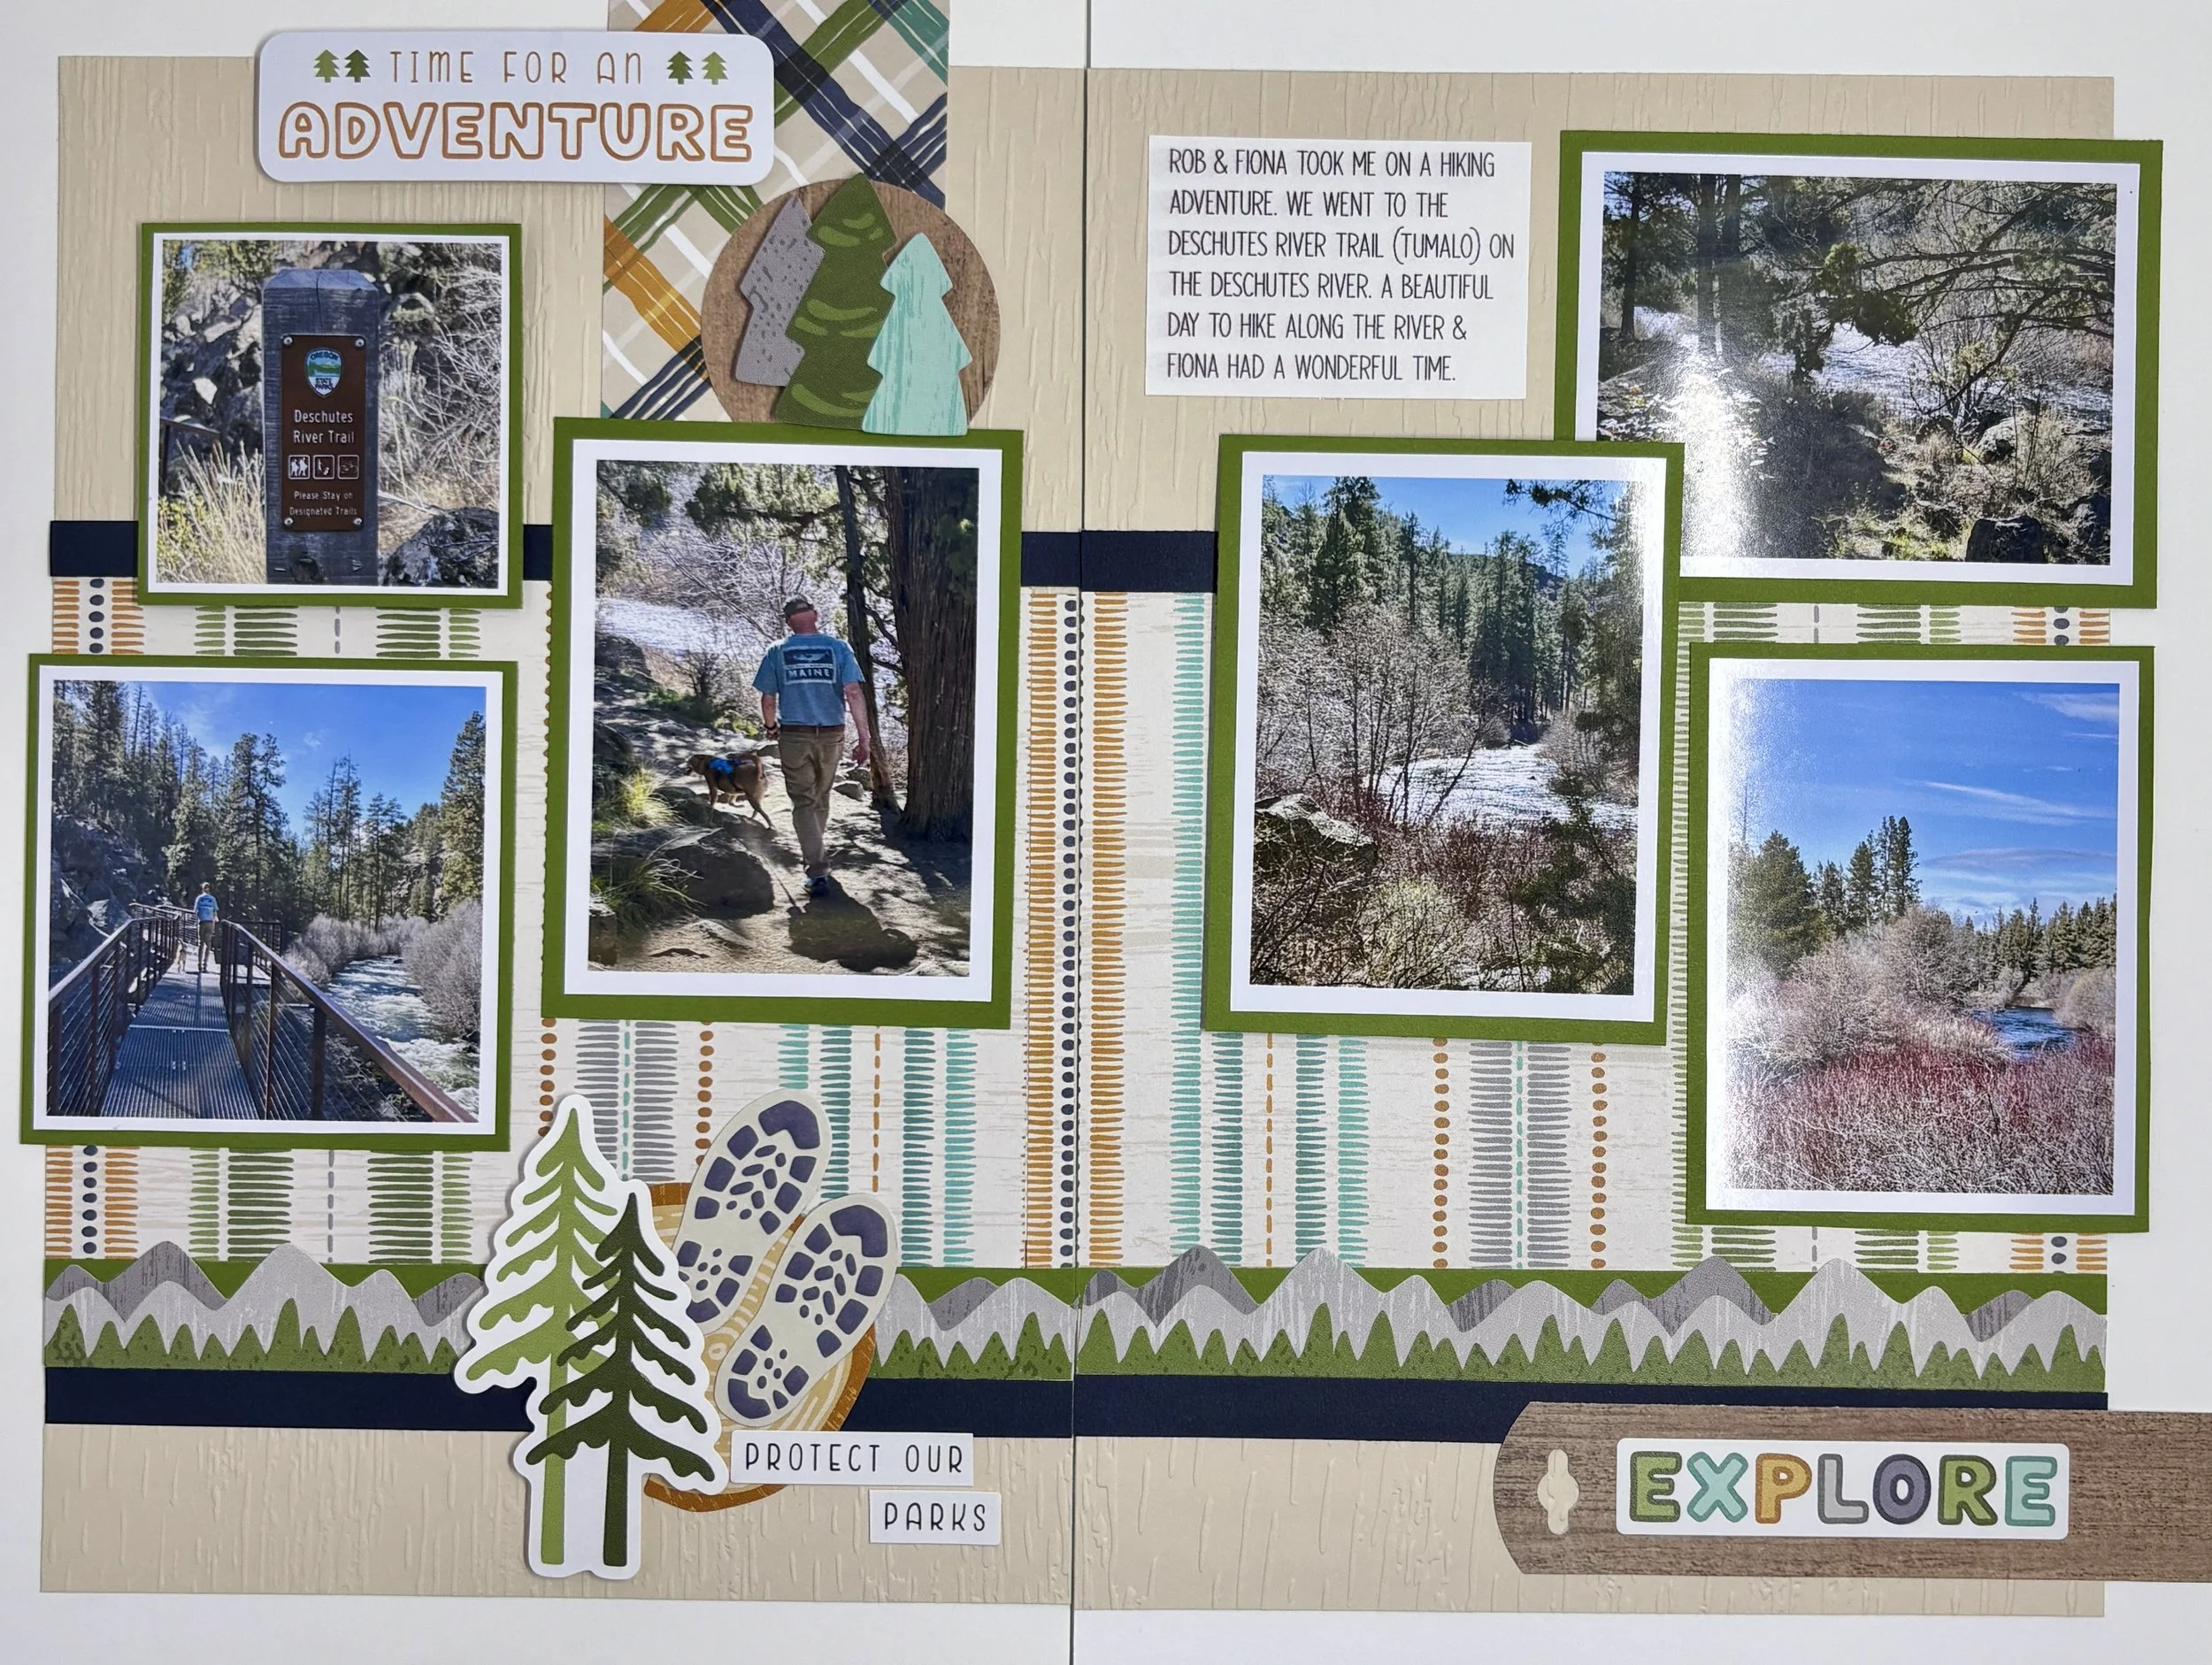
Hiking with Rob and Fiona!
Scrapping the everyday and not just the holiday! Using my Creative Memories 2026 Scrap Journal to capture a hike with Rob and Fiona.
We have created a monster in Fiona. She now expects daily walks…rain, shine or even snow. Yes, you heard me…while it is actively snowing. Well we are now past that gratefully. Yes, I knocked on wood just in case. Today’s post highlights the walk/hike we took at the Deschutes River Trail in Tumalo, Oregon. It was an absolutely beautiful day and I took advantage of a double page spread in my Creative Memories 2026 Scrap Journal where I capture the everyday and not just the holiday. This layout features a collection I purchased in a Secret Box from last year with Creative Memories. That box is not longer available but they do still have Secret Box #4 from last year….and the Secret Boxes are going to continue in 2026…word on the street is that Secret Box #1 for 2026 will be coming soon. Don’t worry, I will let you know all about it when it comes.

You will notice that even in the smaller size, the Scrap Journal can hold a lot of photos. They’re smaller but they get the job done and they operate on a much smaller footprint. A double page spread is only 13.5” wide by 10” tall. A traditional scrapbook double page layout would be 24”wide x 12”tall. Let me know if you want to learn more about scrapping in a smaller format. Keep it scrappy my friends!

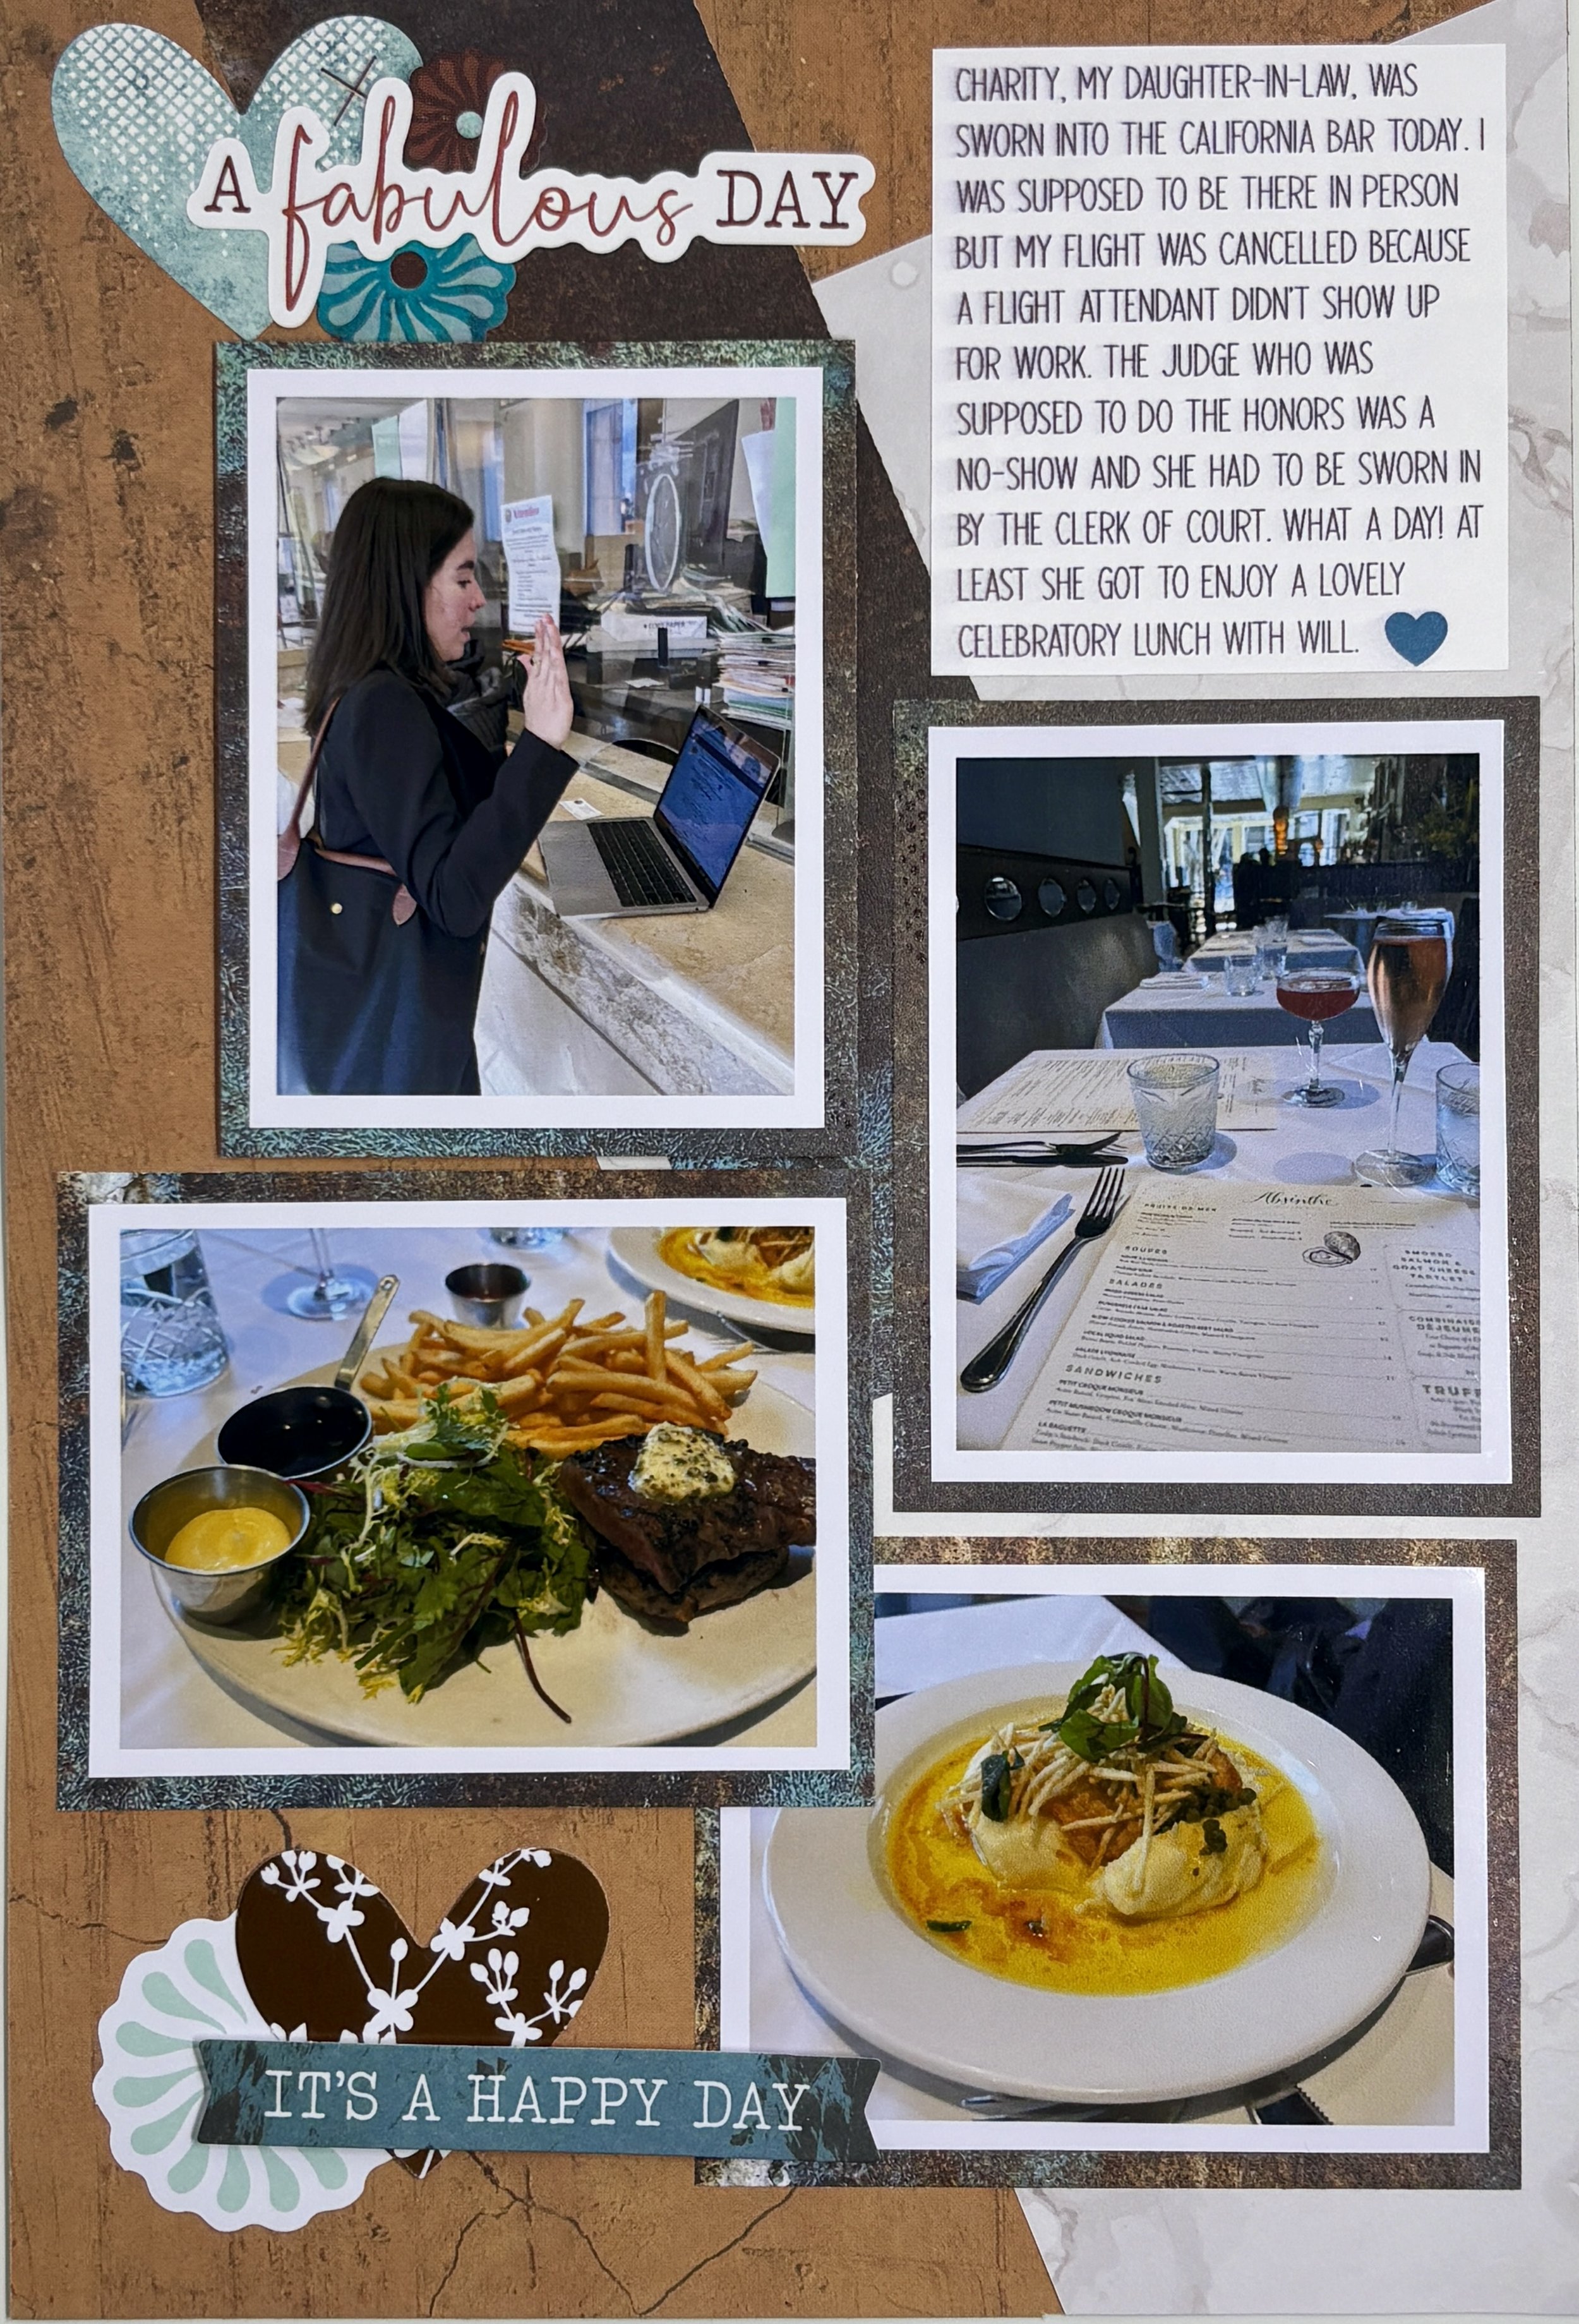
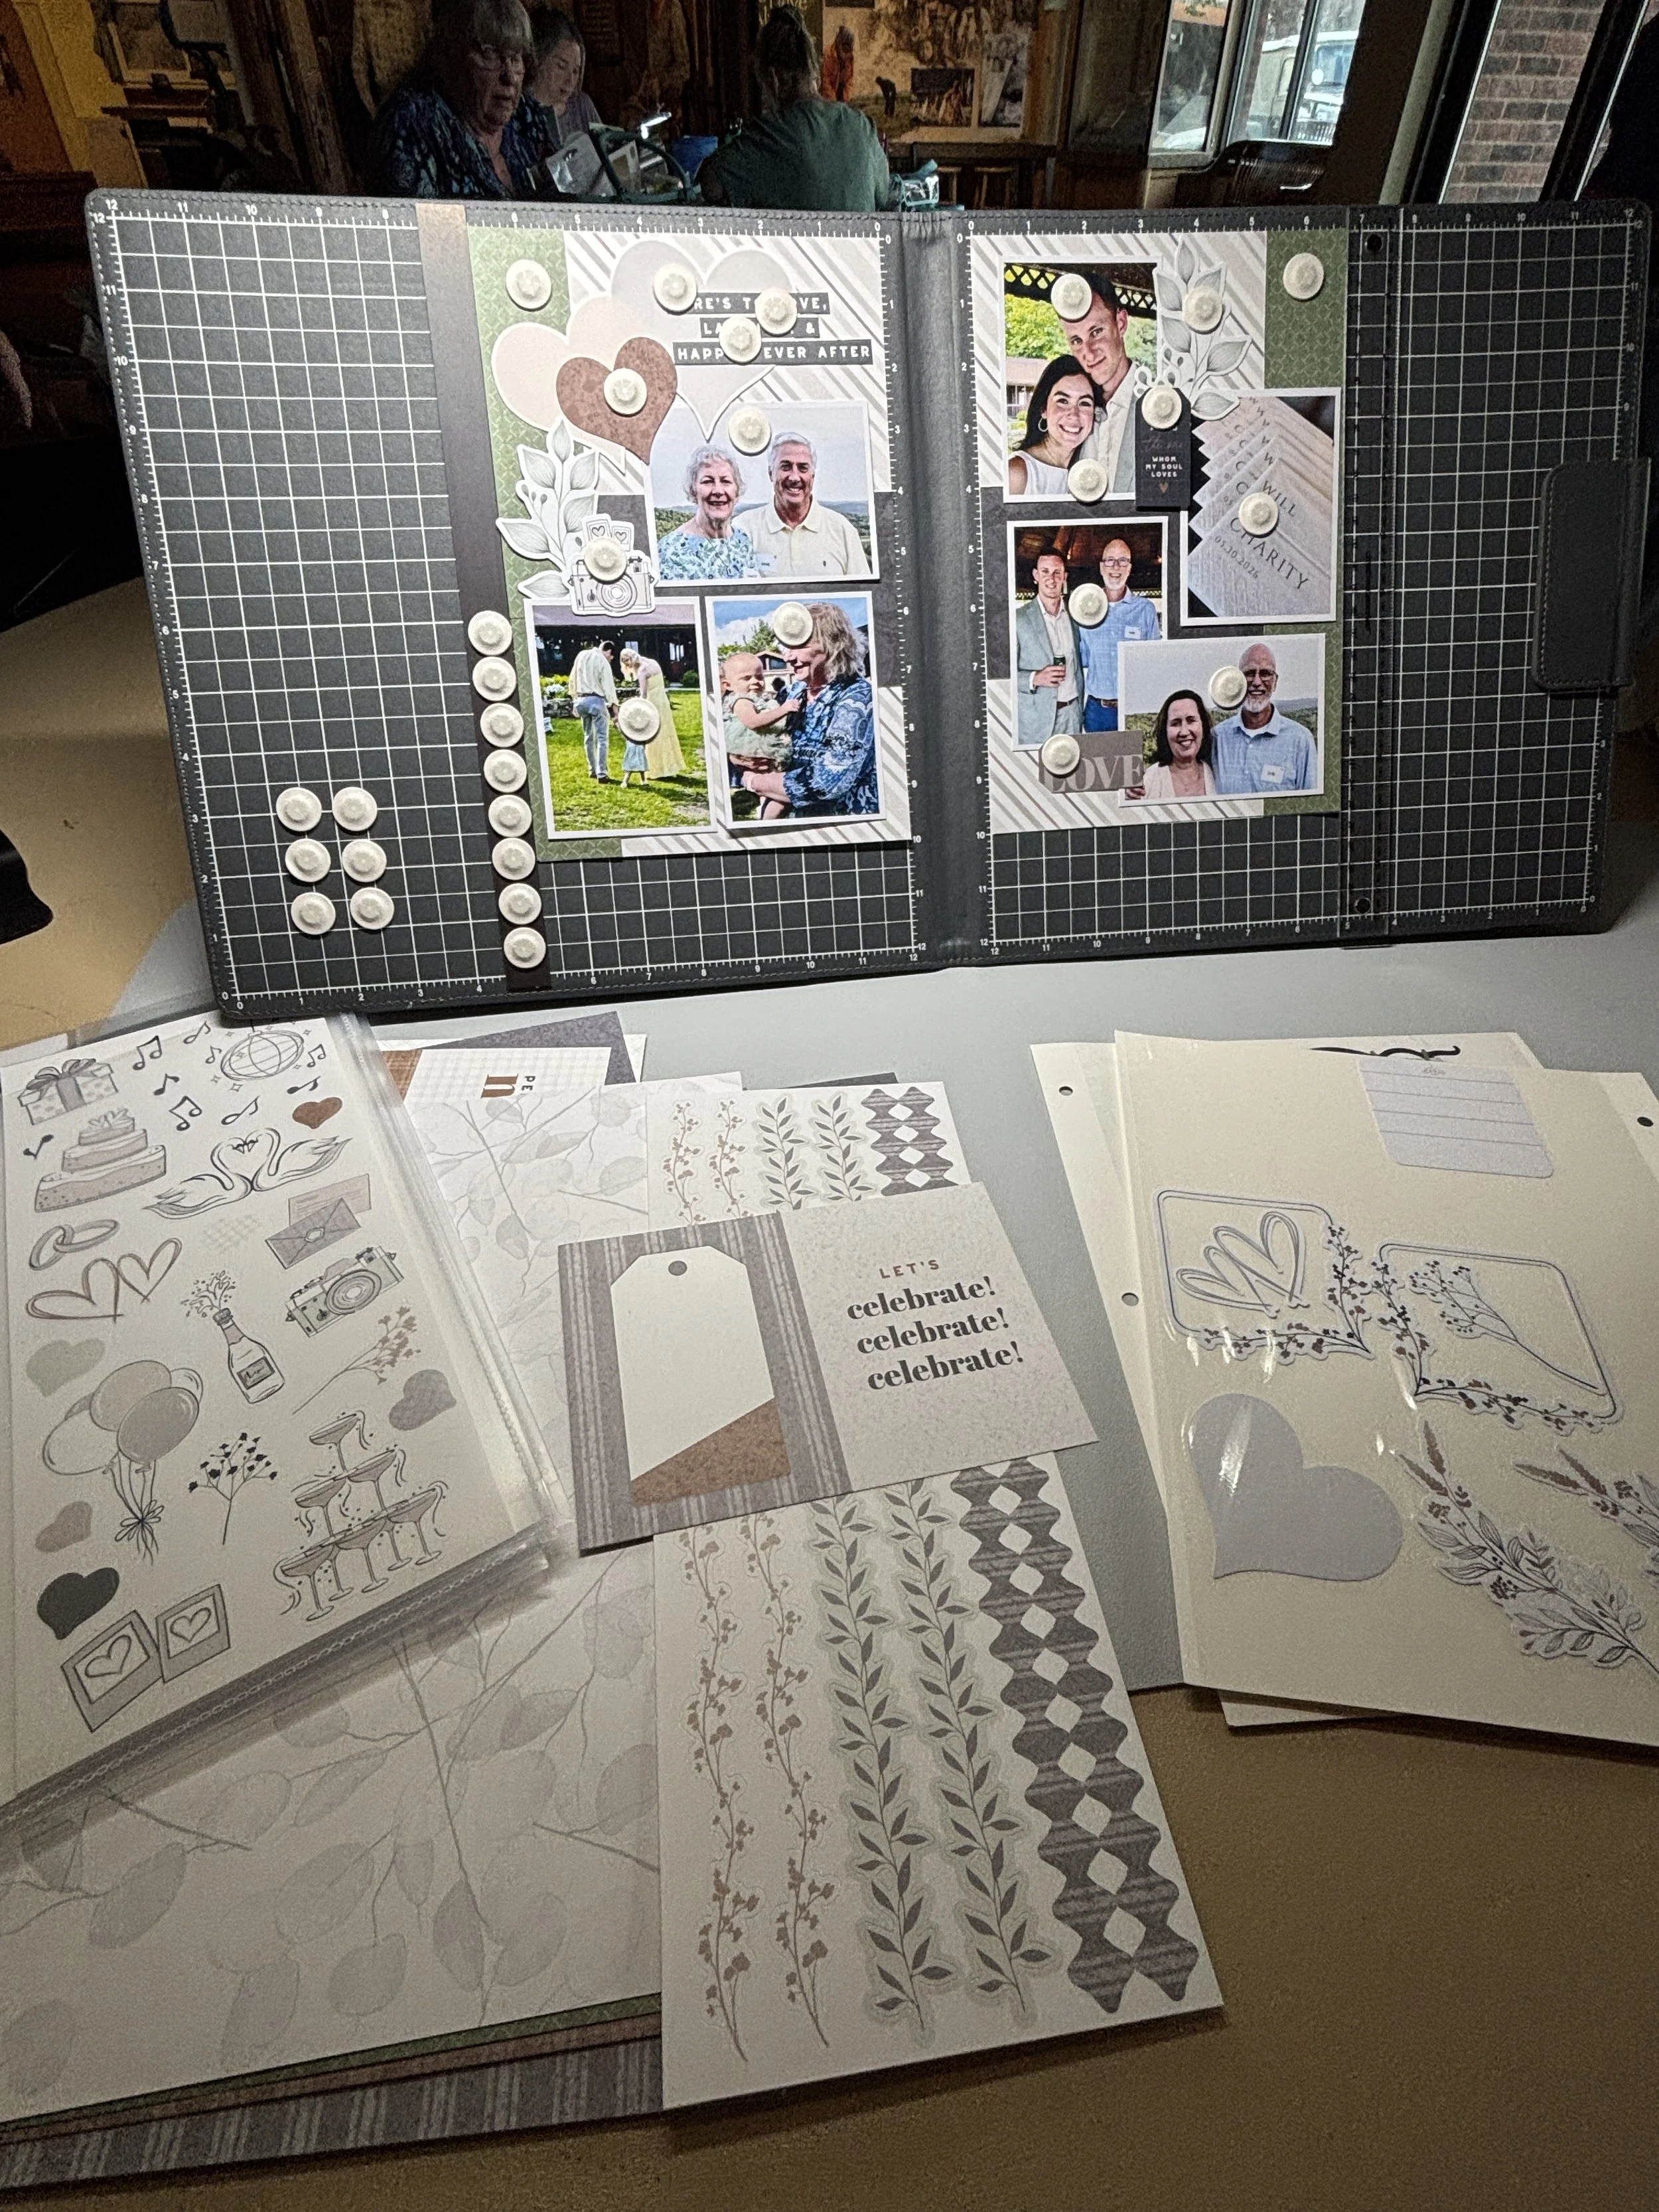
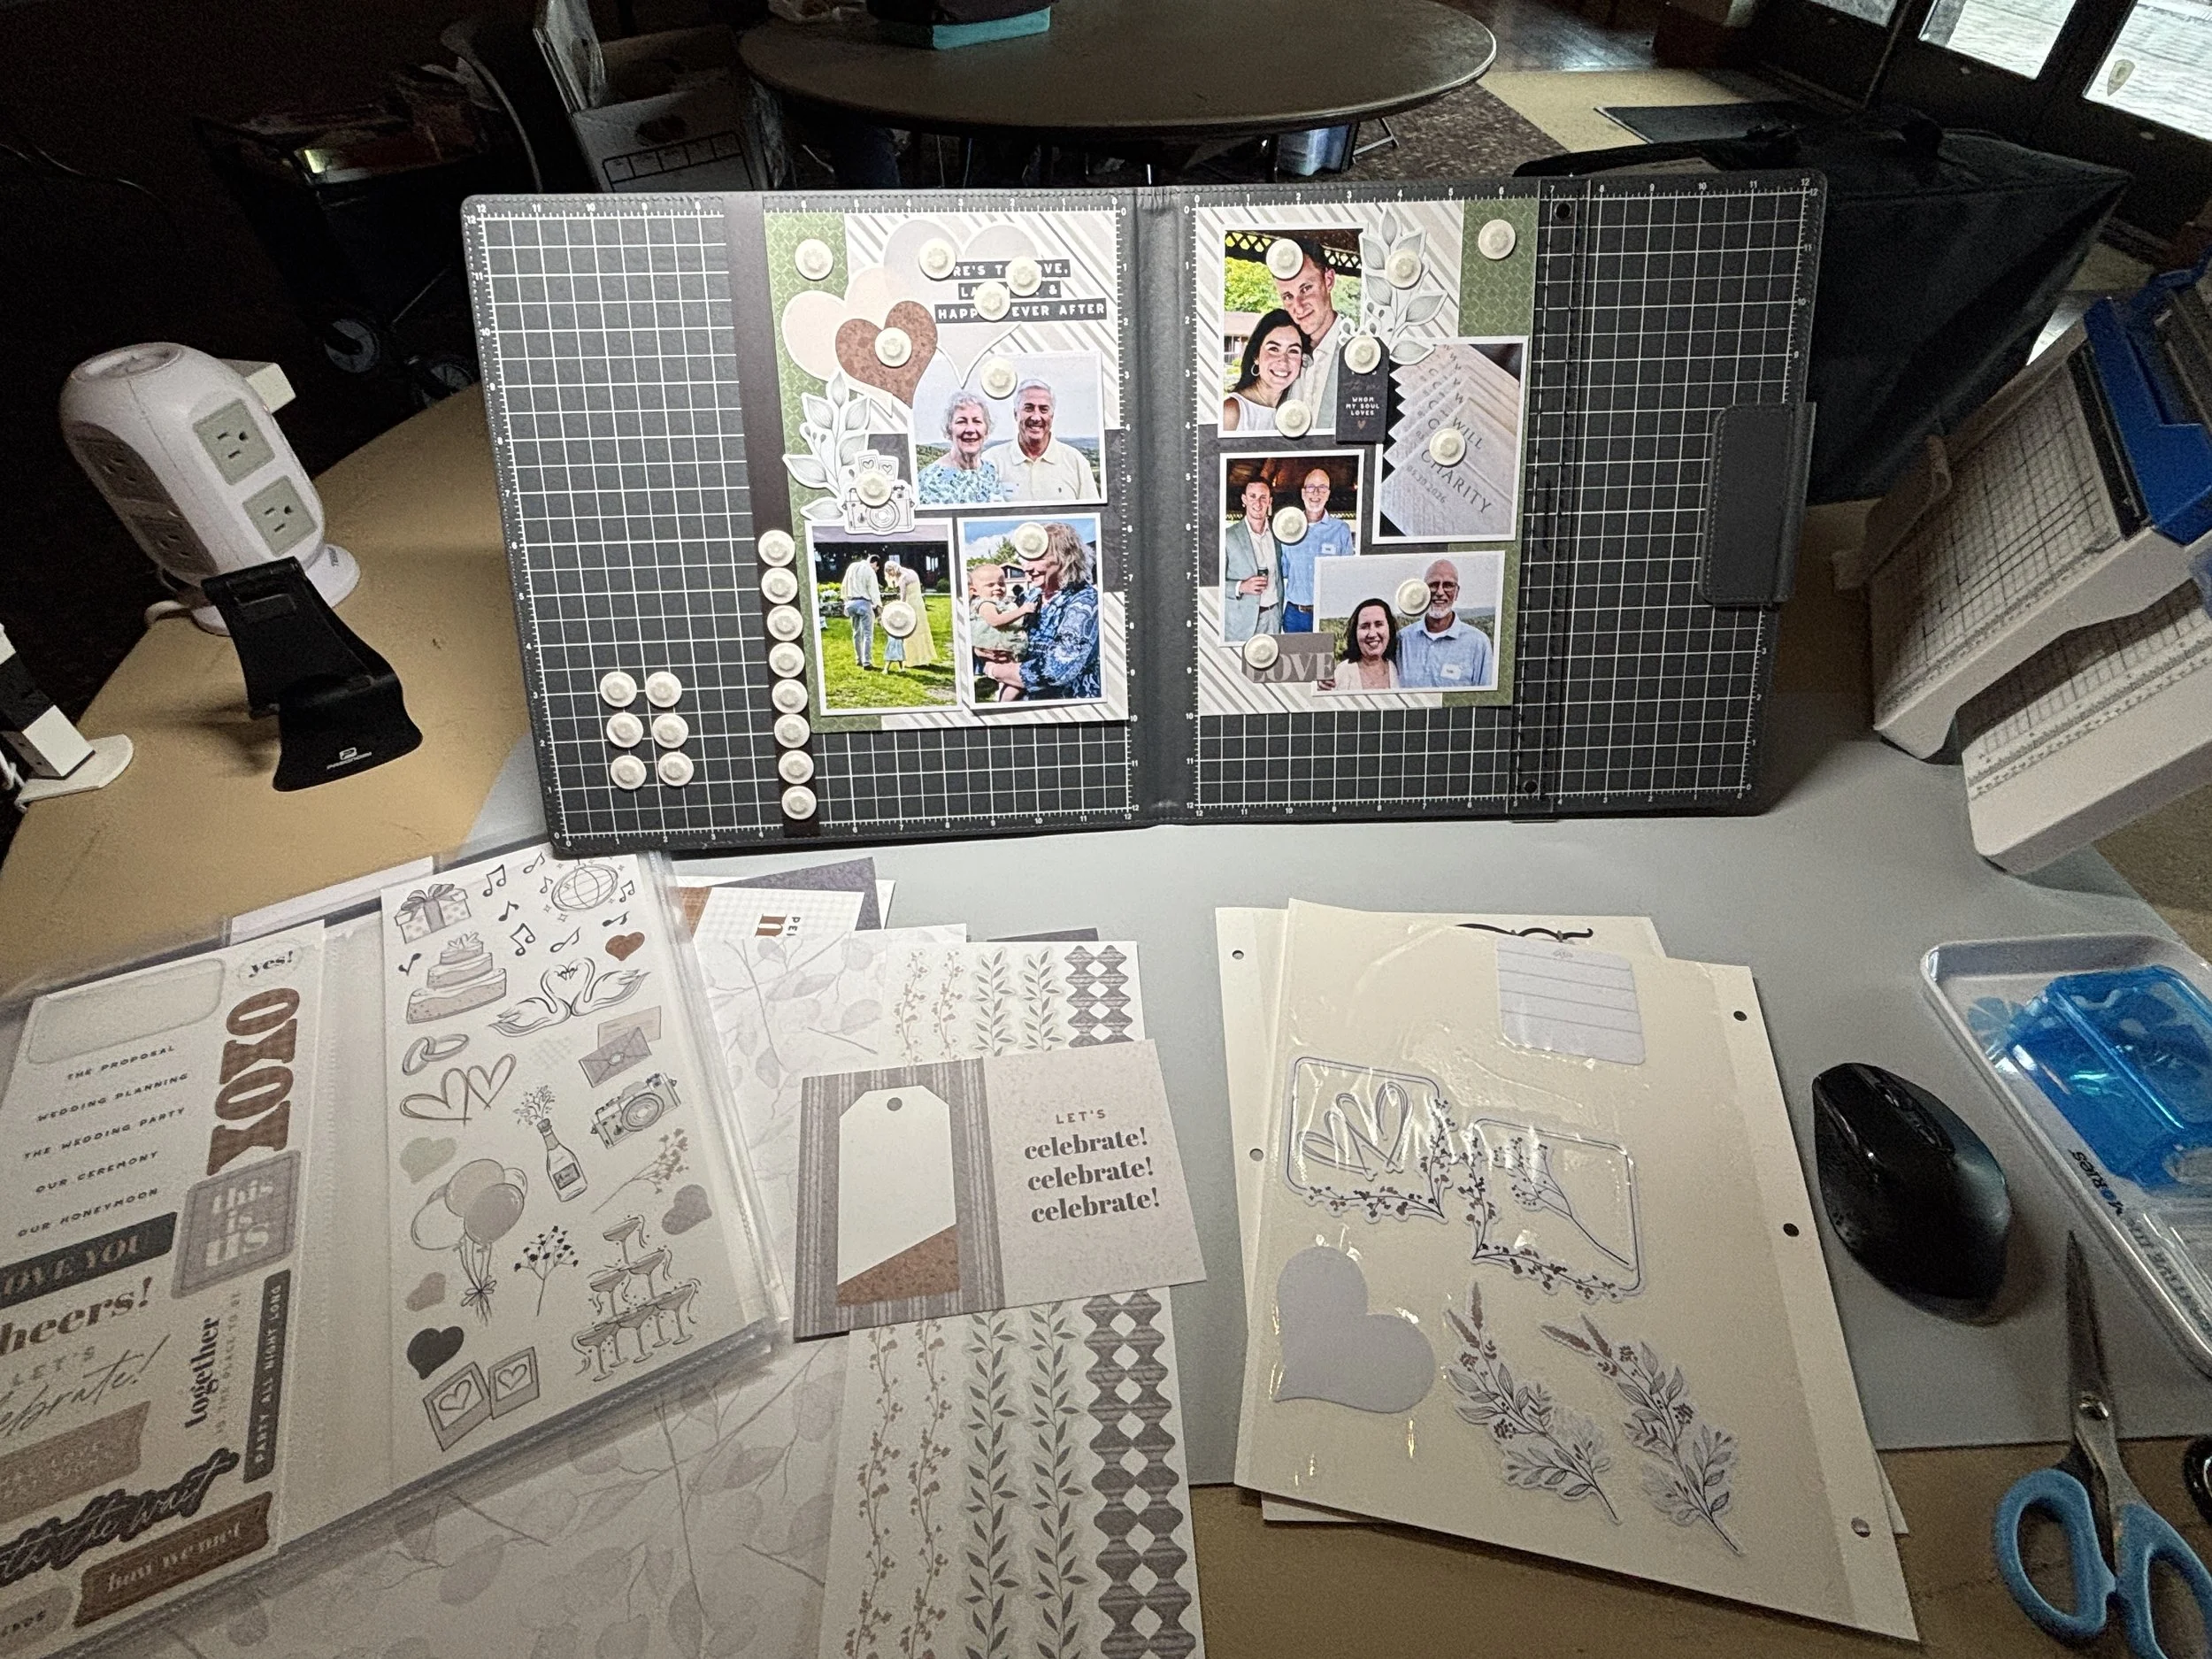
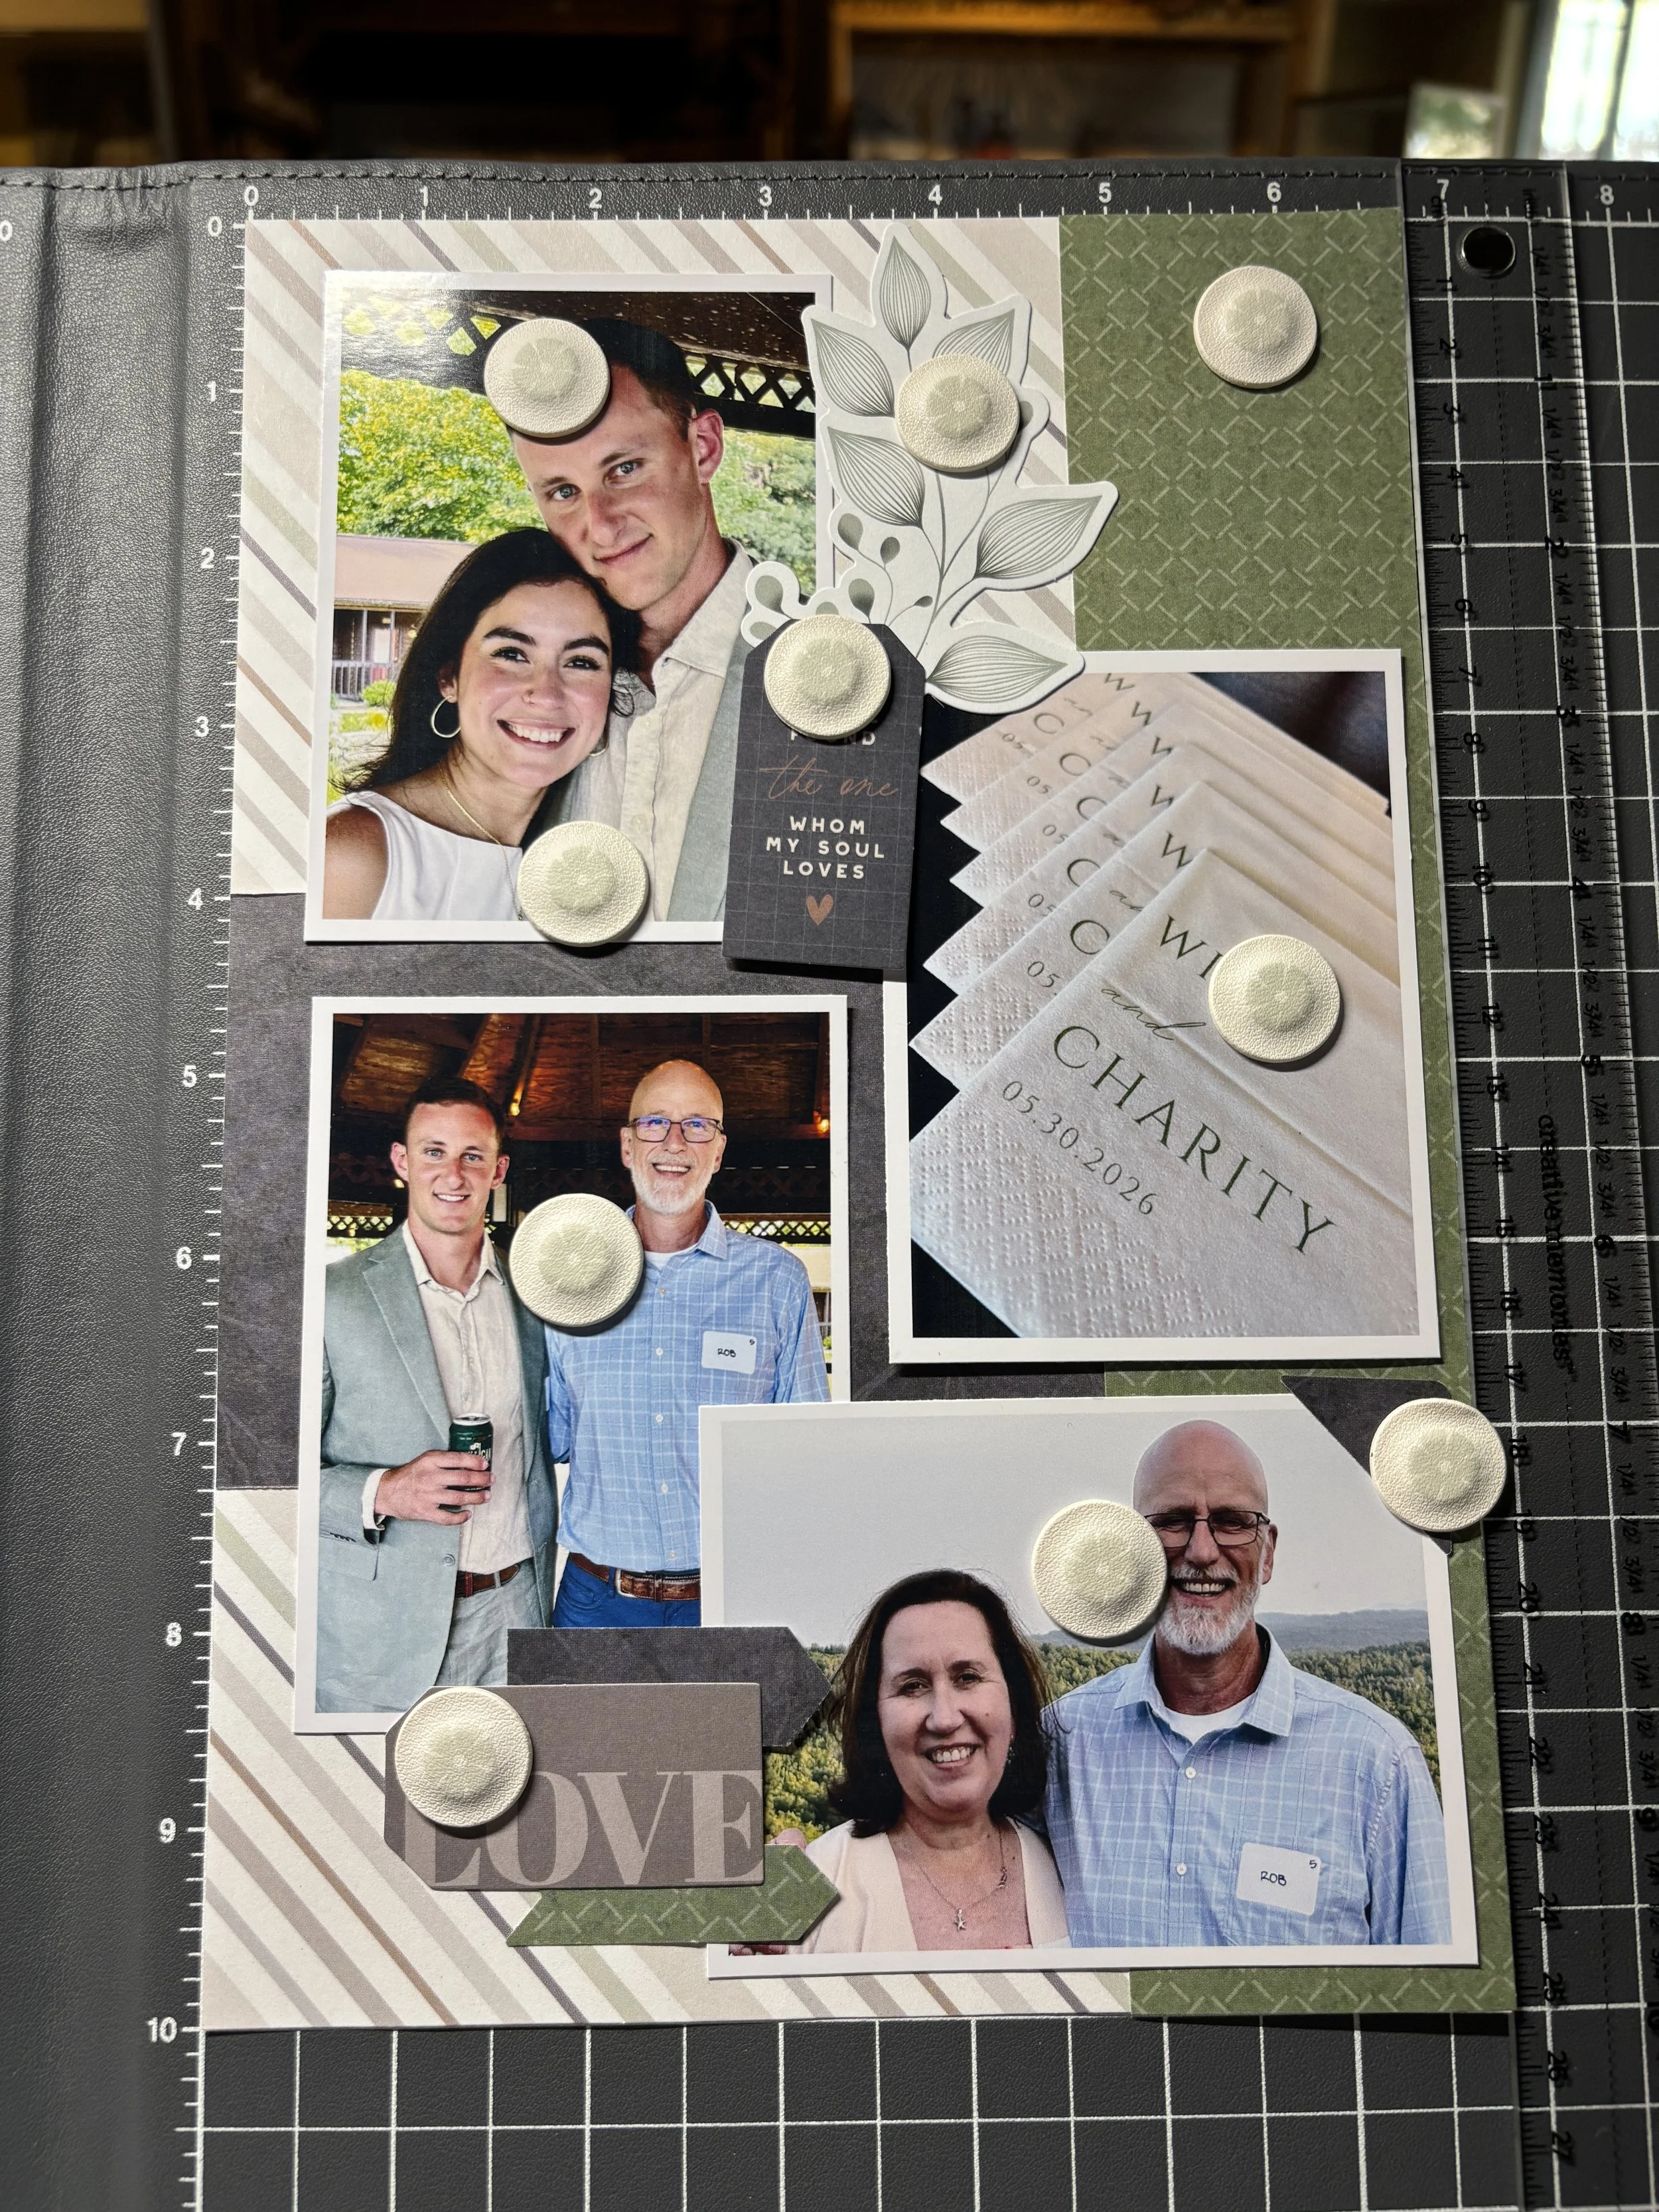
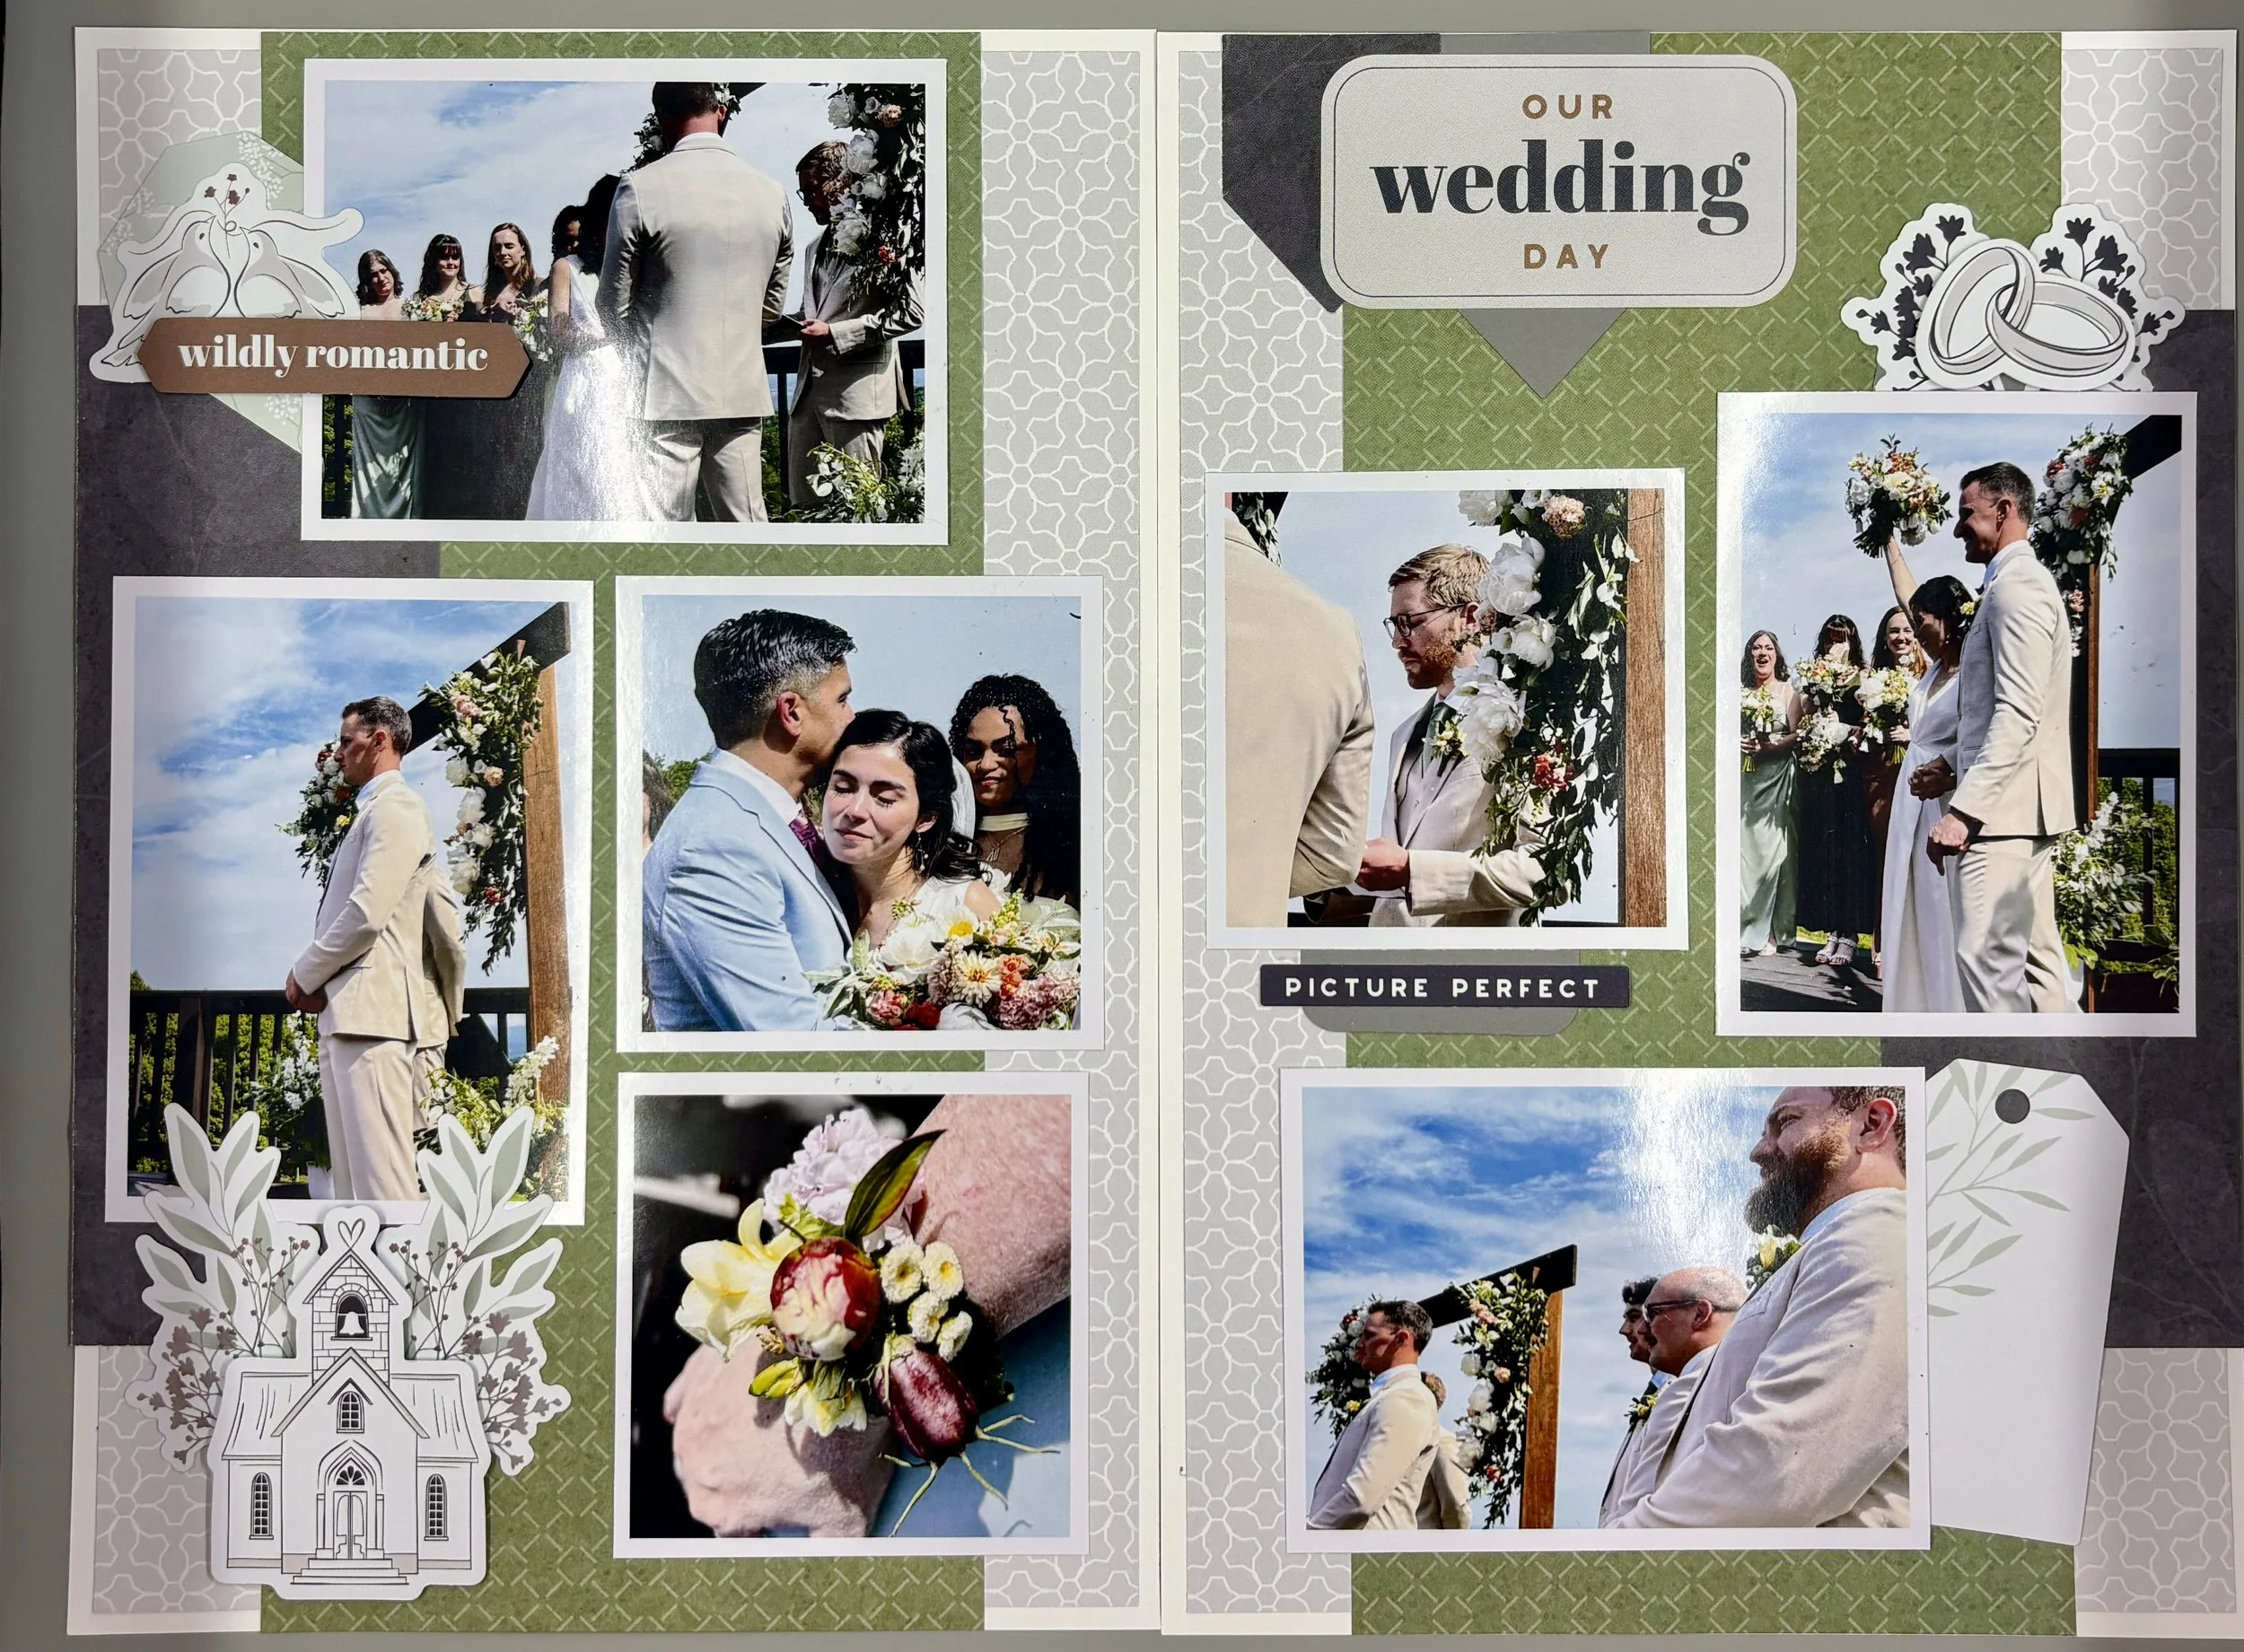
Charity gets sworn in!
Charity joins the California Bar and I document it with Copper Canyon 2 paper and embellishments from Creative Memories in my 2026 Scrap Journal.
My daughter-in-law made us proud by getting sworn in as a member of the California Bar! She officially a practicing attorney in the state of California. I was able to get photos from our son, her husband (Will). I have added her to my 2026 Scrap Journal in January. I used the beautiful Copper Canyon 2 paper pack and embellishments. I love being able to use my Scrap Journal to capture the everyday moments and not just the holidays and vacations.

I hope you enjoyed this layout. If you want to learn more about scrapping in a smaller scrap journal size (6.75” x 10”) instead of the traditional 12”x12” size reach out to me and we can talk about you can get started! Keep it scrappy my friends!

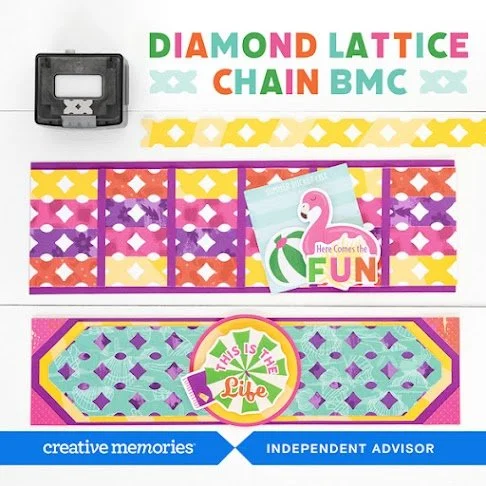
Creative Memories New Release
Scrapping the everyday and not just the holidays using your new Creative Memories Chasing the Sun collection.
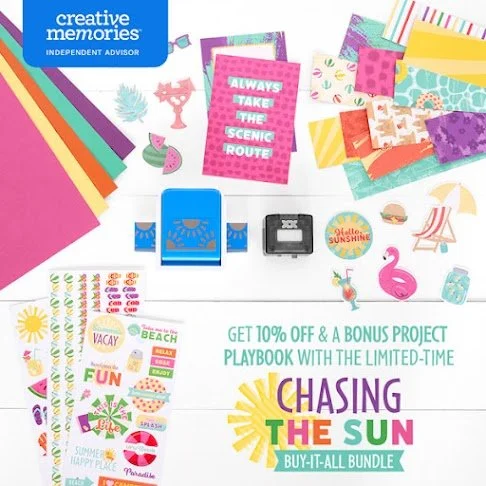
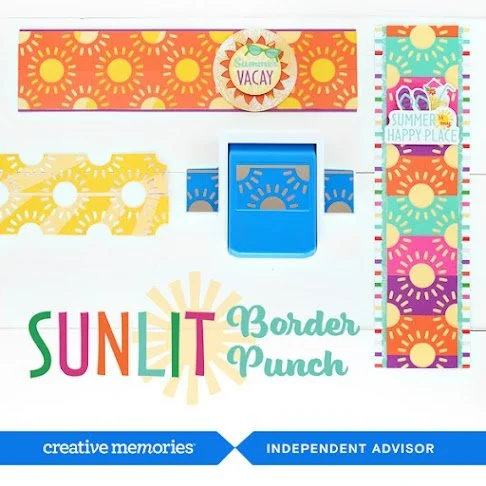
Creative Memories has a new release today and WOW! There is a new collection called Chasing the Sun which includes a Diamond Lattice Border Maker Cartridge and the Sunlit Border Punch and all the usual suspects like some amazing paper, two kinds embellishments packs, stickers, a mat pack and a new 12×12 album. There is also an Add-On Embellishment Bundle for other existing collections including Natural Beginnings, Global Getaway and On the Bright Side. There are also some new stencils and new storage pieces. All-in-all, a great release day for everyone!
Remember, the Chasing the Sun Buy-It-All Bundle (photo below) allows you to buy the bundle at a 10% discount off the retail price but you have to purchase it before 10am, Friday, April 17th. You can still purchase all the pieces of the bundle after April 17th, but you won’t get the extra discount. Reach out if you are interested in purchasing or have questions.

Remember my friends, scrap the everyday and not just holidays. And, as always, keep it scrappy!


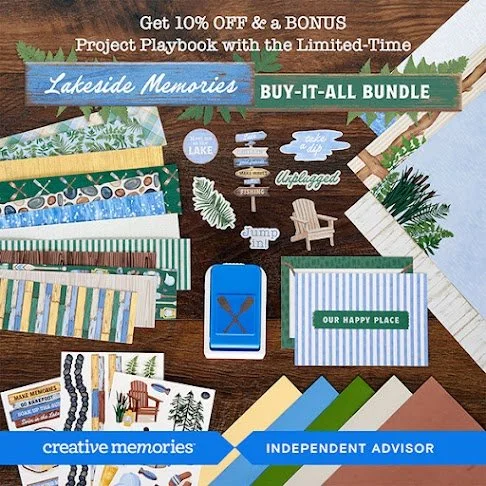
Lakeside Memories!
Hello Everyone! I want to share a special opportunity with Creative Memories to purchase the new Lakeside Memories Collection! The Collection includes a paper pack, stickers, mat pack, embossed embellishments as well as a 12”x12” album and special Oar punch. There’s even a Buy-It-All Bundle that can you save you up to 10% if you purchase before April 3rd (2026) at noon central time.
If you have any questions please reach out and I will help. As always, keep it scrappy friends!

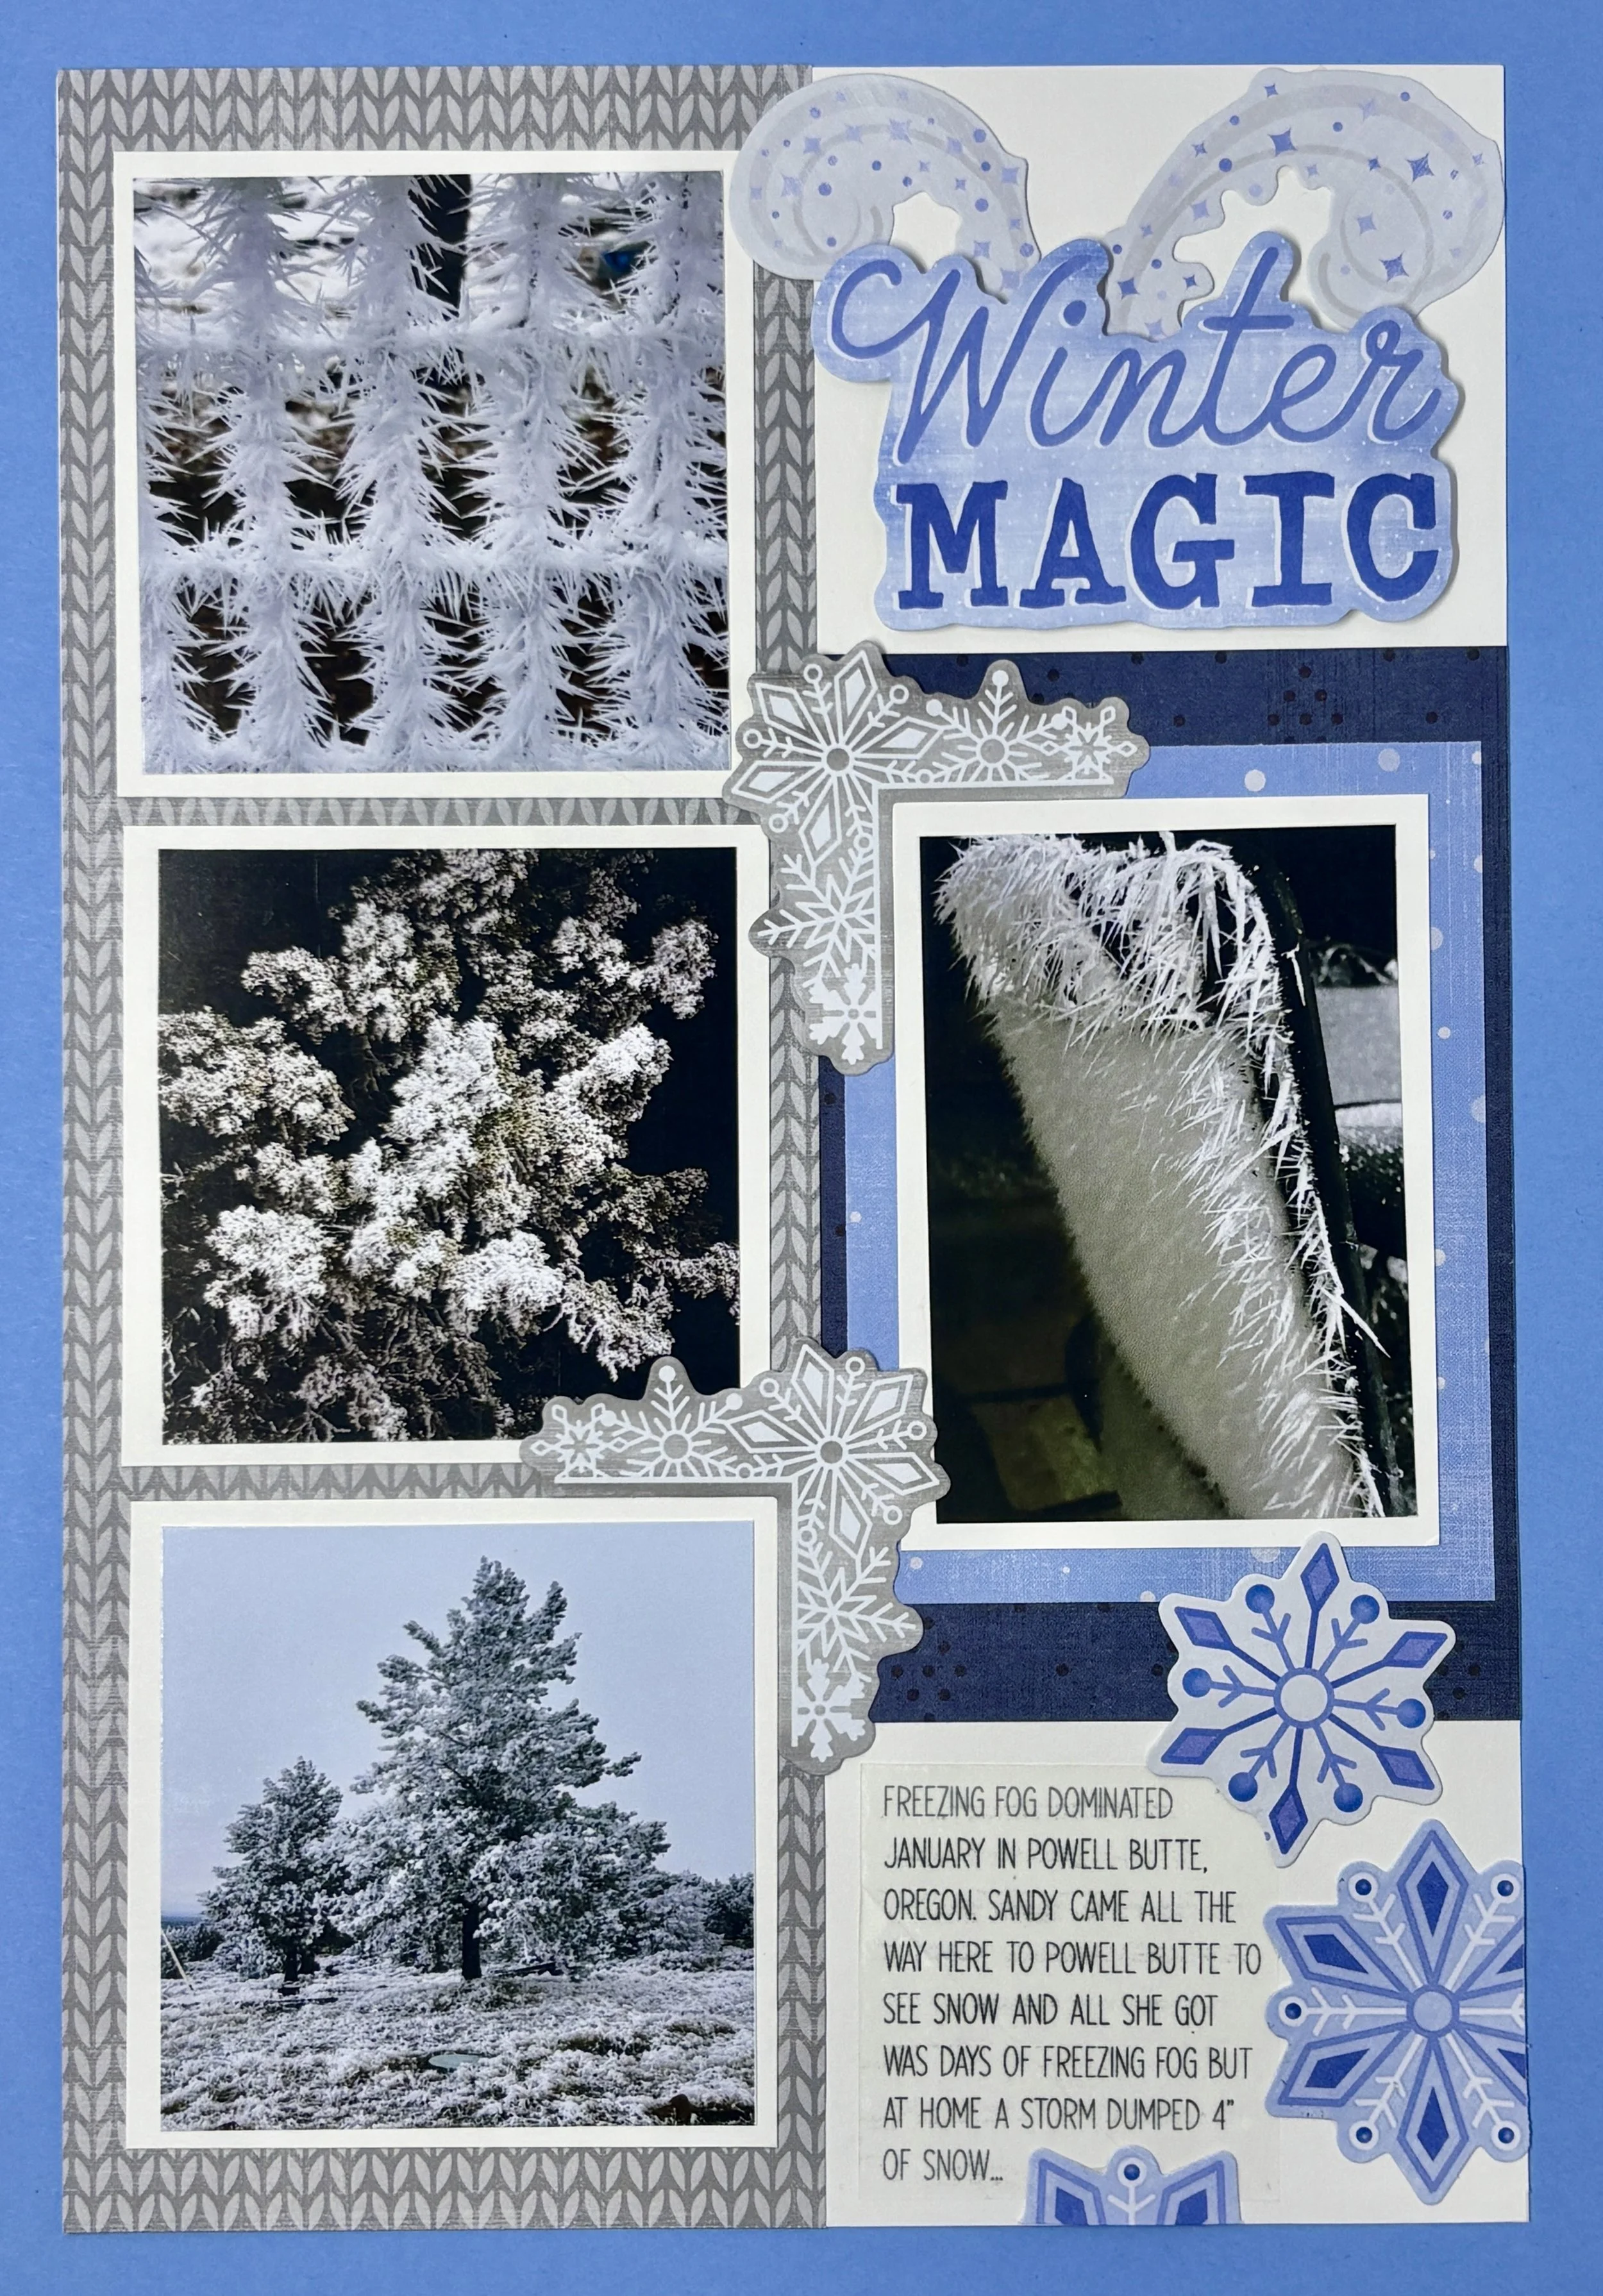
Winter Magic and Freezing Fog
Freezing Fog documented in my Creative Memories 2026 Scrap Journal.
Today I am documenting the freezing fog we received at home this past January in my 2026 Scrap Journal. I’m using the Scrap Journal to capture all the life events, not just the wonderful vacations and holidays, but all the things. This post is about Freezing Fog which is crazy part of winter life here in central Oregon.

Freezing Fog - Central Oregon January 2026
It’s crazy. The fog comes through and leaves ice on everything. There was a strong wind one day and you can see what it did to the ice on the back of the wrought iron patio chair and the fence. I used the current winter collection with Creative Memories called Winter Bliss. I primarily used the designer paper pack and the embellishments.
I hope you enjoyed my layout and if you would like to learn more about scrapbooking with Creative Memories and the Scrap Journal, please reach out. Until next time…keep it scrappy friends!

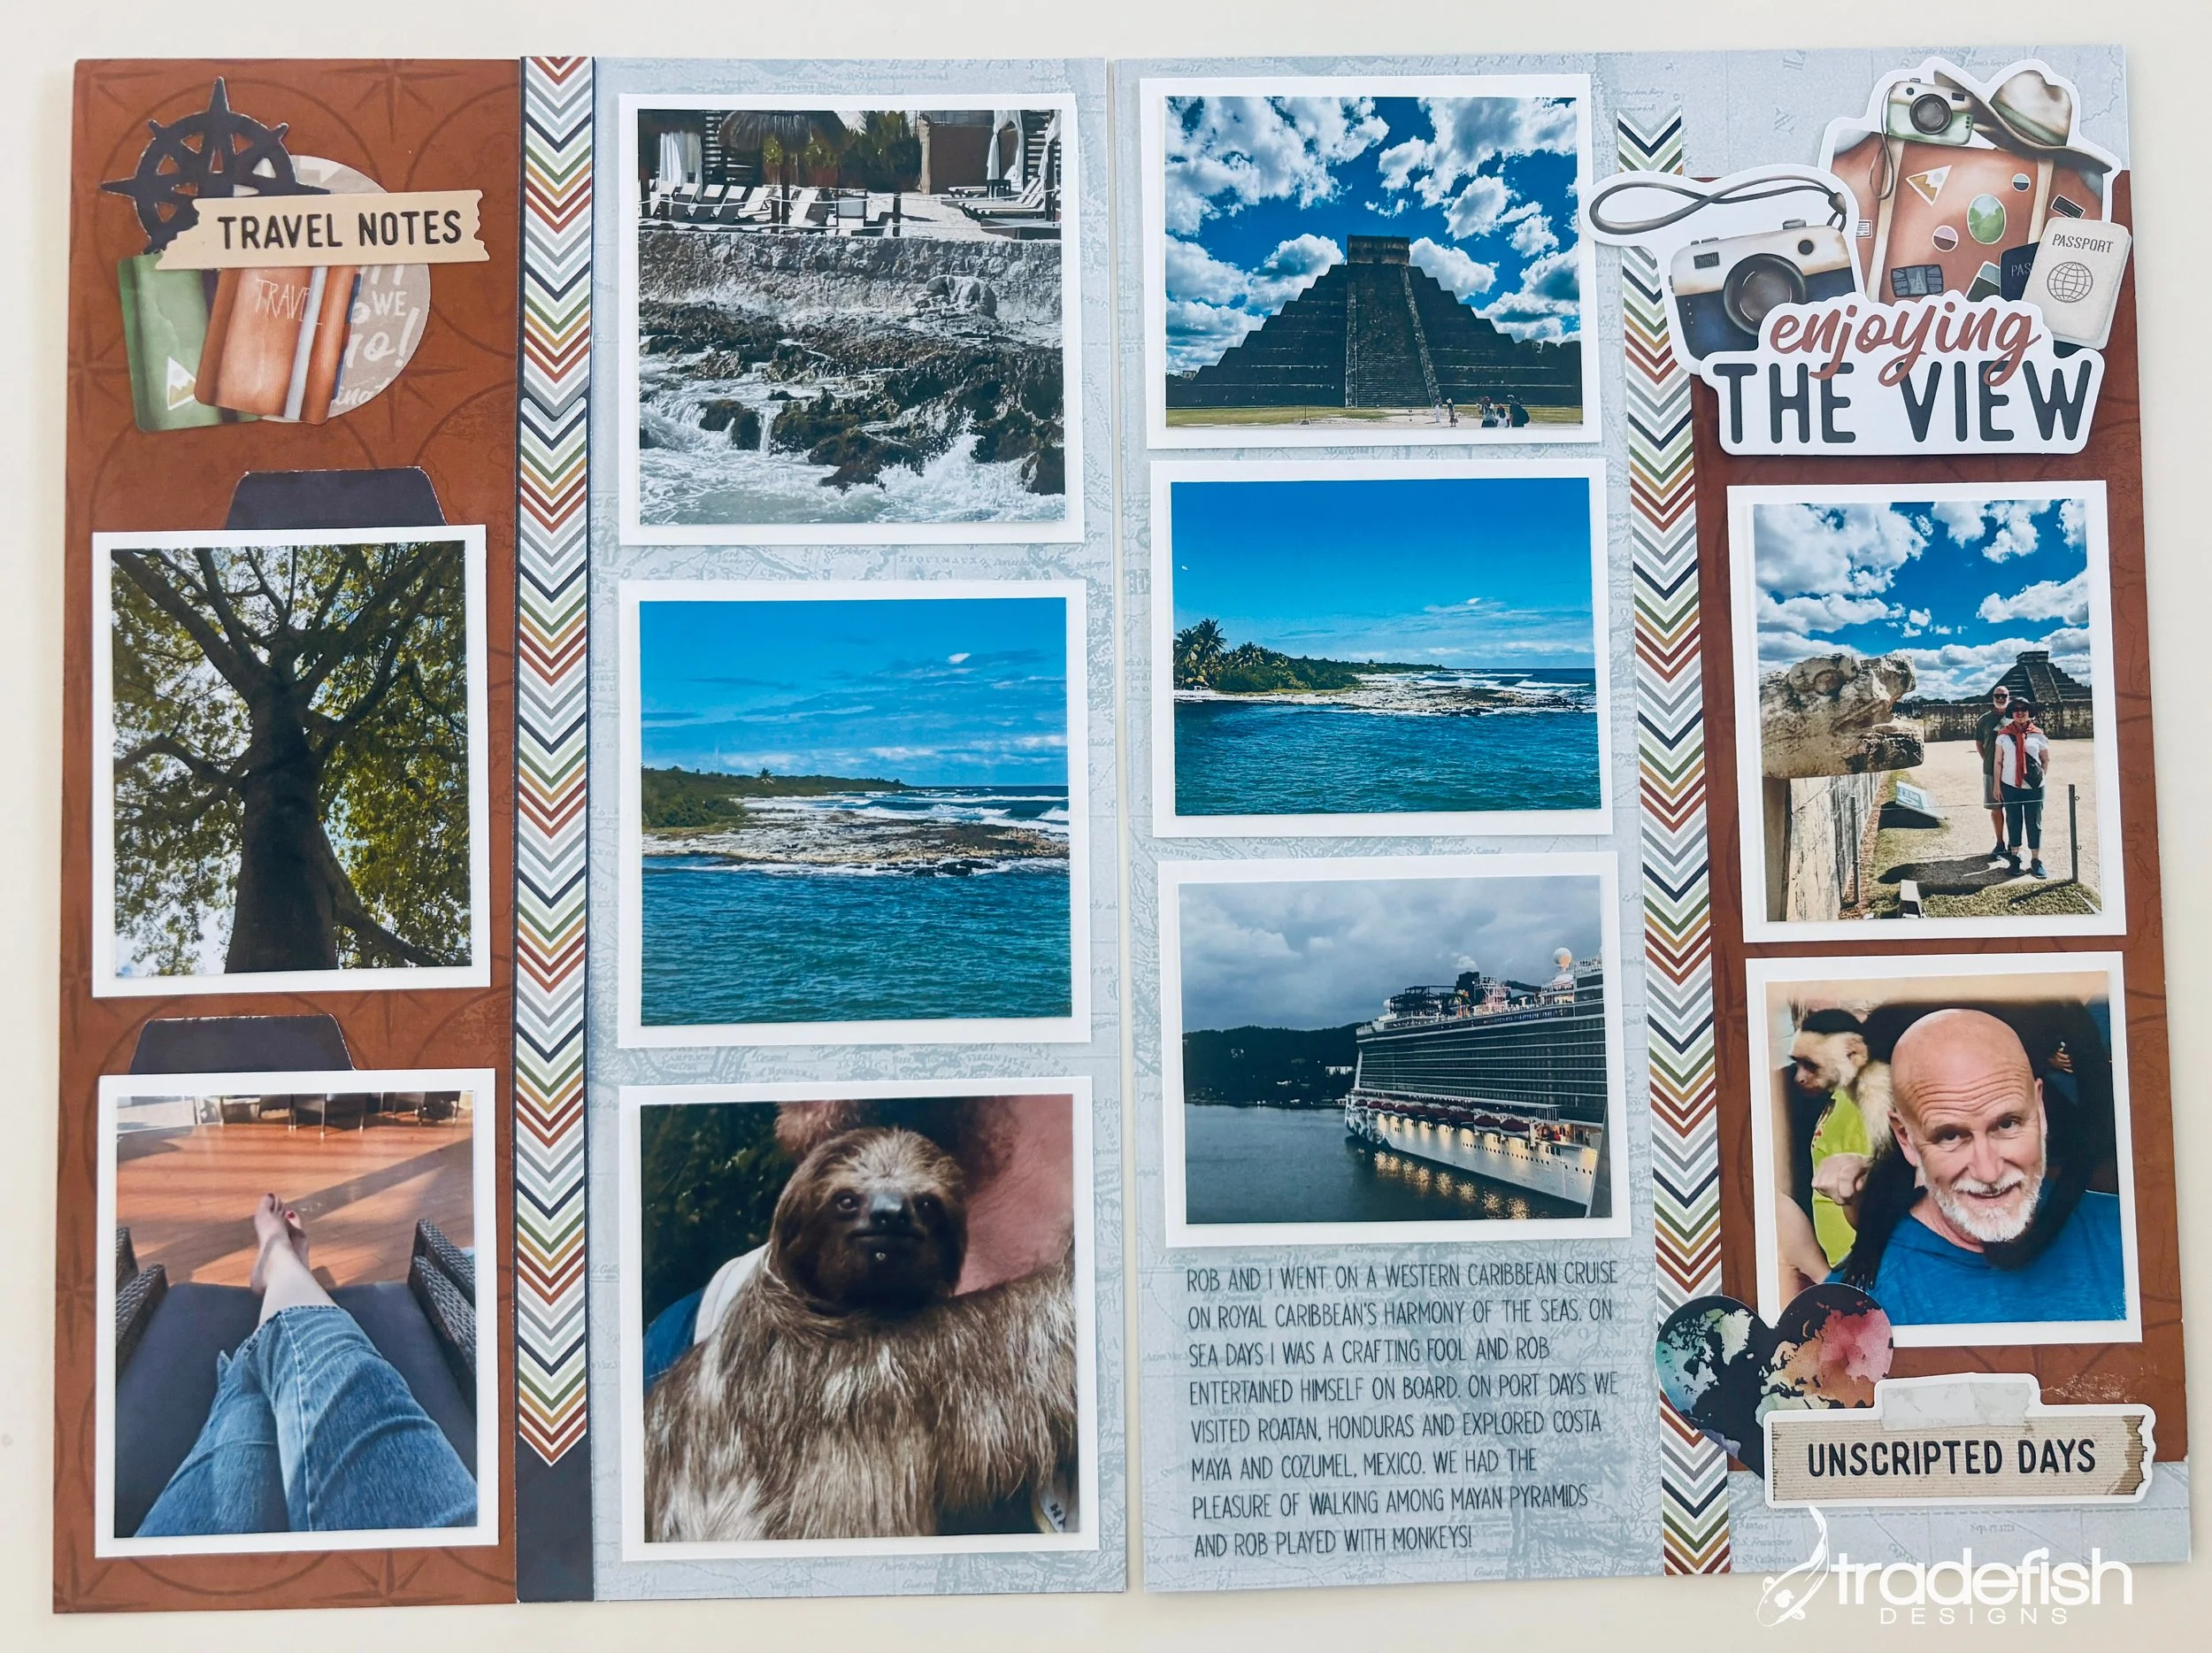
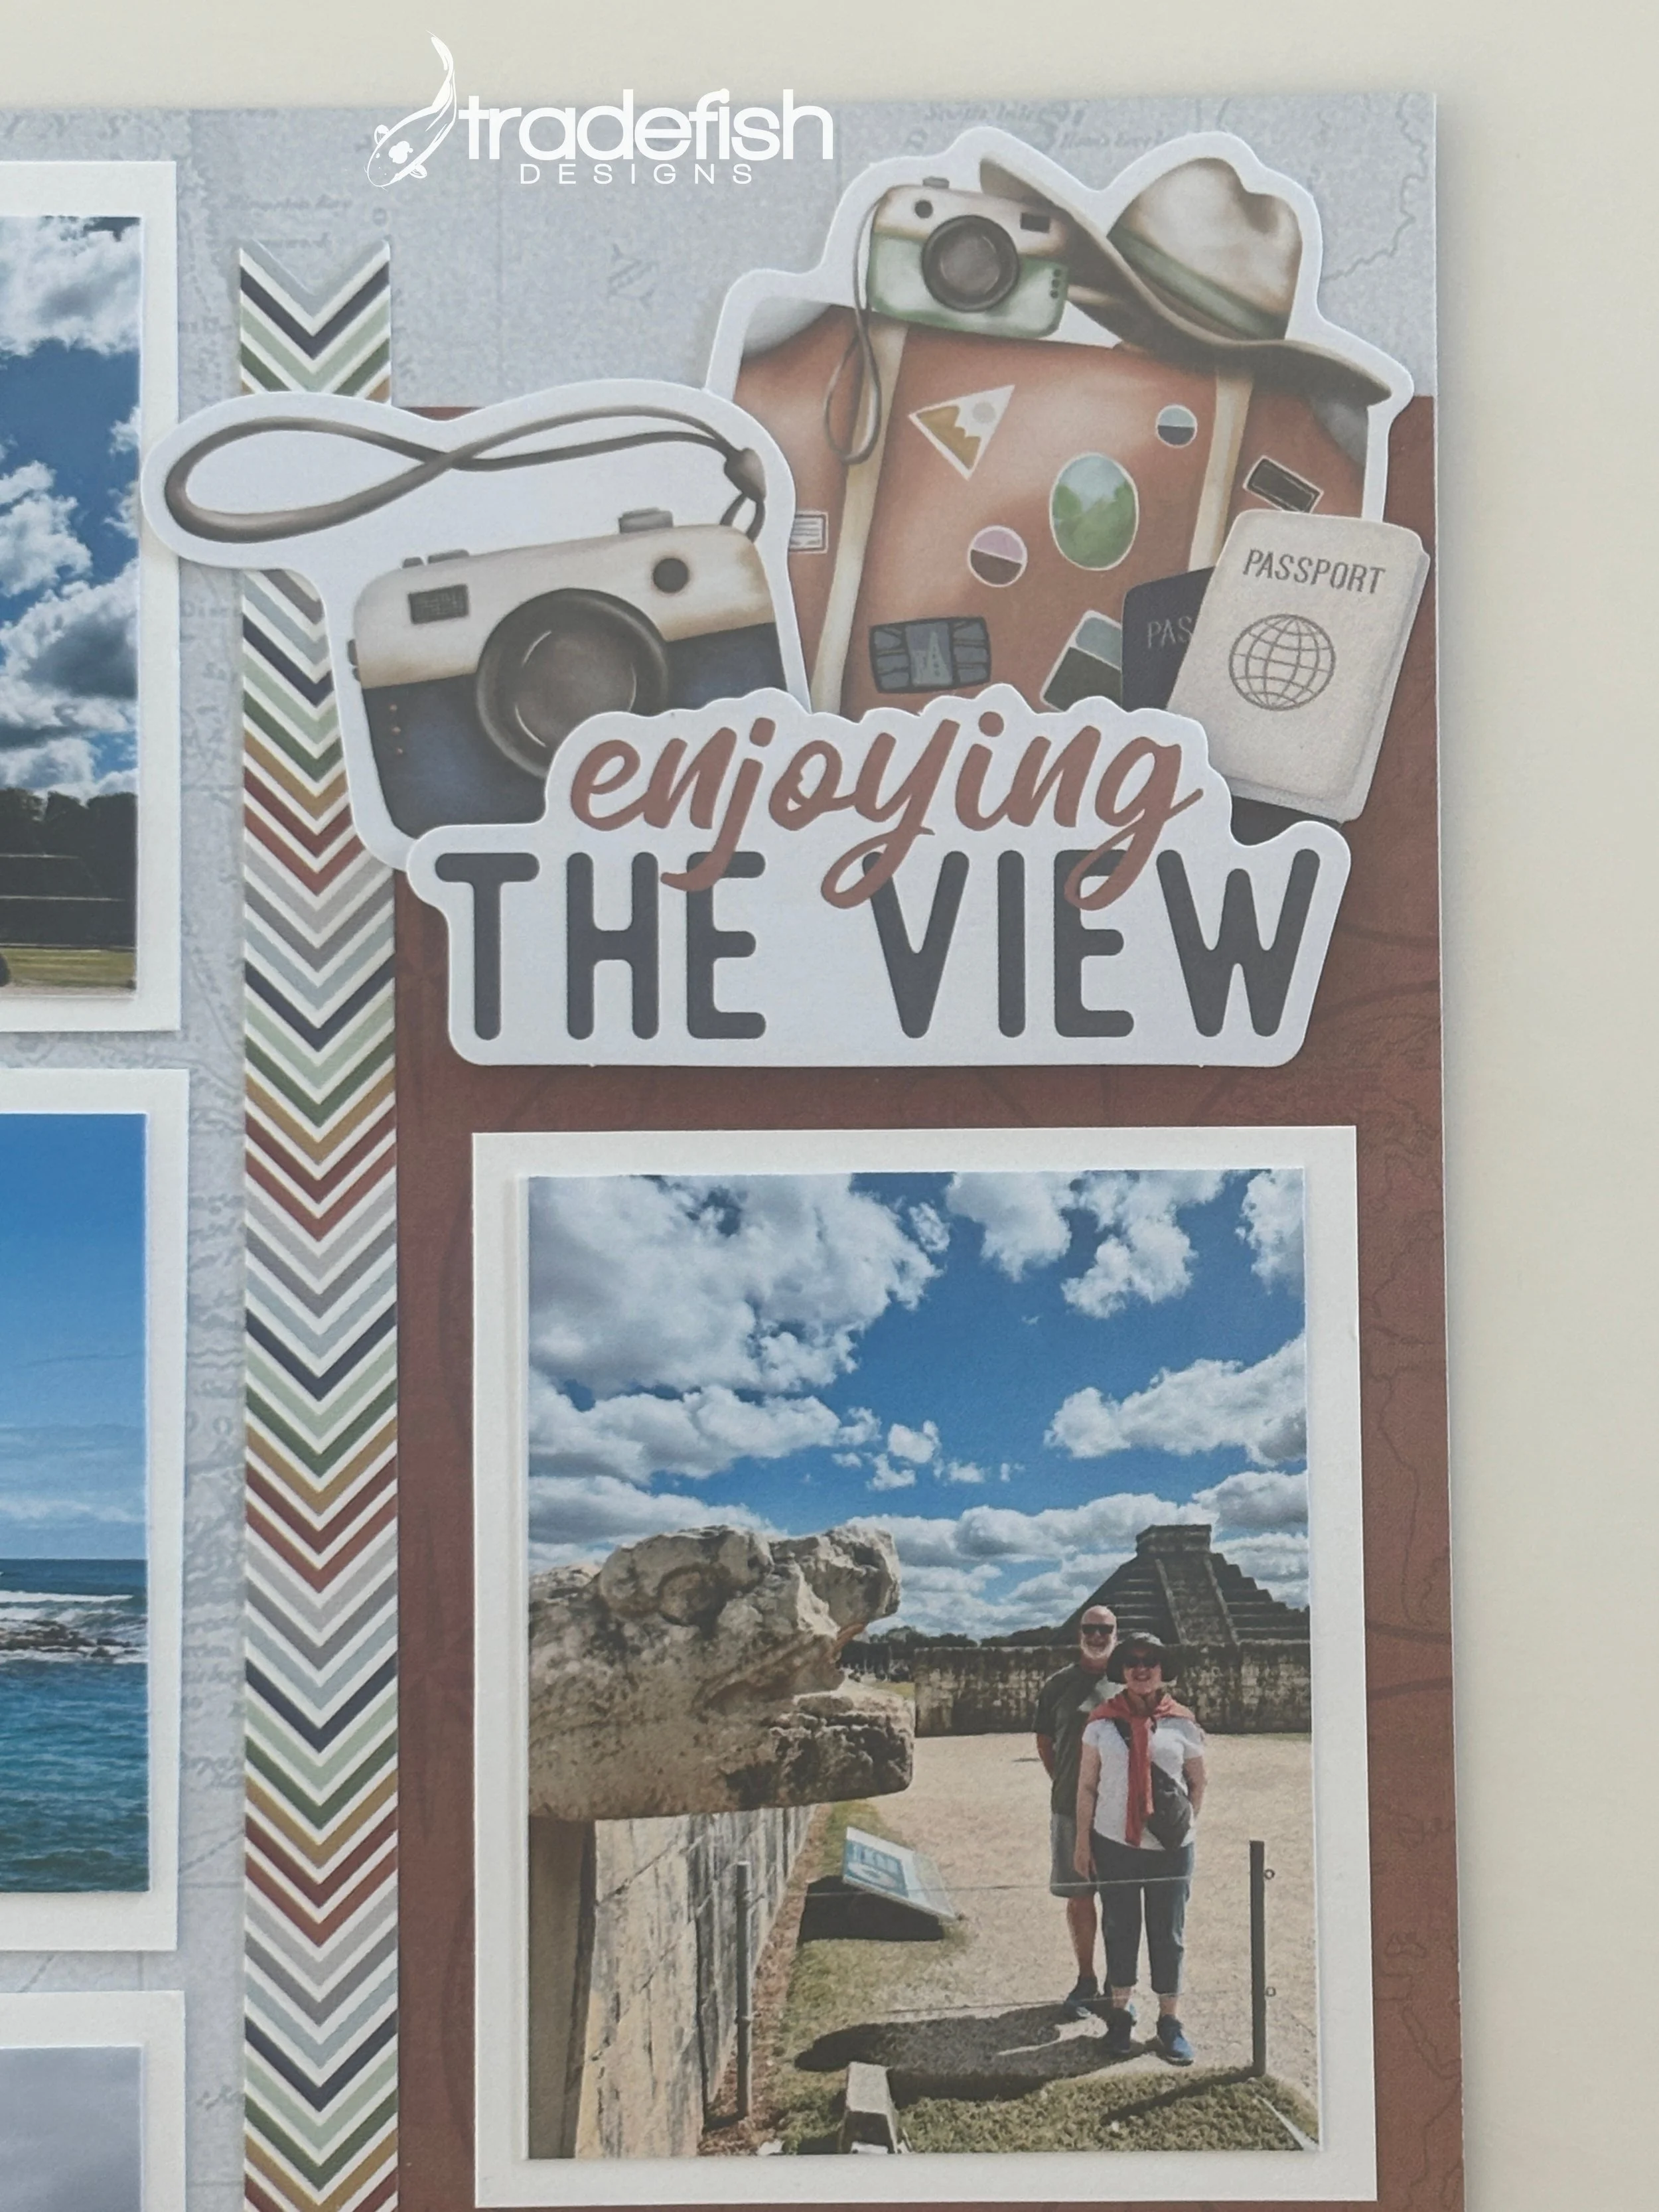
A Global Getaway in my 2026 Scrap Journal!
Western Caribbean Cruise on Royal Caribbean’s Harmony of the Seas.
I enjoying scrapping in a smaller format. I used to create the traditional 12”×12” pages but found out about the smaller size of the Scrap Journal at 6.75” x 10” and fell in love. I use my 2026 Scrap Journal to highlight all the things throughout the year that inspire me to take a photos. I find I scrap just about everything these days. For my first foray back on the blog I thought I would do a recent trip with Rob (a.k.a. “the hubs”). He and I went on a cruise to the Western Caribbean with Royal Caribbean (on Harmony of the Seas) and had a wonderful time. Here are some photos to enjoy.
The layouts below feature the Global Getaway Collection from Creative Memories. It was the perfect collection to capture the vibe of our trip. If you’re interested in checking out the Collection, click HERE. You will notice that the Scrap Journal size doesn’t lend itself to the use of a lot of 4×6 photos. I personally like using smaller photos. If you are interested in my photo printer, click HERE.
Global Getaway Title
I hope you enjoyed my latest Scrap Journal layout. More will be coming over the next few weeks. In the meantime, keep it scrappy friends!