
25 Days of Christmas Cards - Day 23
Day 23 of the 25 Days of Christmas Cards. Gina K Designs. Stampin’Up.
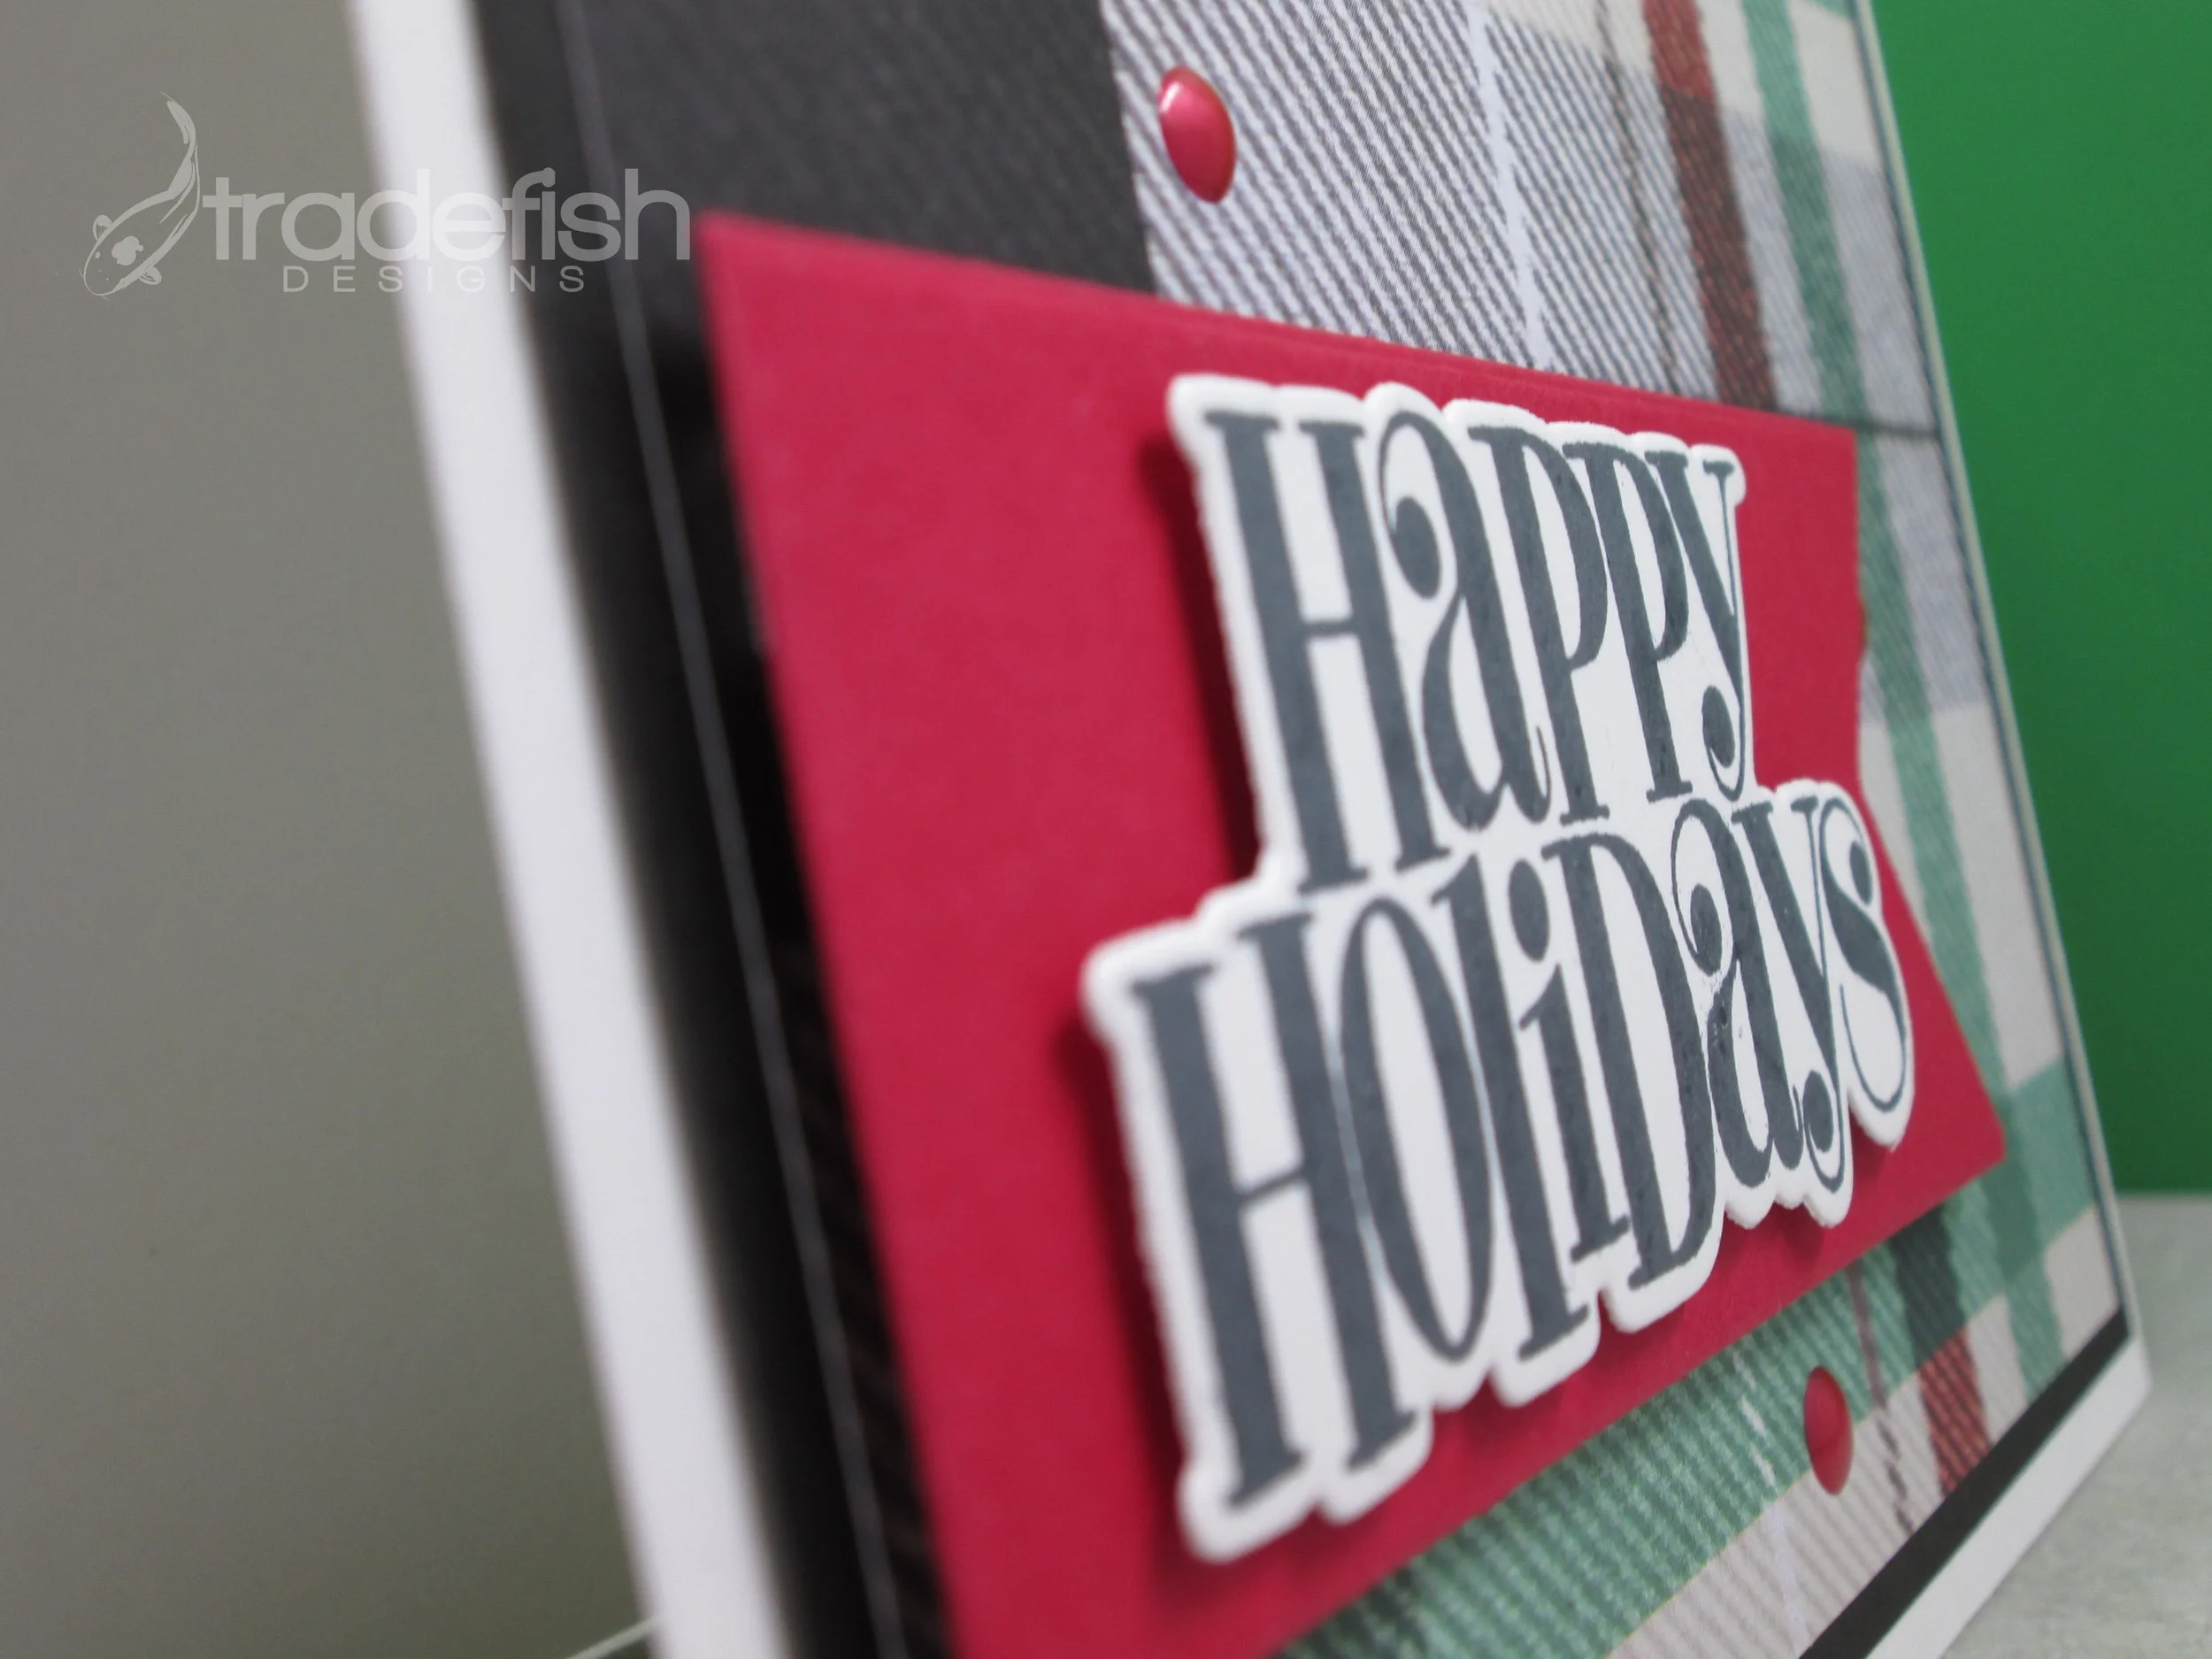
Welcome to the Day 23 of the 25 Days of Christmas Cards. Todays card uses random plaid paper, a simple stamped sentiment and some red pops of color!


Supplies
Stamps: Festive Phrases (Gina K. Designs)
Paper: Real Red and Black (Stampin’Up), Plaid (Misc)
Dies: Festive Phrases (Gina K. Designs)
Embellishment(s): Pearlized Metallic Effects Red (Stampin’Up)

Keep it crafty friends!
25 Days of Christmas Cards - Day 22
Day 22 of the 25 Days of Christmas.
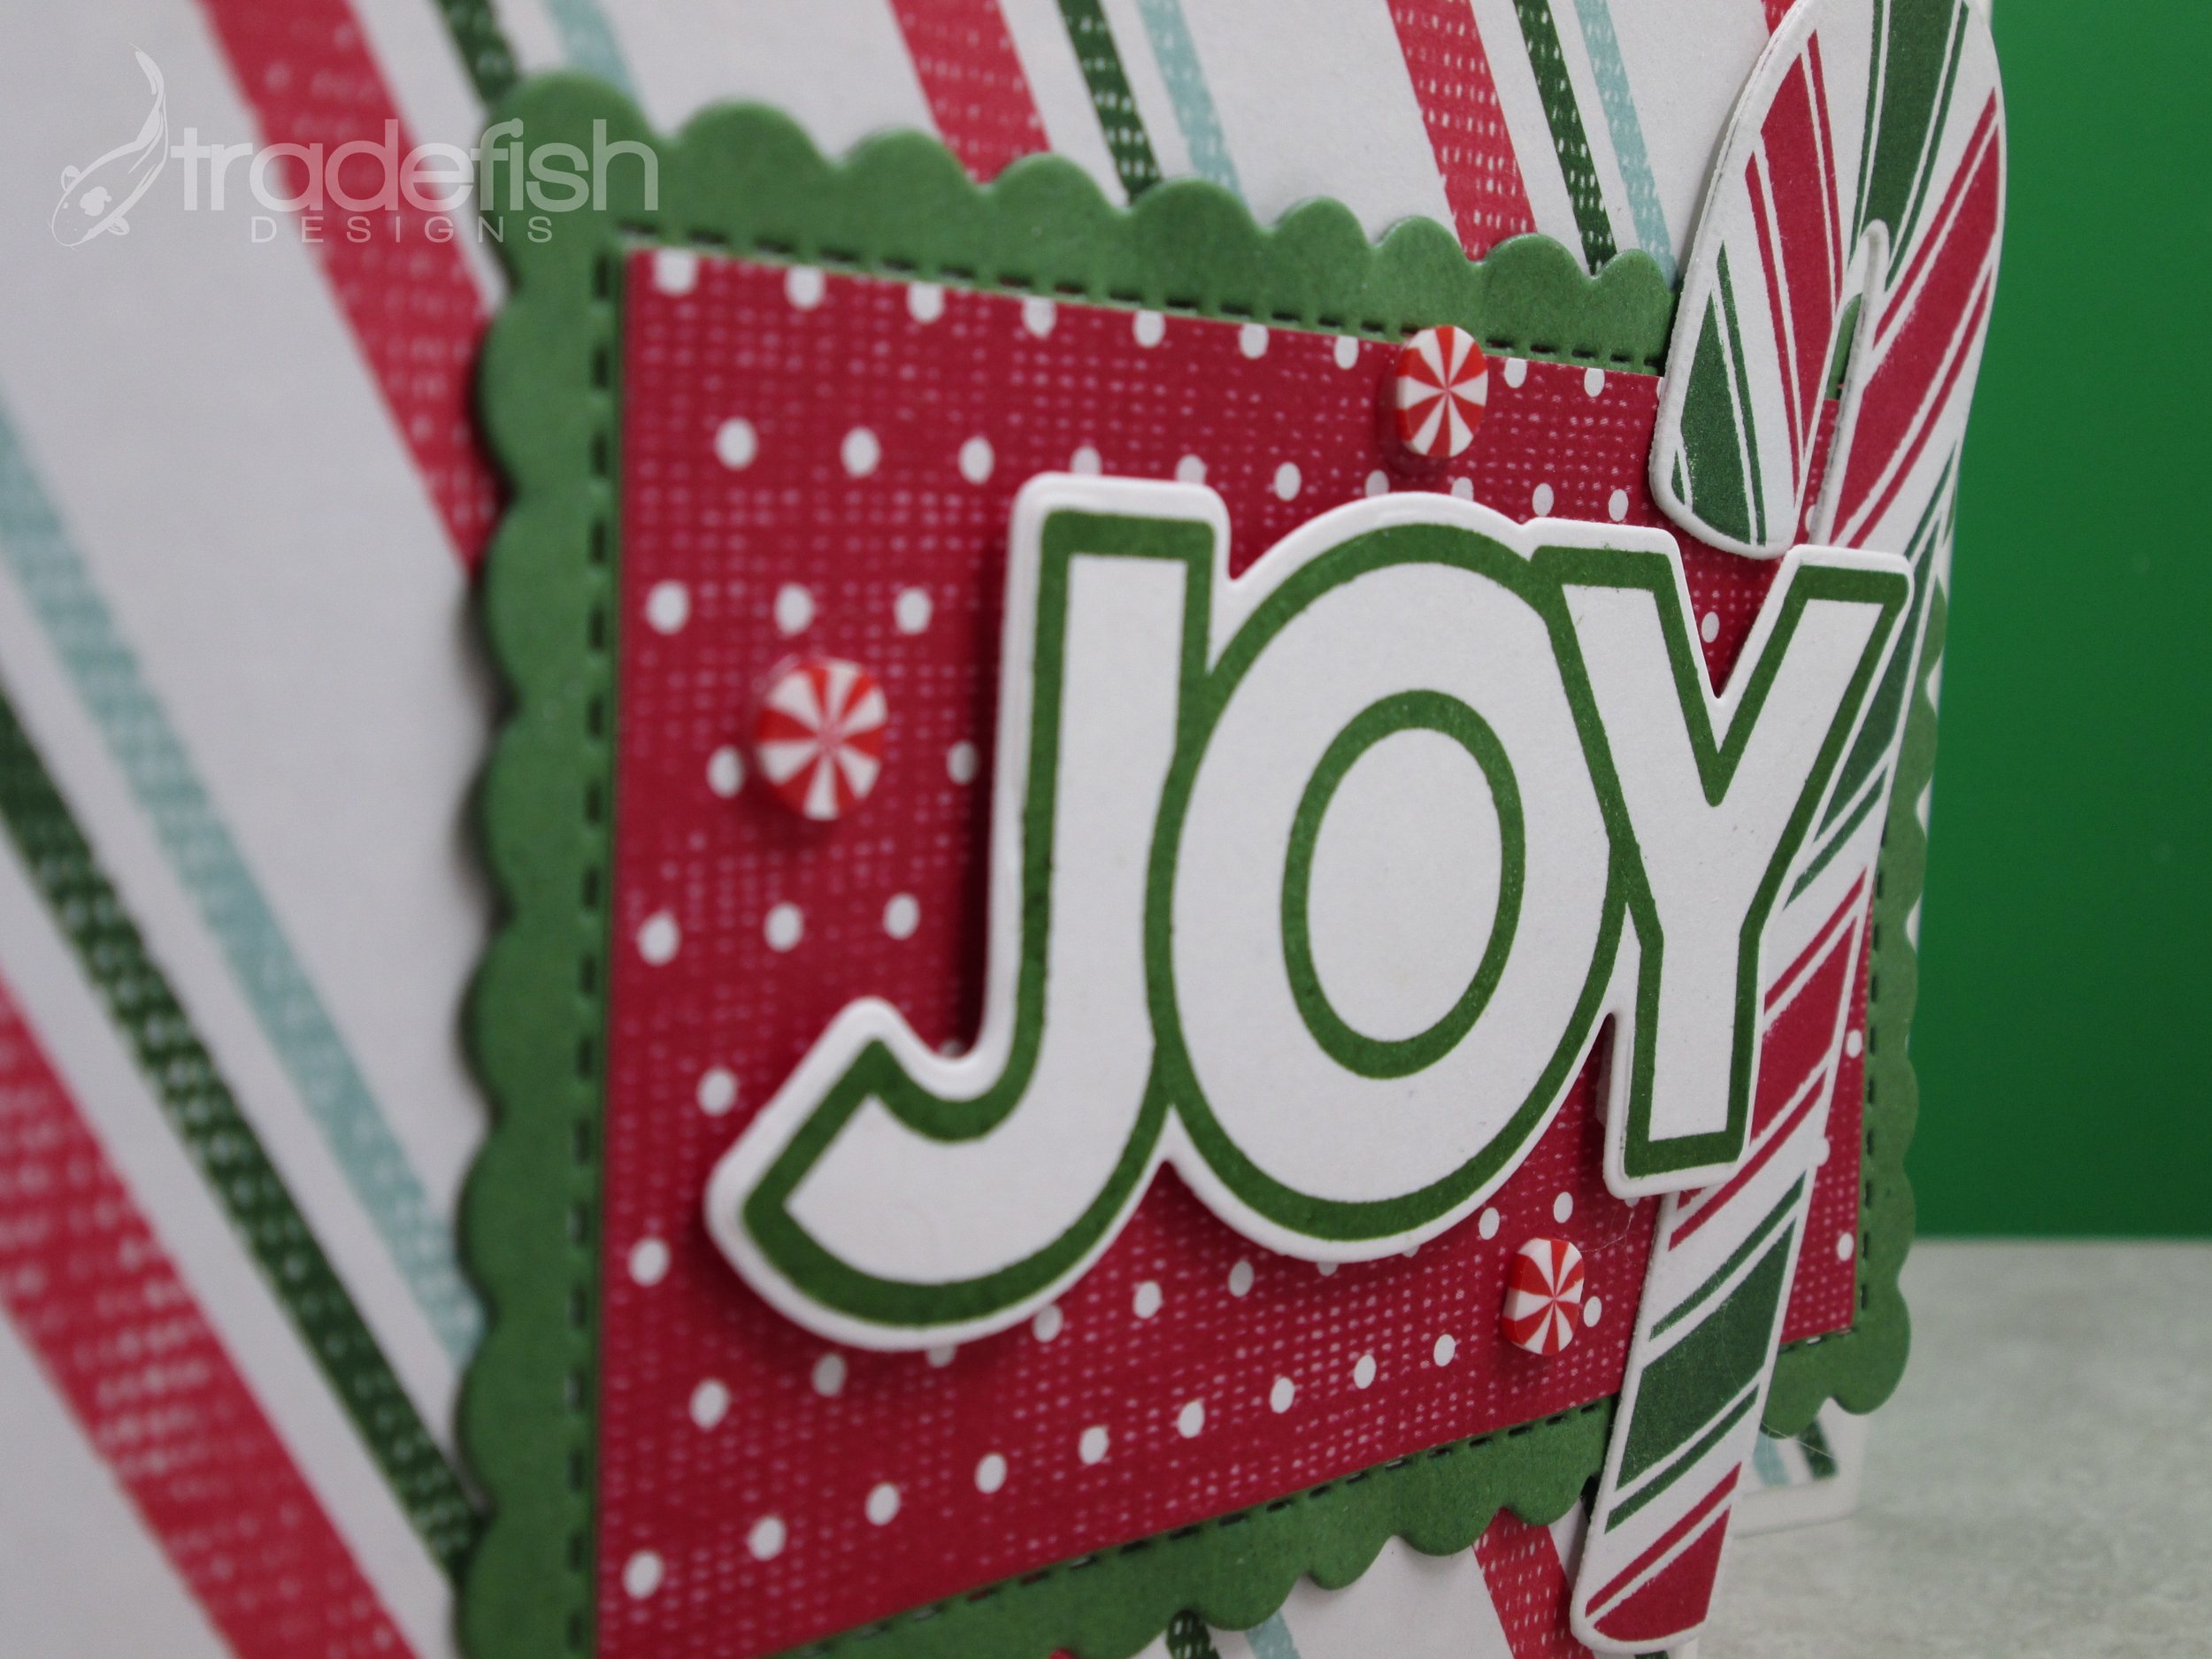
Welcome to Day 22 of the 25 Days of Christmas Cards. Today’s card is a fun candy cane fun fold card.


Supplies
Stamps: Chunky Christmas (CZ Designs)
Ink: Garden Green (Stampin’Up)
Paper: Basic White, Garden Green, Sweet Candy Cane Collection (Stampin’Up) RETIRED
Dies:Sweet Candy Cane Collection (Stampin’Up) RETIRED
Embellishments: Peppermint Bits & Pieces (Taylored Expressions)

Keep it crafty my friends!
25 Days of Christmas Cards - Day 21
Day 21 of the 25 Days of Christmas!
Welcome Day 21 of the 25 Days of Christmas Cards. Today’s card features a fun and graphic background stamp set from Tailored Expressions that I have just discovered is retired (apologies). I’m using traditional colors of red and green with a hint of black and lots of layers. All in a fun holiday card.

Supplies
Stamps: Jolly Holly (Taylored Expressions)
Ink: Garden Green (Stampin’Up)
Paper: Basic White, Garden Green and Real Red (Stampin’Up)

Keep it crafty my friends!
25 Days of Christmas Cards - Day 20
Day 20 of the 25 Days of Christmas Cards.
Welcome to Day 20 of the 25 Days of Christmas Cards. Today's card is bright and cheery. I combine more paper from the Peppermint pad from Scrapbook.com, Stampin’ Up cardstock and a fun, blocky stamp from Tim Holtz (Mini Bold Tidings). I can’t forget to add some of my pearlized enamel effects in Real Red from Stampin’ Up.

Supplies
Stamps: Mini Bold Tiding (Tim Holtz)
Ink: Real Red (Stampin’ Up)
Paper: Real Red & Basic White (Stampin’ Up), Misc Pink (Bazzil), Peppermint (Scrapbook.com)
Dies: 2” Circle Punch (Stampin’ Up)
Embellishments: Pearlized Enamel Effects Real Red (Stampin’ Up)

Keep it crafty friends!

25 Days of Christmas Cards - Day 19
Day 19 of the 25 Days of Christmas Cards.
Welcome to Day 19 of the 25 Days of Christmas Cards. Today’s card uses some fun holiday paper from Scrapbook.com called Peppermint. I paired it with some Stampin’ Up Pretty Peacock cardstock and coordinating ink color. I added a little pop of pink from my paper stash and added some Metallic Enamel Effects in Silver.
Supplies
Stamps: Misc
Ink: Pretty Peacock (Stampin’ Up)
Paper: Peppermint (Scrapbook.com), Pretty Peacock and Basic White (Stampin’ Up), Misc Pink (Bazzil)
Dies: 2” Circle (Stampin’ Up Punch), 2” Starburst shape (Stampin’ Up Punch)
Embellishments: Metallic Enamel Effects Silver (Stampin’ Up)

Keep it crafty friends!
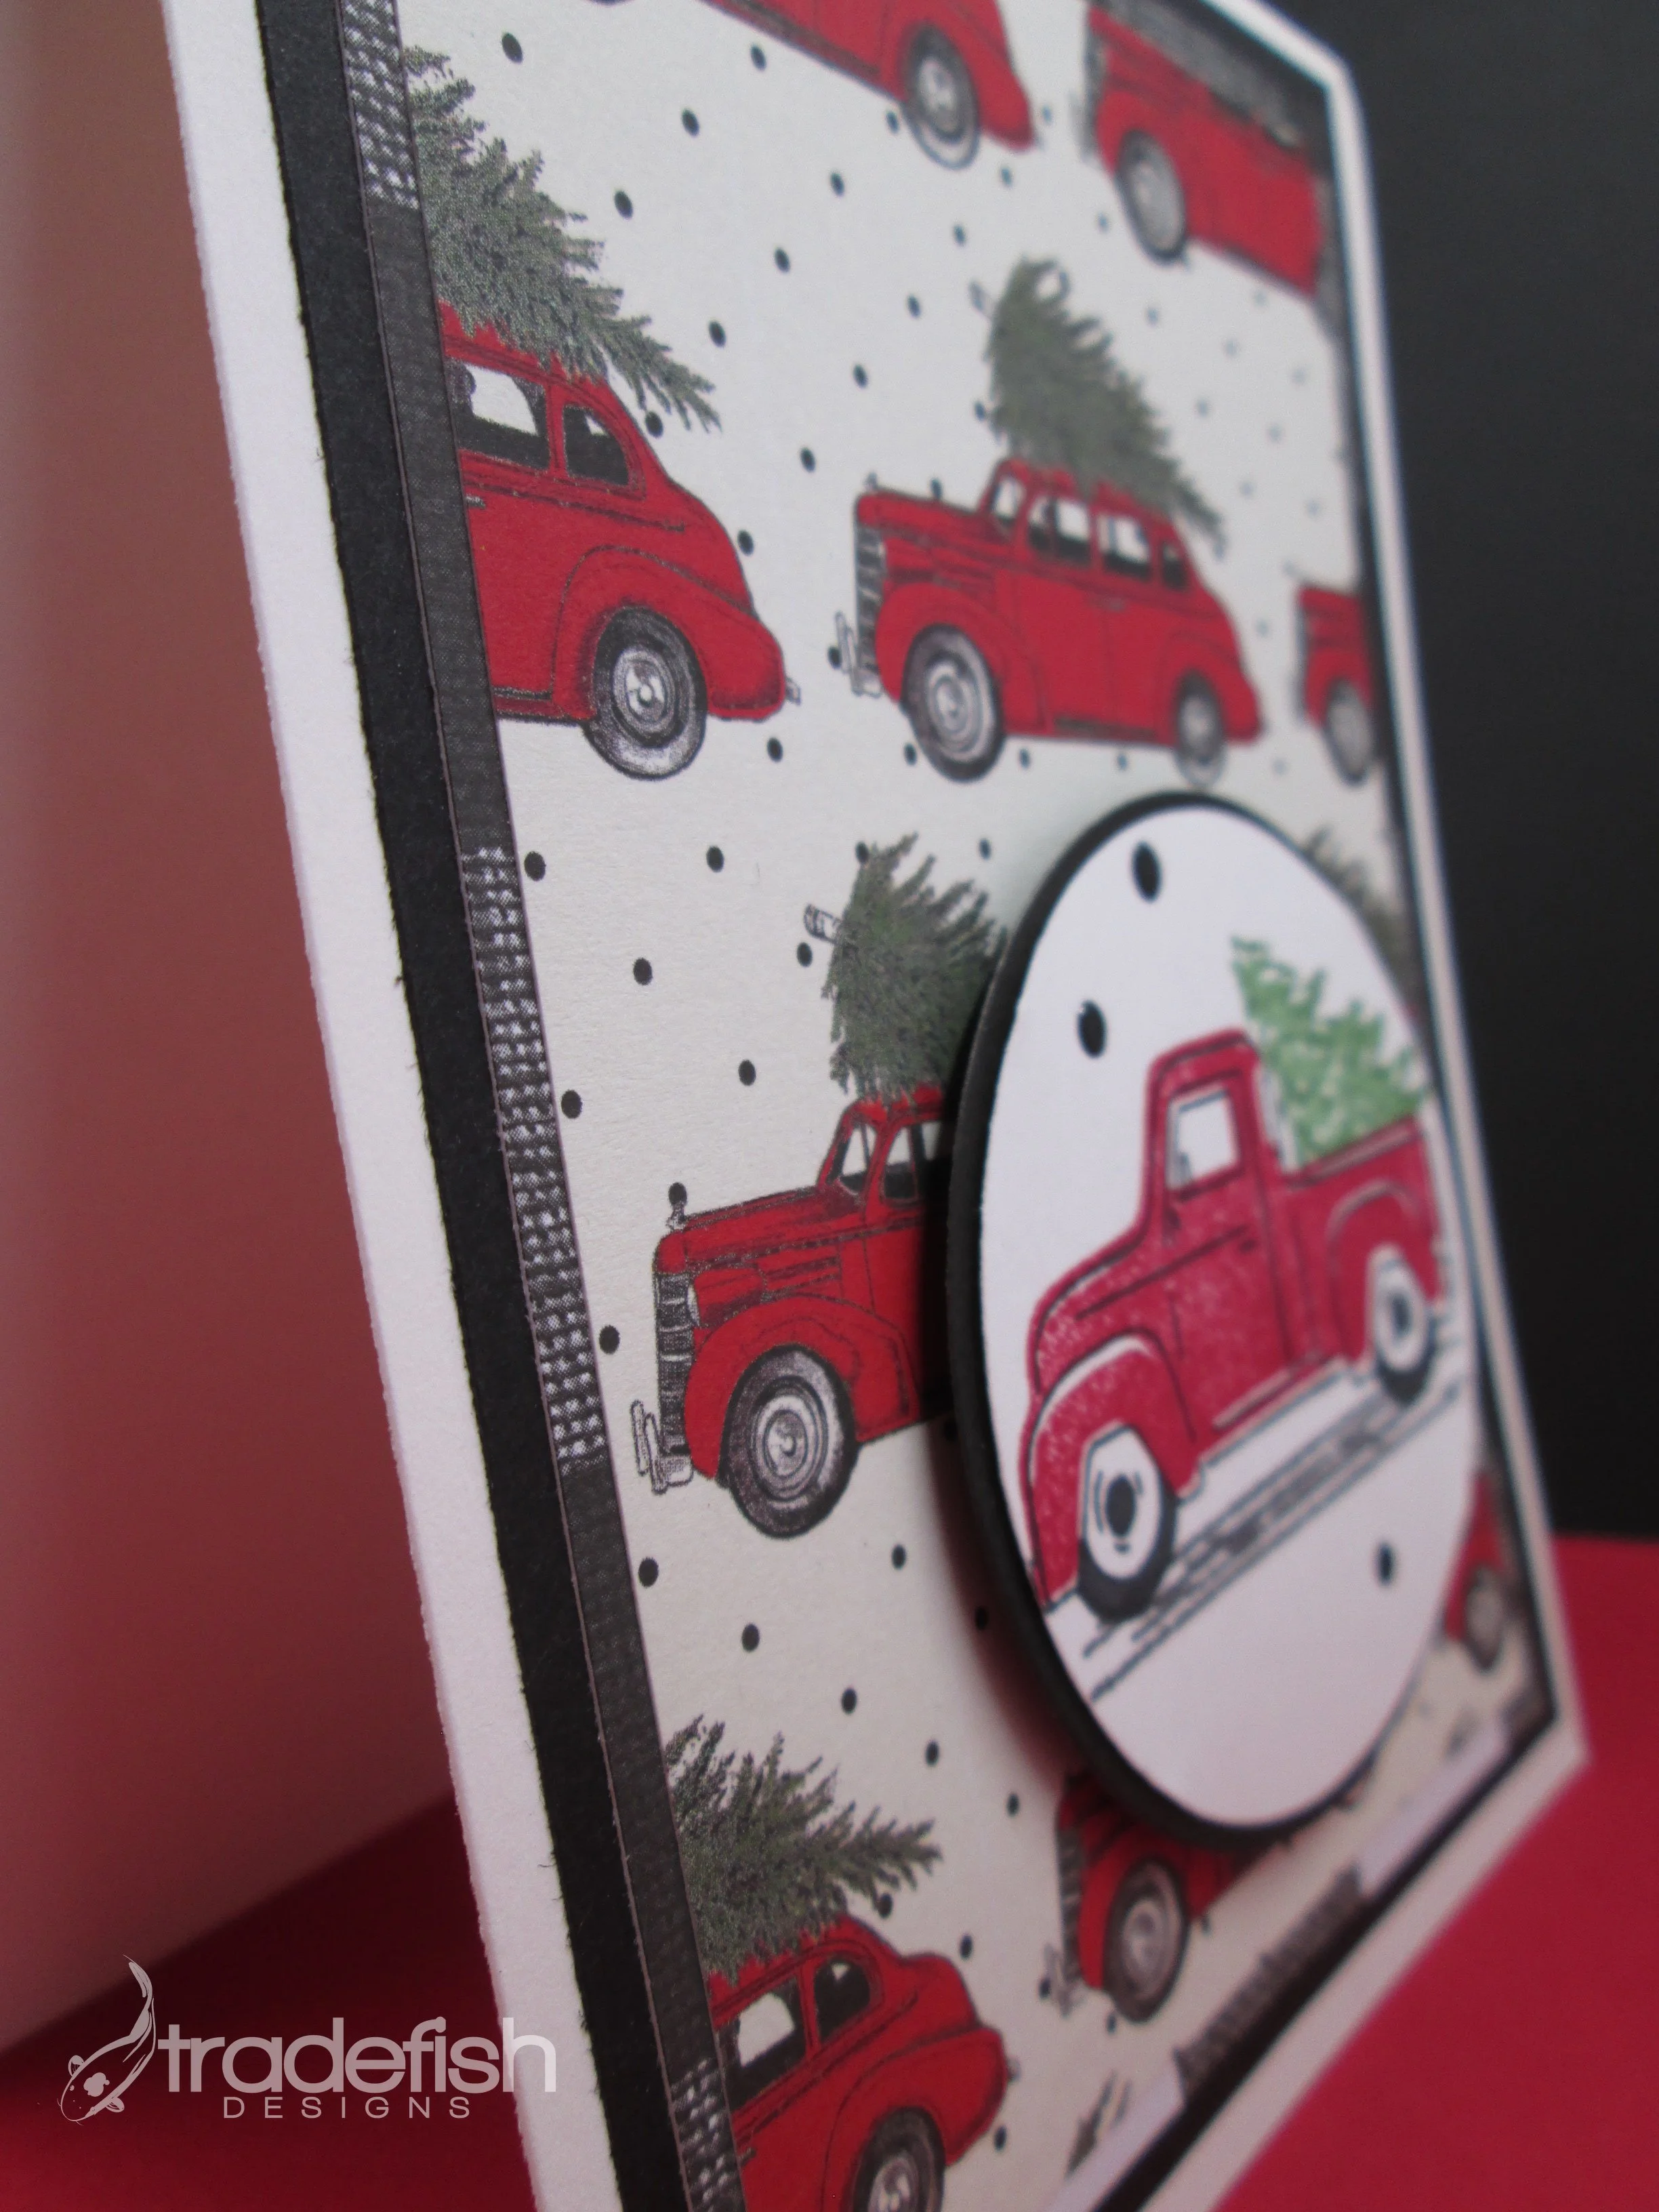
25 Days of Christmas Cards - Day 15
Day 15 of the 25 Days of Christmas Cards with the red pickup truck and christmas tree.
Welcome to Day 15 of the 25 Days of Christmas Cards. Today’s card uses the old red pick up truck image with the pine tree in the in the back for the center image. The background paper is from my stash. I think it is from a pack from Hobby Lobby (I think its The Paper Studio brand). It’s a red car but was close enough to let me use my Trucking Along stamp set from Stampin’ Up. And I couldn’t let an opportunity to use my Black Gloss Pops of Color go by with the black polka dots in the background paper.

Red, black, white and green make for a great color combination.

Supplies
Stamps: Trucking Along (Stampin’ Up)
Ink: Real Red, Garden Green (Stampin’ Up) Memento Tuxedo Black
Paper: Misc - The Paper Studio (Hobby Lobby), Basic White & Black (Stampin’Up)
Dies: Nested Circles (Waffle Flower)
Embellishments: Black Gloss Pops of Color (Scrapbook.com)

Keep it crafty friends!

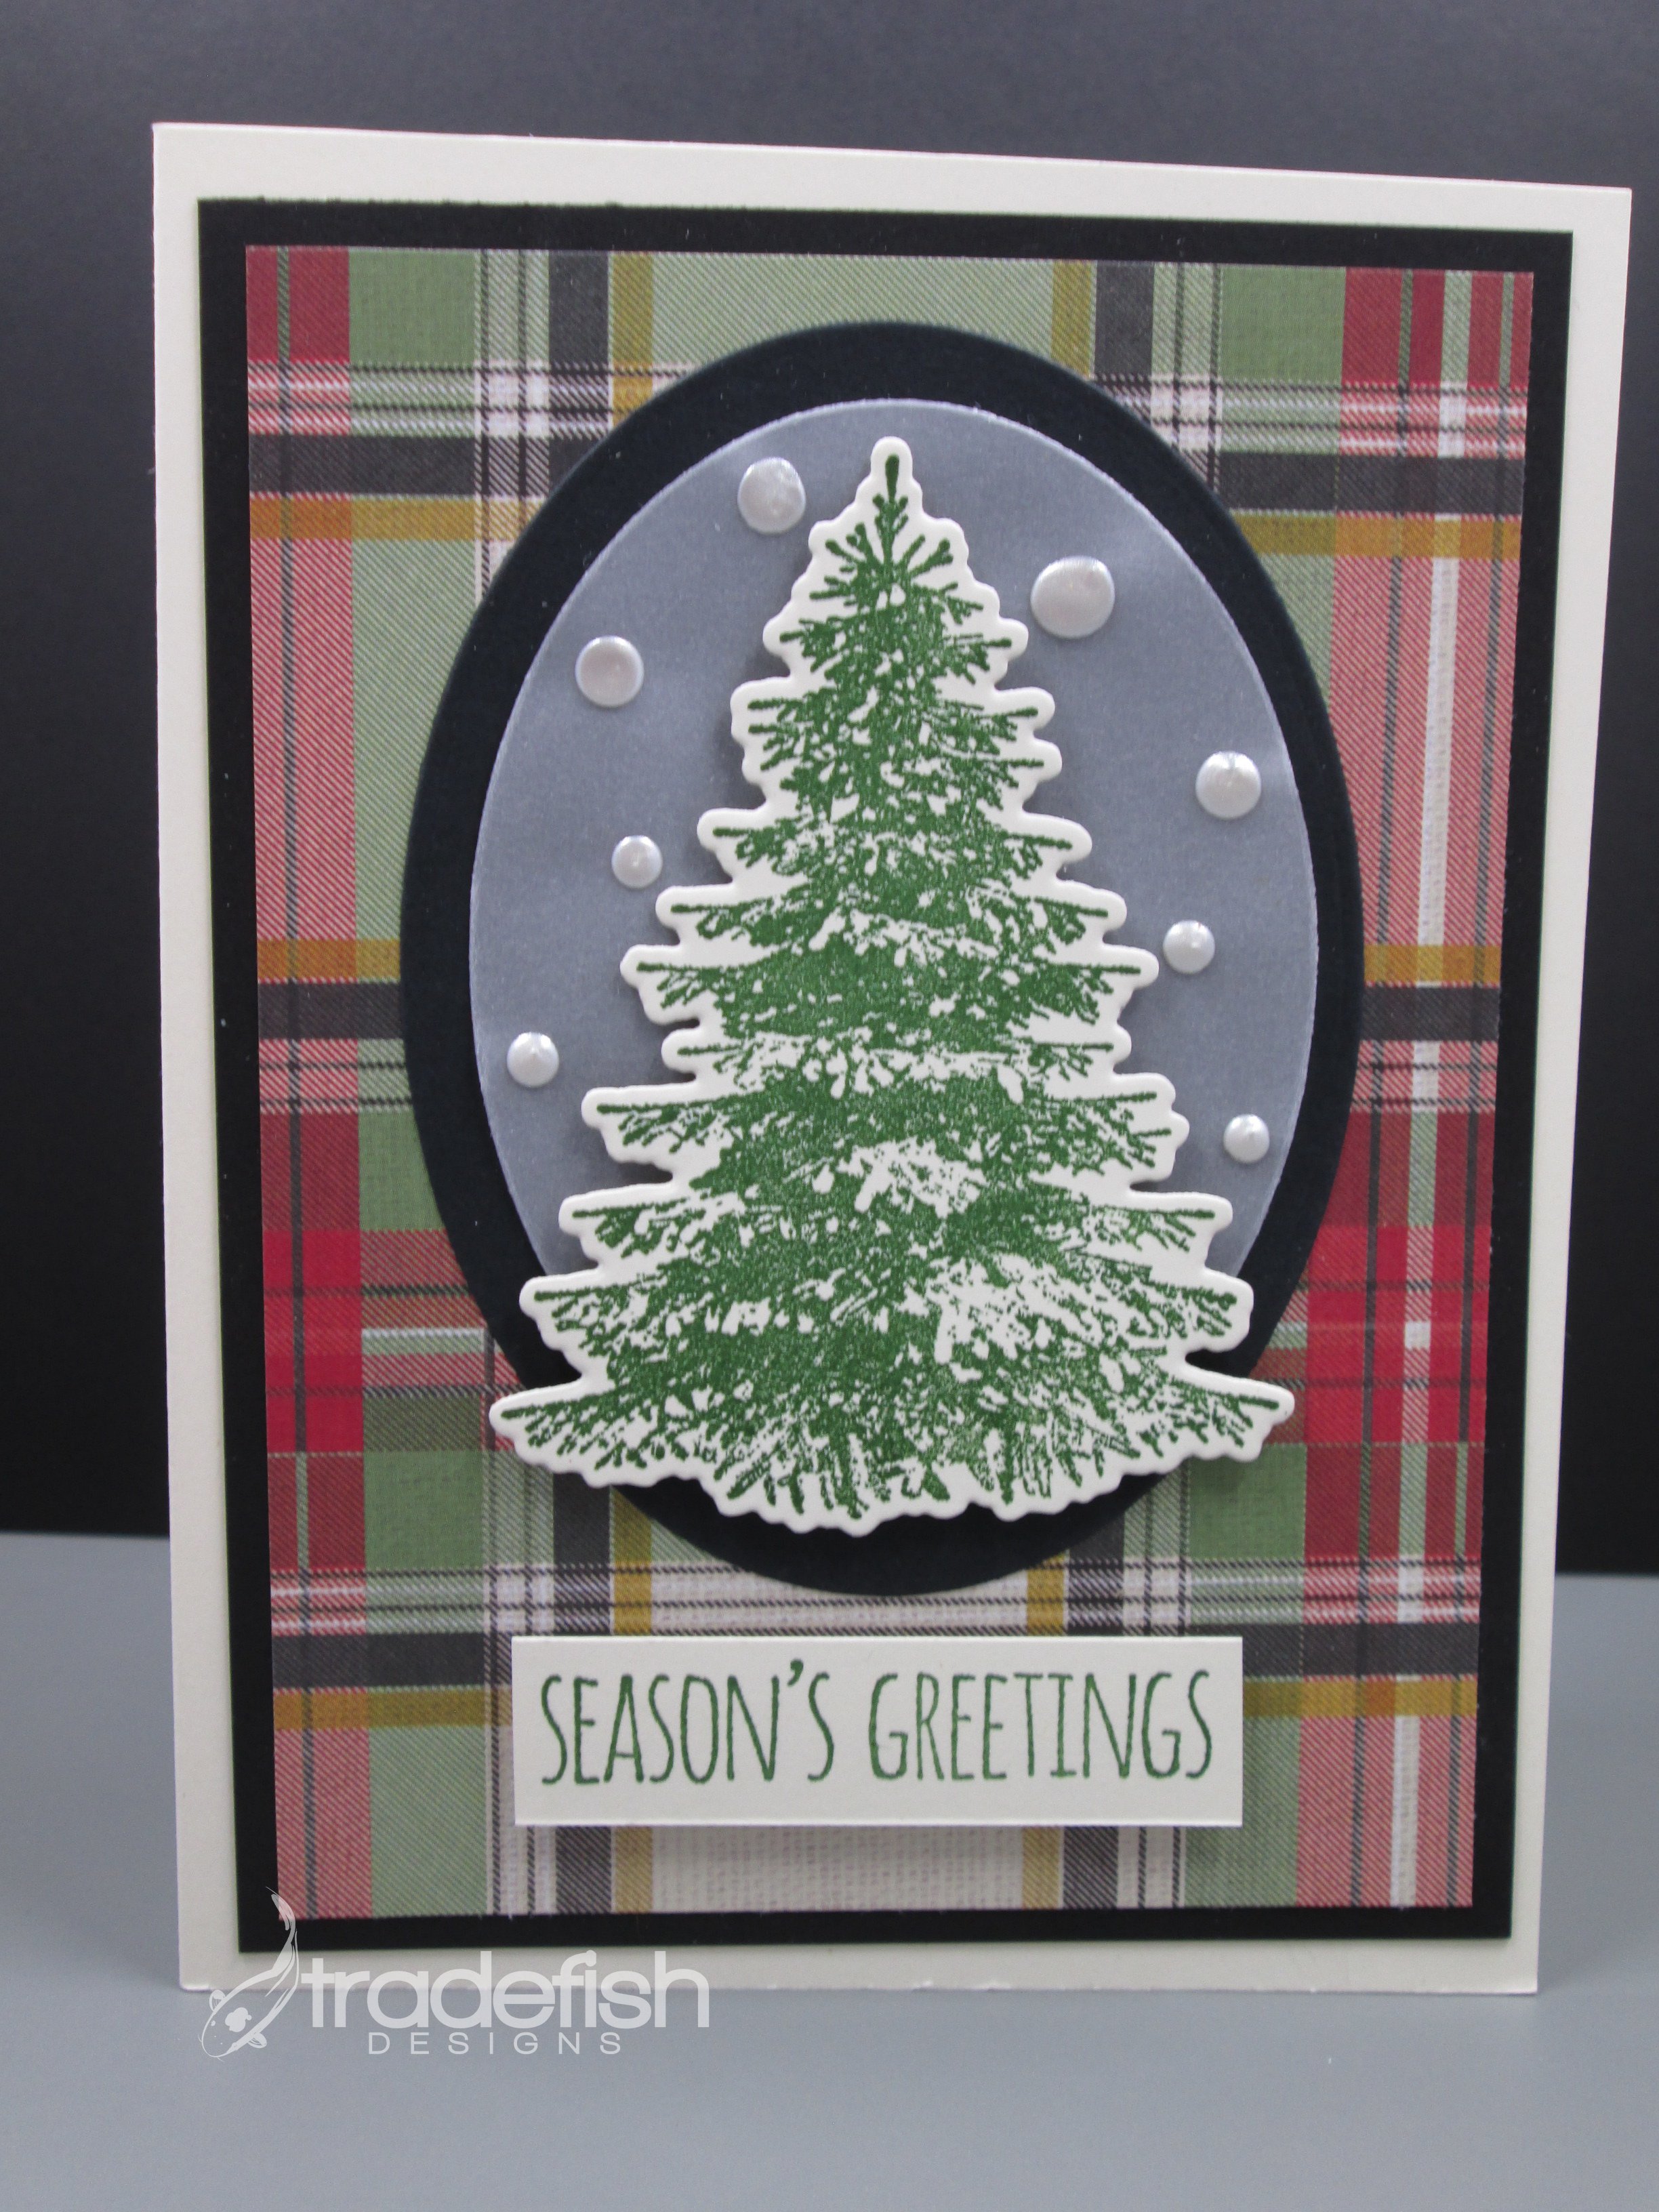
25 Days of Christmas Cards - Day 12
Day 12 of the 15 Days of Christmas Cards
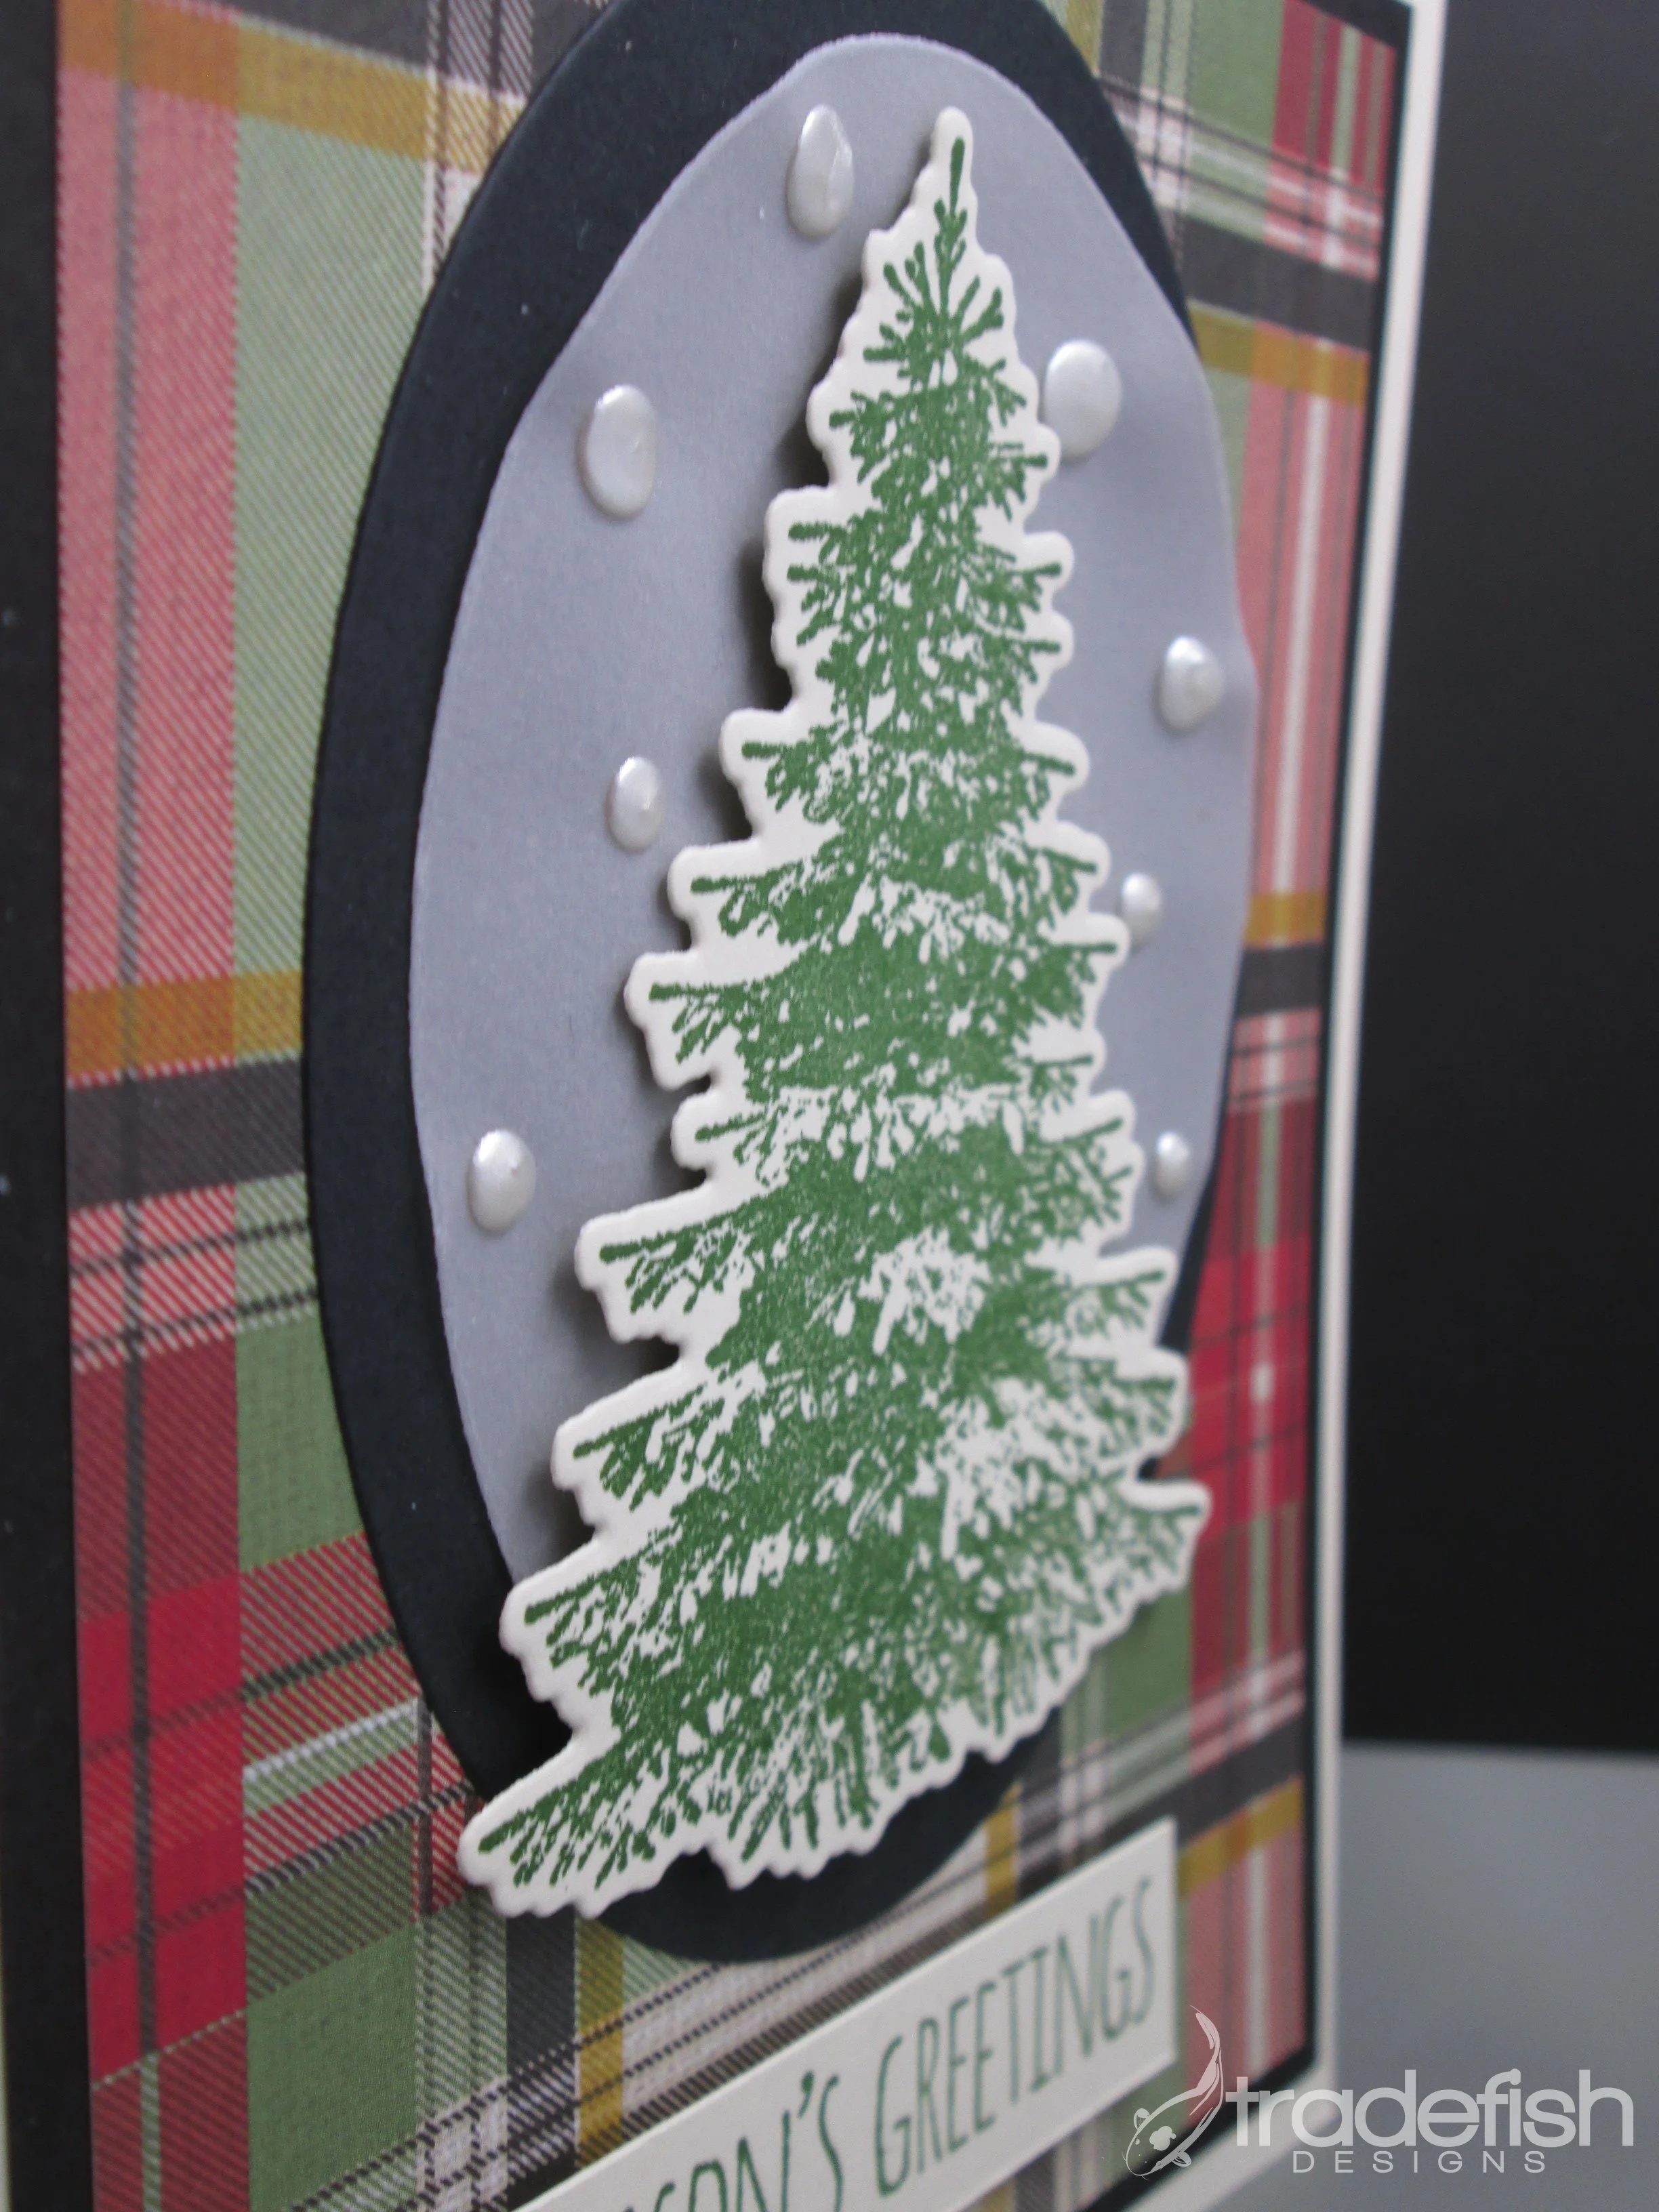
Welcome to the Day 12 of the 25 Days of Christmas. Today’s card uses some miscellaneous plaid paper. I find a good plaid is always a good base paper for a holiday or seasonal card and when it comes from a 12x12 paper pad each sheet gives me a foundation for 6 cards! I created the pine tree using a Stampin’ Up stamp set with my Garden Green ink pad. I popped it onto a vellum background so it wouldn’t be as stark as if I would have placed it directly onto the black oval. I used my Waffle Flower Nesting Oval Dies for the foundation of the tree and the Satin Pearl Pops of Color to mimic snow. I added a fun Tim Holtz sentiment from the Scribbly Christmas set below the oval in a coordinating Garden Green ink. Simple but a little whimsical at the same time.
Supplies
Stamps: Scribbly Christmas (Tim Holtz), Winter Woods (Stampin’ Up)
Ink: Garden Green (Stampin’ Up)
Paper: Vanilla, Black, Vellum (Stampin’ Up), Plaid (Misc)
Dies: Ovals (Waffle Flower)
Embellishments: Pops of Color - Satin Pearl (Scrapbook.com)

Keep it crafty my friends!
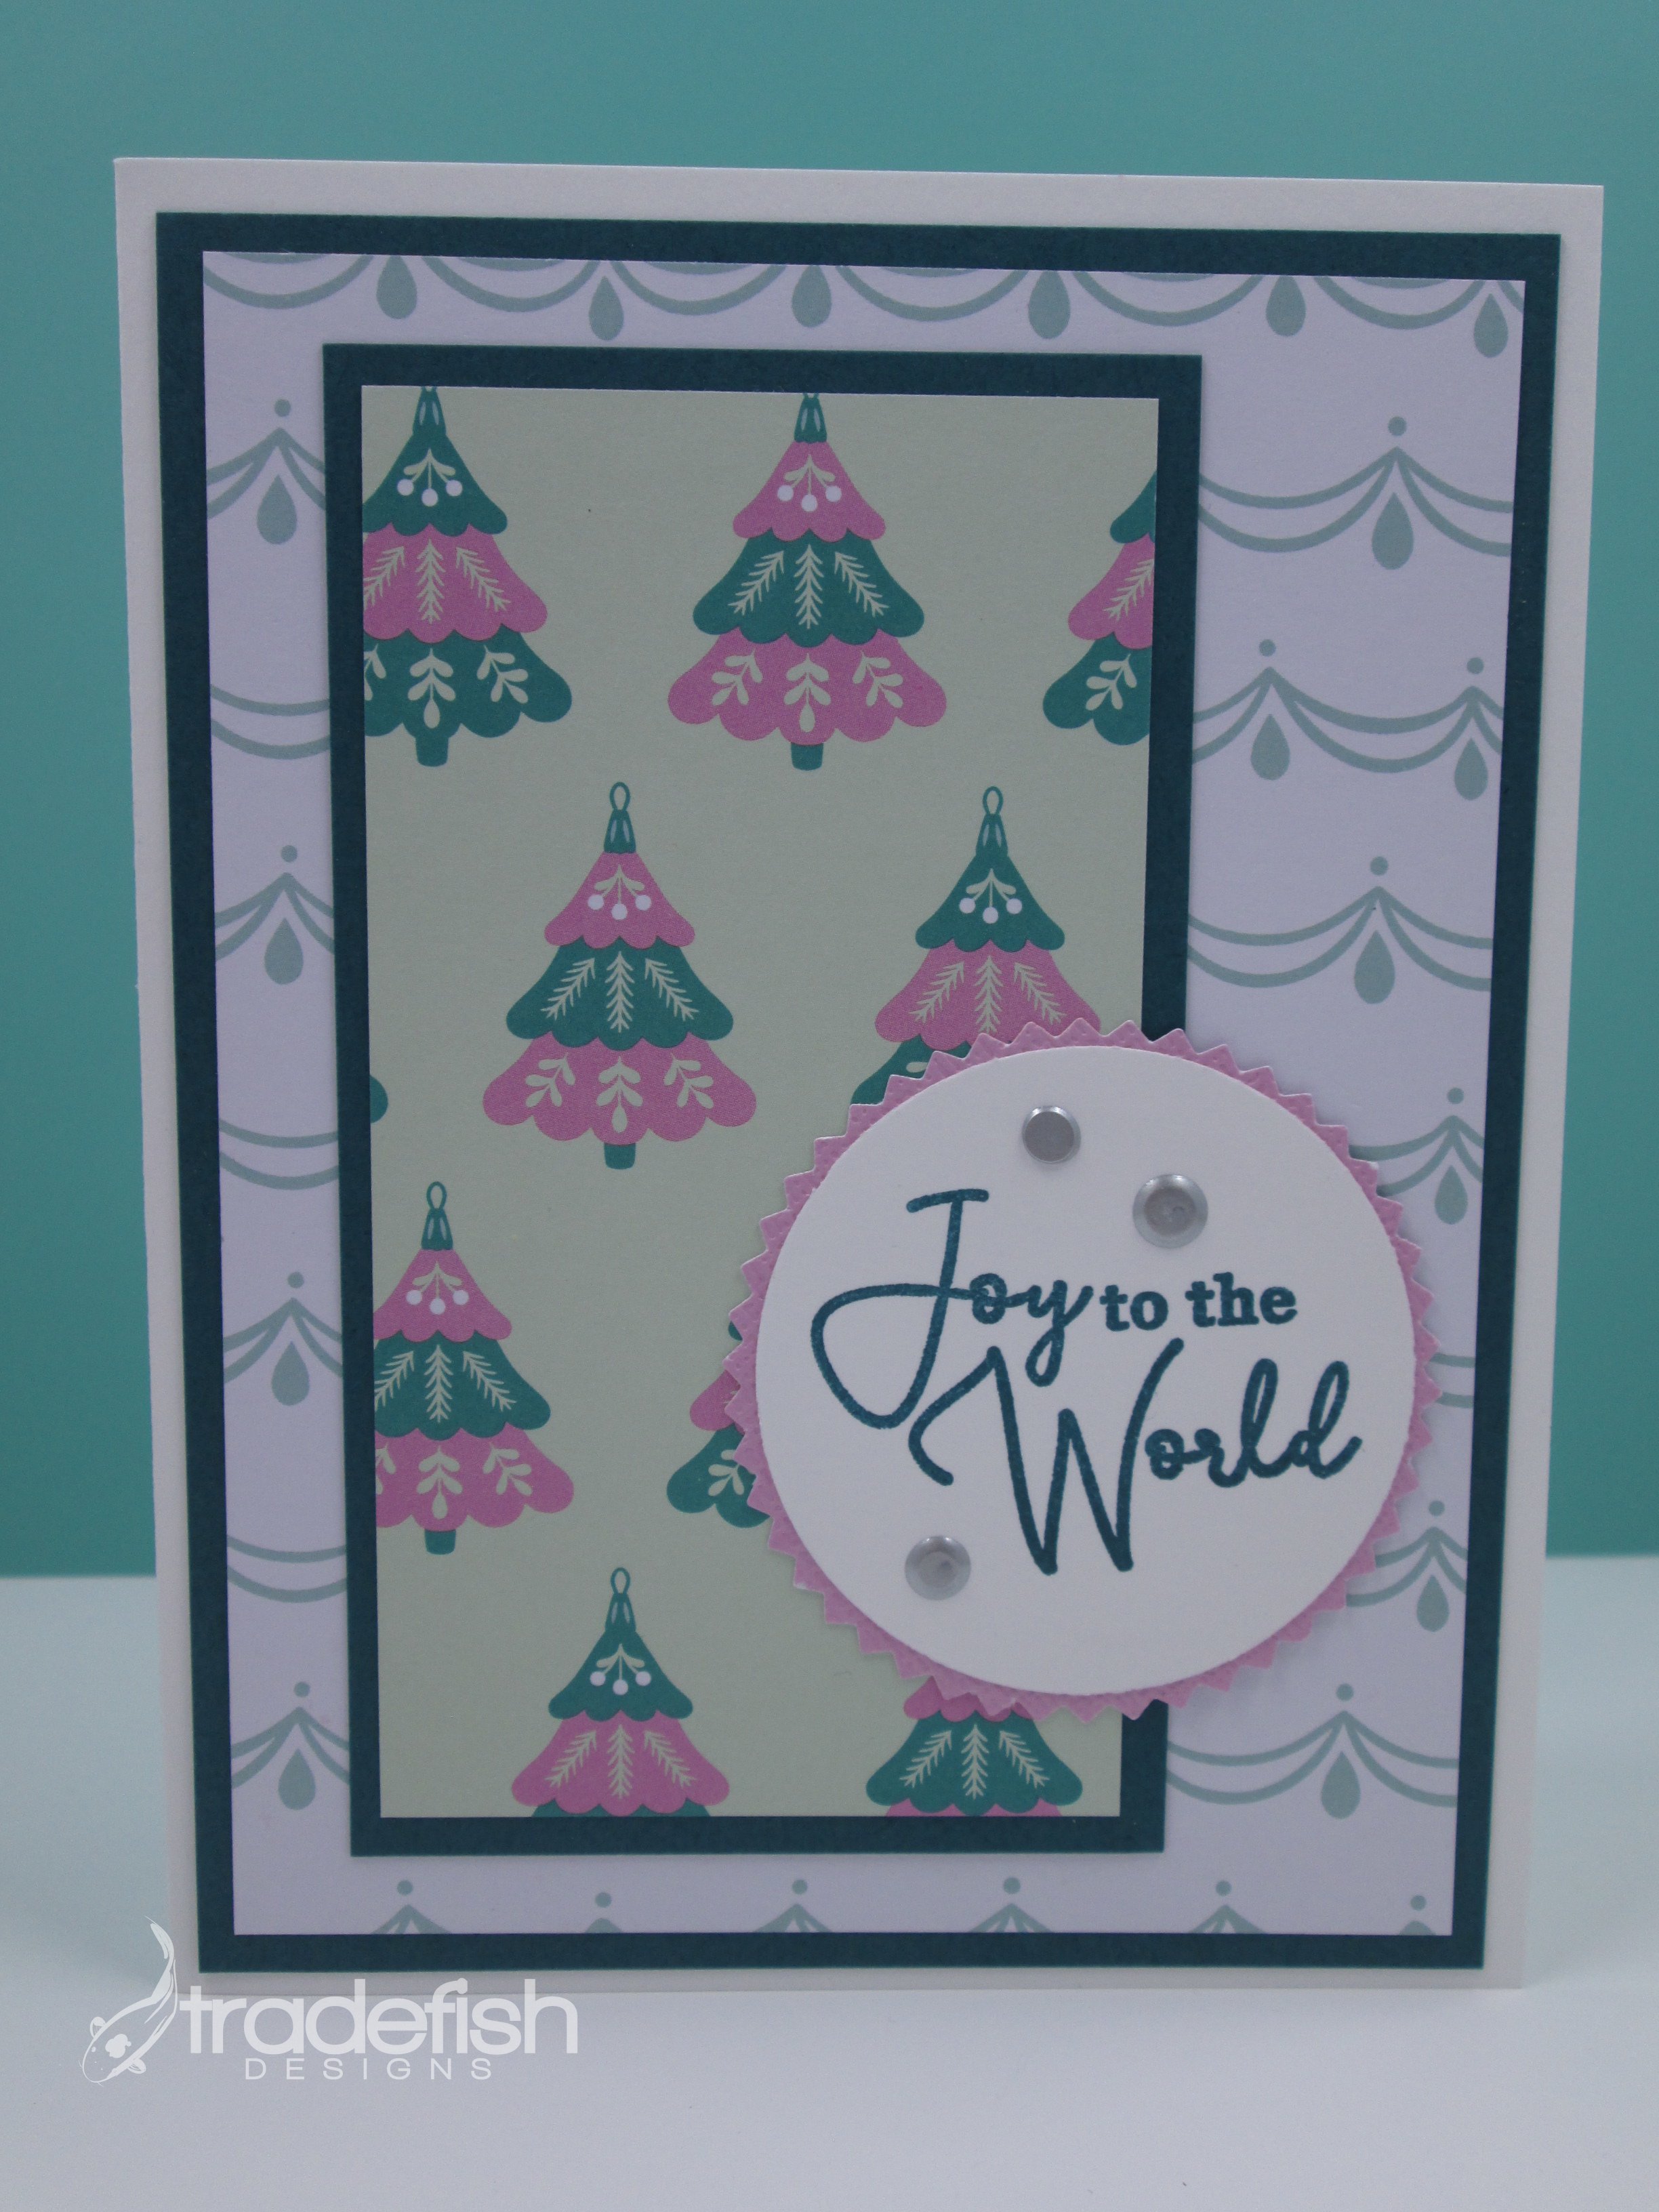
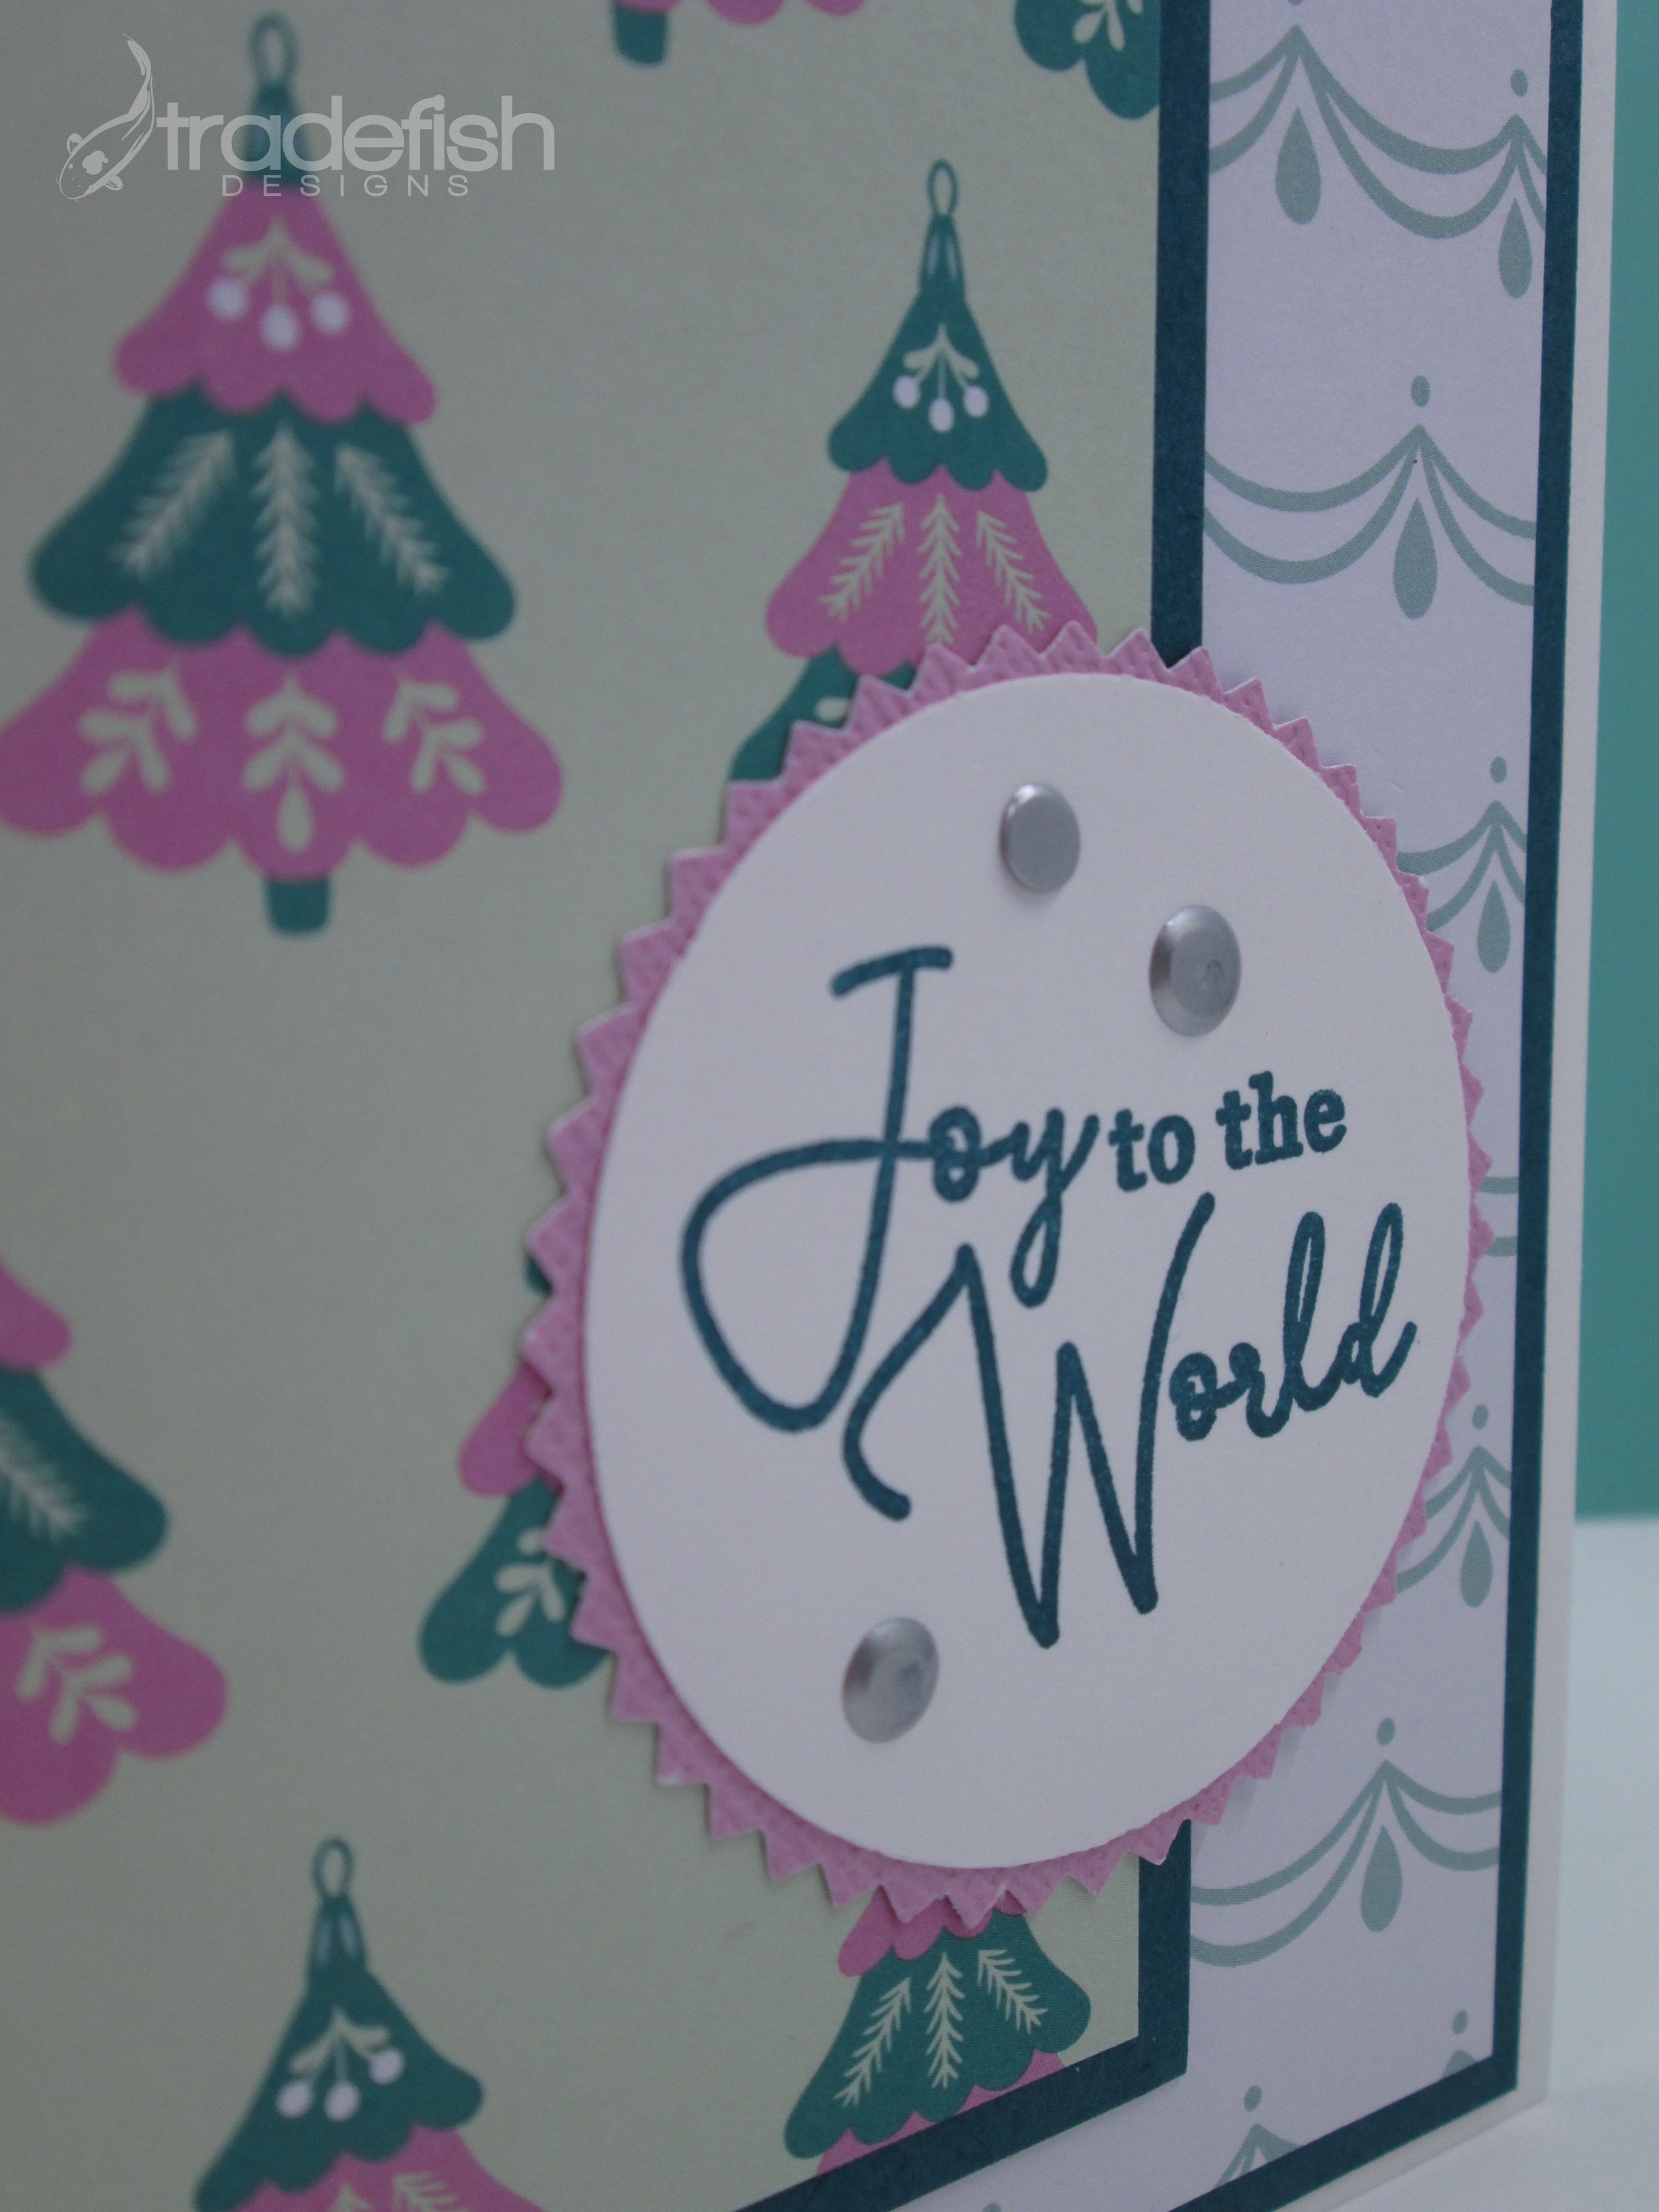
25 Days of Christmas Cards - Day 9
Day 9 of the 25 Days of Christmas Cards
Welcome to Day 9 of the 25 Days of Christmas Cards! Today’s card uses some paper from the Peppermint Paper Pad from Scrapbook.com and some basic paper that coordinates from Stampin’ Up. I added some fun silver drops from Stampin’ Up and this cards was done. A very simple use of some layered rectangles with a sentiment and some drops of silver make this an easy card with dimension but will not add extra postage when it is mailed.


Supplies
Stamps: Misc (Crafter’s Companion)
Ink: Mint Macaron (Stampin’ Up)
Paper: Peppermint (Scrapbook.com), Basic White & Mint Macaron (Stampin’ Up)
Embellishments: Metallic Enamel Effects Basics Silver (Stampin’ Up)

Keep it crafty my friends!
A Merry Christmas Snowflake
A Merry Christmas Snowflake card using Snowman Season and Let It Snow DSP showcasing fussy cutting and using your scrap designer paper.
Here’s a snowflake Christmas card. I used an Operation Write Homes Sketches #09 and some basic rhinestones and I was done. A few paper laters and voila, a fun Christmas card with a non-traditional color scheme.


I hope you enjoyed my card today. If you are interested in any of the items I used in this project please check out the Product List below. Pleases note that some items may be no longer available depending upon when you see this post – if that’s the case, feel free to substitute items you may already have in your craft stash. Keep it crafty friends!

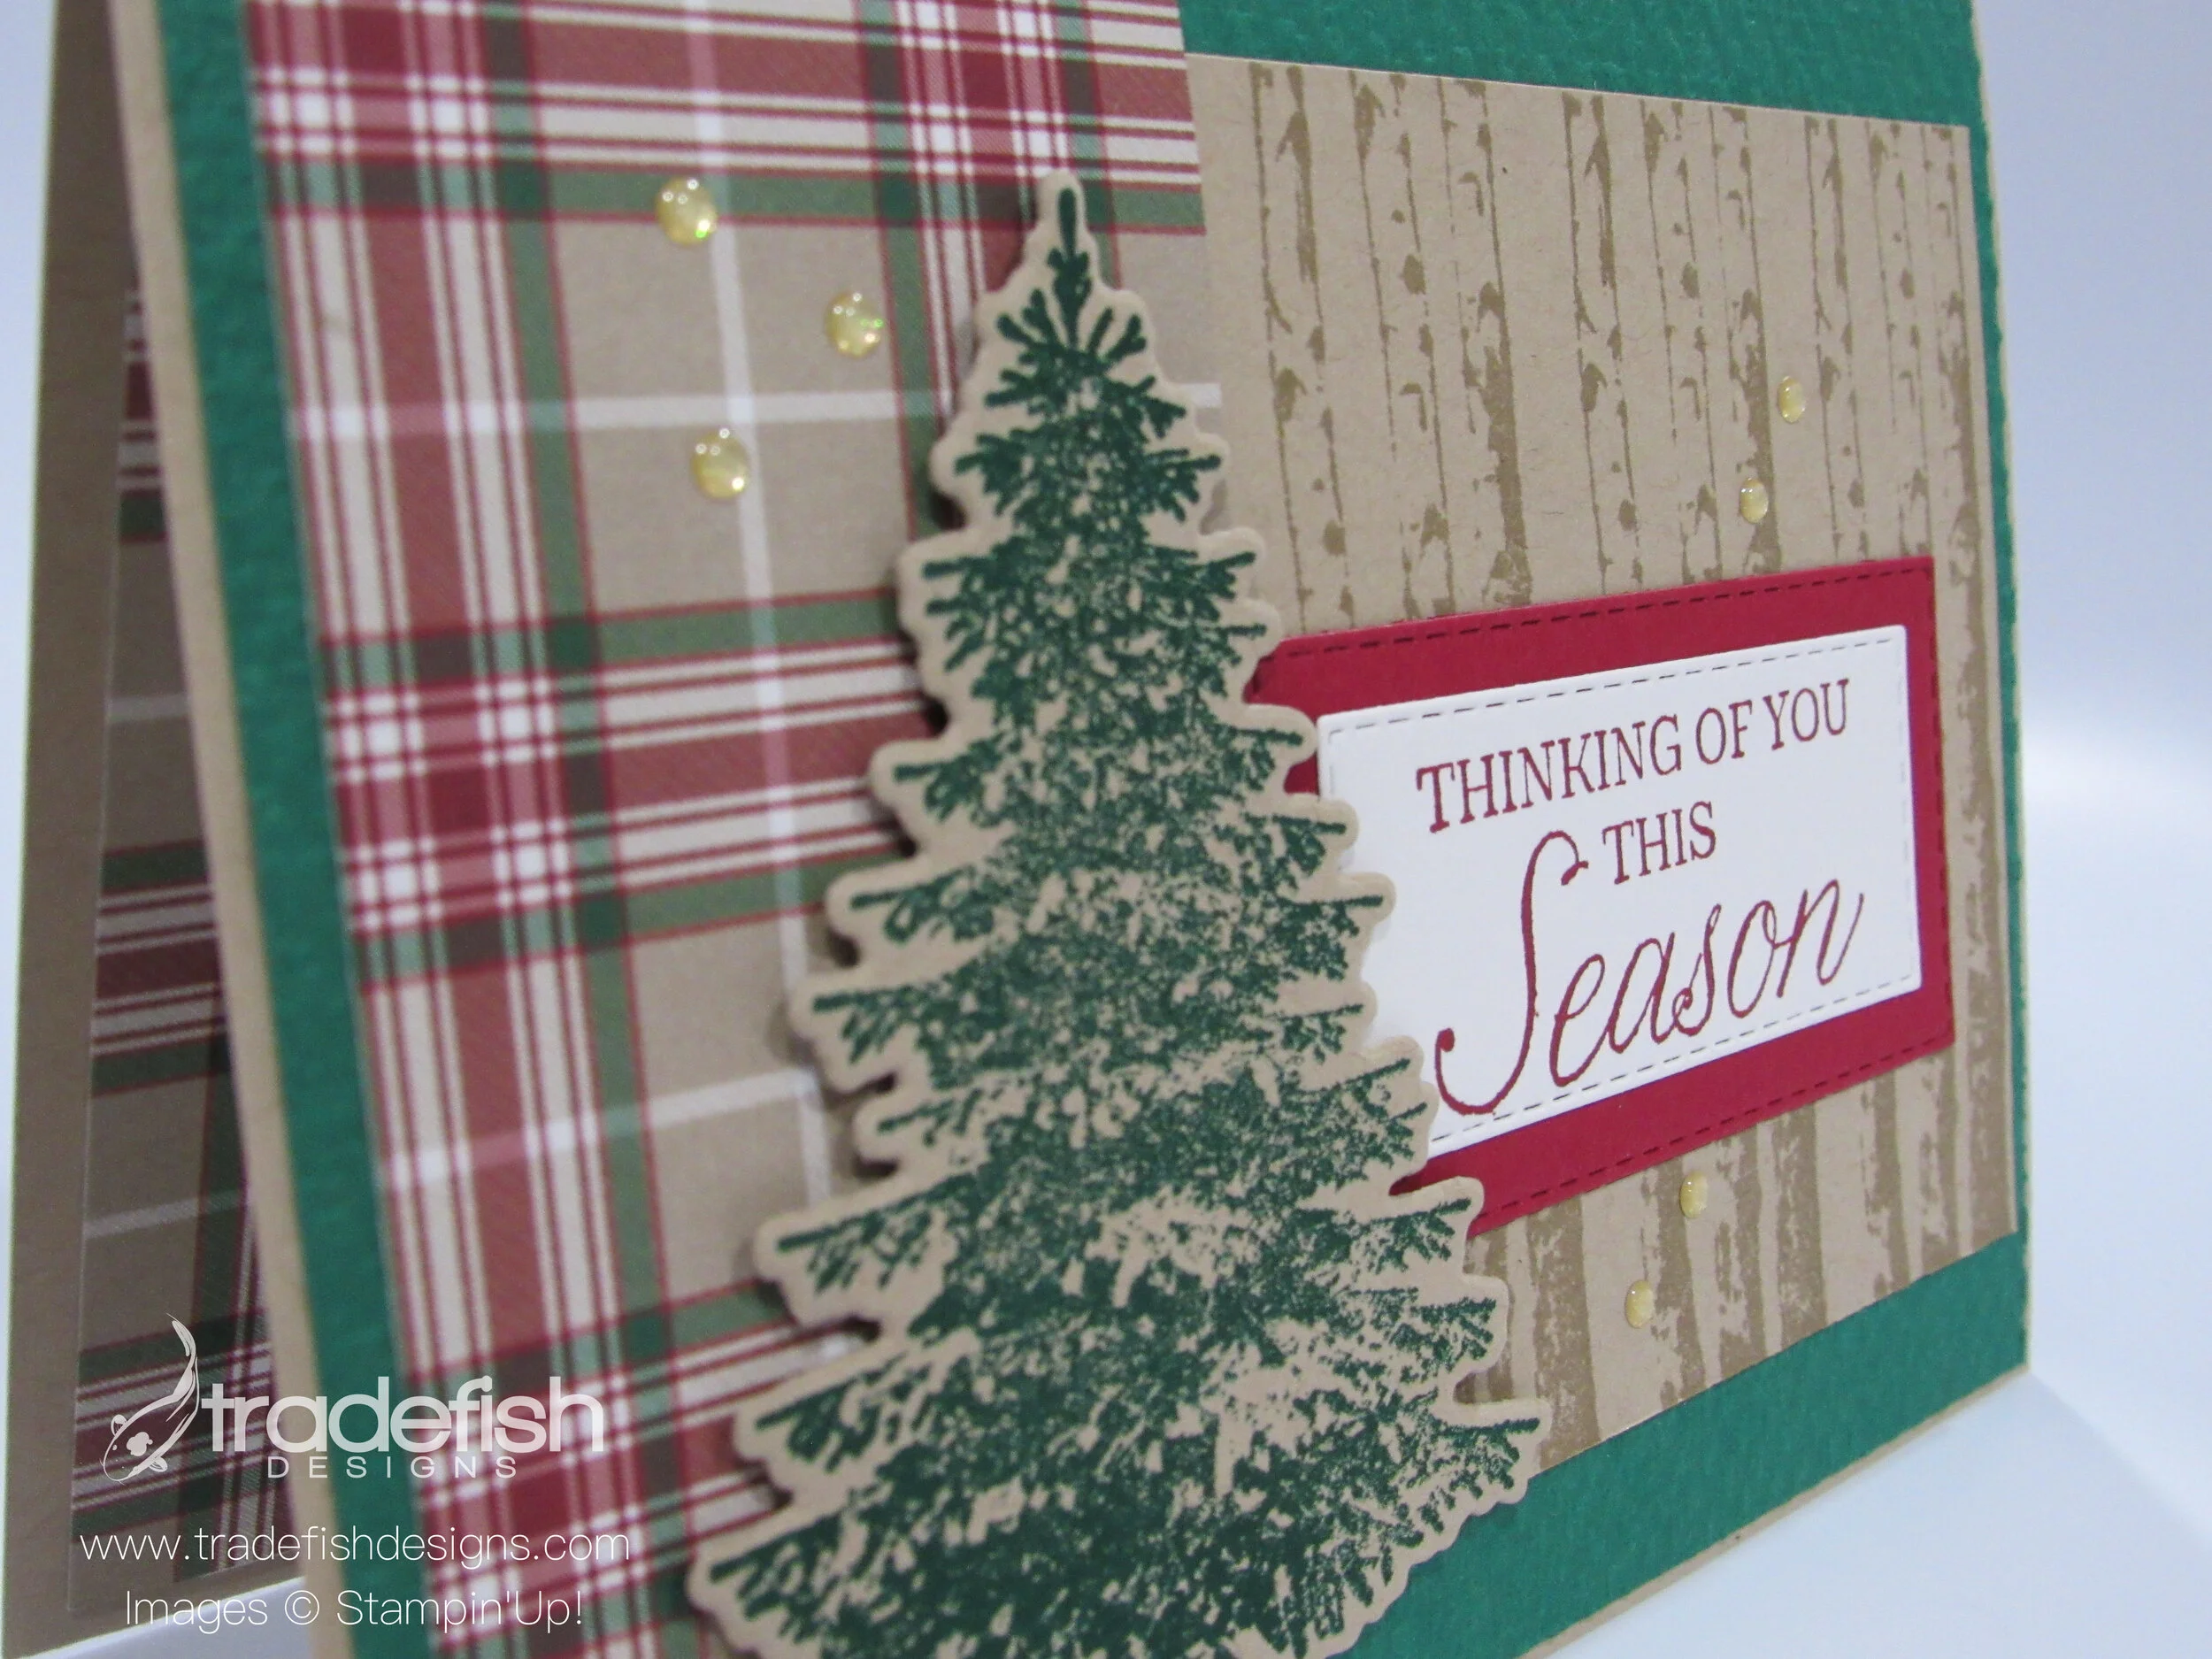
Thinking of You This Season
Thinking of You This Season with Stampin’ Up’s Plaid Tidings Designer Series Paper and Winter Woods stamp set.
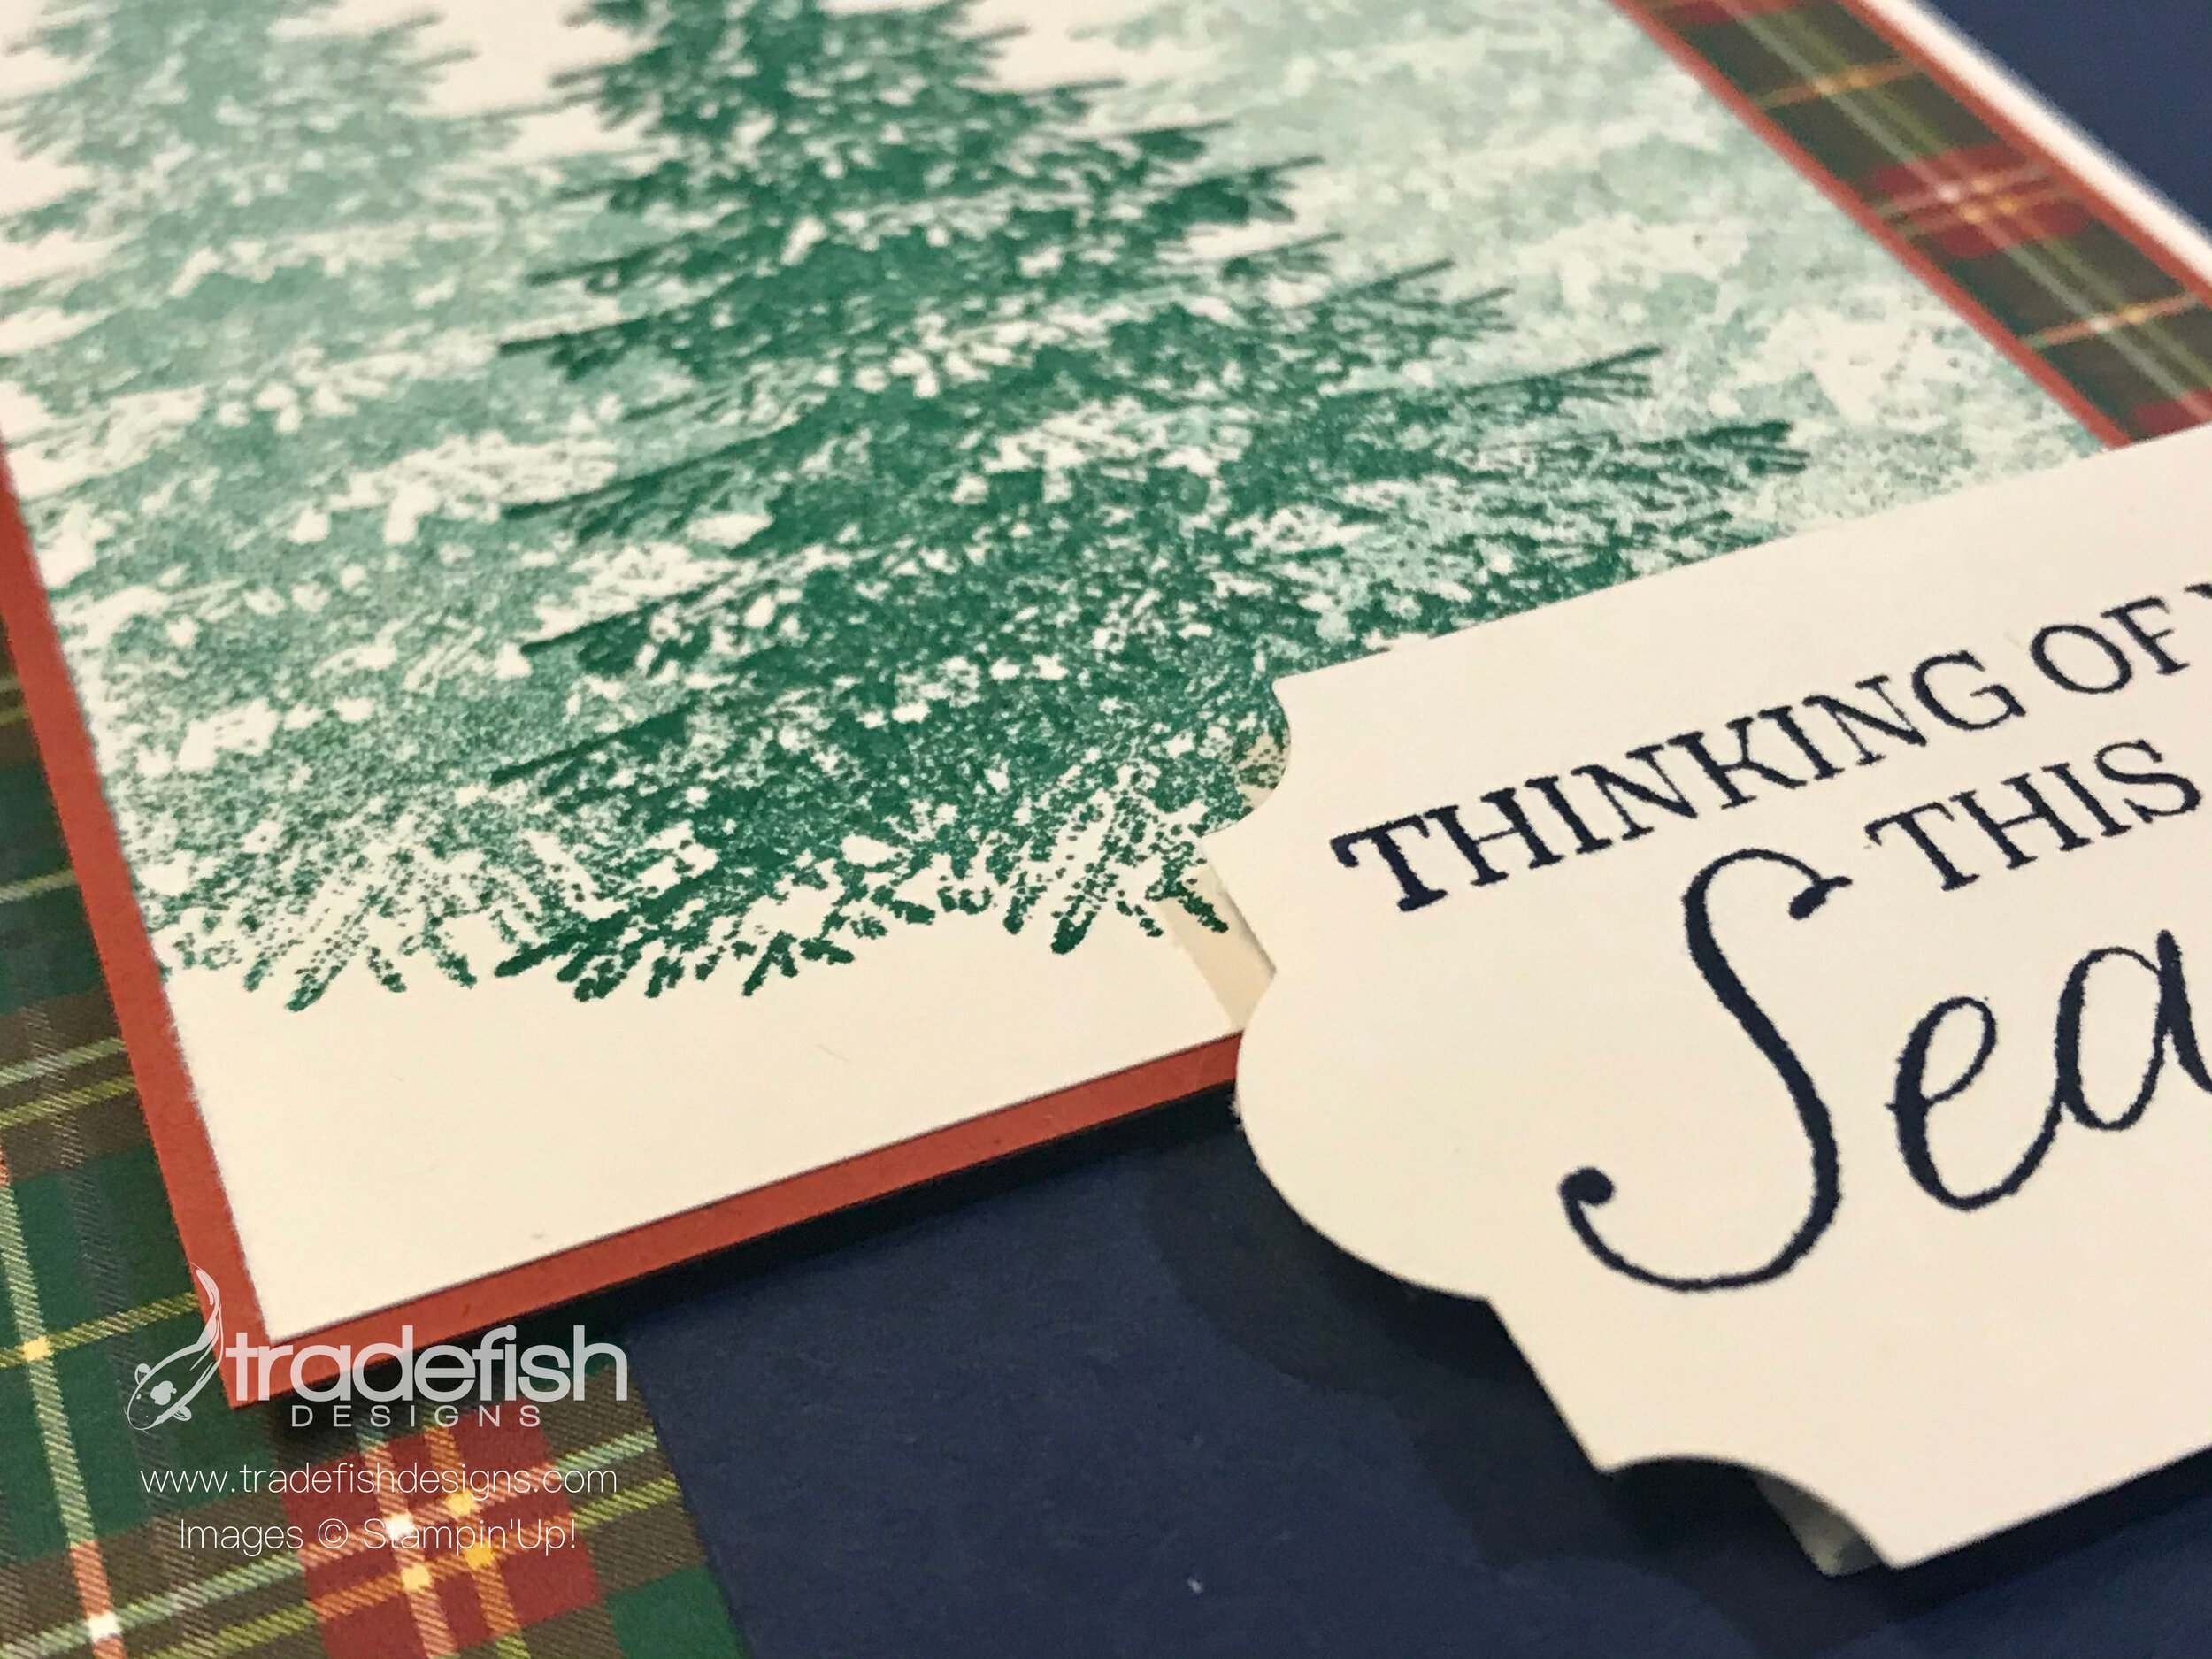
Oh Christmas Tree, Oh Christmas Tree…I love a card with trees. Here’s a card front using the Winter Woods stamp set and 3 generations of stamping to achieve a layered look to my tree. I inked up the block with some Shaded Spruce ink and stamped in the center (1st generation), then I stamped again - without reining to the lest of my original tree (2nd generation) and the final tree was stamped again, without inking to the right of the original tree (3rd generation). One ink pad creates three color ways.

The angle shot shows the lift I get to the layers using dimensional adhesive. You also get a close up look at the sentiment and punch. It’s a simple card in that there is some basic stamping but a lot of layers in color cardstock and Designer Series Paper. No bling on this one so it would be a great candidate for the men on your Christmas list.

I hope you enjoyed my card today. If you are interested in any of the items I used in this project please check out the Product List below. Pleases note that some items may be no longer available depending upon when you see this post – if that’s the case, feel free to substitute items you may already have in your craft stash. Keep it crafty friends!
 | ||||
 |  |  |
 Designer Series Paper")


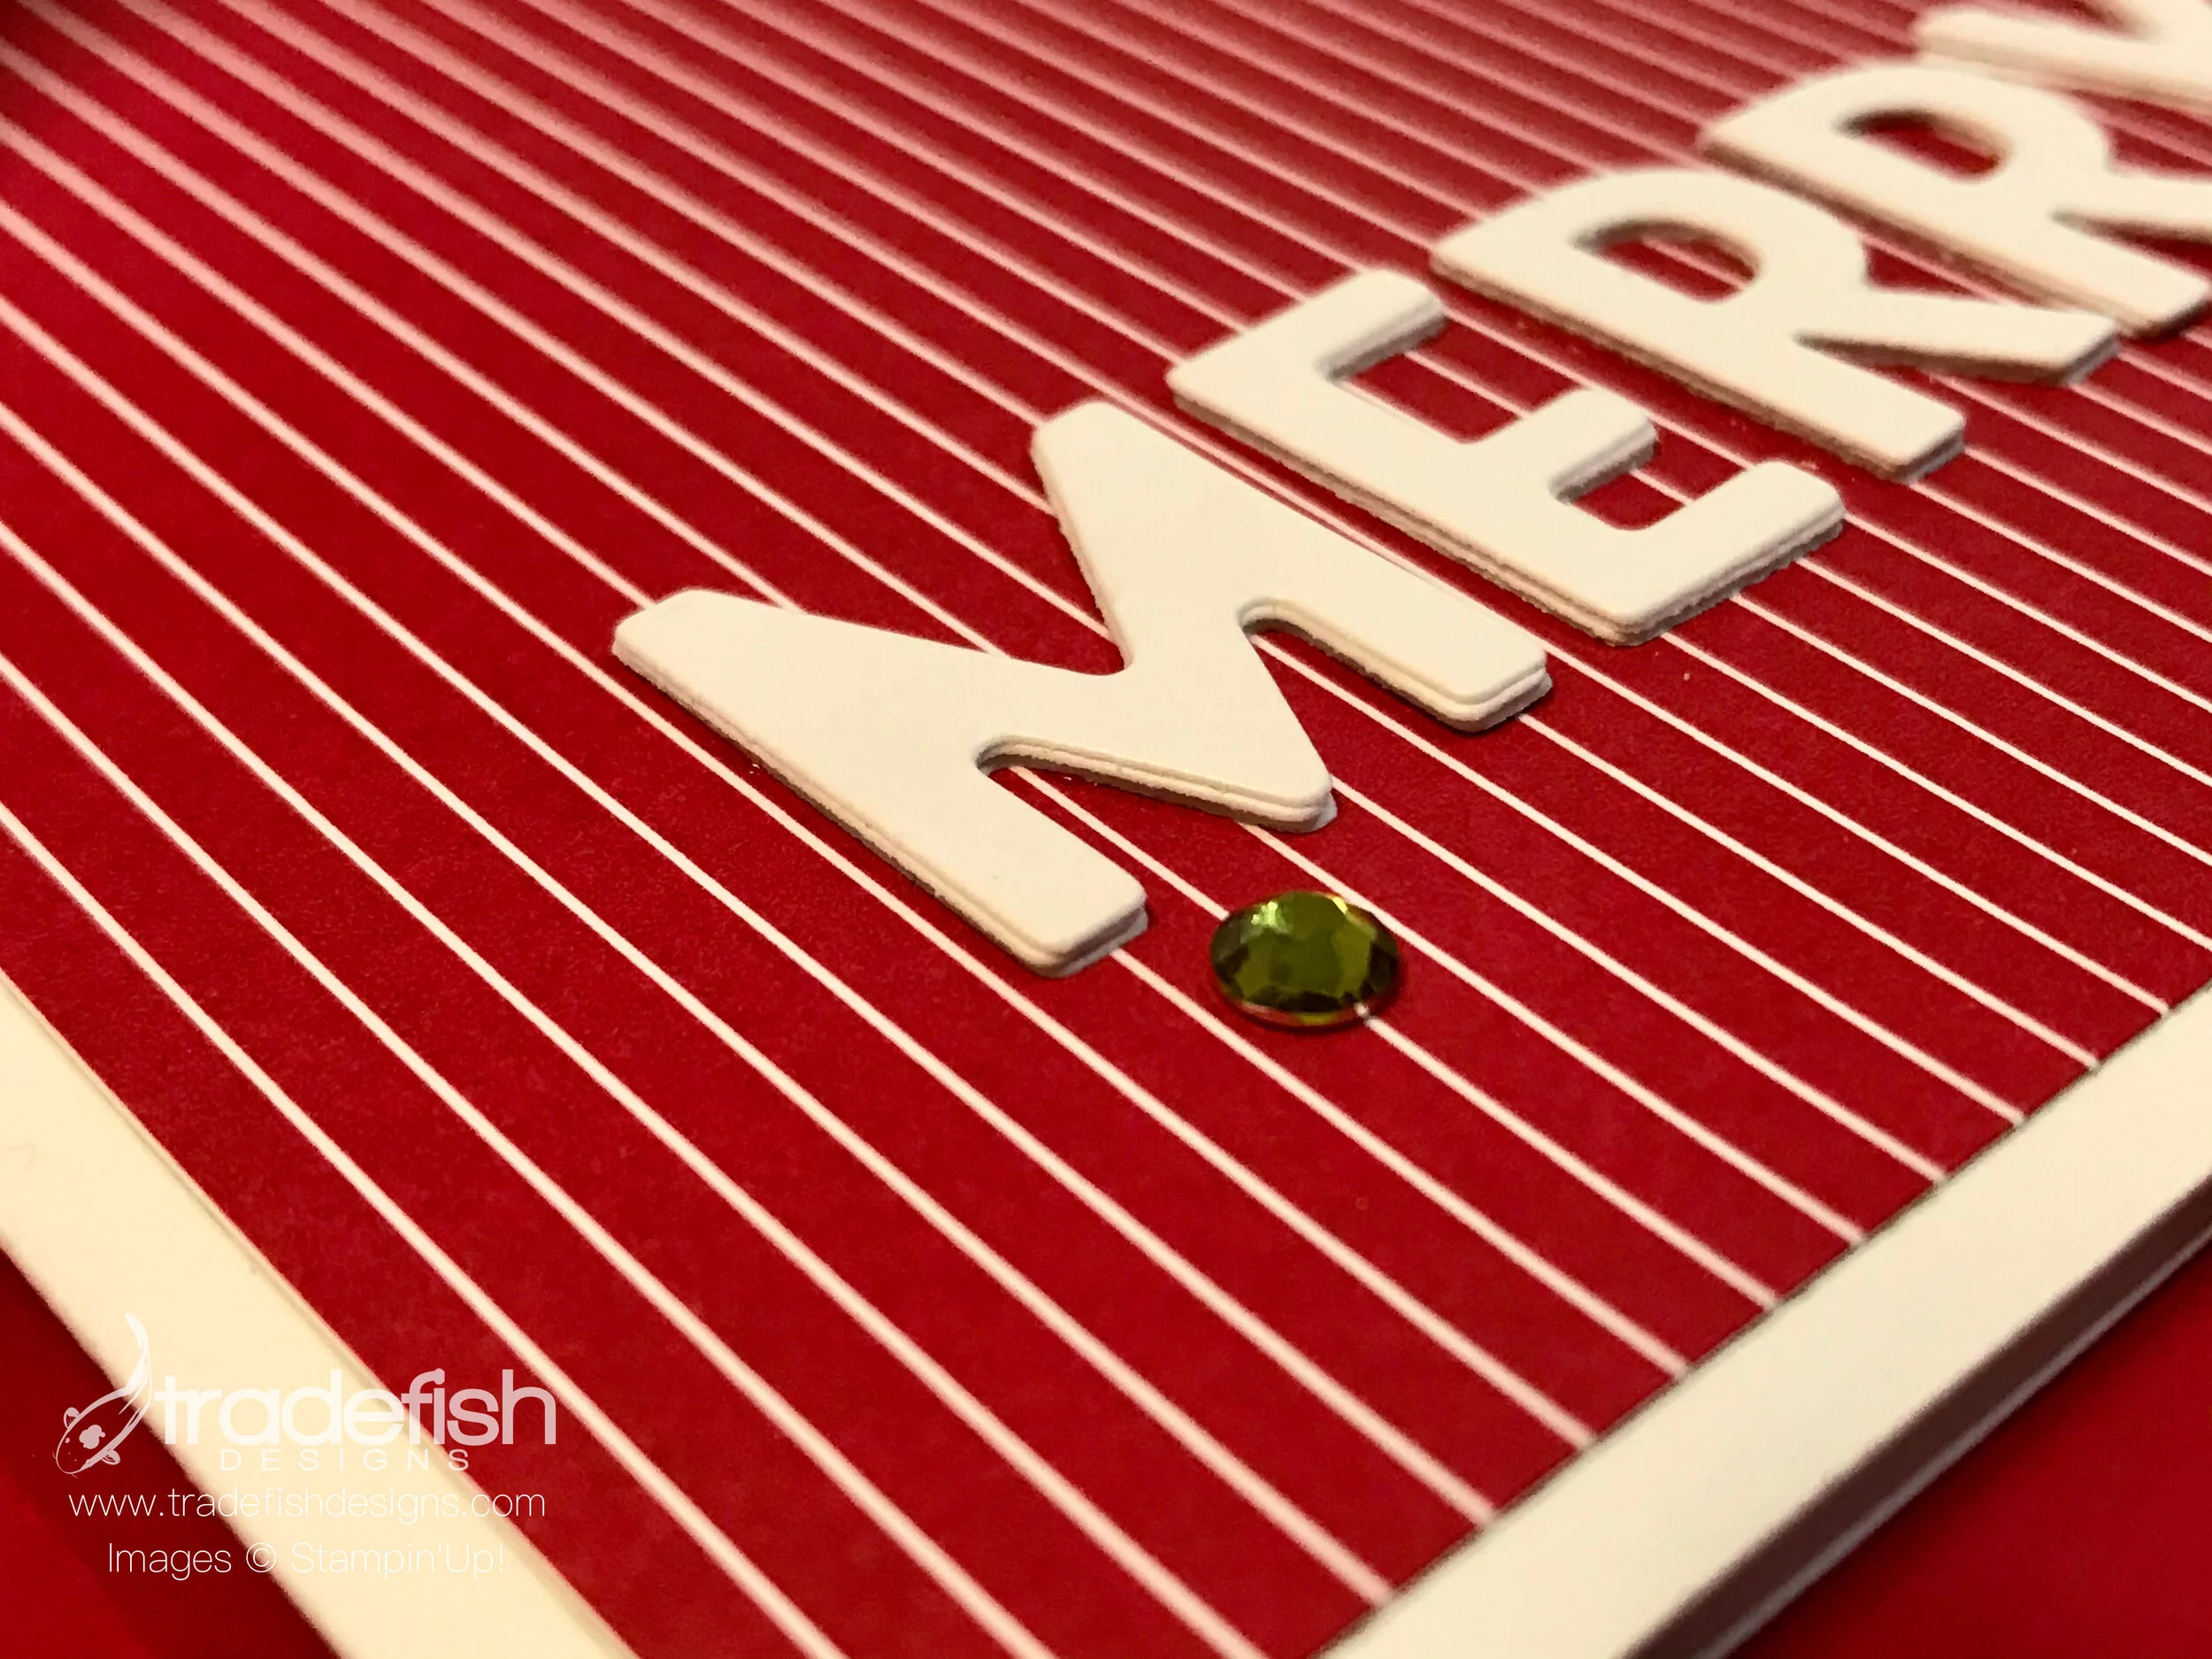
A Simple Merry
A simple Merry card using Stampin’ Up’s Playful Alphabet, Heartwarming Hugs Designer Series Paper and some Noble Peacock Rhinestones.
I love the simplicity of this card! I used the Playful Alphabet dies, some basic Designer Series Paper and some Noble Peacock Rhinestones and voila, the card is done. I will be doing many more of these cards. I find my favorite cards are always the ones that are clean and simple.

The angle photo shows the dimension I achieved by stacking and adhering the individual letters 4 times. This takes a little time but the effect is worth it. If you have dimensional/foam adhesive or even fun foam from the craft store you can get the same effect. Don’t be afraid to keep it simple.

I hope you enjoyed my card today. If you are interested in any of the items I used in this project please check out the Product List below. Pleases note that some items may be no longer available depending upon when you see this post – if that’s the case, feel free to substitute items you may already have in your craft stash. Keep it crafty friends!
 |  Noble Peacock Rhinestones [149494] $5.50 | |


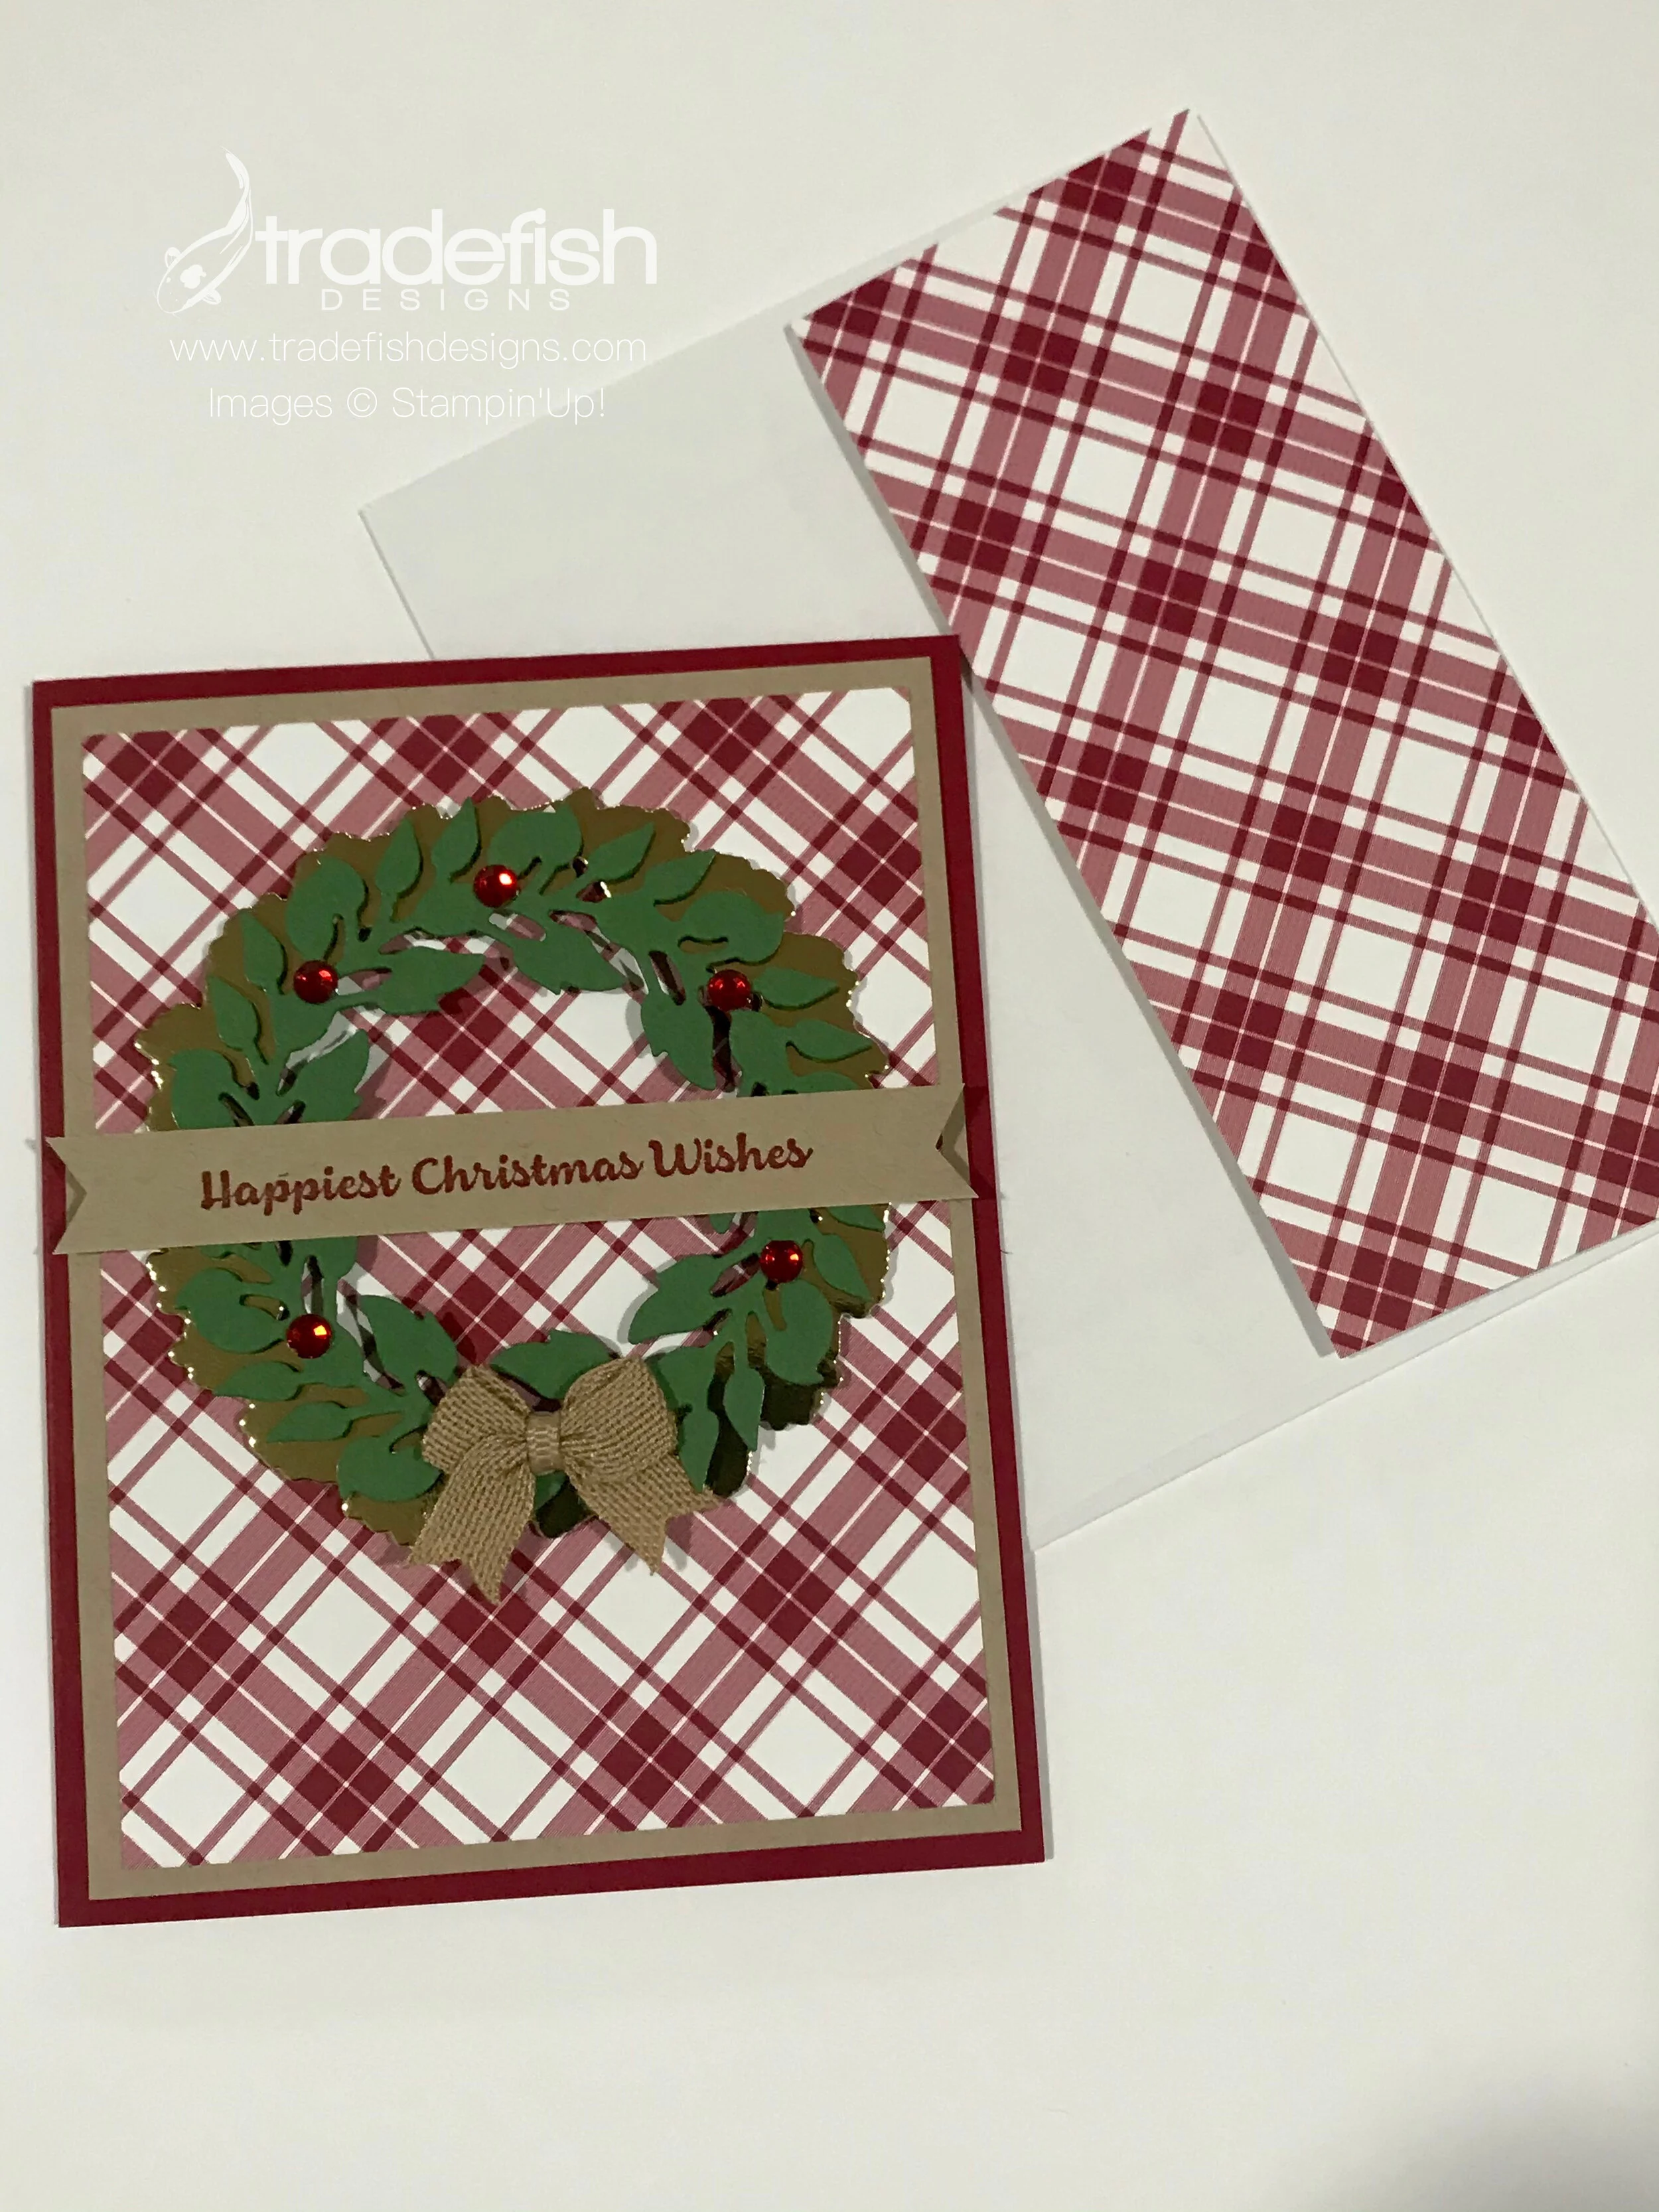
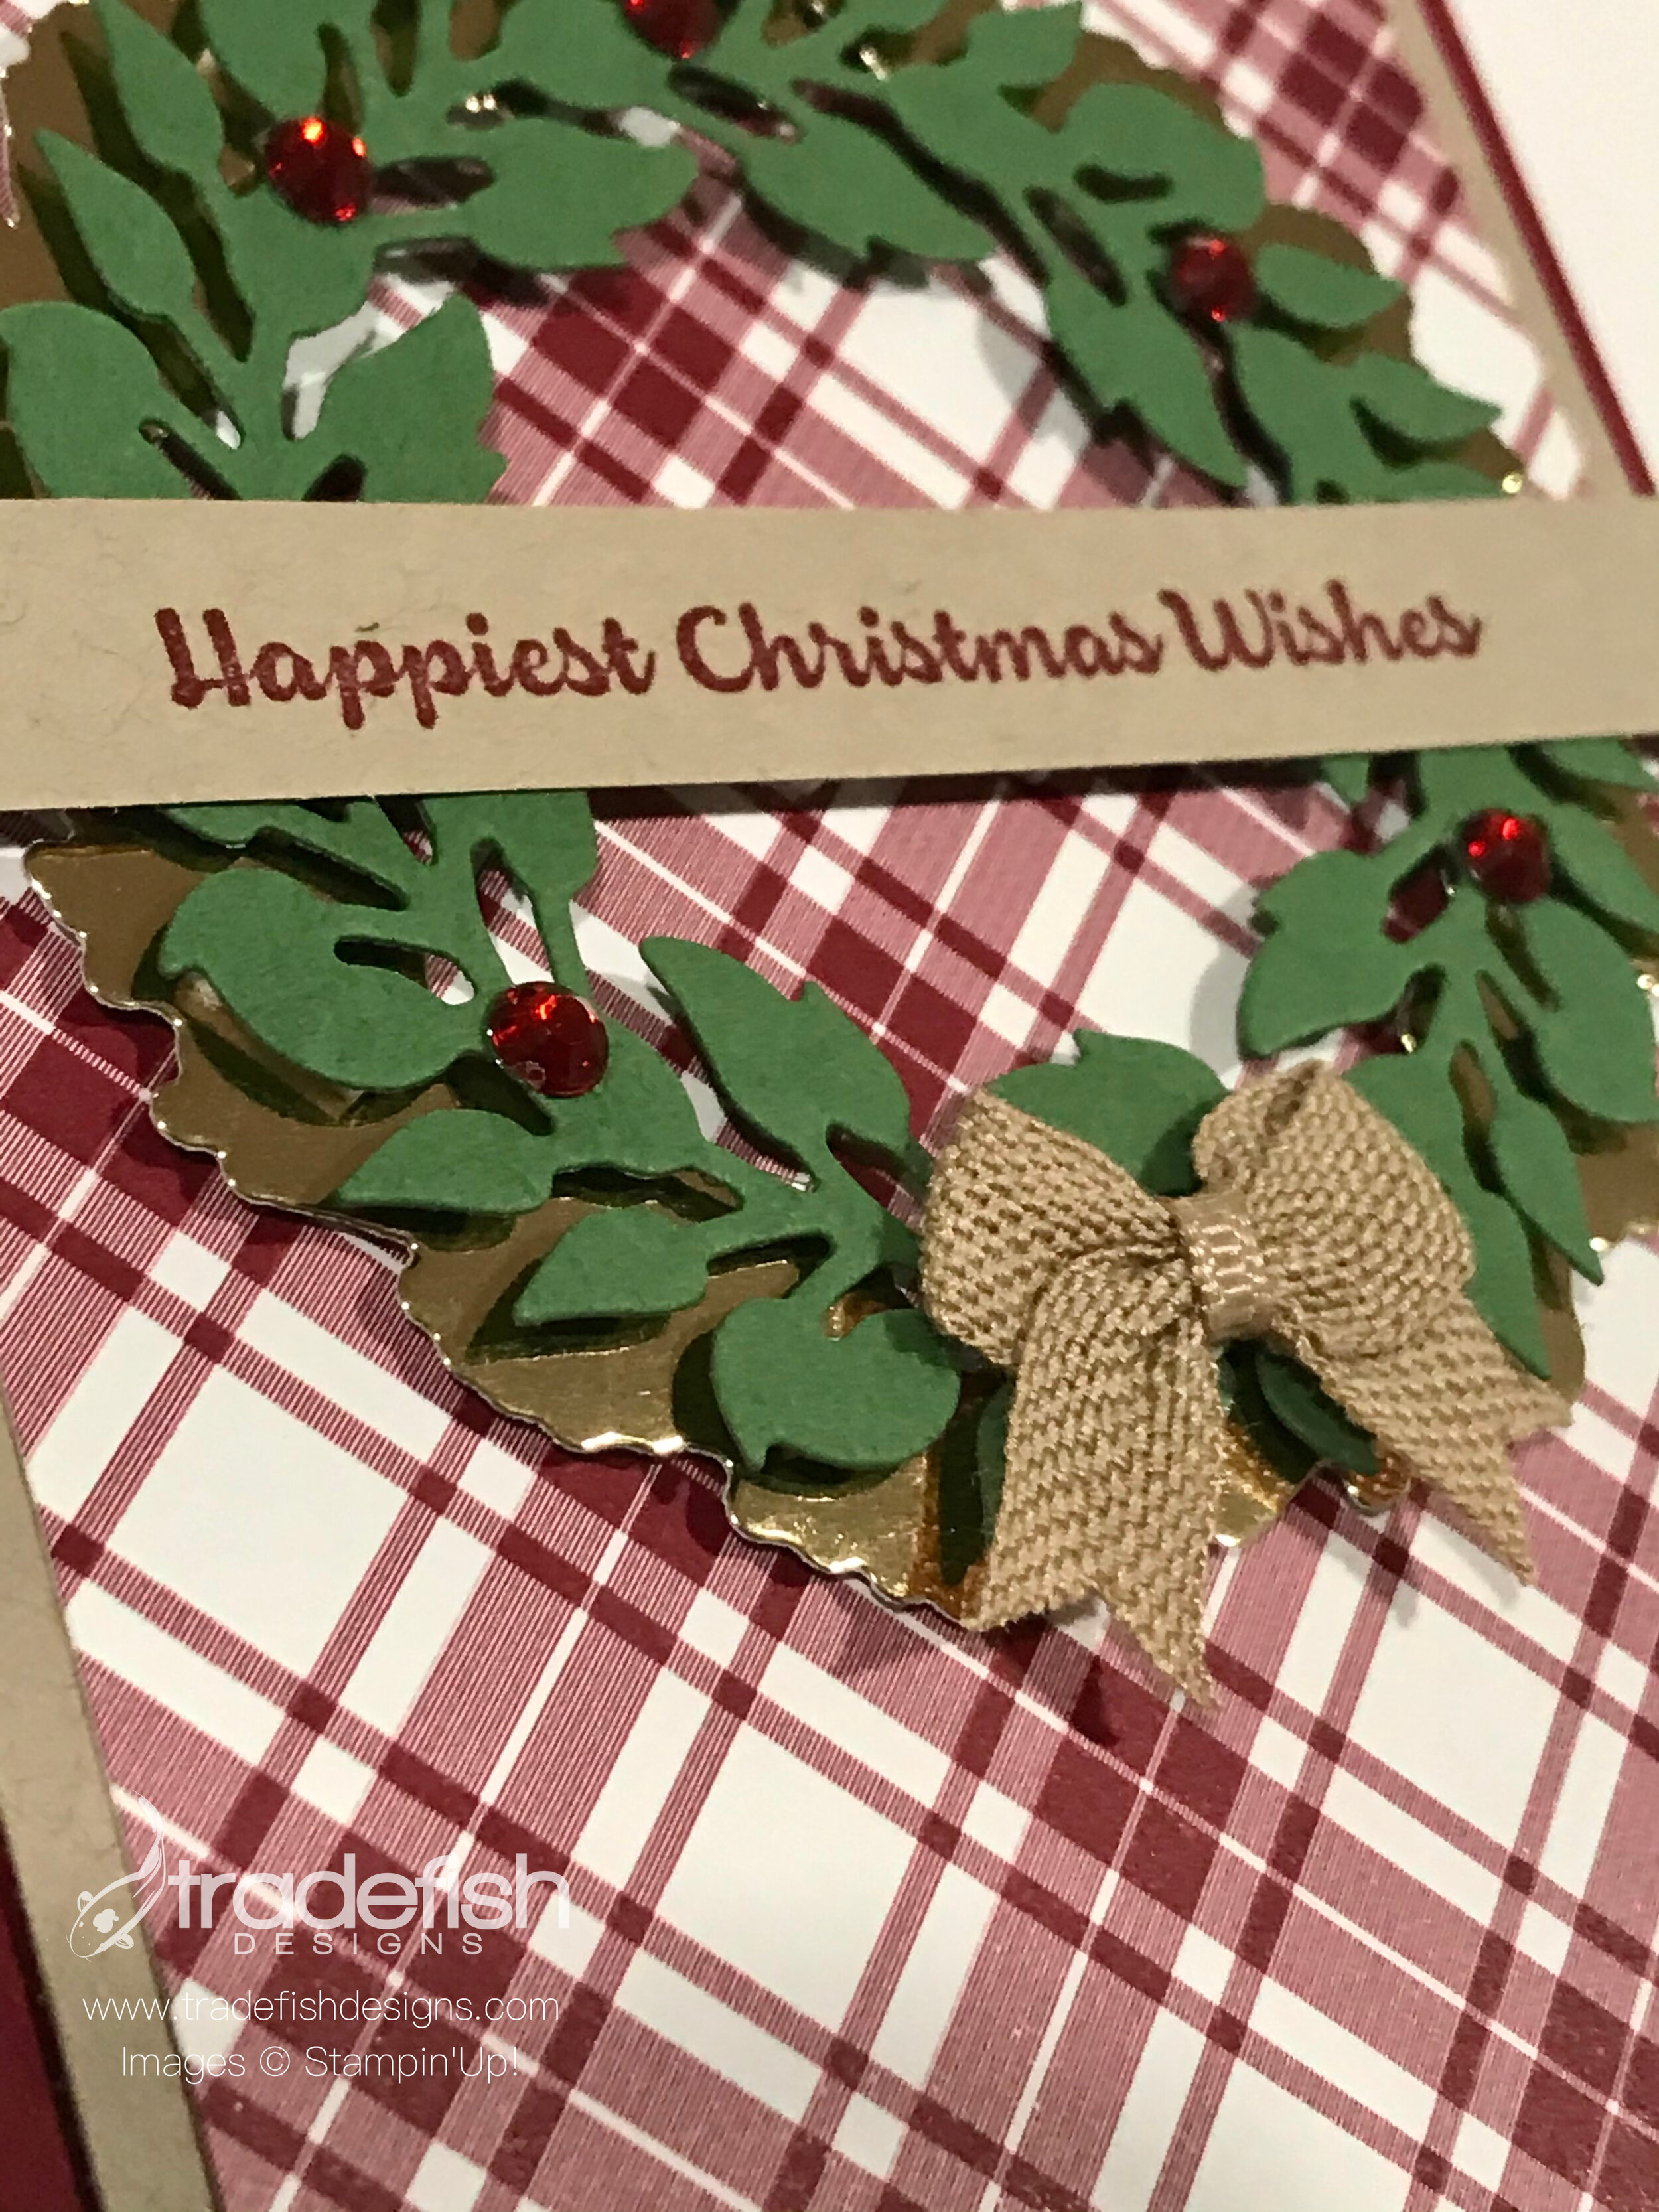
A Christmas Wreath for You!
A Christmas card and matching envelope using the All Around Wreath dies, Lots of Cheer Stamps, Plaid Tiding Designer Series Paper and the Mojo Monday Sketch #504.
Here’s a fun card using more paper from the Plaid Tidings Designer Series Paper and the All Around Wreath dies. Don’t you love a good holiday plaid?

This card layout is based on a Mojo Monday Sketch (#504). The link for this sketch is below the sketch photo.

LINK to this card sketch.
My angle photo really makes the craft ribbon bow just pop! This is a fun bow I purchased in a set of 6 from Hobby Lobby. You can also make your own if you happen to be a good bow-tier…I’m not so when I saw this pre-done and with dimensional adhesive I was in heaven.
Remember peeps, no naked envelopes! Here I just threw some extra matching paper on the envelope flap. Easy-peasy.

I hope you enjoyed my card today. If you are interested in any of the items I used in this project please check out the Product List below. Pleases note that some items may be no longer available depending upon when you see this post – if that’s the case, feel free to substitute items you may already have in your craft stash. Keep it crafty friends!

 Lots Of Cheer Cling Stamp Set [149503] $20.00 | ||||
 |  |  | ||
| |  | |


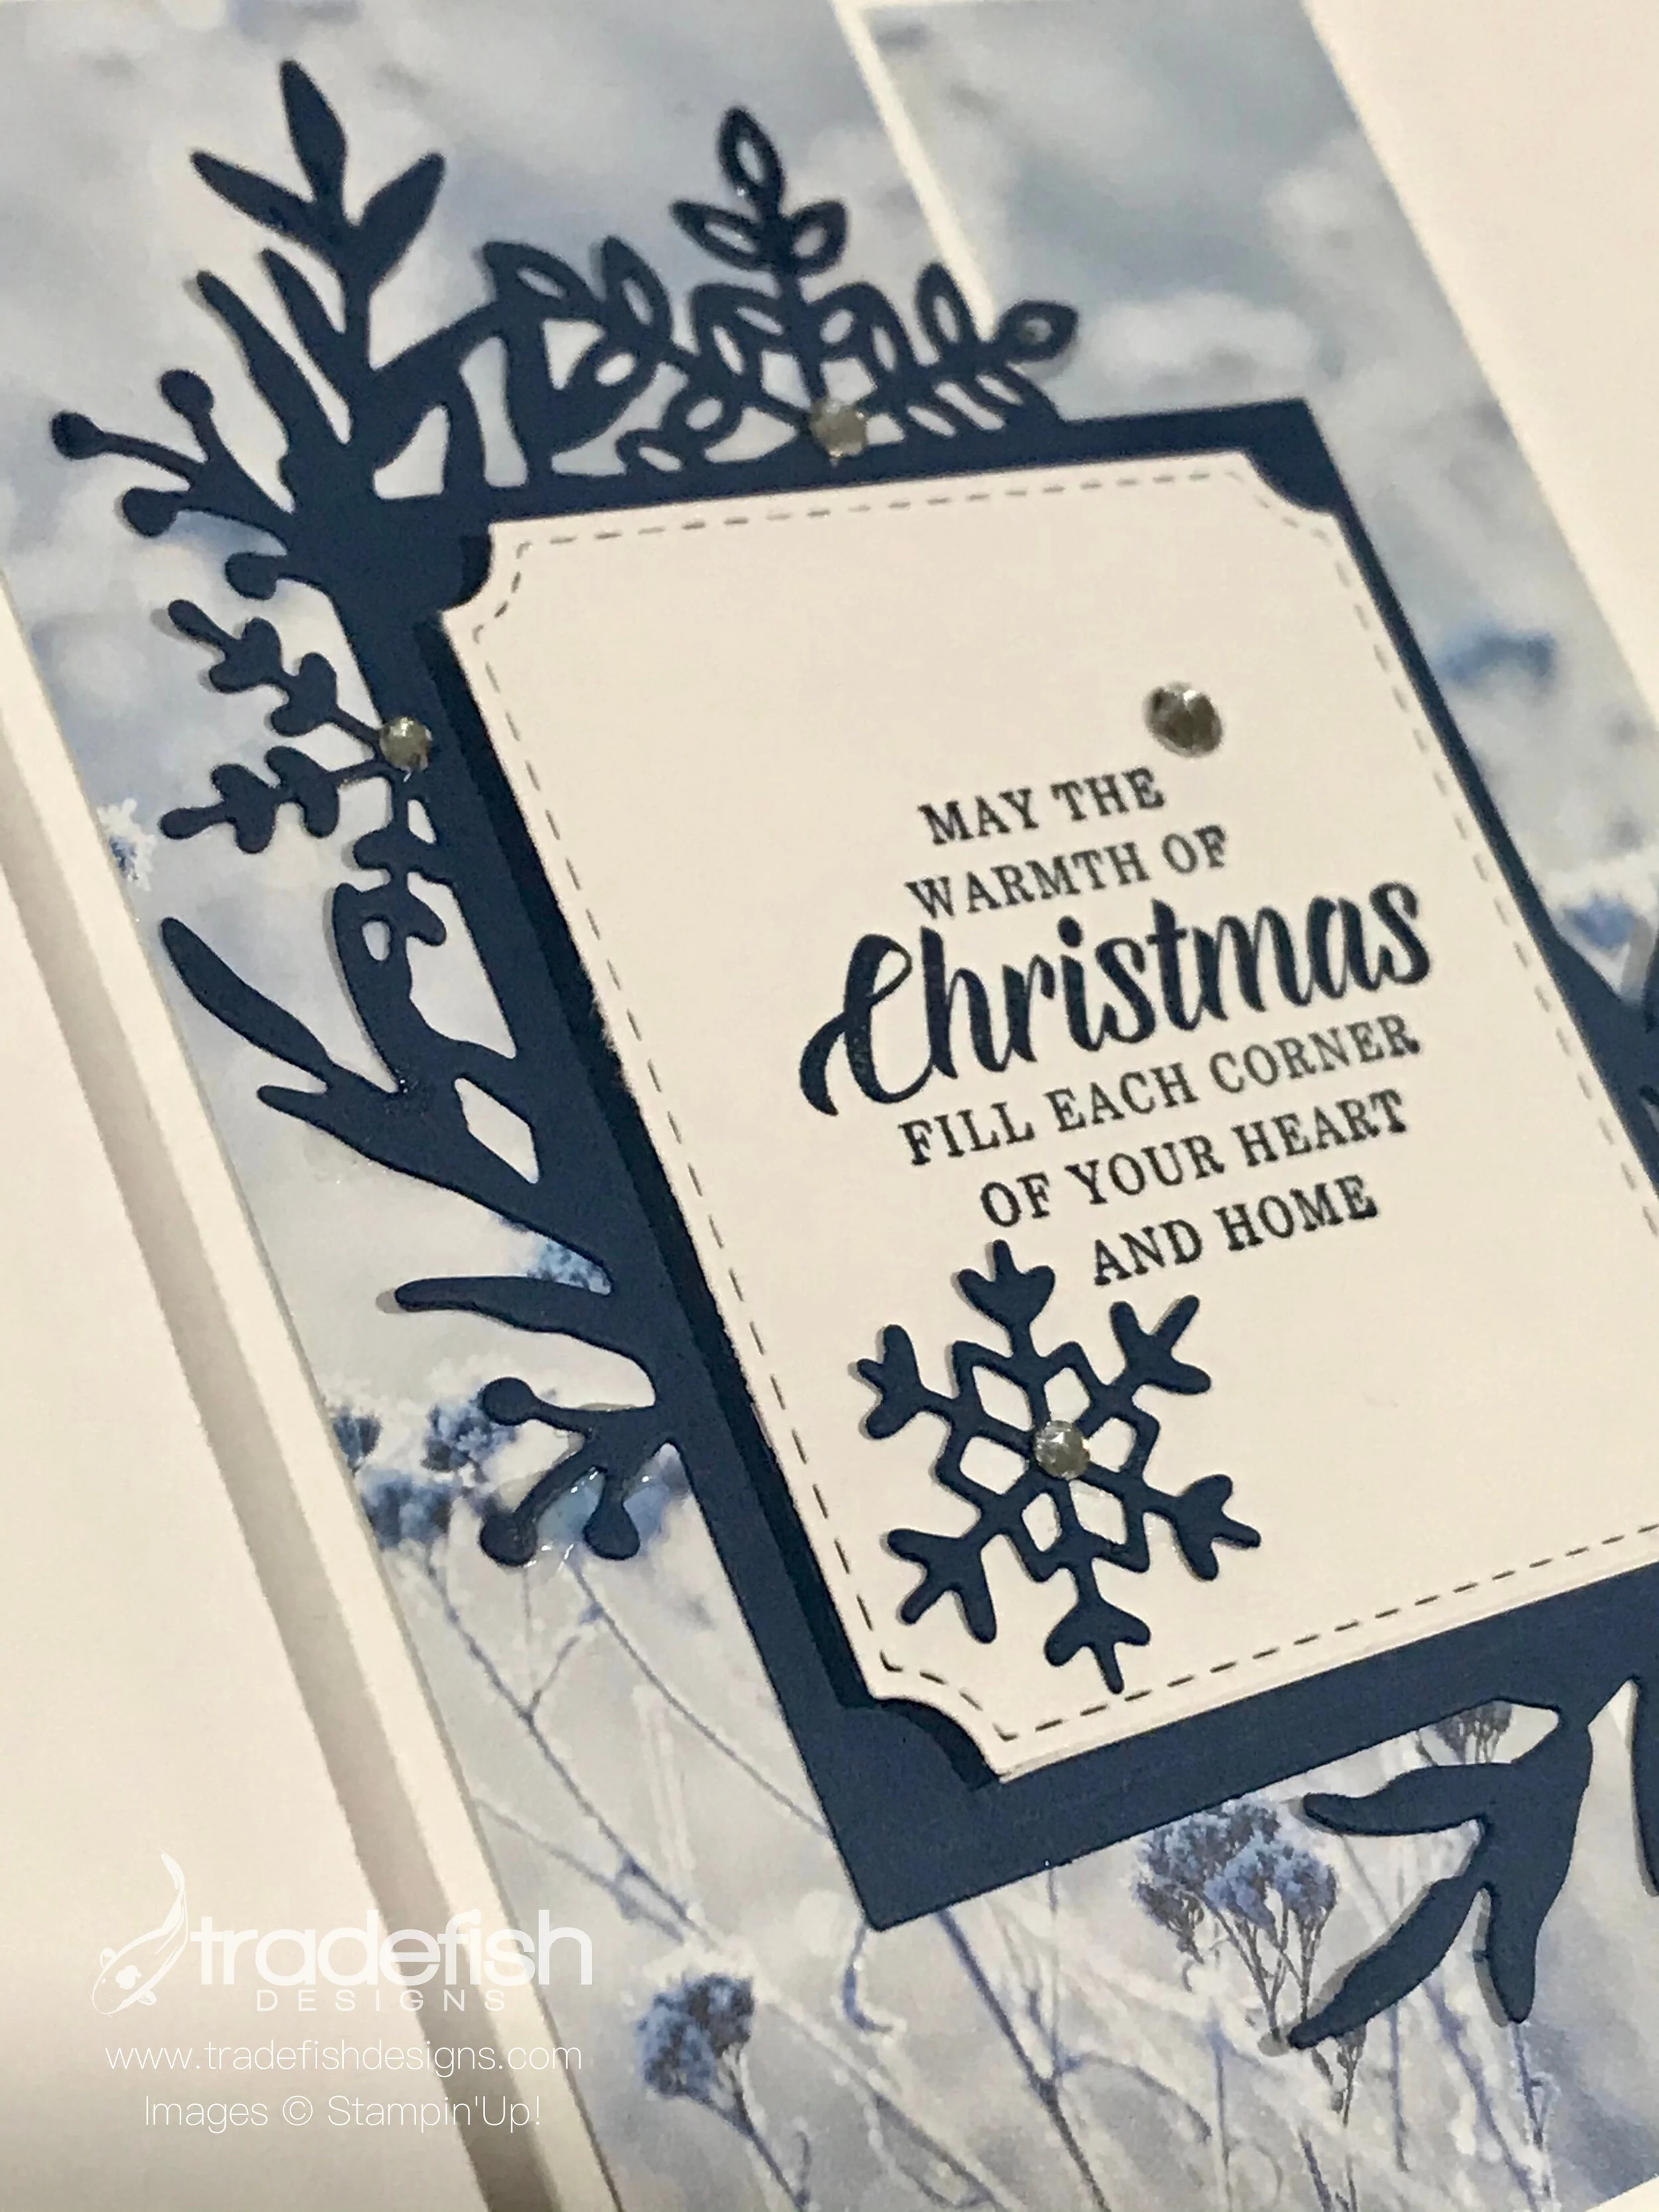
A Frosty Christmas Card for you (and it's a gift card holder too!)
A frosty Christmas card that doubles as a gift card holder using Feels Like Frost paper, Frosted Frames and Timeless Tidings stamps.
It’s another holiday card on the blog. Remember, all November posts will feature holiday/Christmas cards to inspire you to break out your stash of holiday stamps, papers and embellishments and get crafty. Today’s card uses the Feels Like Frost Designer Series Paper again and the fun Frosted Frames dies. Hint: there will be many more cards featuring the Feels Like Frost paper…you’ve be warned!
The sentiment is taken from a retired stamp set, but you can substitute anything you want. This doesn’t have to be a Christmas card either…it could be a winter thank you card…you decide. The angle shot on my cards is a way to show off the dimension of the card but it also makes you look at a card differently. You can really see the details that you often miss when putting it together. I love the stitching from the die on the Whisper White paper that contrasts with the frame in Night of Navy. And who doesn’t love a good basic rhinestone!

The inside of this card is designed with a pocket on the left hand side that can hold a gift card. I may send this to my son who will not be home for Christmas this year. He is an officer in the Coast Guard and will likely be onboard his ship somewhere in the Pacific Ocean.

I hope you enjoyed my card today. If you are interested in any of the items I used in this project please check out the Product List below. Pleases note that some items may be no longer available depending upon when you see this post – if that’s the case, feel free to substitute items you may already have in your craft stash. Keep it crafty friends!
 |  | | |  |

 Designer Series Paper")

Let's start making those holiday cards my crafty friends!
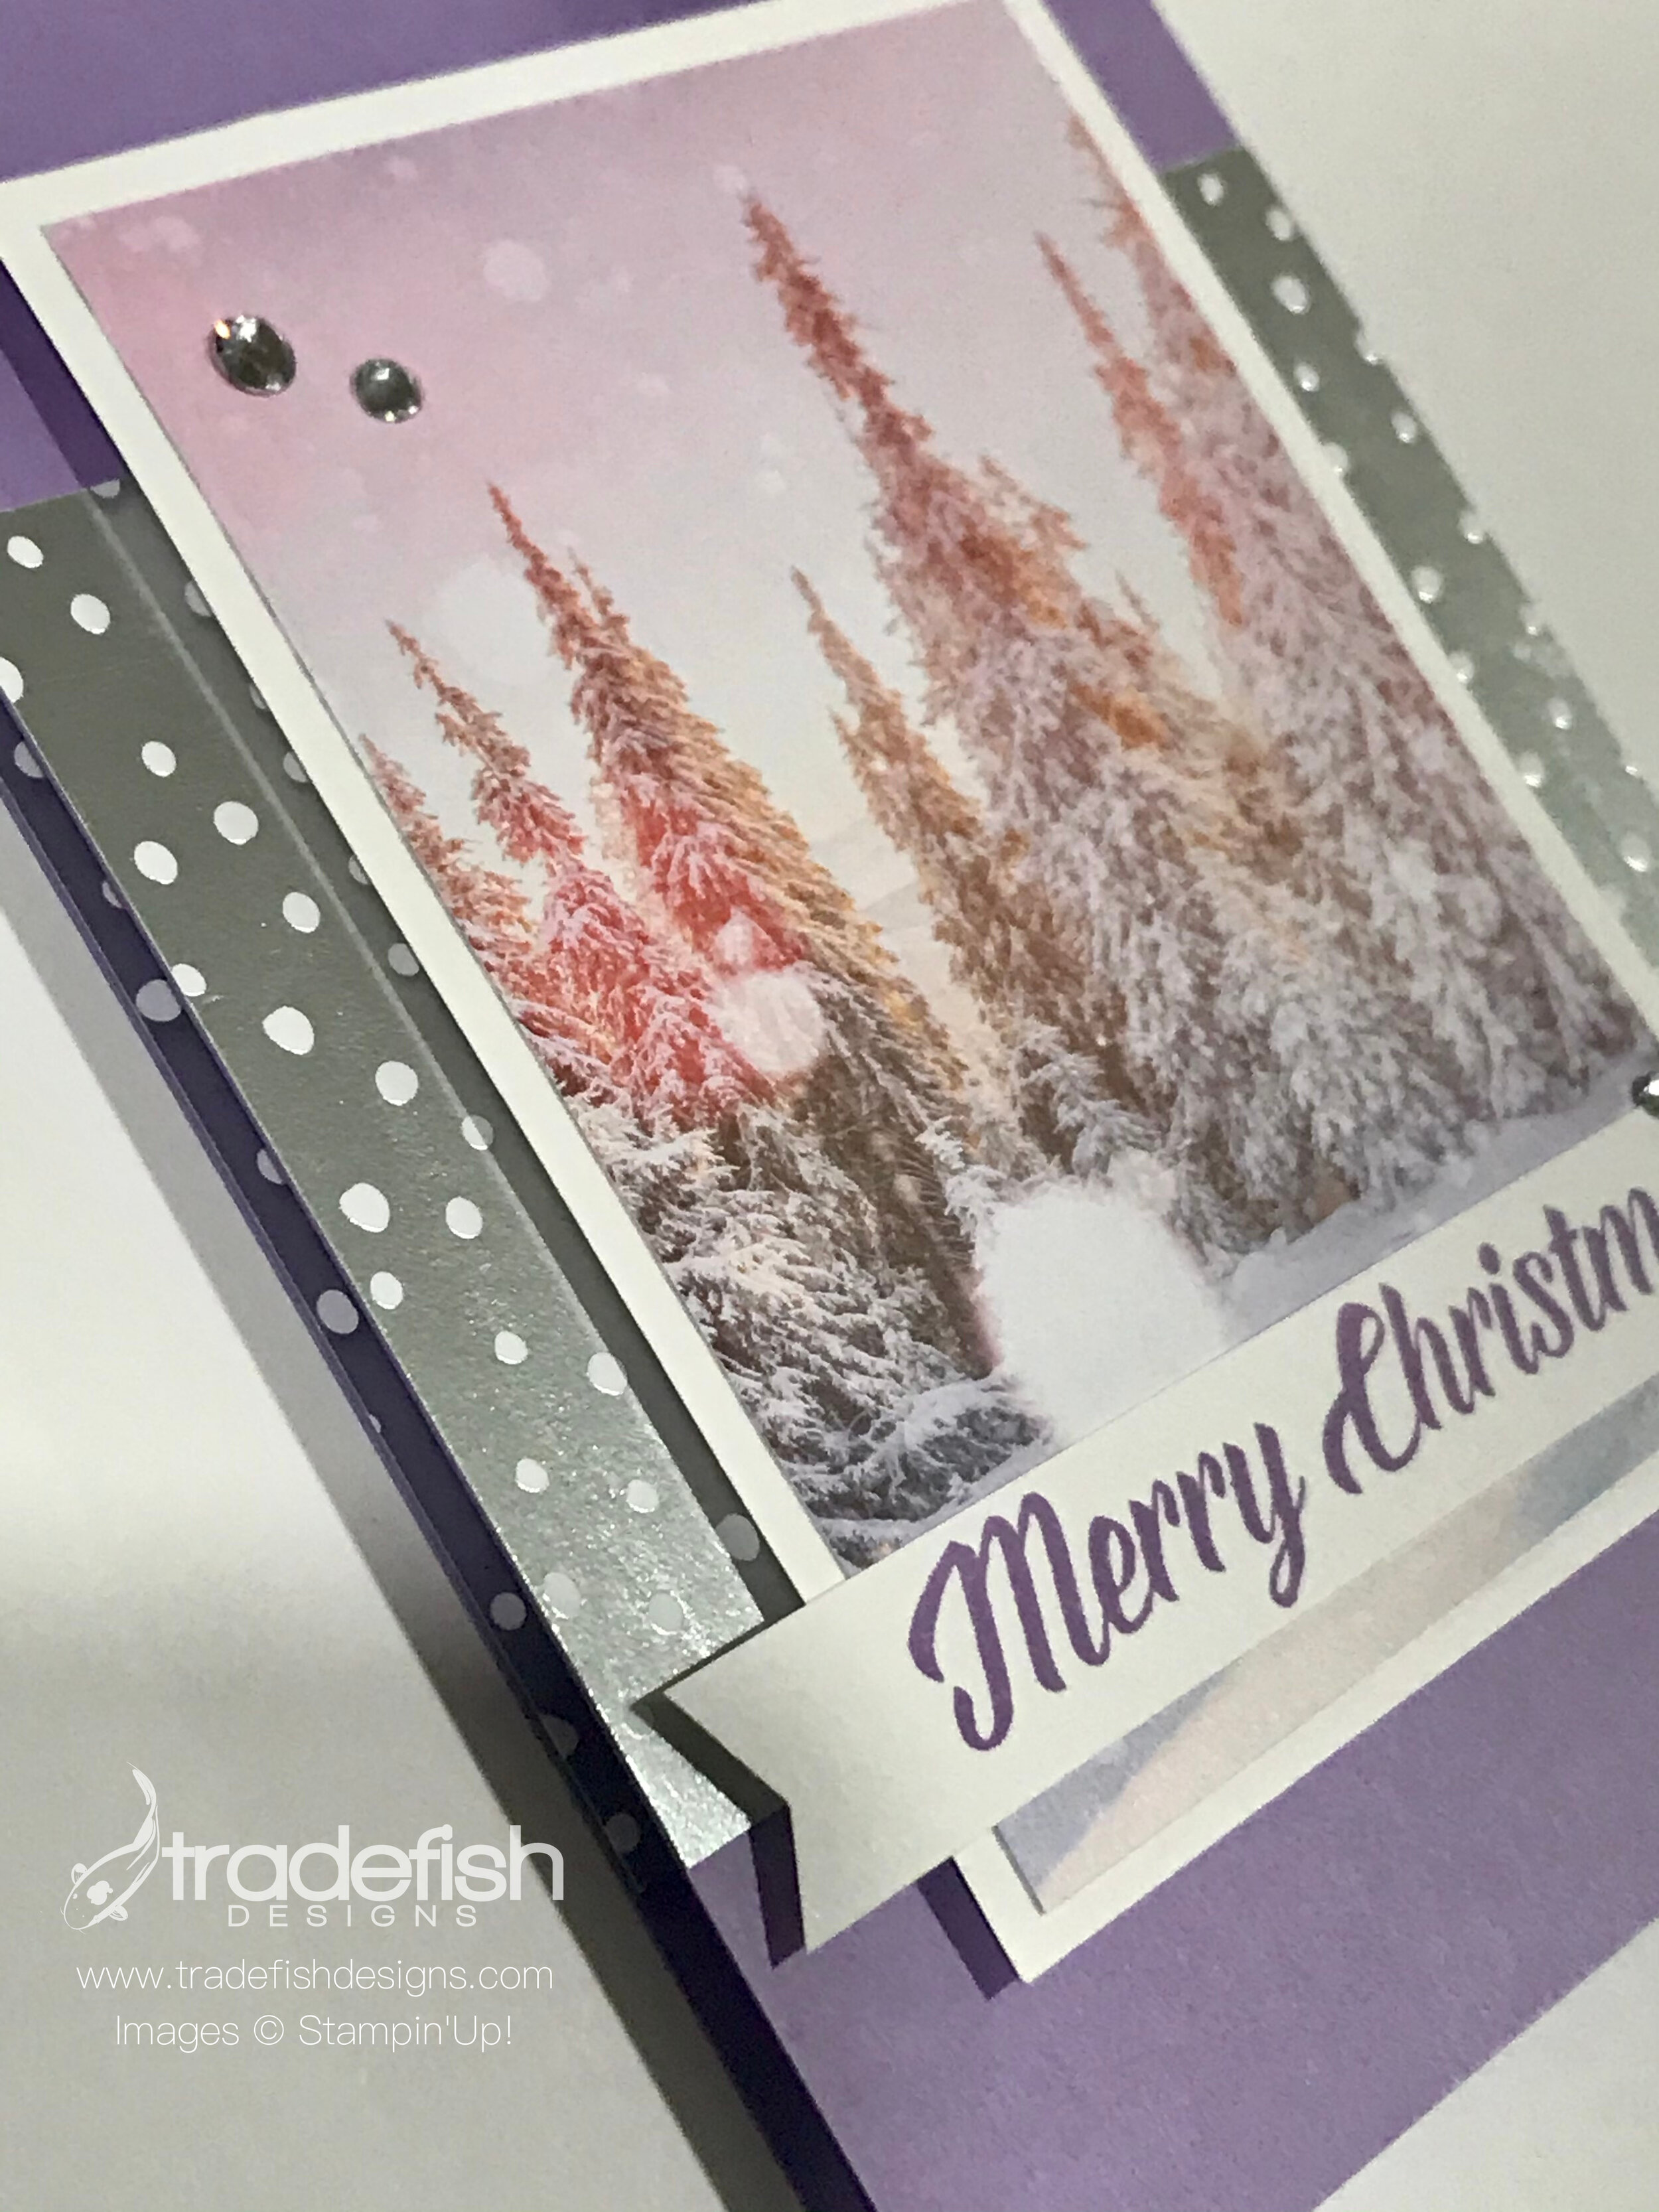
A Christmas card using the non-traditional color of Highland Heather and Feels Like Frost Designer Series Paper.
Welcome to November my crafty friends! I have to admit it does not feel like we are entering into the holiday season. It has been quite a year. In an effort to move me along toward Christmas, every post this month will feature a Christmas card. I hope to not only inspire you to create your own holiday cards but to finish up all my Christmas cards. I traditionally send them out after Thanksgiving to friends and family.
Here’s a Christmas card using the non-traditional colors of white, silver and Highland Heather. This Feels Like Frost Designer Series Speciality Paper will be highlighted throughout the month because (1) it’s just too beautiful not to share and (2) I have a bunch of it and don’t want to be a paper hoarder.

One of the best things about this speciality paper is that one side is a photo of an outdoor wintery scene while the other side features a silver and white design. I added some pretty rhinestones to mimic the snowfall and a simple sentiment in Highland Heather to finish off this super simple but beautiful card.

The inside of the card coordinates with the look of the front leaving plenty of room for a holiday message.

I hope you enjoyed my card today. If you are interested in any of the items I used in this project please check out the Product List below. Pleases note that some items may be no longer available depending upon when you see this post – if that’s the case, feel free to substitute items you may already have in your craft stash. Keep it crafty friends!
| | | |


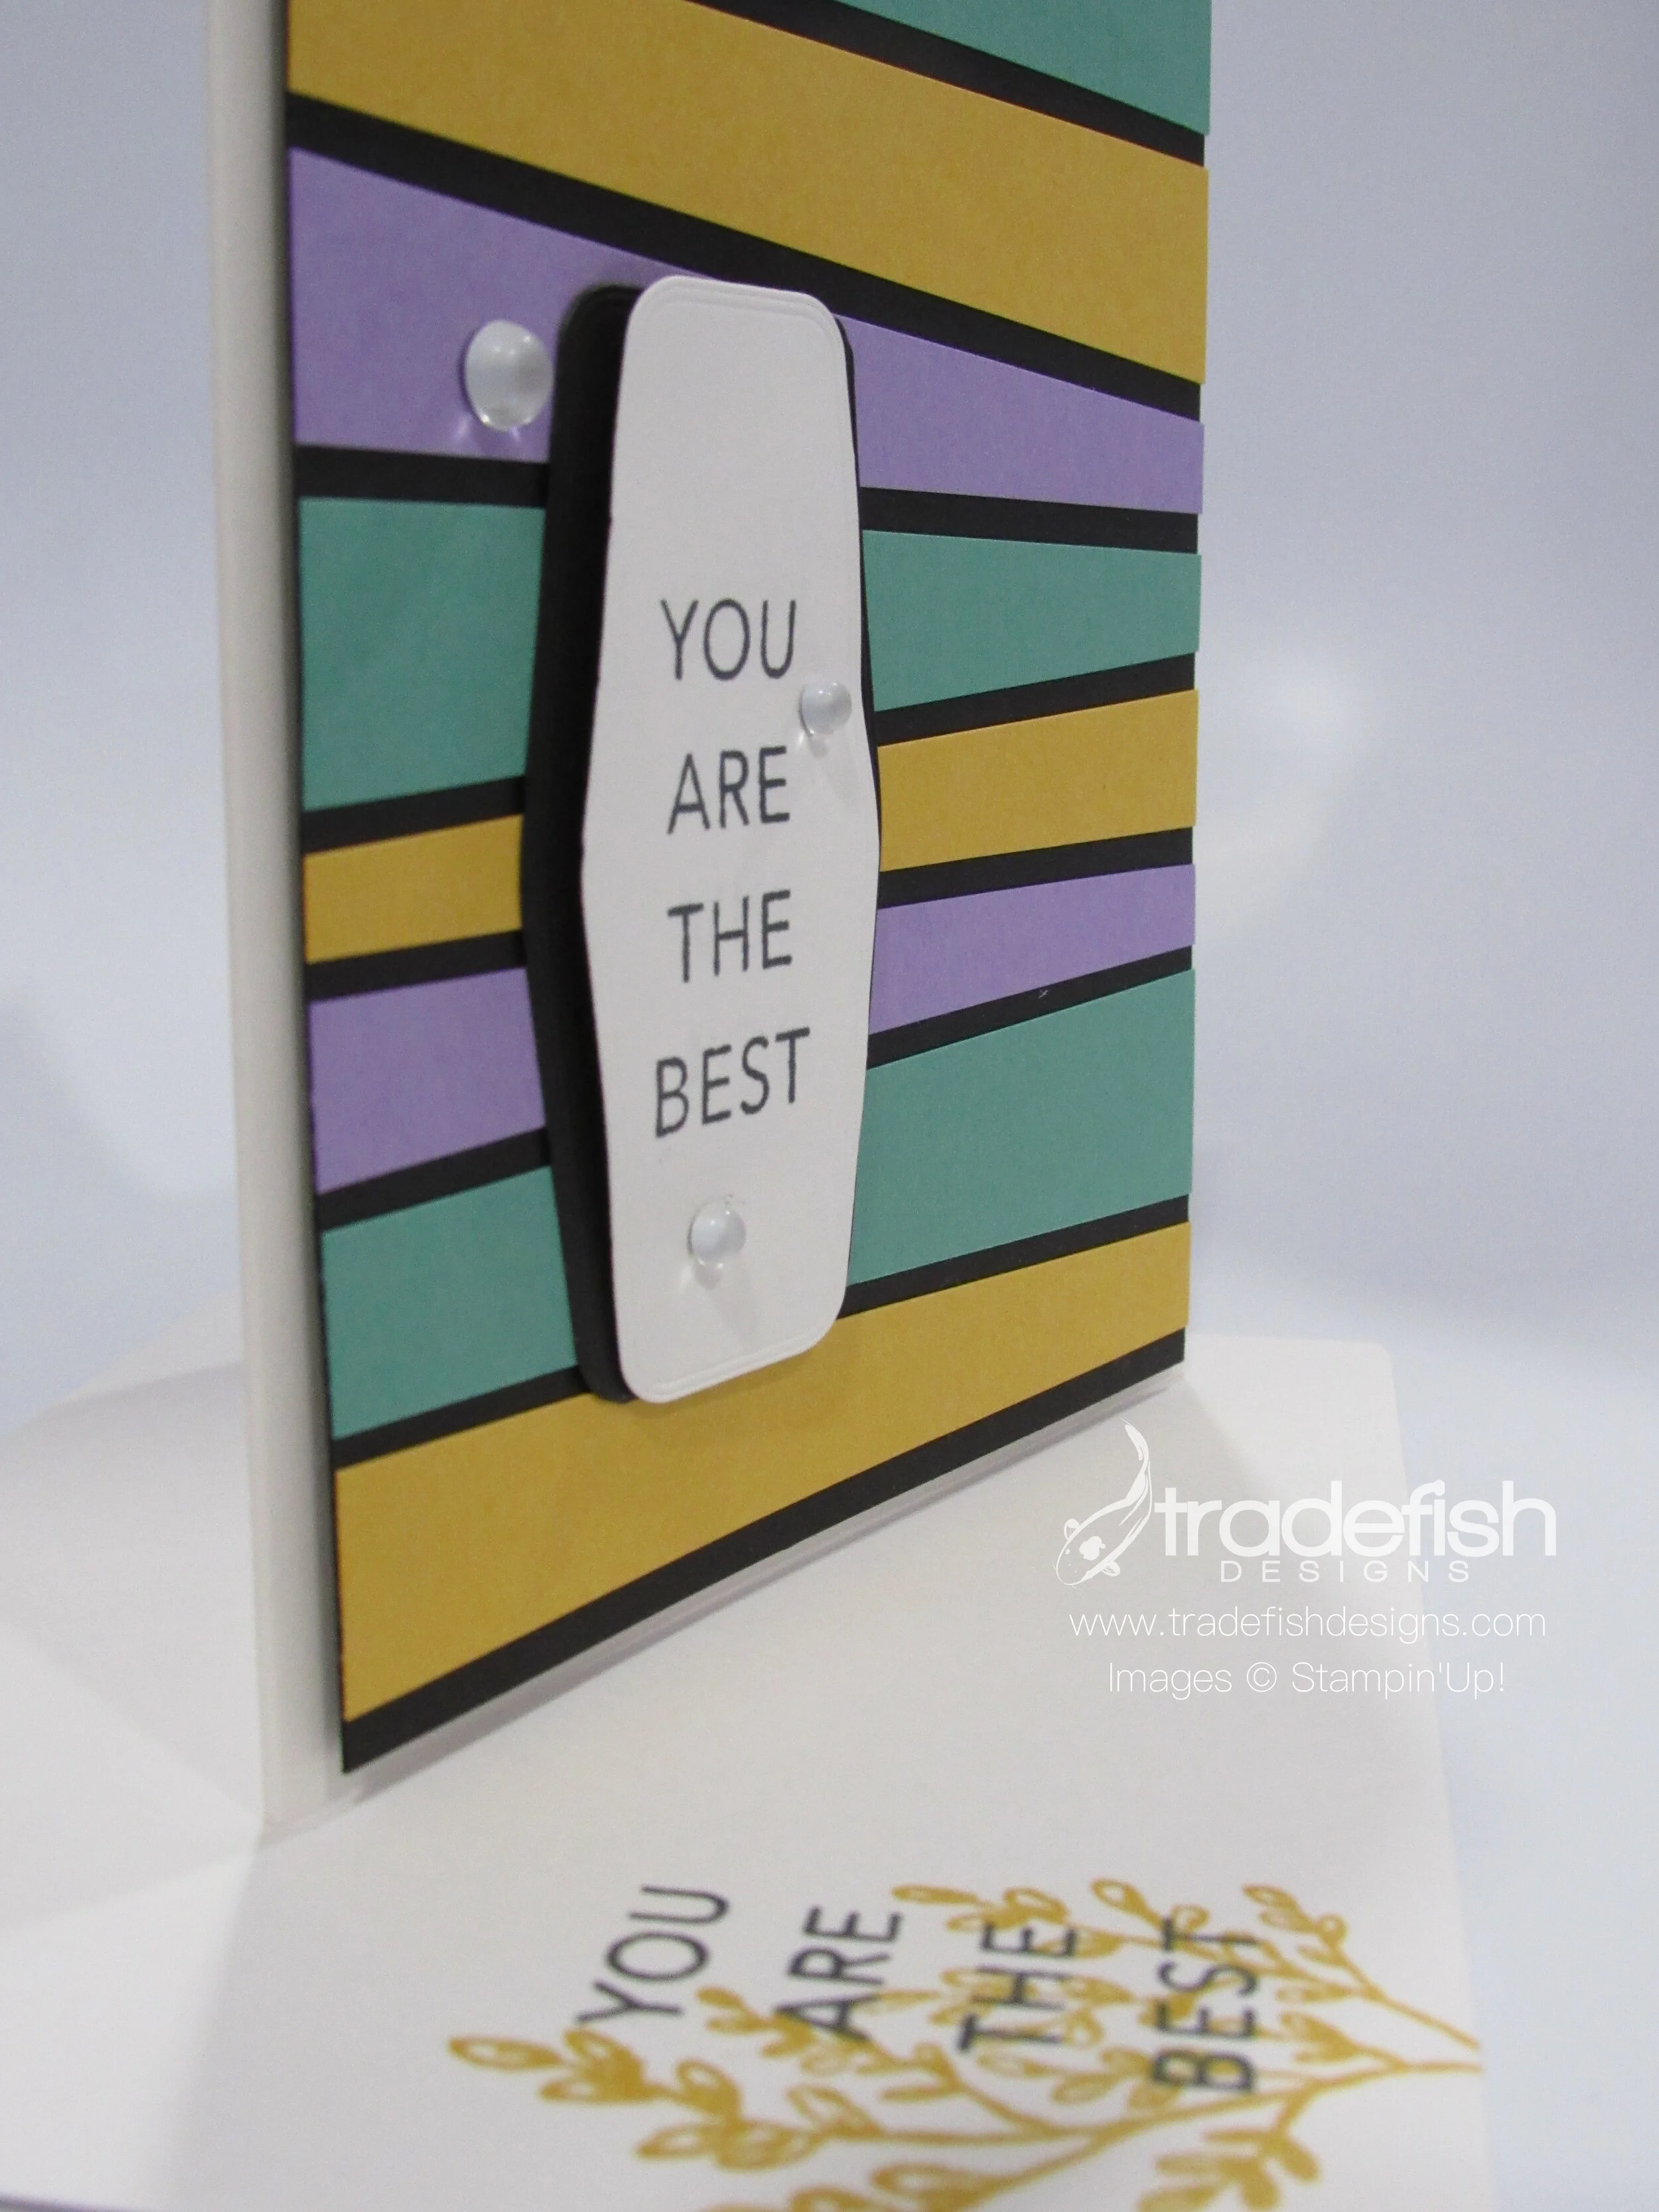
You are simply the best Bruno Bertucci! (A Scrappy Strips Technique Card)
A simple card using Bruno Bertucci’s Scrappy Strips Technique and the Tasteful Touches stamp set. #scrappystrips.
I have to admit that I made this card back in June after learning about the #ScrappyStrips technique from Bruno Bertucci - a Stampin Up Demonstrator in Australia. I realized that I never posted it on the blog and thought I better jump on it right away. This card is genius in its simplicity and will blow your mind at how easy it is to put together. If you want to see Bruno in action, check out this YouTube LINK.

The colors I used were Bumblebee, Just Jade and Highland Heater on a Basic Black background. My stamping was done on Whisper White with some Frosted Epoxy Droplets. Super simple stamping to make sure I didn’t distract from the amazing technique.

My envelope flap is covered in Bumblebee Cardstock that I stamped with an image from the Tasteful Touches stamp set.

I hope you enjoyed my card today. A special thanks for the inspiration from Bruno Bertucci! If you are interested in any of the items I used in this project please check out the Product List below. Pleases note that some items may be no longer available depending upon when you see this post – if that’s the case, feel free to substitute items you may already have in your craft stash. Keep it crafty friends!
 | ||||
 |  |  | |
")


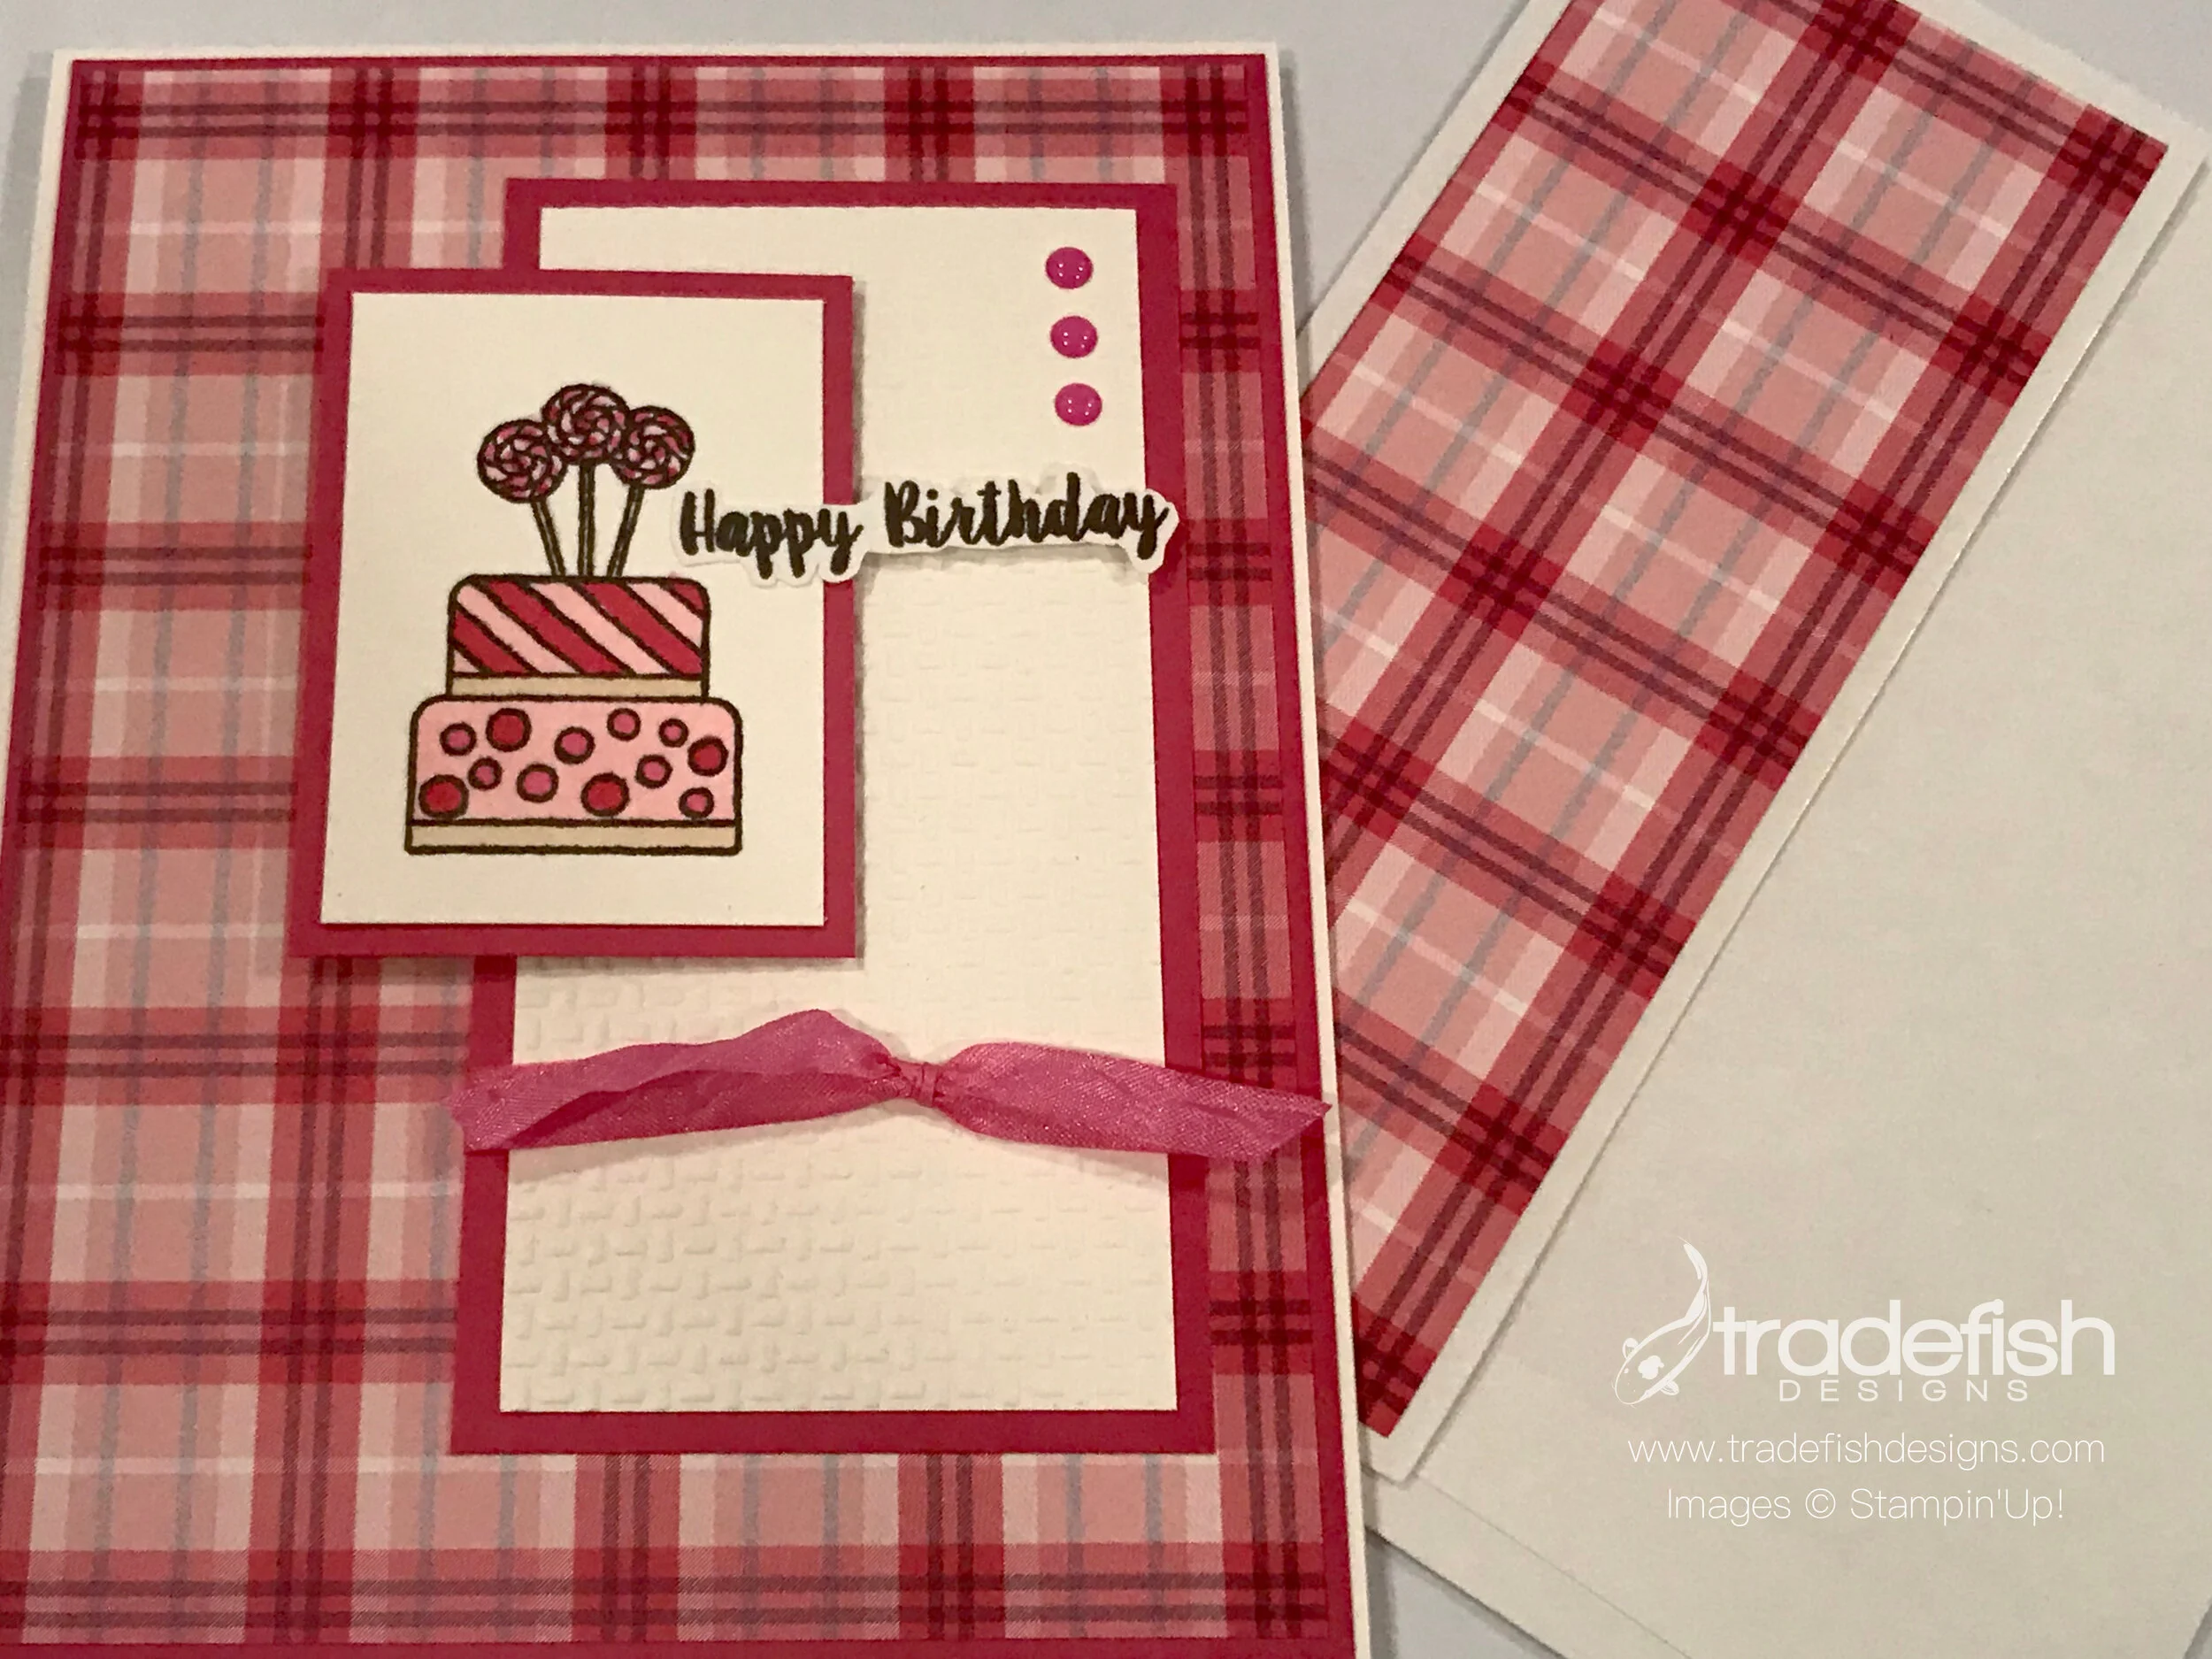
Happy Birthday Aliza!
A pretty pink plaid birthday card using Stampin' Up products Plaid Tidings, Piece of Cake, Stampin' Blends, Wrapped in Texture, In Color Enamel Dots and Crinkled Seam Binding Ribbon. This card also uses a sketch from Operation Write Home.
This weekend my neighbor Aliza turned 5 years old! It has been a very exciting week leading up to the big day. It was announced every day to me in the backyard over the fence so I wouldn’t forget. She was going to the beach for the weekend to celebrate. I know she, her parents, and her big brother Trace had a wonderful time. In honor of her birthday I created this simple, but fun, card in her favorite color…PINK!

I used a sketch from Operation Write Home as a foundation but did a little free-lancing. I used some pink plaid, and why wouldn’t you for a 5 year old girl’s birthday card, and some cool enamel dots in, you guessed it, pink!

The angle in this photo highlights the dimension I achieved using one of the Wrapped in Texture embossing folders as well as shows off the coloring I did using Stampin’ Blends. Don’t forget the fussy-cutting on did on the Happy Birthday sentiment. Only the best for Aliza!

I also used my Melon Mambo Stampin’ Blend (light) to color the Whisper White Crinkled Seam Ribbon pink to coordinate with the card. And I always insist on a coordinating envelope. Here I used some of the excess designer paper and added it to the flap of the envelope. Don’t tell Aliza, but I’m adding five-one dollar bills in the card…one for each year. I can’t wait to give it to her!

I hope you enjoyed my card today. If you are interested in any of the items I used in this project please check out the Product List below. Pleases note that some items may be no longer available depending upon when you see this post – if that’s the case, feel free to substitute items you may already have in your craft stash. Keep it crafty friends!
 Piece Of Cake Photopolymer Stamp Set [148610] $17.00 | | |||
 | ||||
| | |


 Crinkled Seam Binding Ribbon")

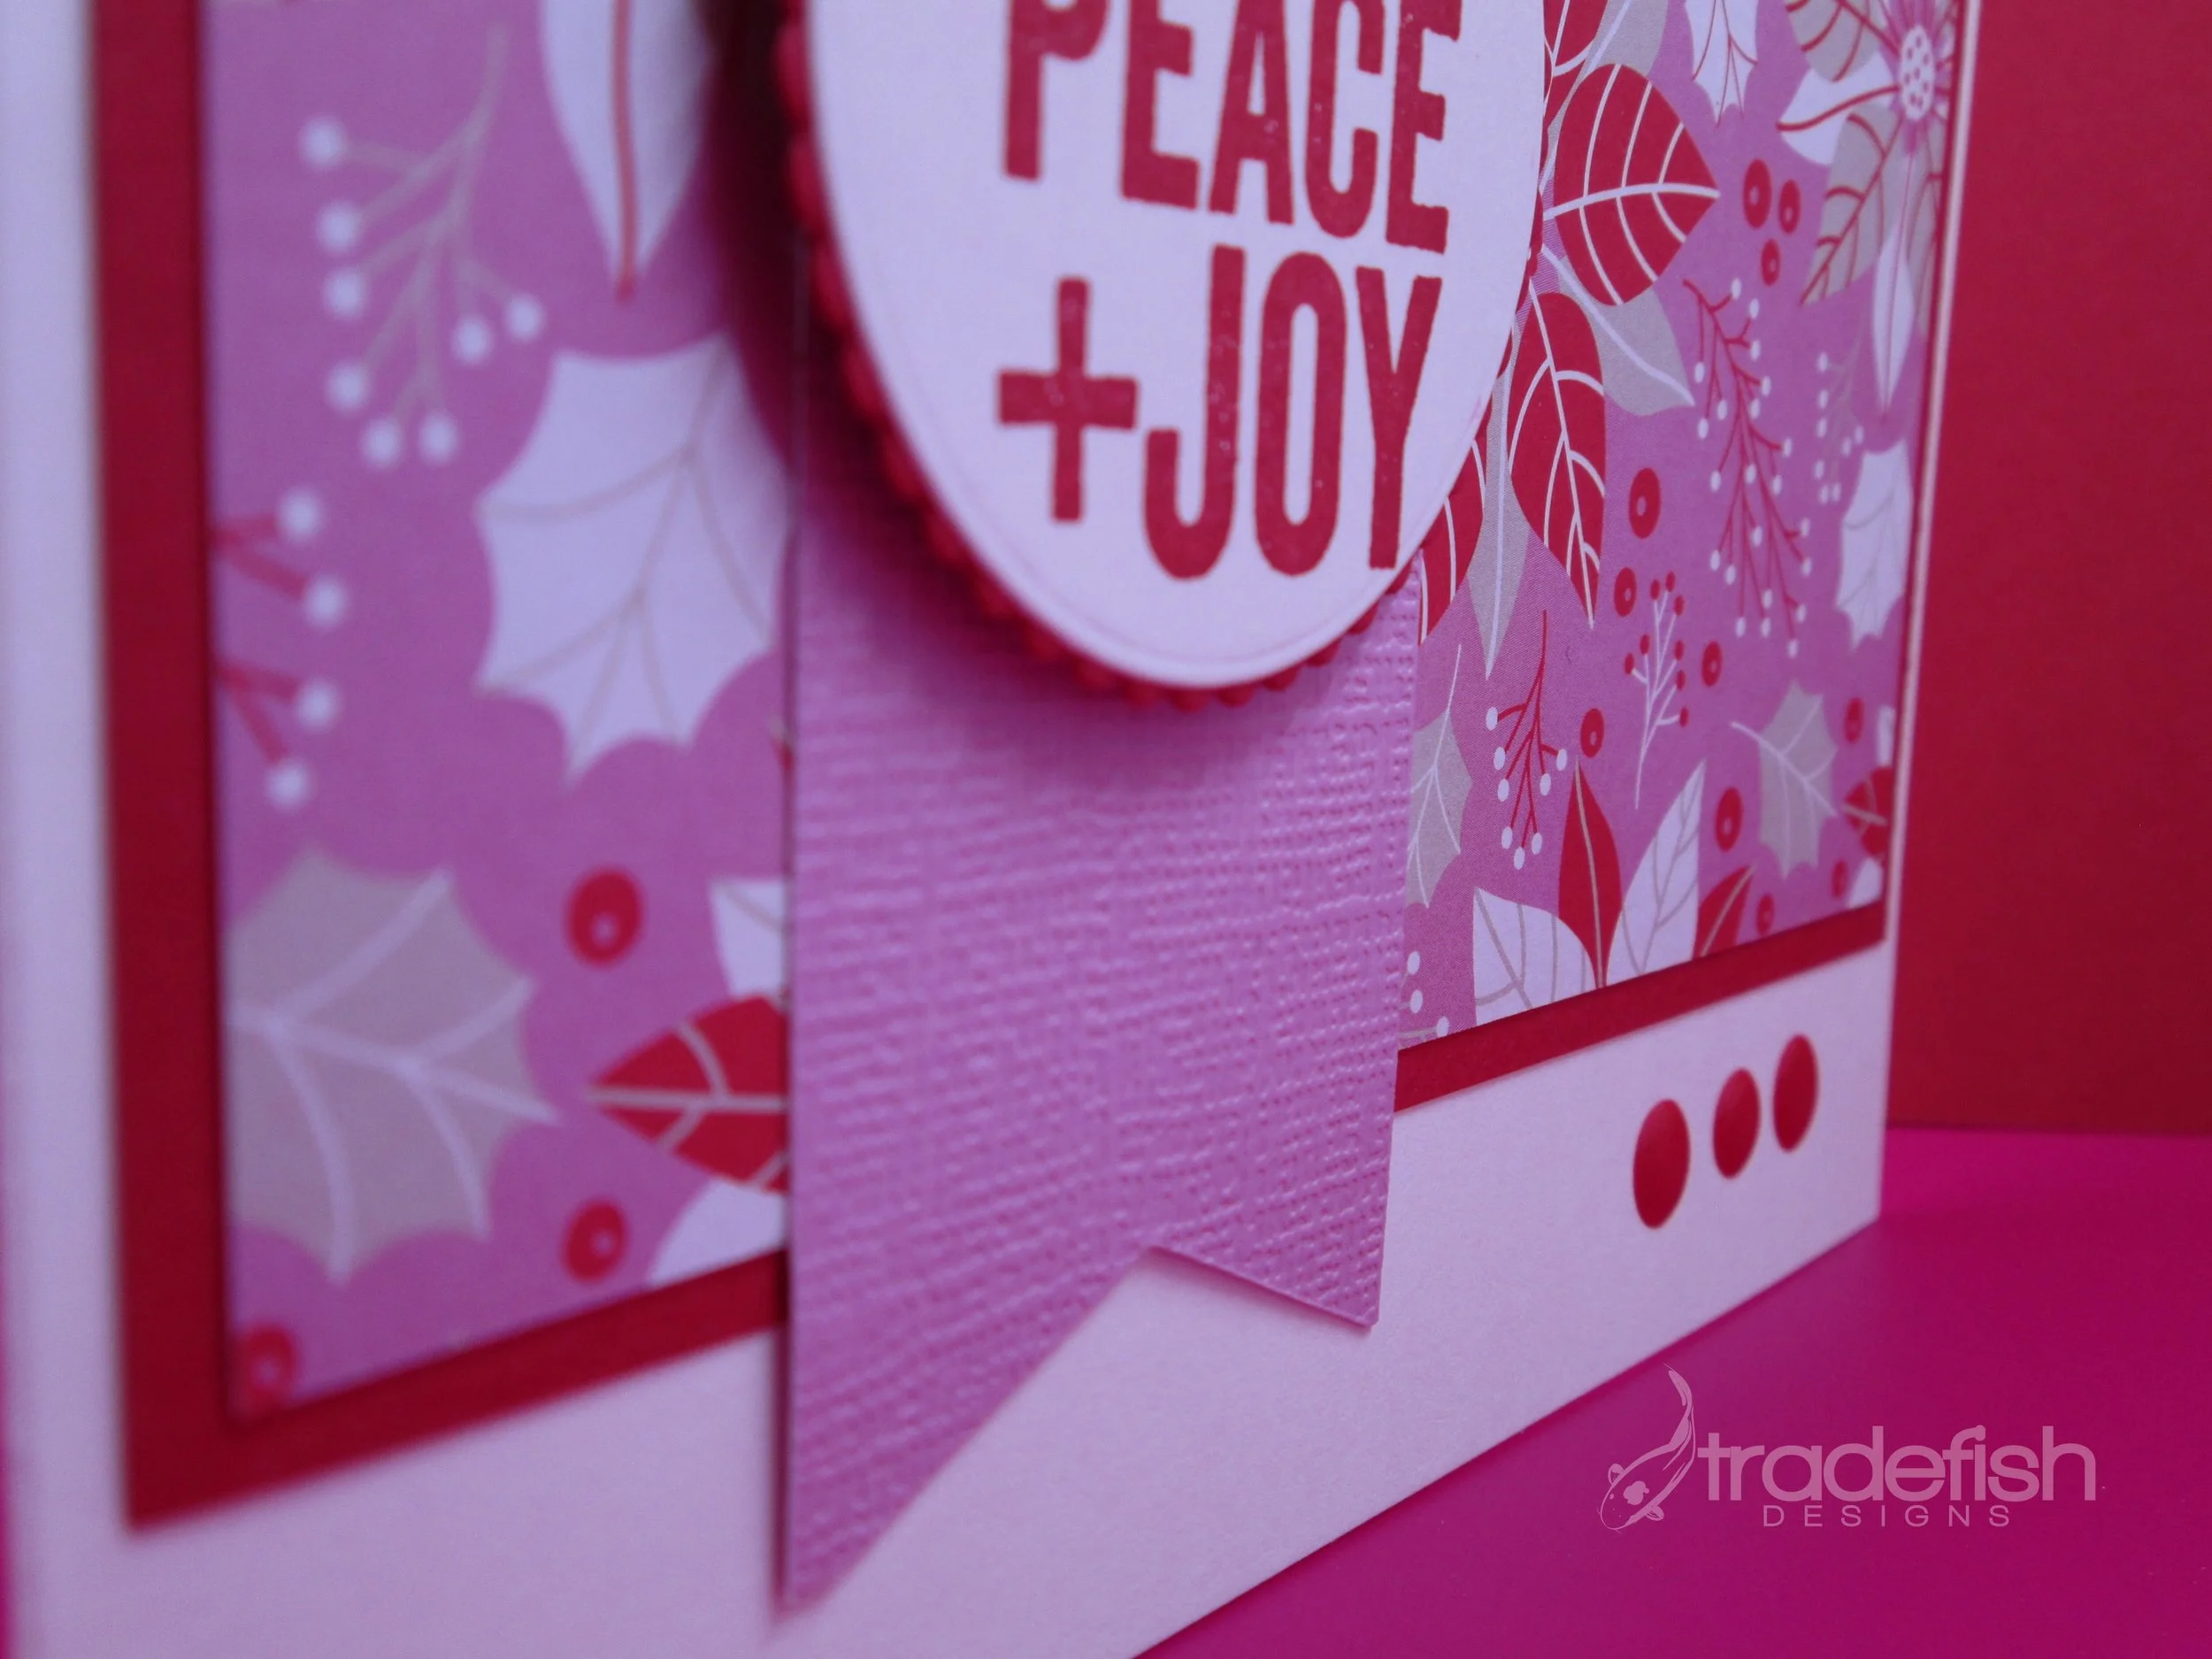
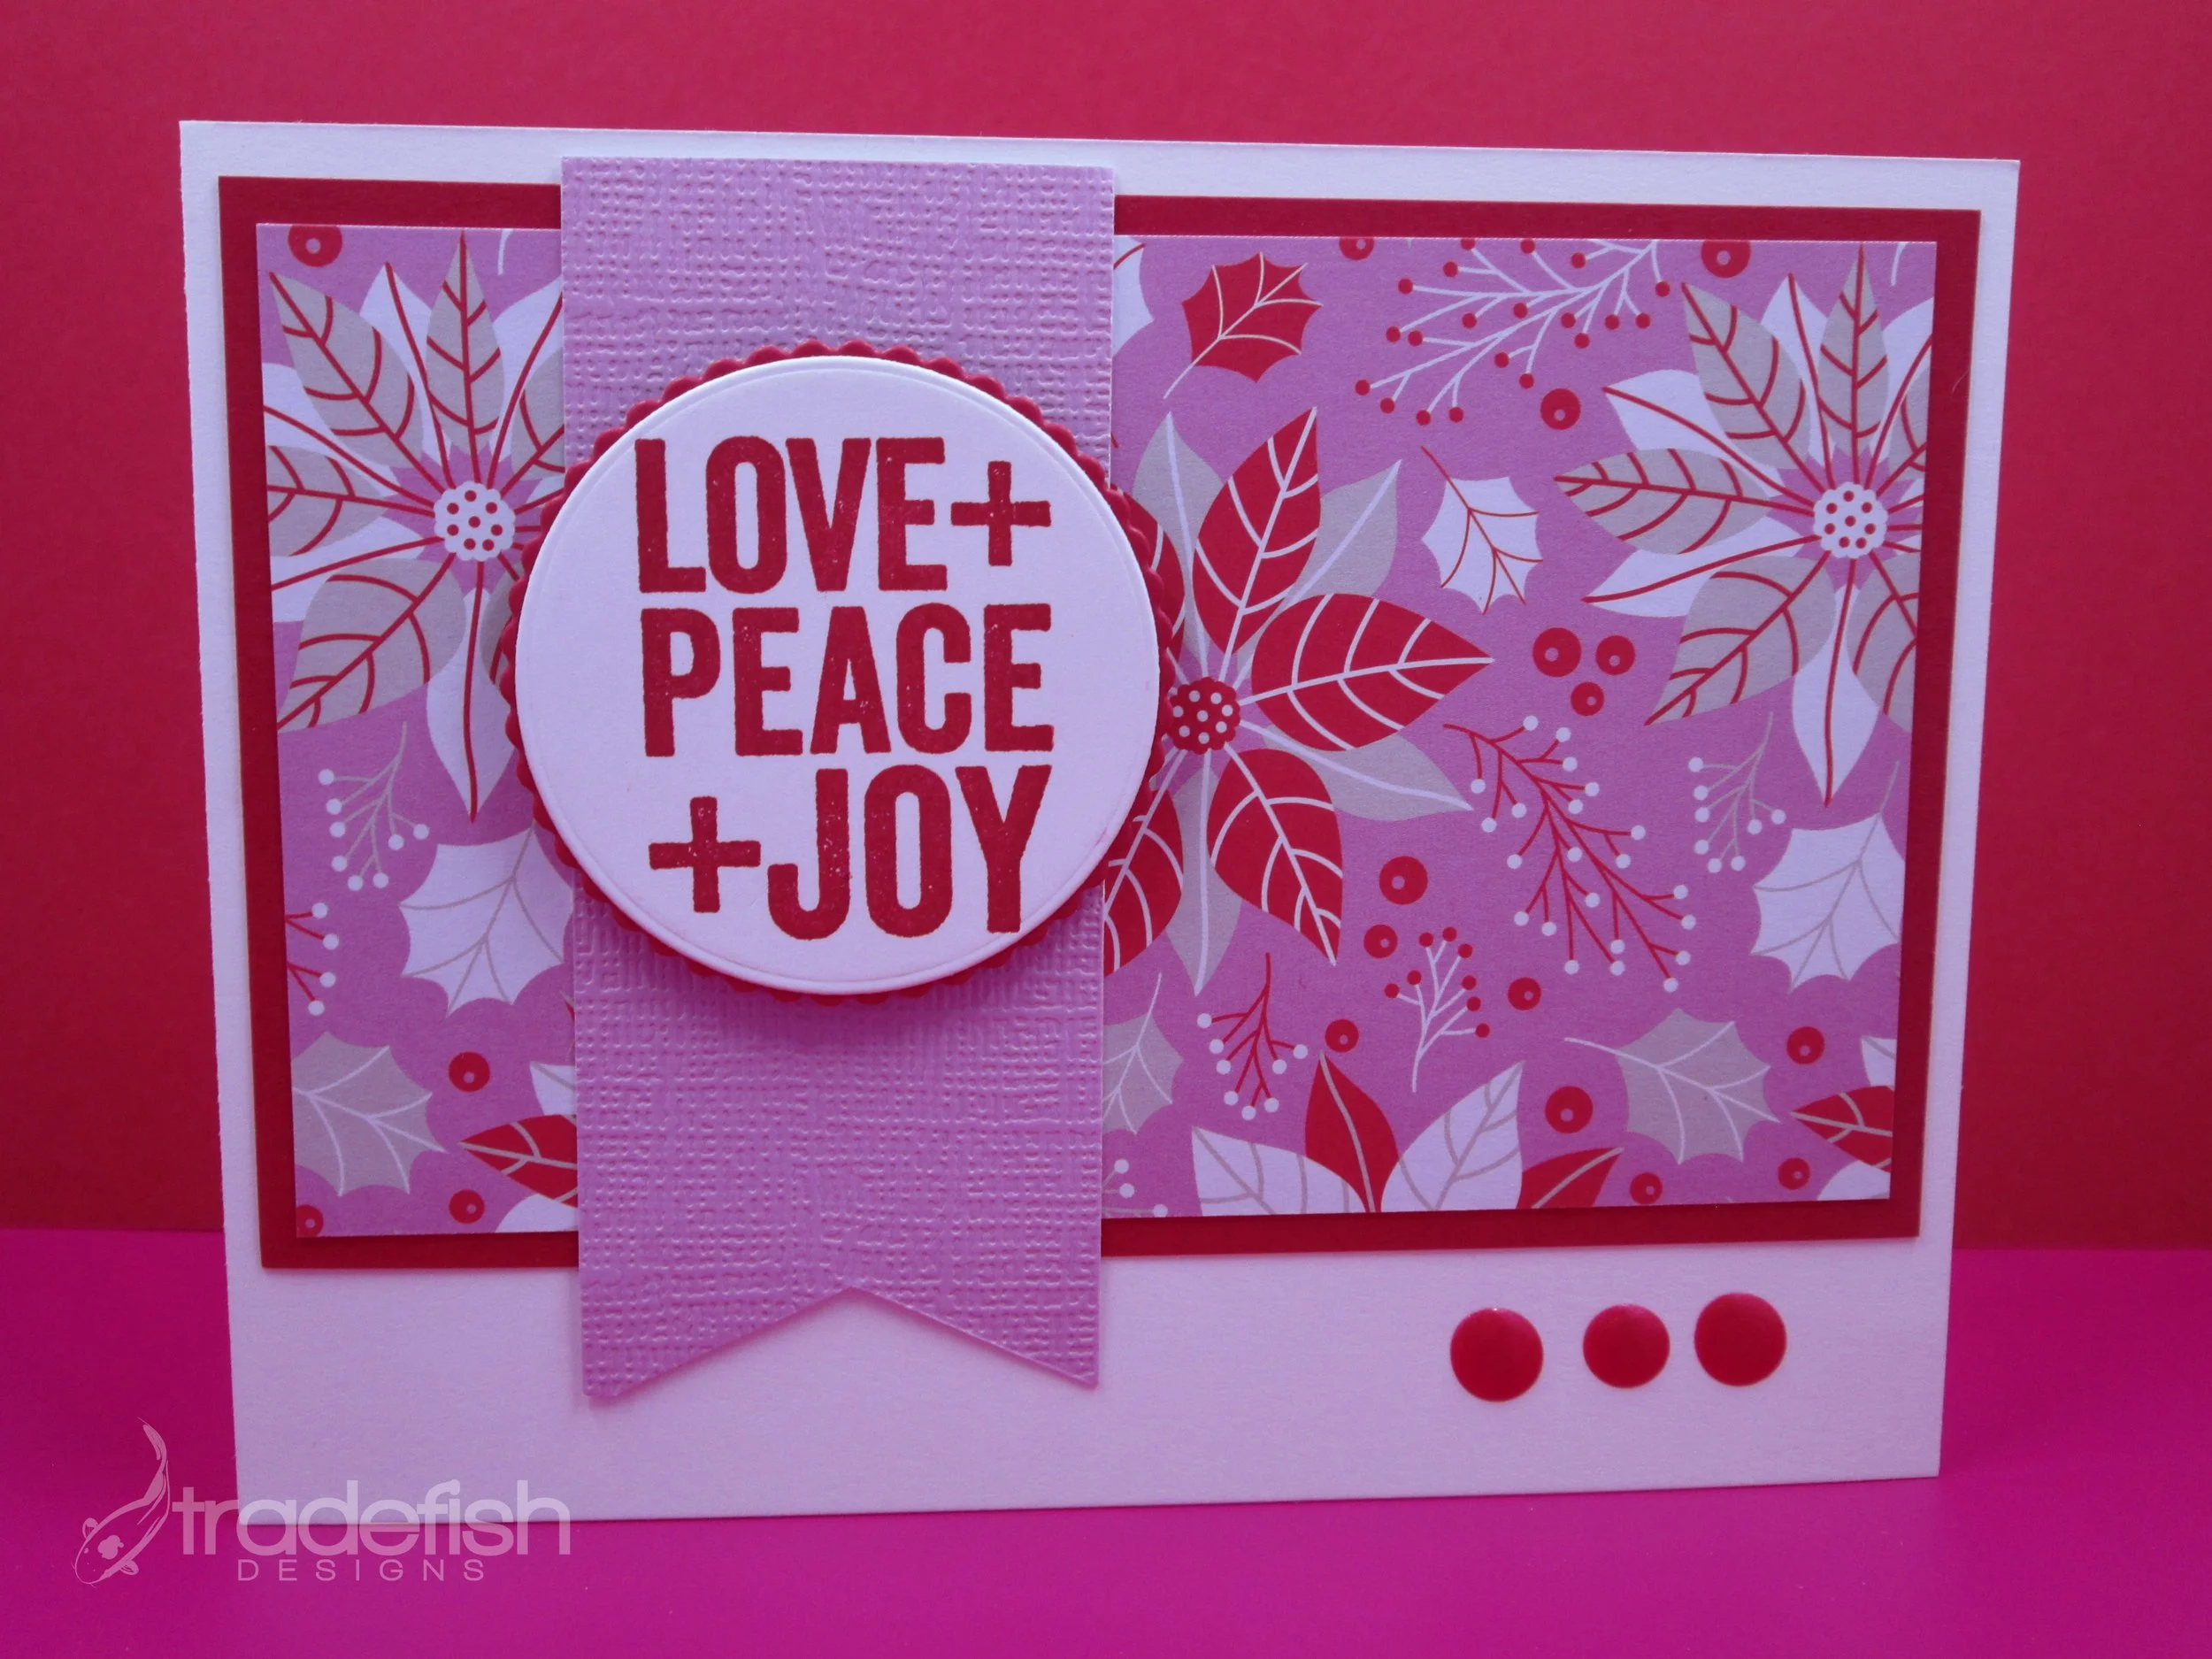
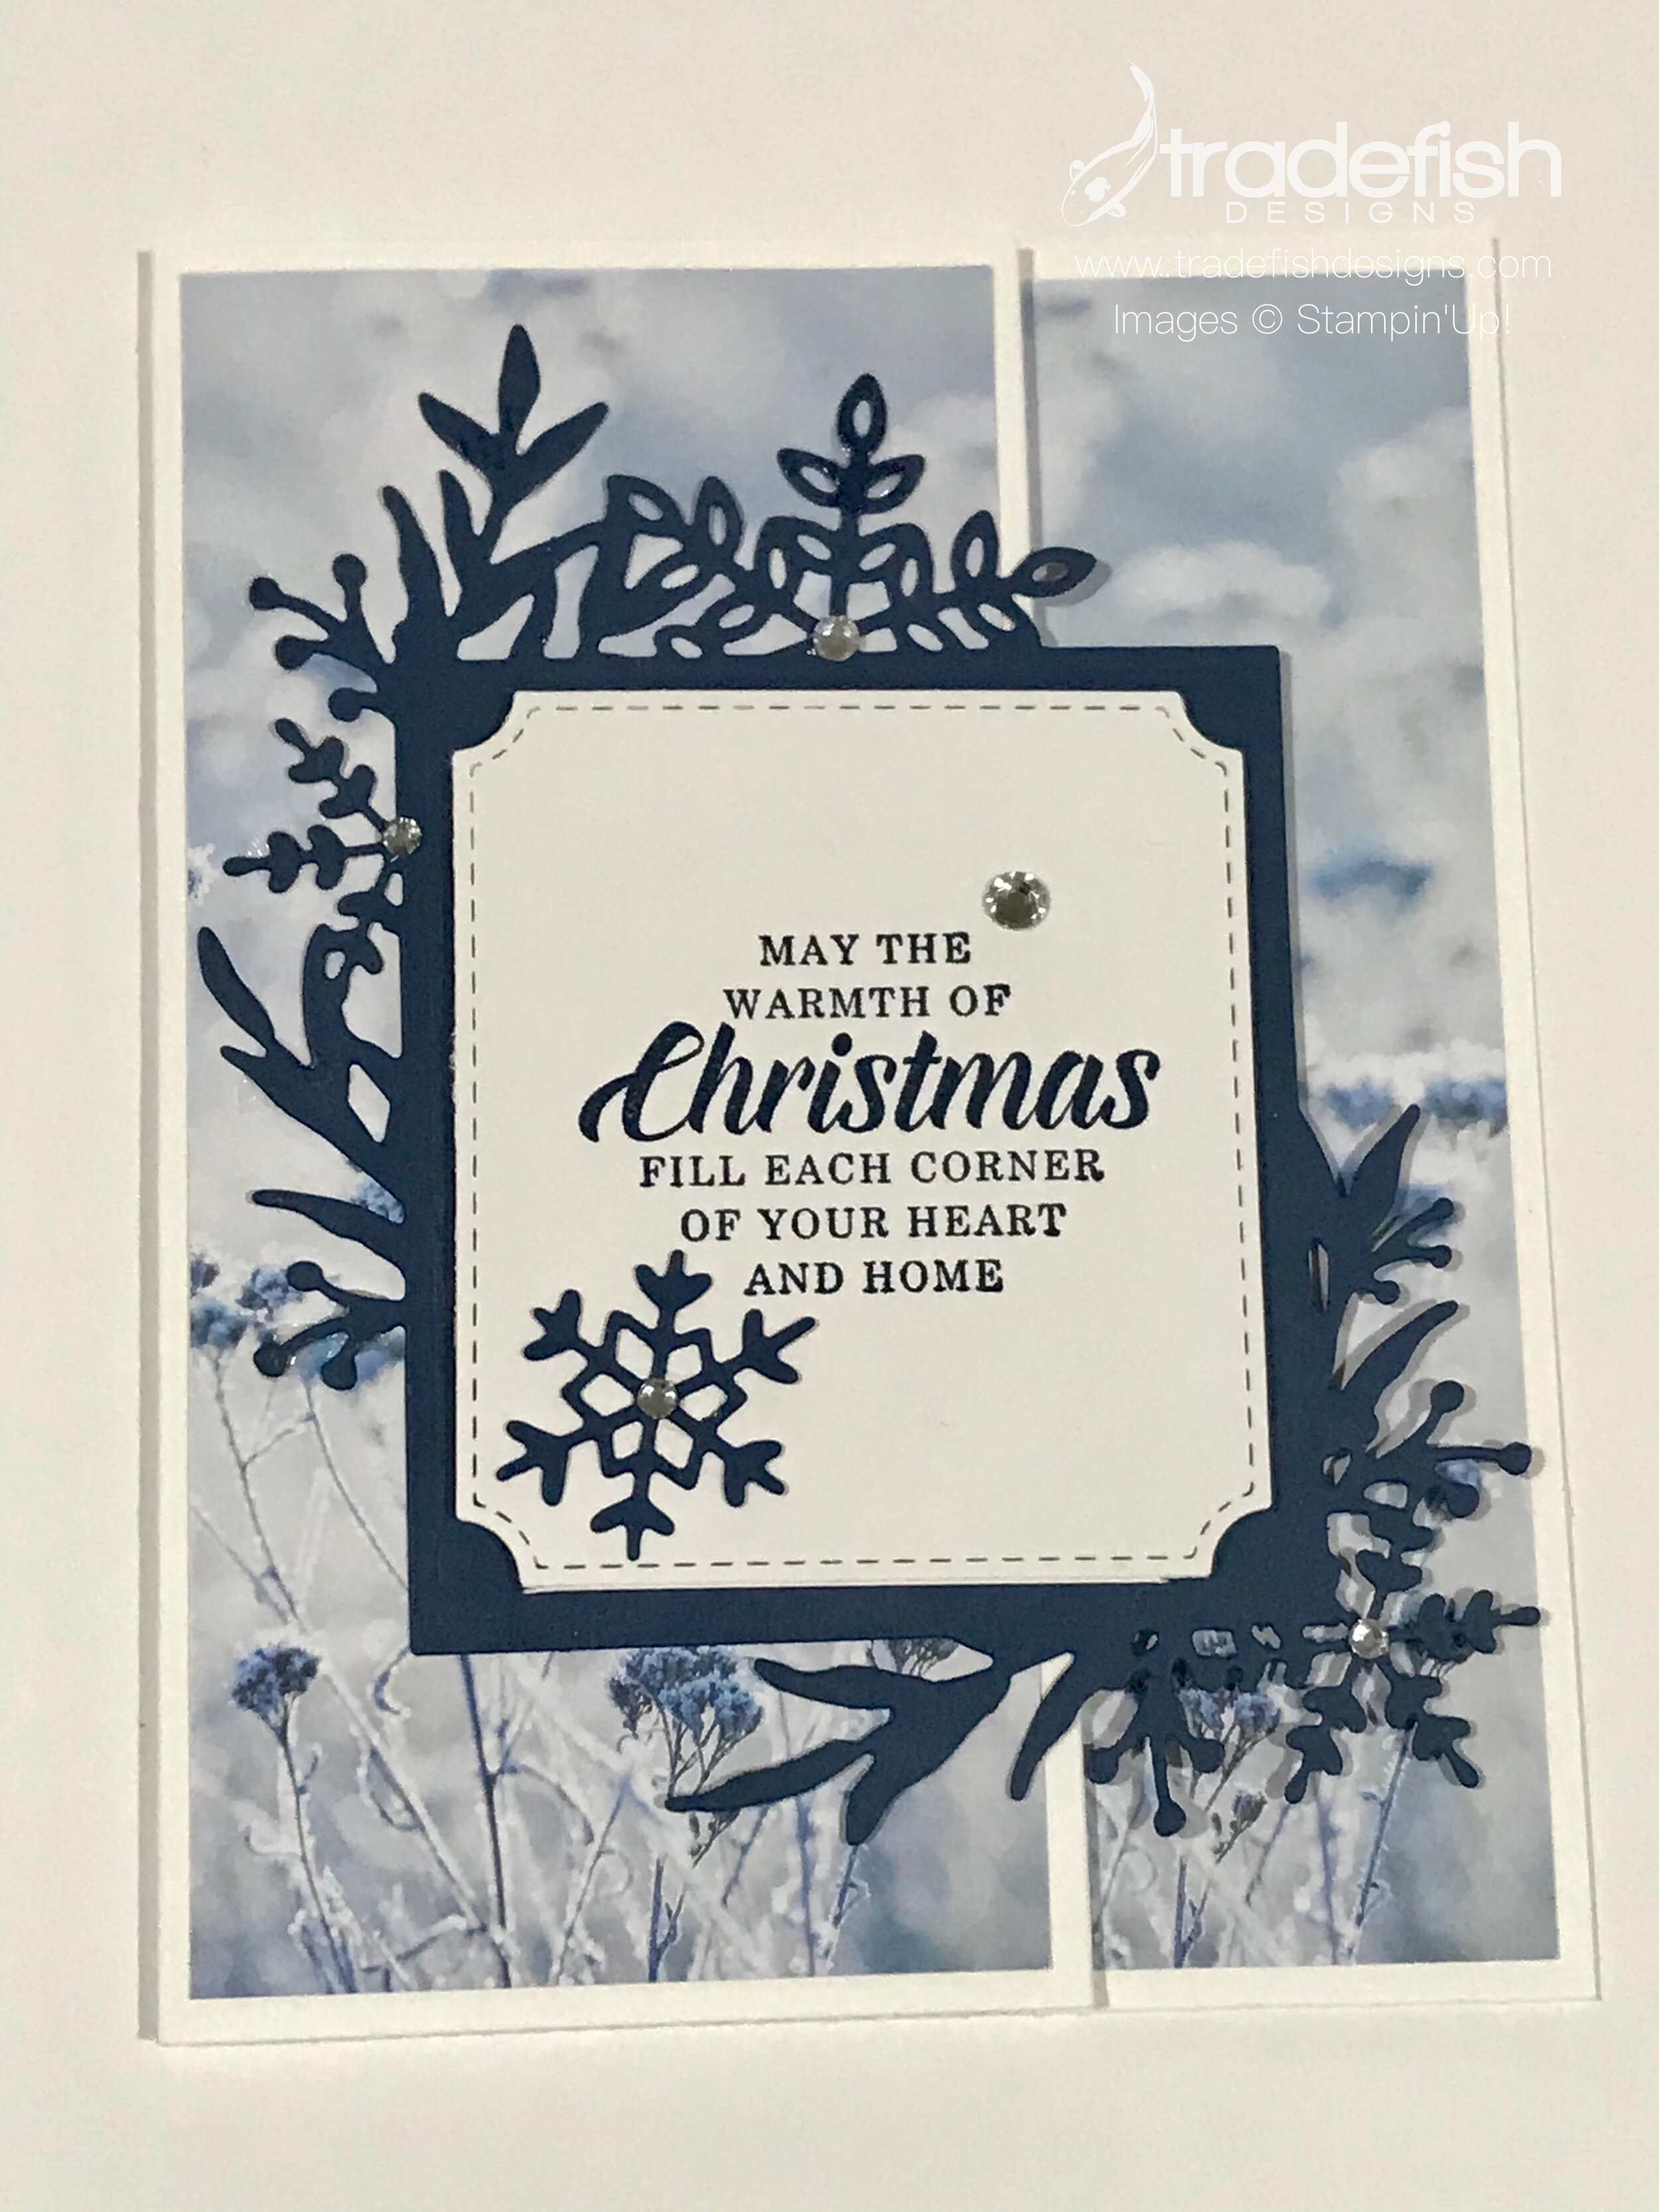
Thinking of You This Season - Holiday Card
Today’s card is a Christmas card using the Winter Woods stamps and the coordinating In The Woods dies from Stampin’ Up.

The angle shows the dimension you get from the tree and the background embossing. Mixing all the layers gives the card depth. Plus I like to add a little bling with the gold glitter enamel gems,

Don’t forget to decorate the inside of the card. I used the coordinating designer series paper and stamped the pine tree off the side to allow for space for a holiday message.

I hope you enjoyed my card today. If you are interested in any of the items I used in this project please check out the Product List below. Keep it crafty friends!
| |  | ||
 | | ||
| |


Keep it crafty peeps!
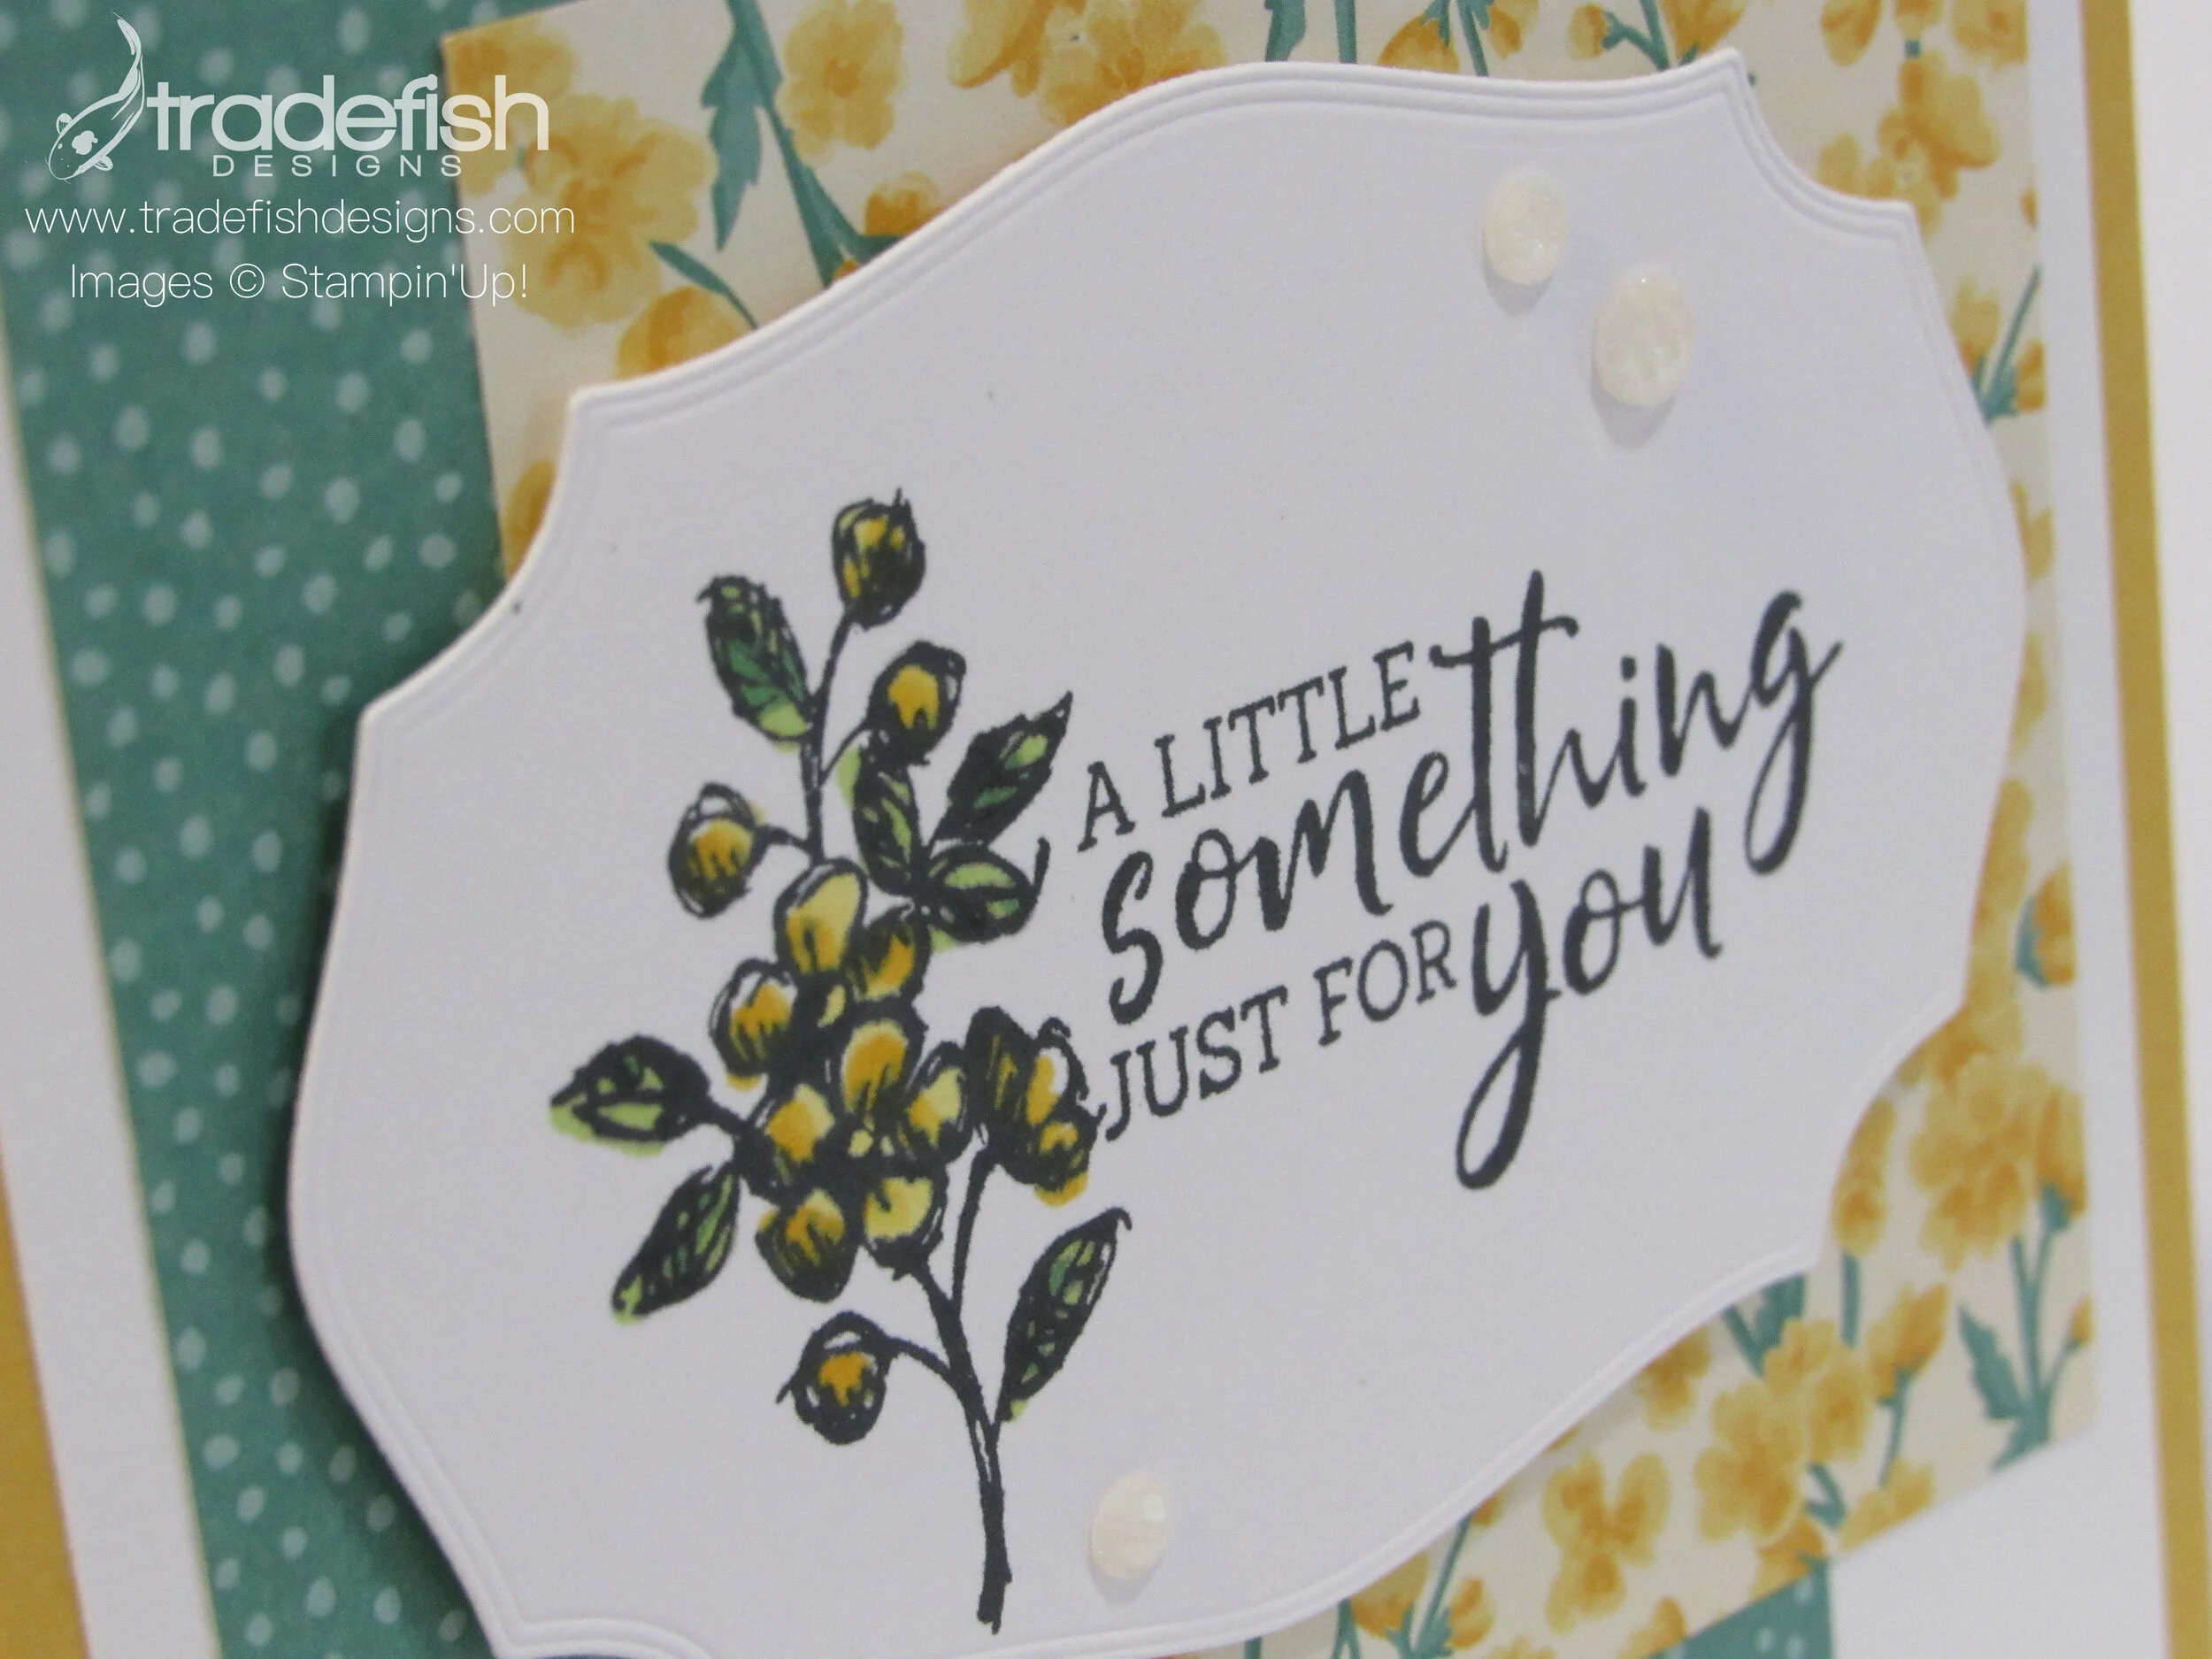
A Little Something Just For You.
Here’s another card using my favorite stamp set in the current Stampin’ Up catalog - Fancy Phrases. I’m not a girly girl and flowers aren’t normally my go to design but it’s something about the sketchy design and the sentiments that just speak to my crafty heart.

I always like to take an angled photo to give you a different perspective to the card. It also shows of the dimension is an eye-pleasing way. This photo shows off the lovely die cut from Tasteful Labels dies, the Elegant Faceted Gems and the fact that I don't always color inside the lines (which just proves it’s homemade). Isn’t this label die just gorgeous?!

Notice I added a little flower to the envelope? No reason you can’t add a smile to mail carrier’s face right?!

I hope you enjoyed my card today. If you are interested in any of the items I used in this project please check out the Product List below. Keep it crafty friends!
 | | |||
 | | |
 Designer Series Paper")


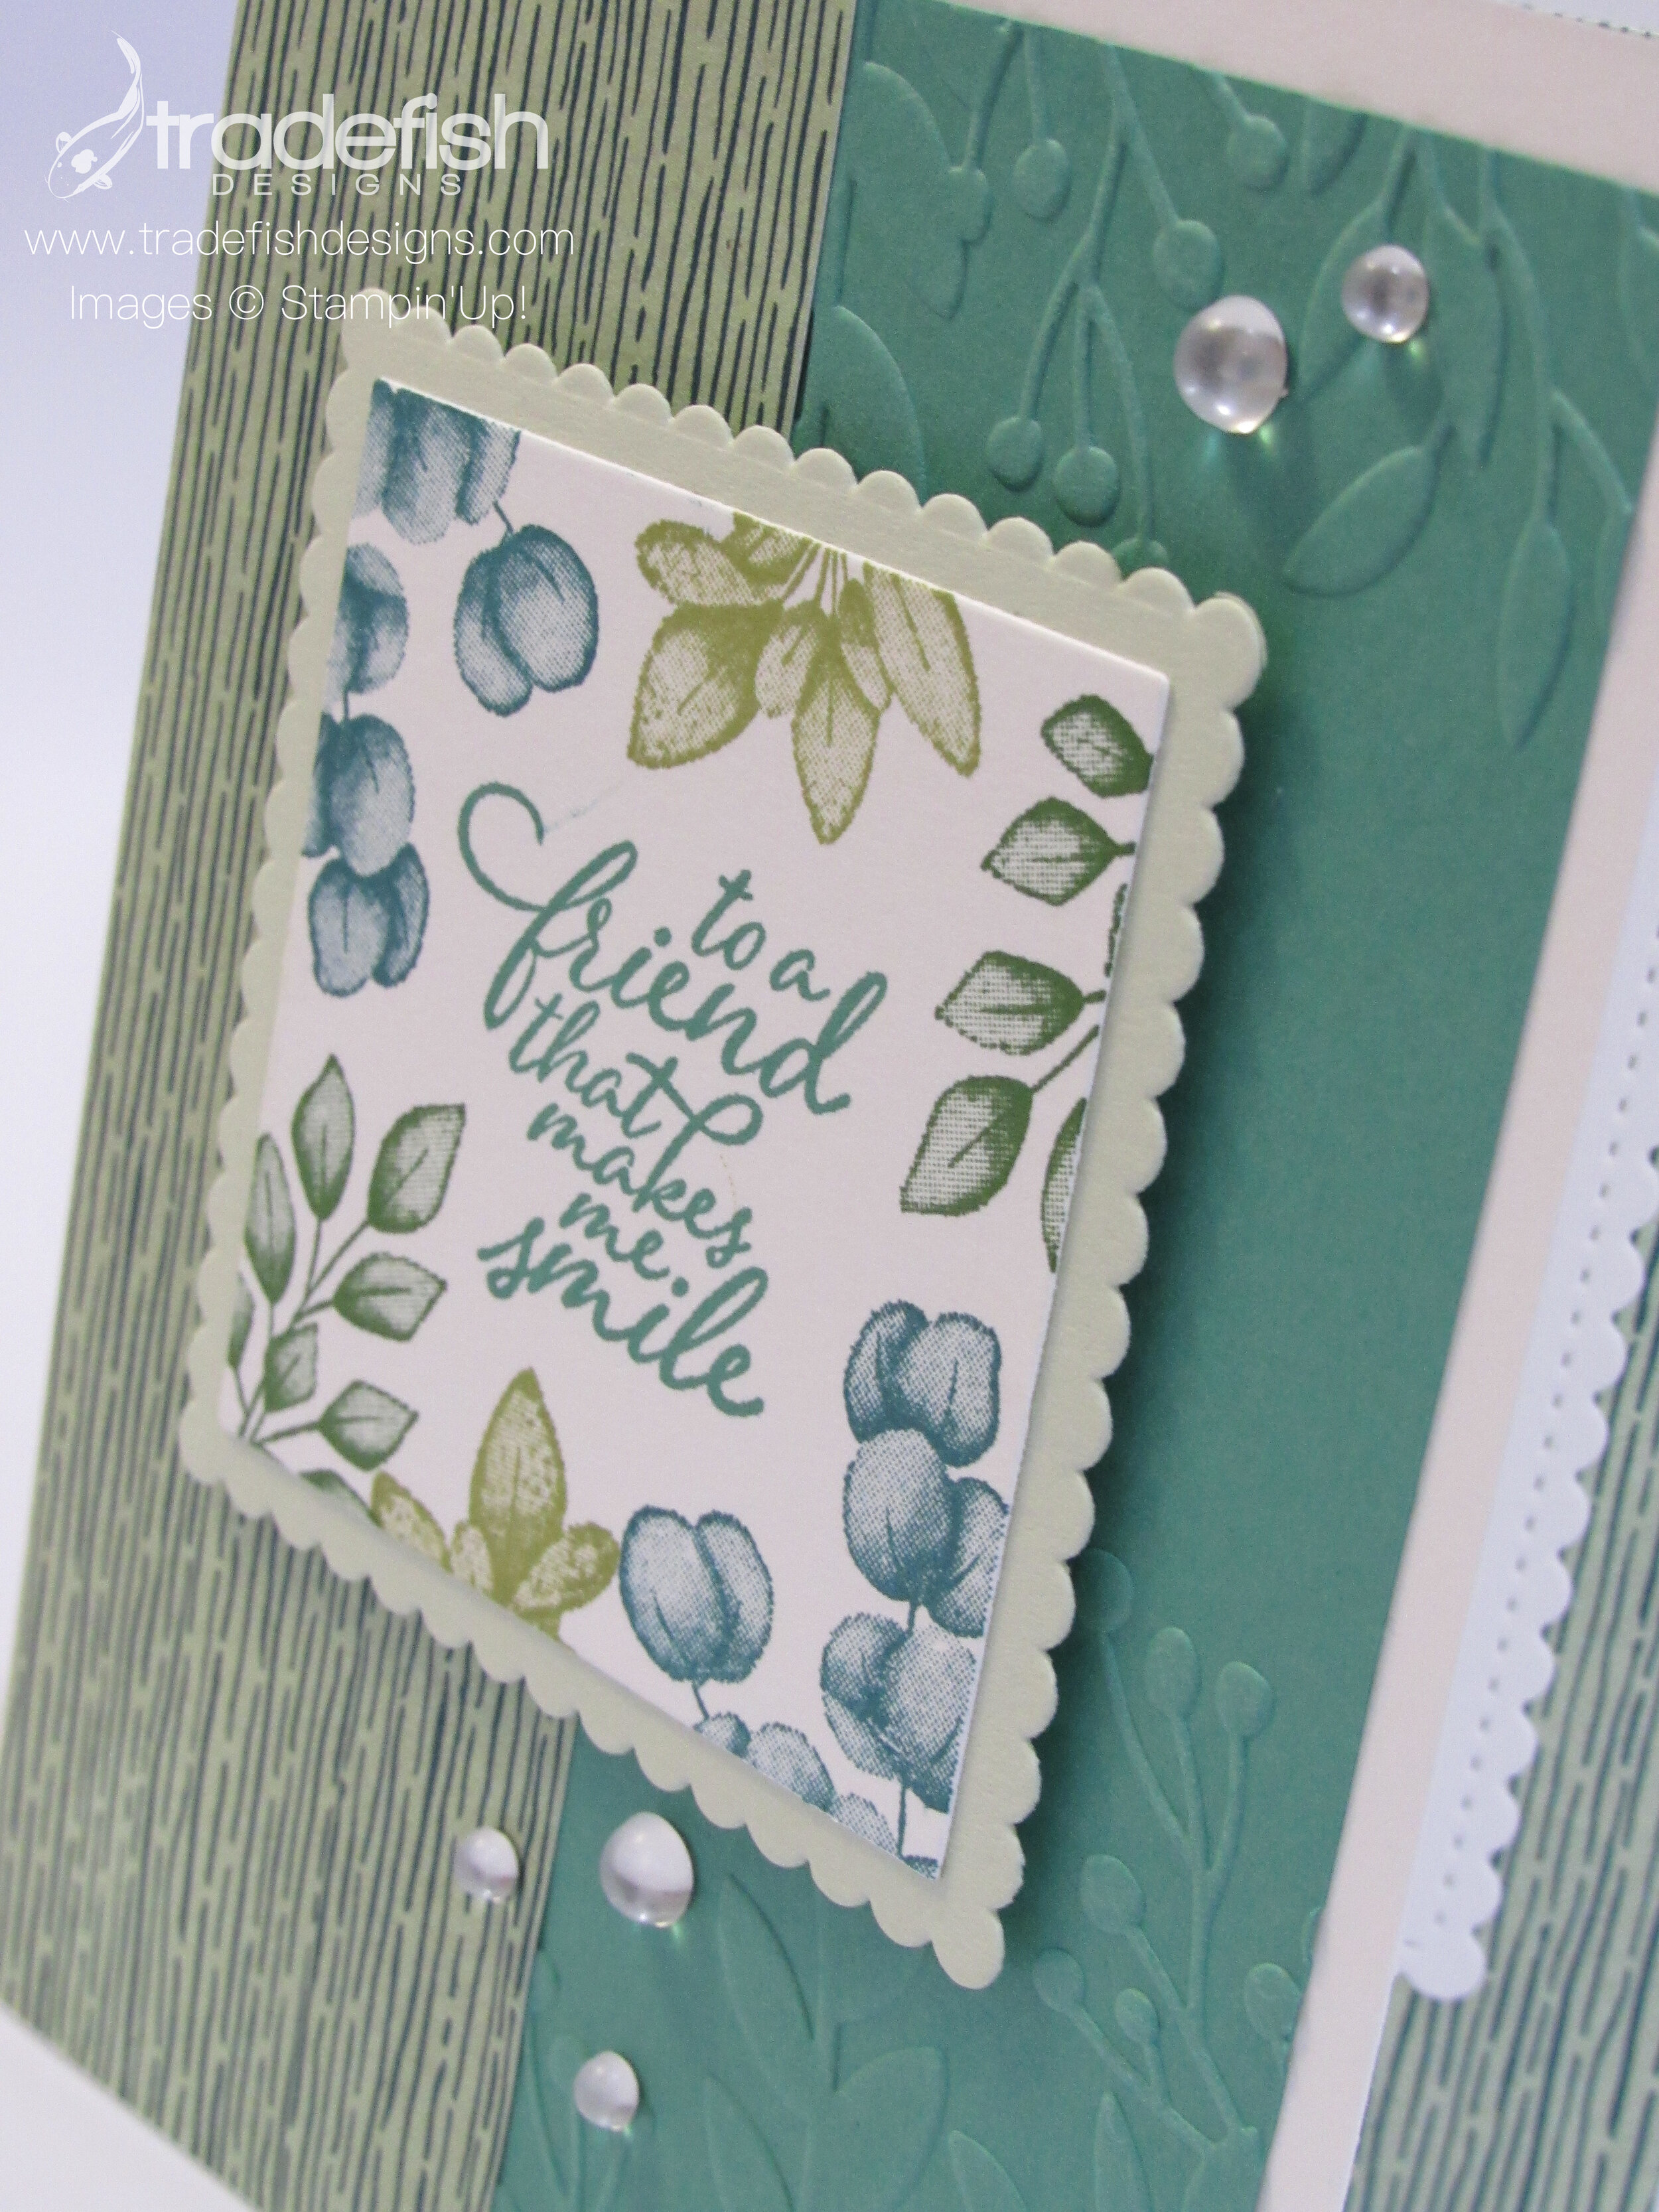
To a friend that makes me smile
The card for today was from a kit someone sent to me but I did what I call “freelancing”. This just means that I took the original design and amped it up to fit my style. This project uses one of my favorite stamps sets from Stampin’ Up…Forever Fern. The color combinations in the coordinated designer series paper is just gorgeous.

The soothing colors, textures and die cutting just make me smile. You can see the coordinating embossing folder, epoxy drops and multi colors of leaves all on display. Making this card was just so satisfying.

Remember my crafty friends, no naked envelopes!

I hope you enjoyed my card today. If you are interested in any of the items I used in this project please check out the Product List below. Keep it crafty friends!
 | ||||
 | ||||
 |  | |
")


Keepin’ it real crafty!
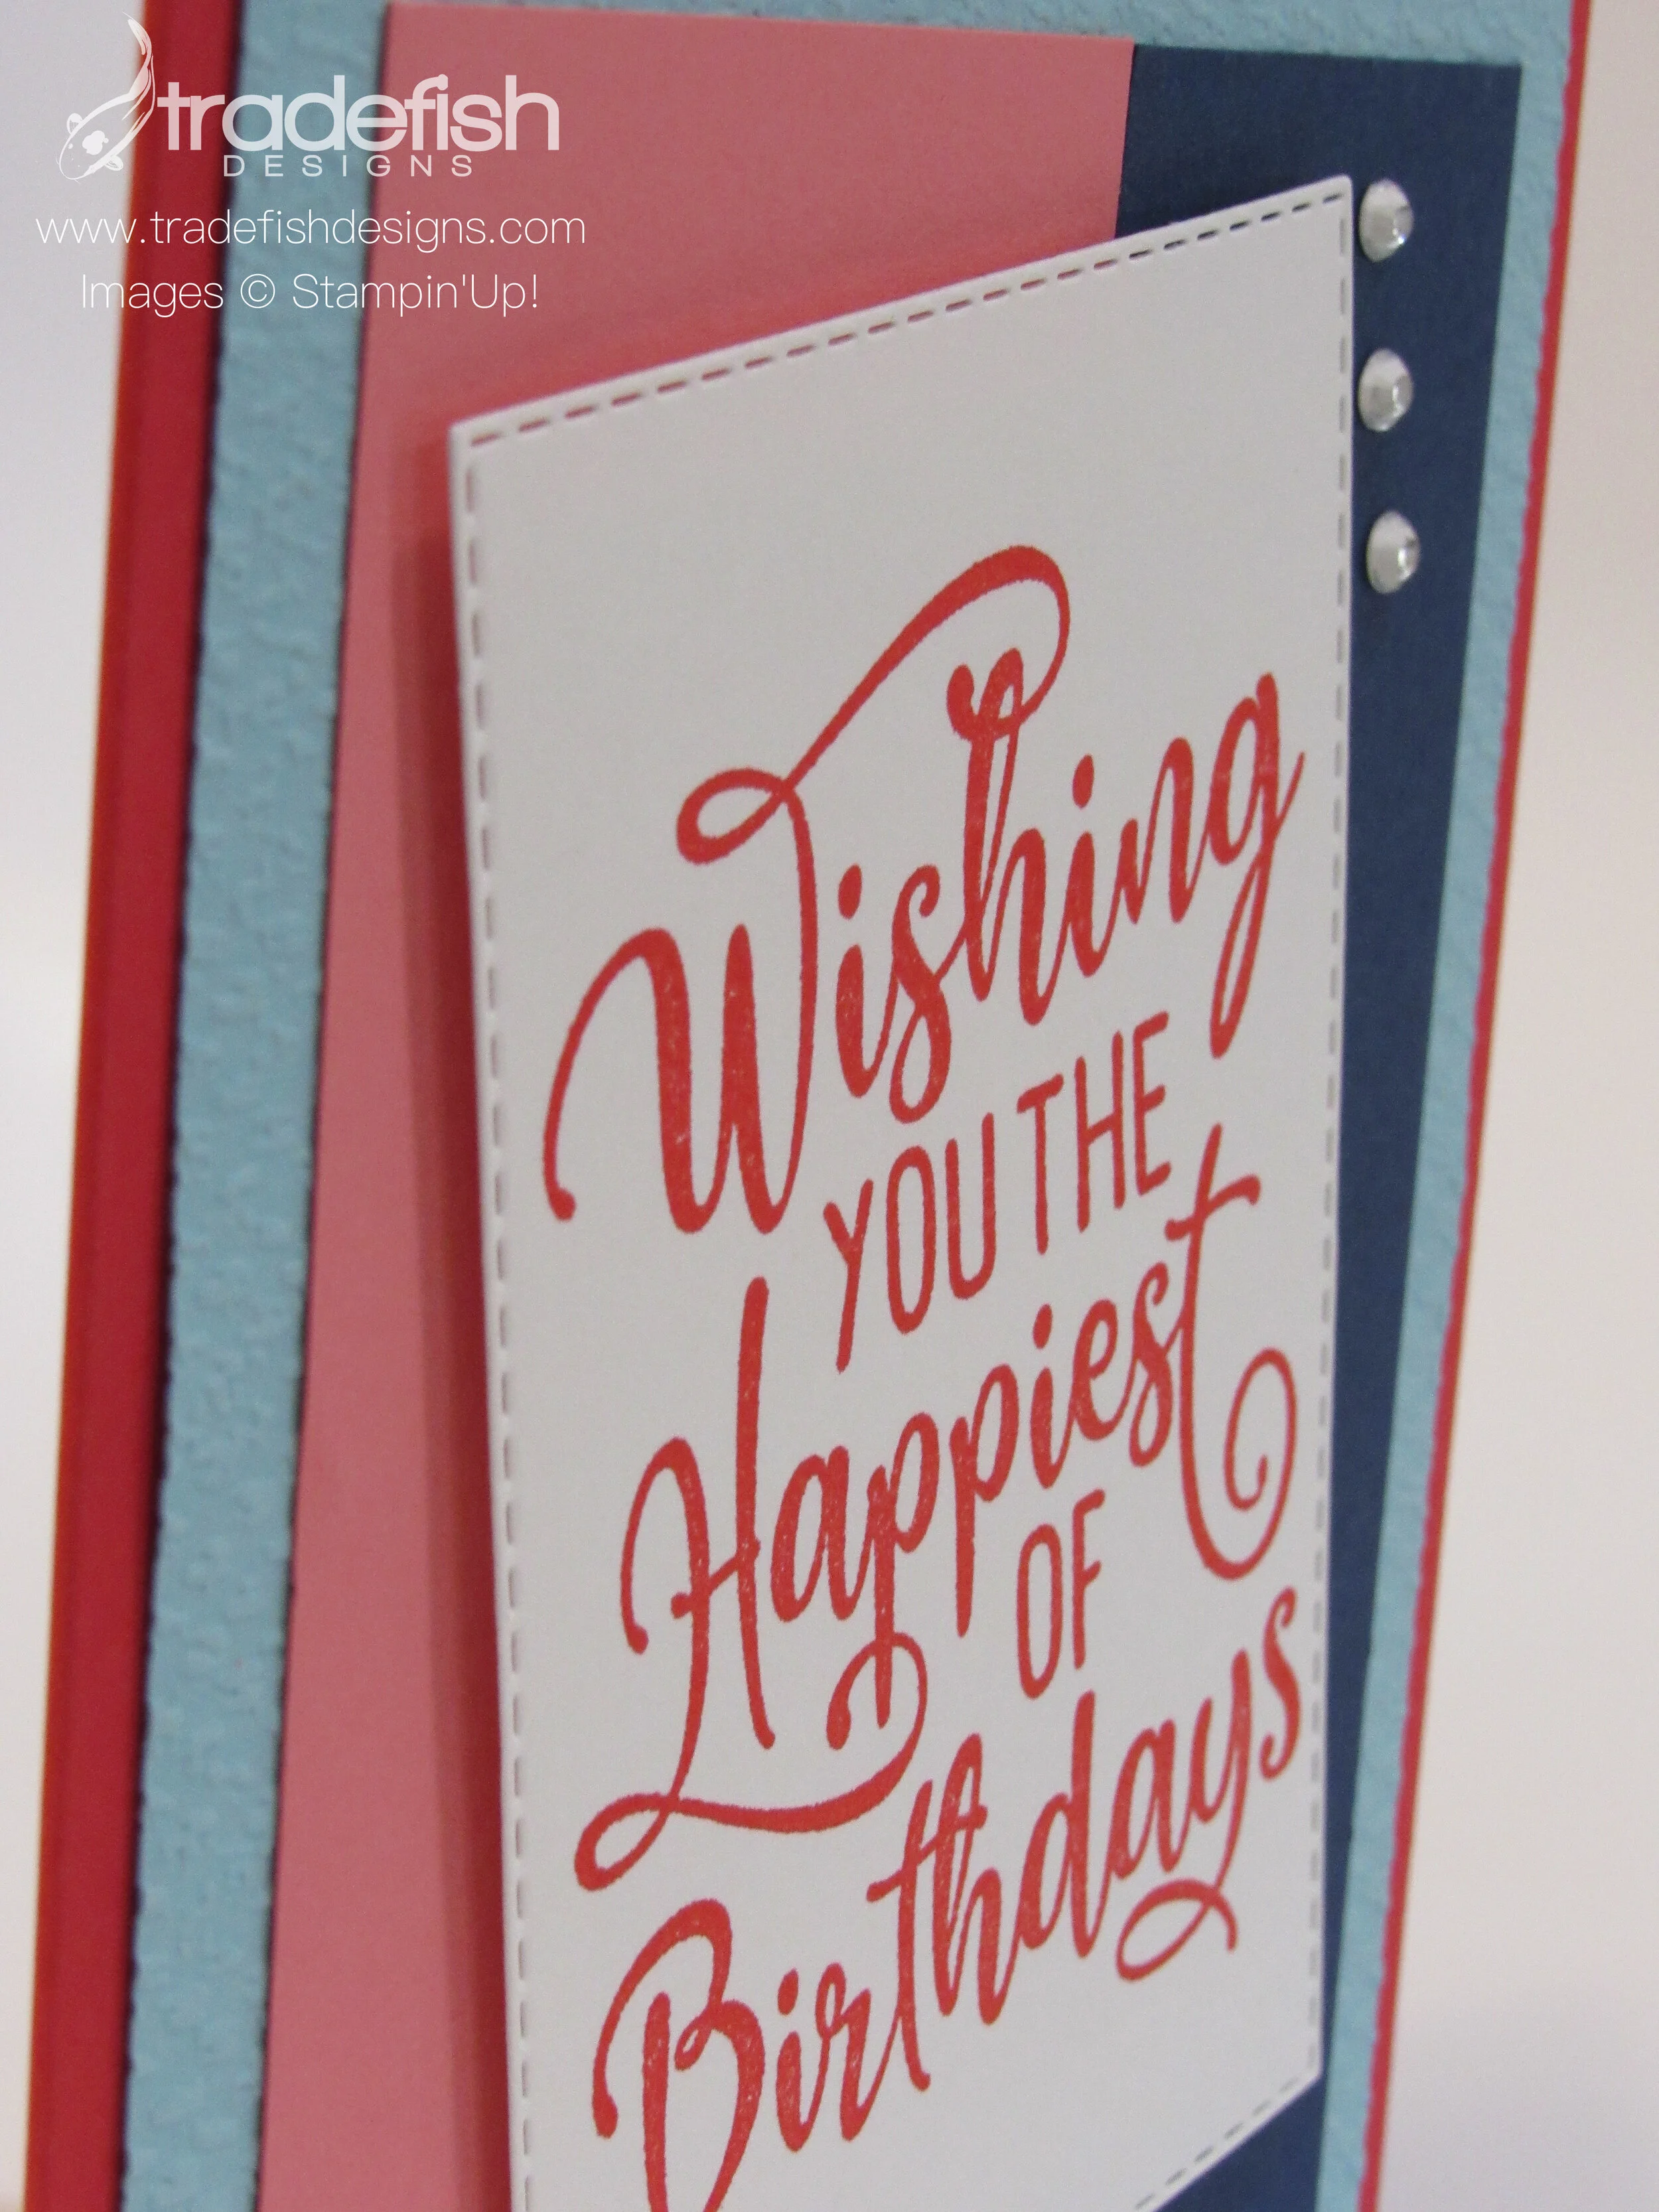
Colorsplash #3: Wishing you the happiest of birthdays.
I took part in a Colorsplash Challenge which required the use of 4 colors: Poppy Parade, Flirty Flamingo, Balmy Blue and Night of Navy. Those colors and a new stamp set led me to this fun birthday card. Loving how the design shows off the texture of the embossing done to the Balmy Blue cardstock. #colorsplash3

At this angle you can see the cool stitching on the rectangle die and the rhinestones.

I couldn’t forget the inside of my card. A simple and bright message in Poppy Parade.

I hope you enjoyed my card today. If you are interested in any of the items I used in this project please check out the Product List below. Keep it crafty friends!
 | |||
| |
")


Keepin’ it crafty!