
Blind Spot Animal Sanctuary and Printing Center USA
Charity begins at home with Christmas cards and calendars for Blind Spot Animal Sanctuary using Printing Center USA!
Hello everyone! Today I’m taking a break from showing off may latest card designs to share more about me and what I’m passionate about…
As I have mentioned in the past, I am proud to be on the Board of a farm animal sanctuary located in Rougemont, North Carolina. The sanctuary is called the Blind Spot Animal Sanctuary and Rescue. Blind Spot is home to over 100 neglected and homeless farm animals. The goal of the Sanctuary is to educate, rehabilitate, raise awareness and find loving homes for these forgotten animals. One of the ways I give of my time is to create homemade Christmas cards to send to anyone who has donated over $25 in the year to the Sanctuary as a thank you for donating and supporting their work. Last year I sent out over 500 Christmas cards. This year, I have created 750 homemade cards to send out! Now you know why I post Christmas cards on my blog throughout the year…because I’m making them all year round to keep up! I will post this year’s card below. If you want a chance to get one, go online using the link HERE and make a donation right away!
What you may not know is that for the past 3 years I’ve created a calendar as part of an annual fund raiser for the Sanctuary and to get this done I have partnered up with Printing Center USA. They print everything from flyers to books and have an amazing customer service department that is always ready to help.
I am in the middle of working on our 4th calendar for 2021 and want to promote this wonderful company. As I said, we’ve create calendars that were 8-1/2” x 11” inches with saddle stitching for 3 years. The calendar started out pretty simple with just photos. Then I added stories to go along with the photos. This year I’m working to create a 12” x 12” calendar with multi-photo layouts and stories. It will be the biggest and best yet.
Each year I’ve gotten better at designing the calendar and their tools have improved year over year making it possible for me, a full-time attorney, to use what little free time I do have to create something so important. Not only that, they are one of the best deals around for fundraisers and anyone interested in designing a good quantity of calendars. We usually get at least 100 calendars but they can do much more. If you are looking for a great resource for all your printing needs and were considering creating a calendar for fundraising I encourage you to check them out! Check them out HERE!
I’ll let you know when the calendars are in and ready for purchase! In the meantime, go to Blind Spot and make a donation of $25 or more to get a Christmas card from me…tell them Cecilia sent you!!!

Here’s a sneak peek at what you could receive from me for making a donation of $25 or more!

Keep it charitable my crafty peeps! Donate if you can…
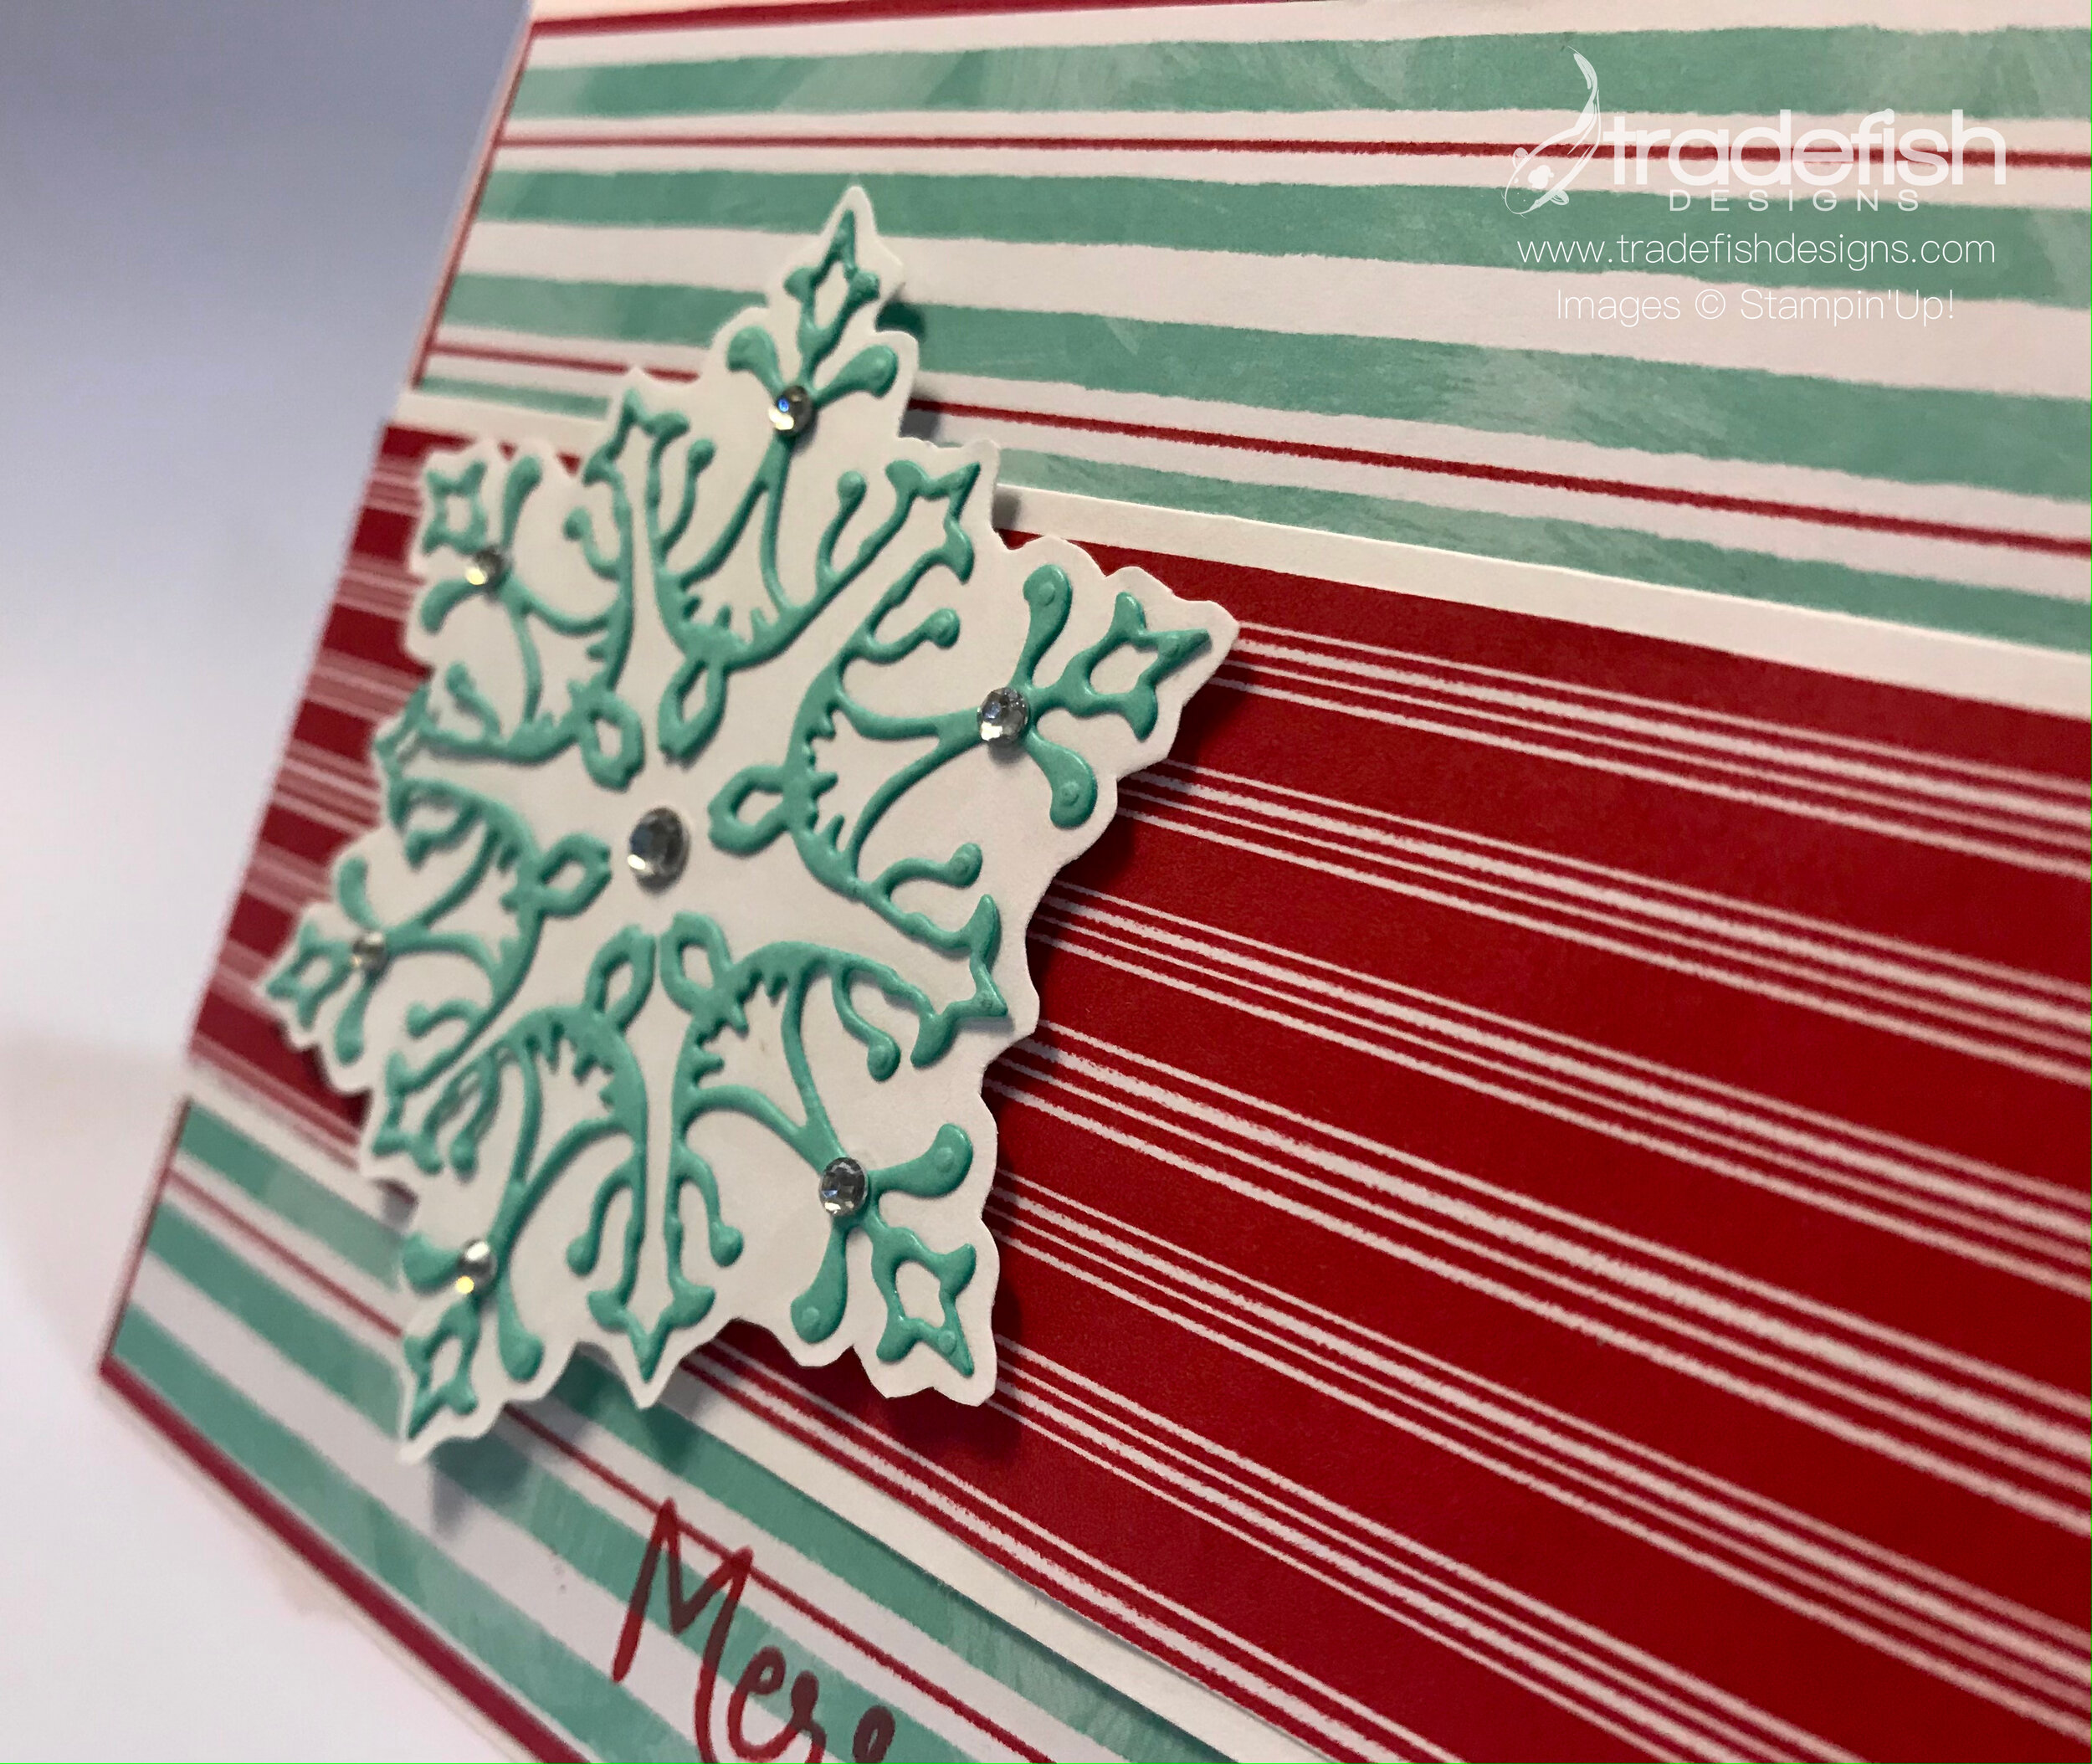
A Merry Christmas Snowflake
A Merry Christmas Snowflake card using Snowman Season and Let It Snow DSP showcasing fussy cutting and using your scrap designer paper.
Here’s a snowflake Christmas card. I used an Operation Write Homes Sketches #09 and some basic rhinestones and I was done. A few paper laters and voila, a fun Christmas card with a non-traditional color scheme.


I hope you enjoyed my card today. If you are interested in any of the items I used in this project please check out the Product List below. Pleases note that some items may be no longer available depending upon when you see this post – if that’s the case, feel free to substitute items you may already have in your craft stash. Keep it crafty friends!

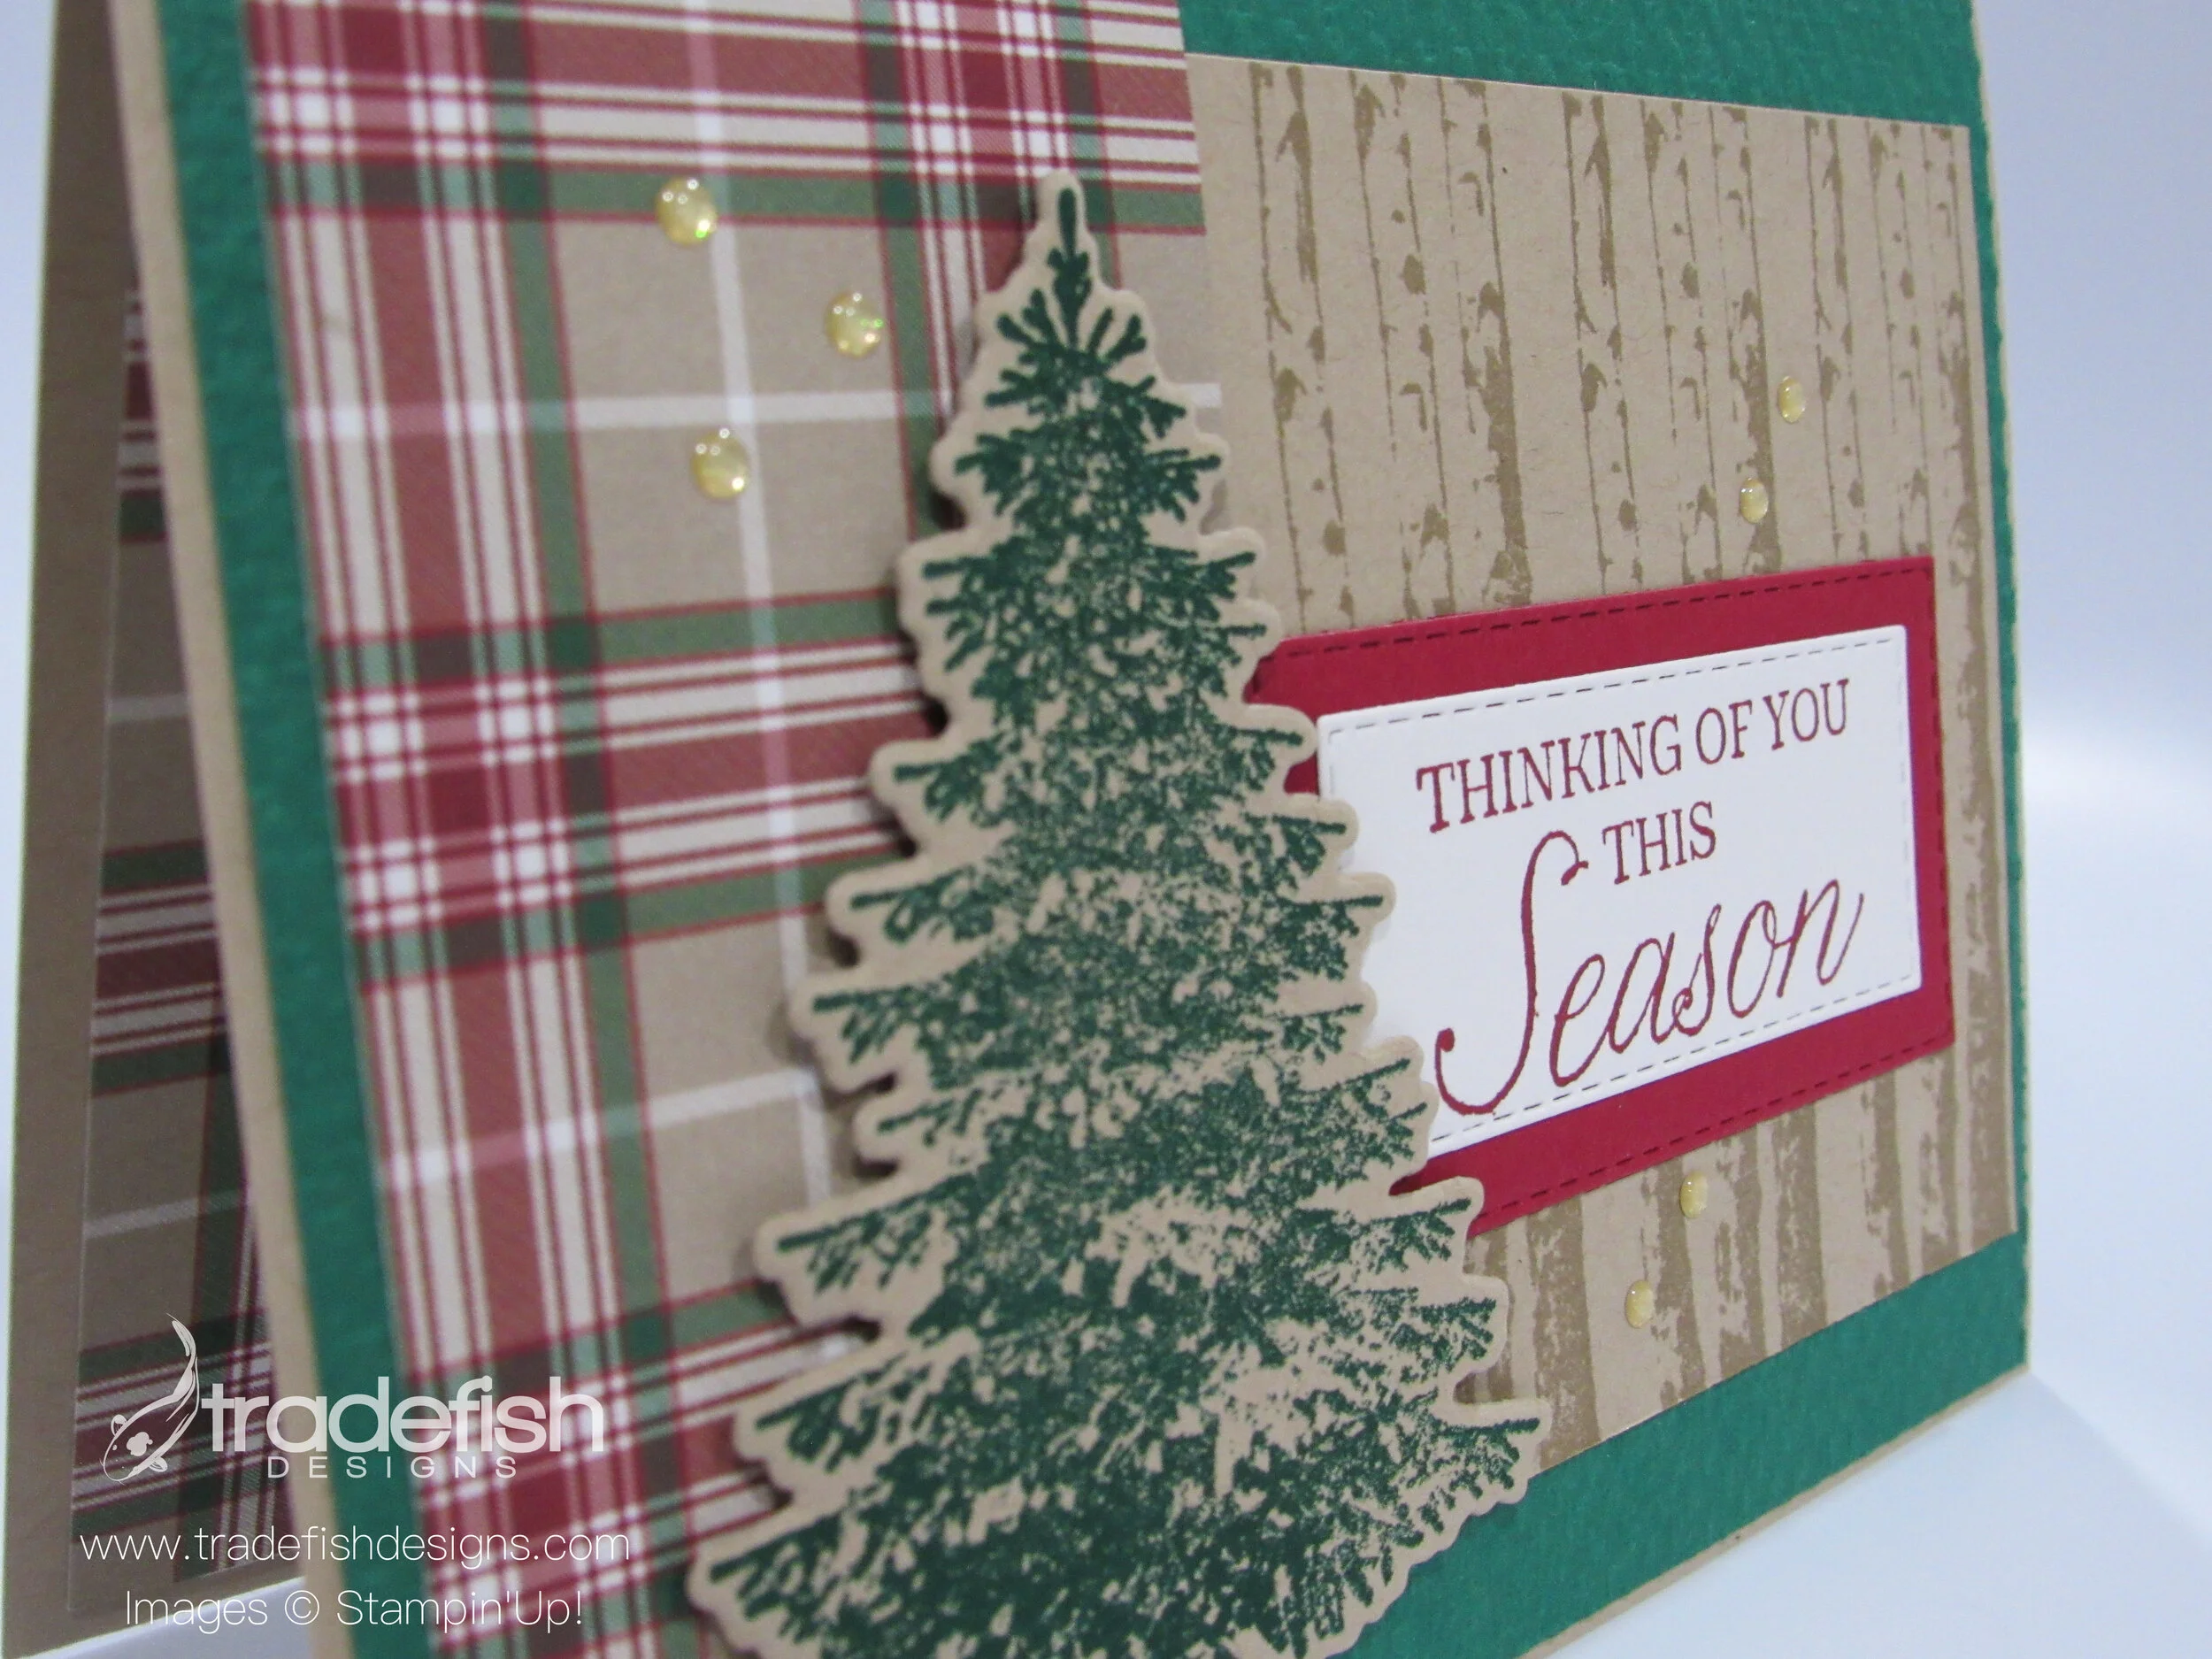
Thinking of You This Season
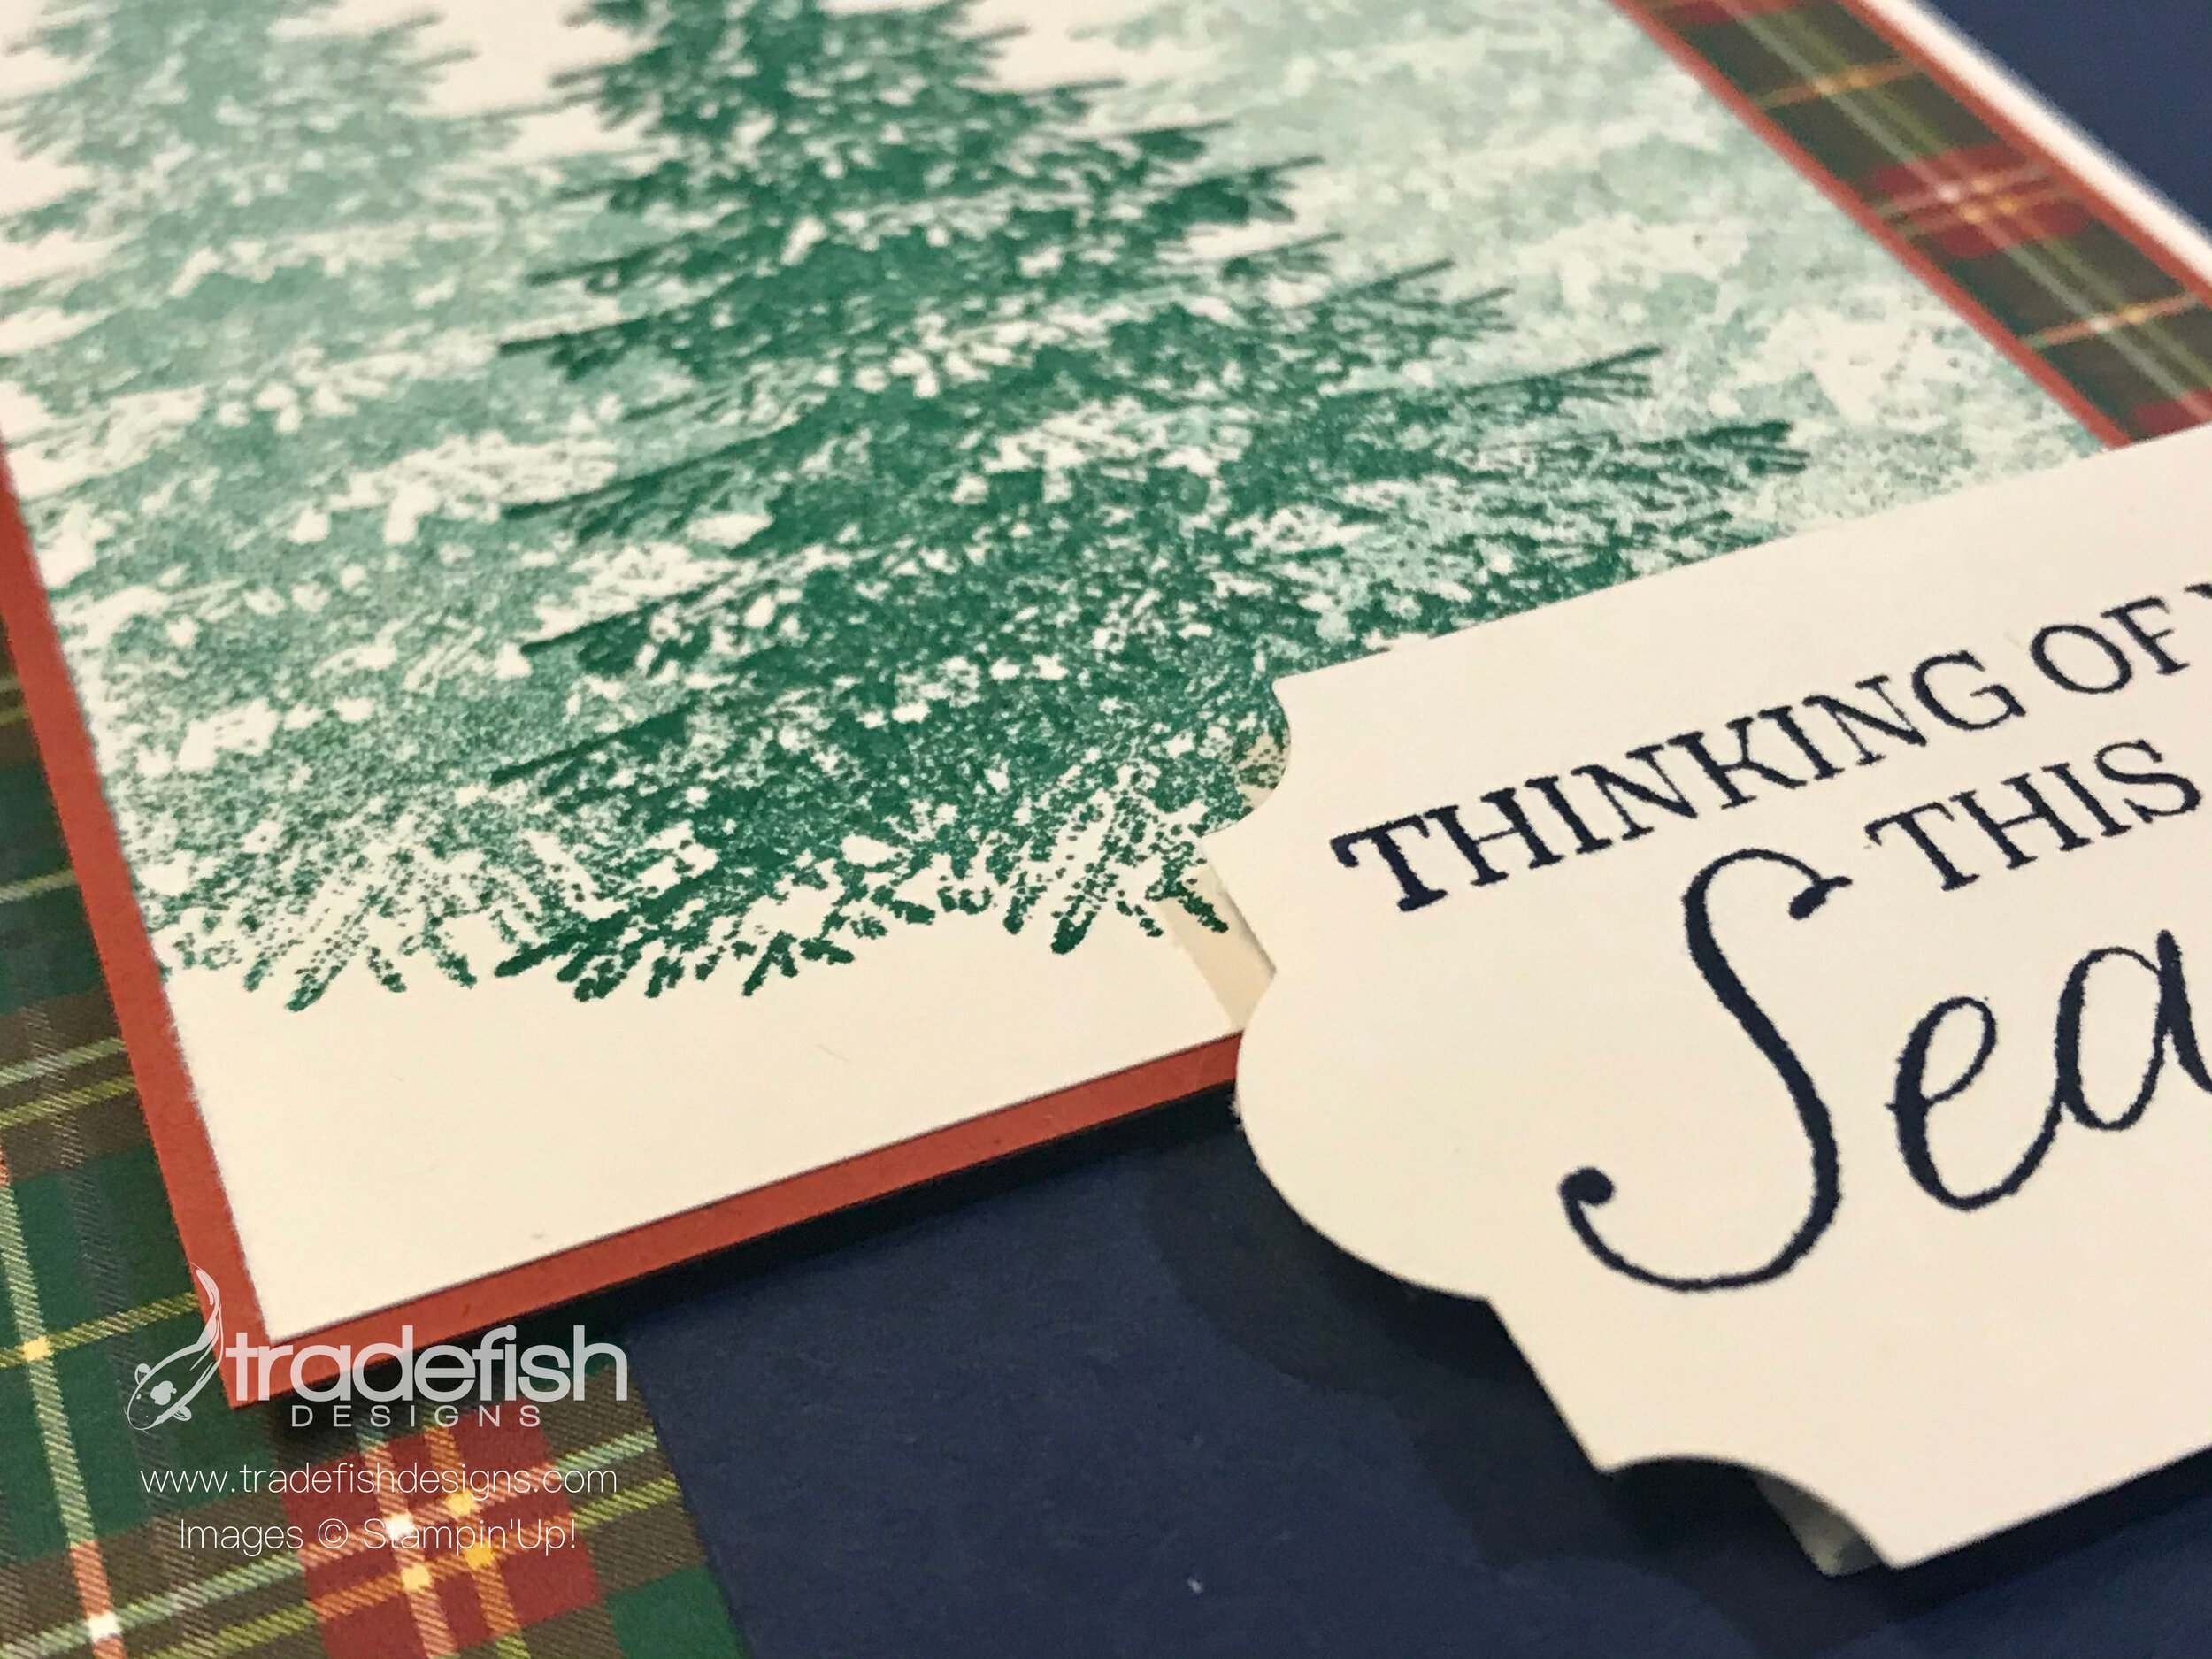
Thinking of You This Season with Stampin’ Up’s Plaid Tidings Designer Series Paper and Winter Woods stamp set.
Oh Christmas Tree, Oh Christmas Tree…I love a card with trees. Here’s a card front using the Winter Woods stamp set and 3 generations of stamping to achieve a layered look to my tree. I inked up the block with some Shaded Spruce ink and stamped in the center (1st generation), then I stamped again - without reining to the lest of my original tree (2nd generation) and the final tree was stamped again, without inking to the right of the original tree (3rd generation). One ink pad creates three color ways.

The angle shot shows the lift I get to the layers using dimensional adhesive. You also get a close up look at the sentiment and punch. It’s a simple card in that there is some basic stamping but a lot of layers in color cardstock and Designer Series Paper. No bling on this one so it would be a great candidate for the men on your Christmas list.

I hope you enjoyed my card today. If you are interested in any of the items I used in this project please check out the Product List below. Pleases note that some items may be no longer available depending upon when you see this post – if that’s the case, feel free to substitute items you may already have in your craft stash. Keep it crafty friends!
 | ||||
 |  |  |
 Designer Series Paper")


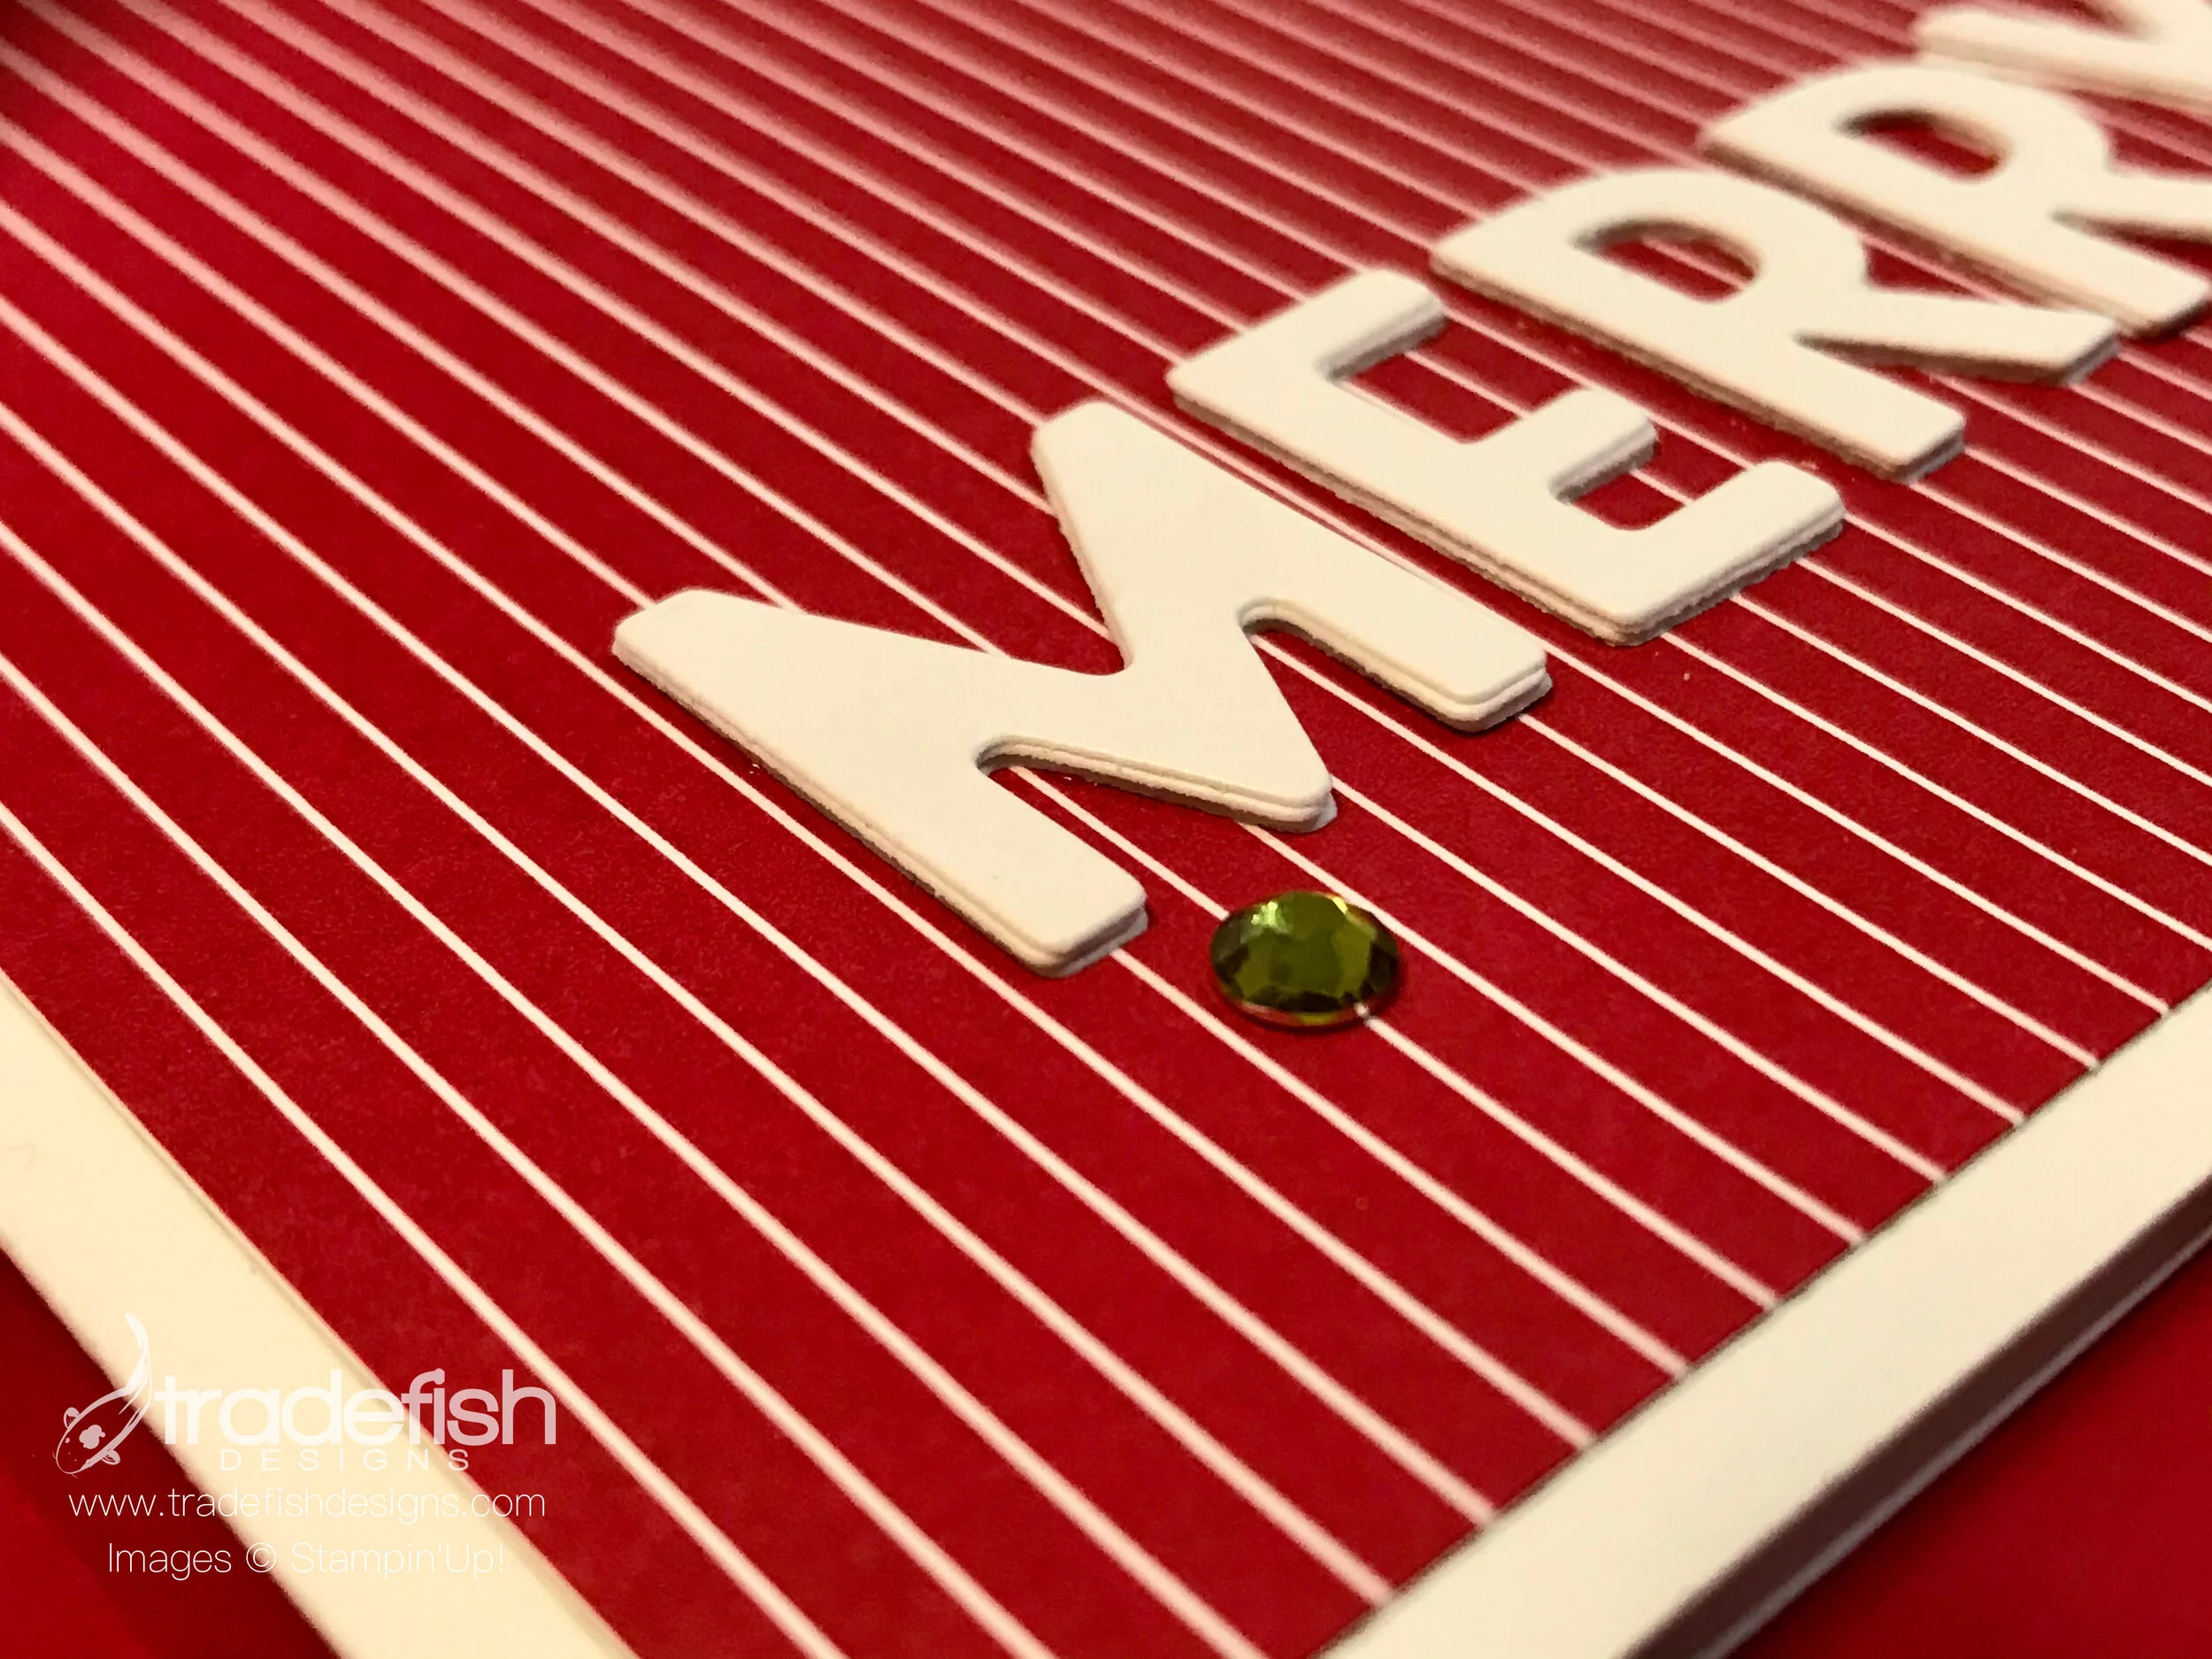
A Simple Merry
A simple Merry card using Stampin’ Up’s Playful Alphabet, Heartwarming Hugs Designer Series Paper and some Noble Peacock Rhinestones.
I love the simplicity of this card! I used the Playful Alphabet dies, some basic Designer Series Paper and some Noble Peacock Rhinestones and voila, the card is done. I will be doing many more of these cards. I find my favorite cards are always the ones that are clean and simple.

The angle photo shows the dimension I achieved by stacking and adhering the individual letters 4 times. This takes a little time but the effect is worth it. If you have dimensional/foam adhesive or even fun foam from the craft store you can get the same effect. Don’t be afraid to keep it simple.

I hope you enjoyed my card today. If you are interested in any of the items I used in this project please check out the Product List below. Pleases note that some items may be no longer available depending upon when you see this post – if that’s the case, feel free to substitute items you may already have in your craft stash. Keep it crafty friends!
 |  Noble Peacock Rhinestones [149494] $5.50 | |


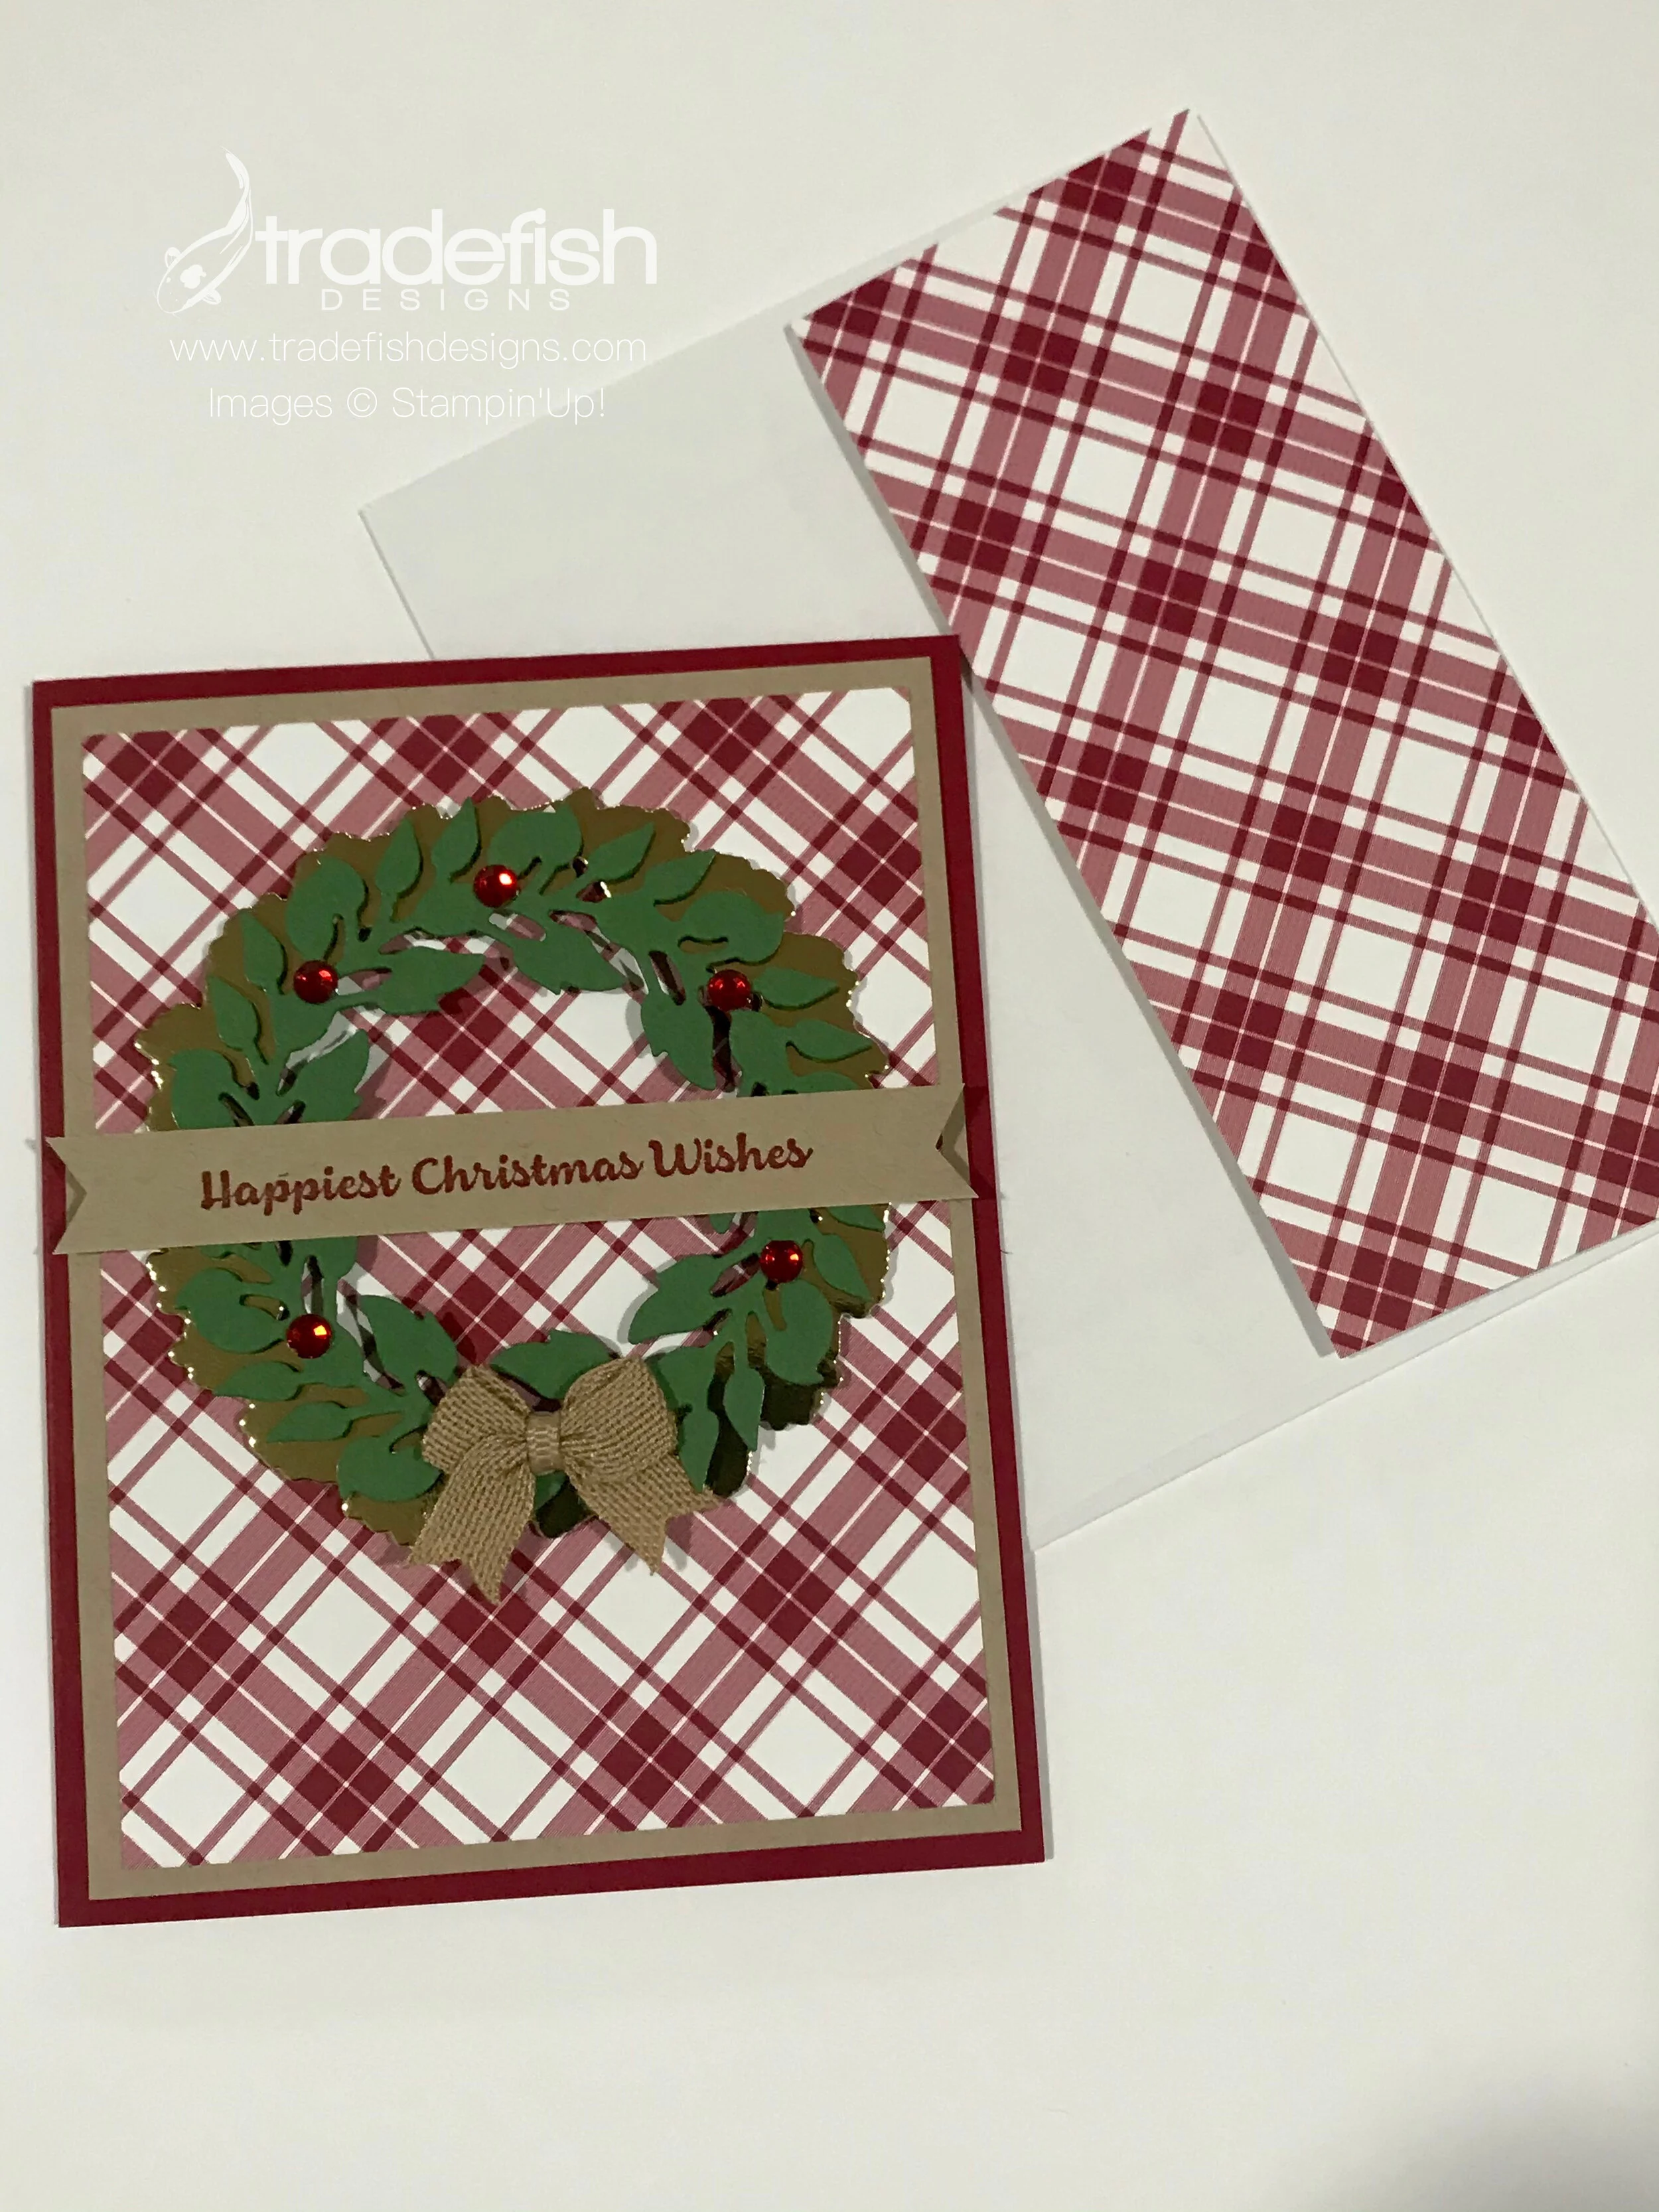
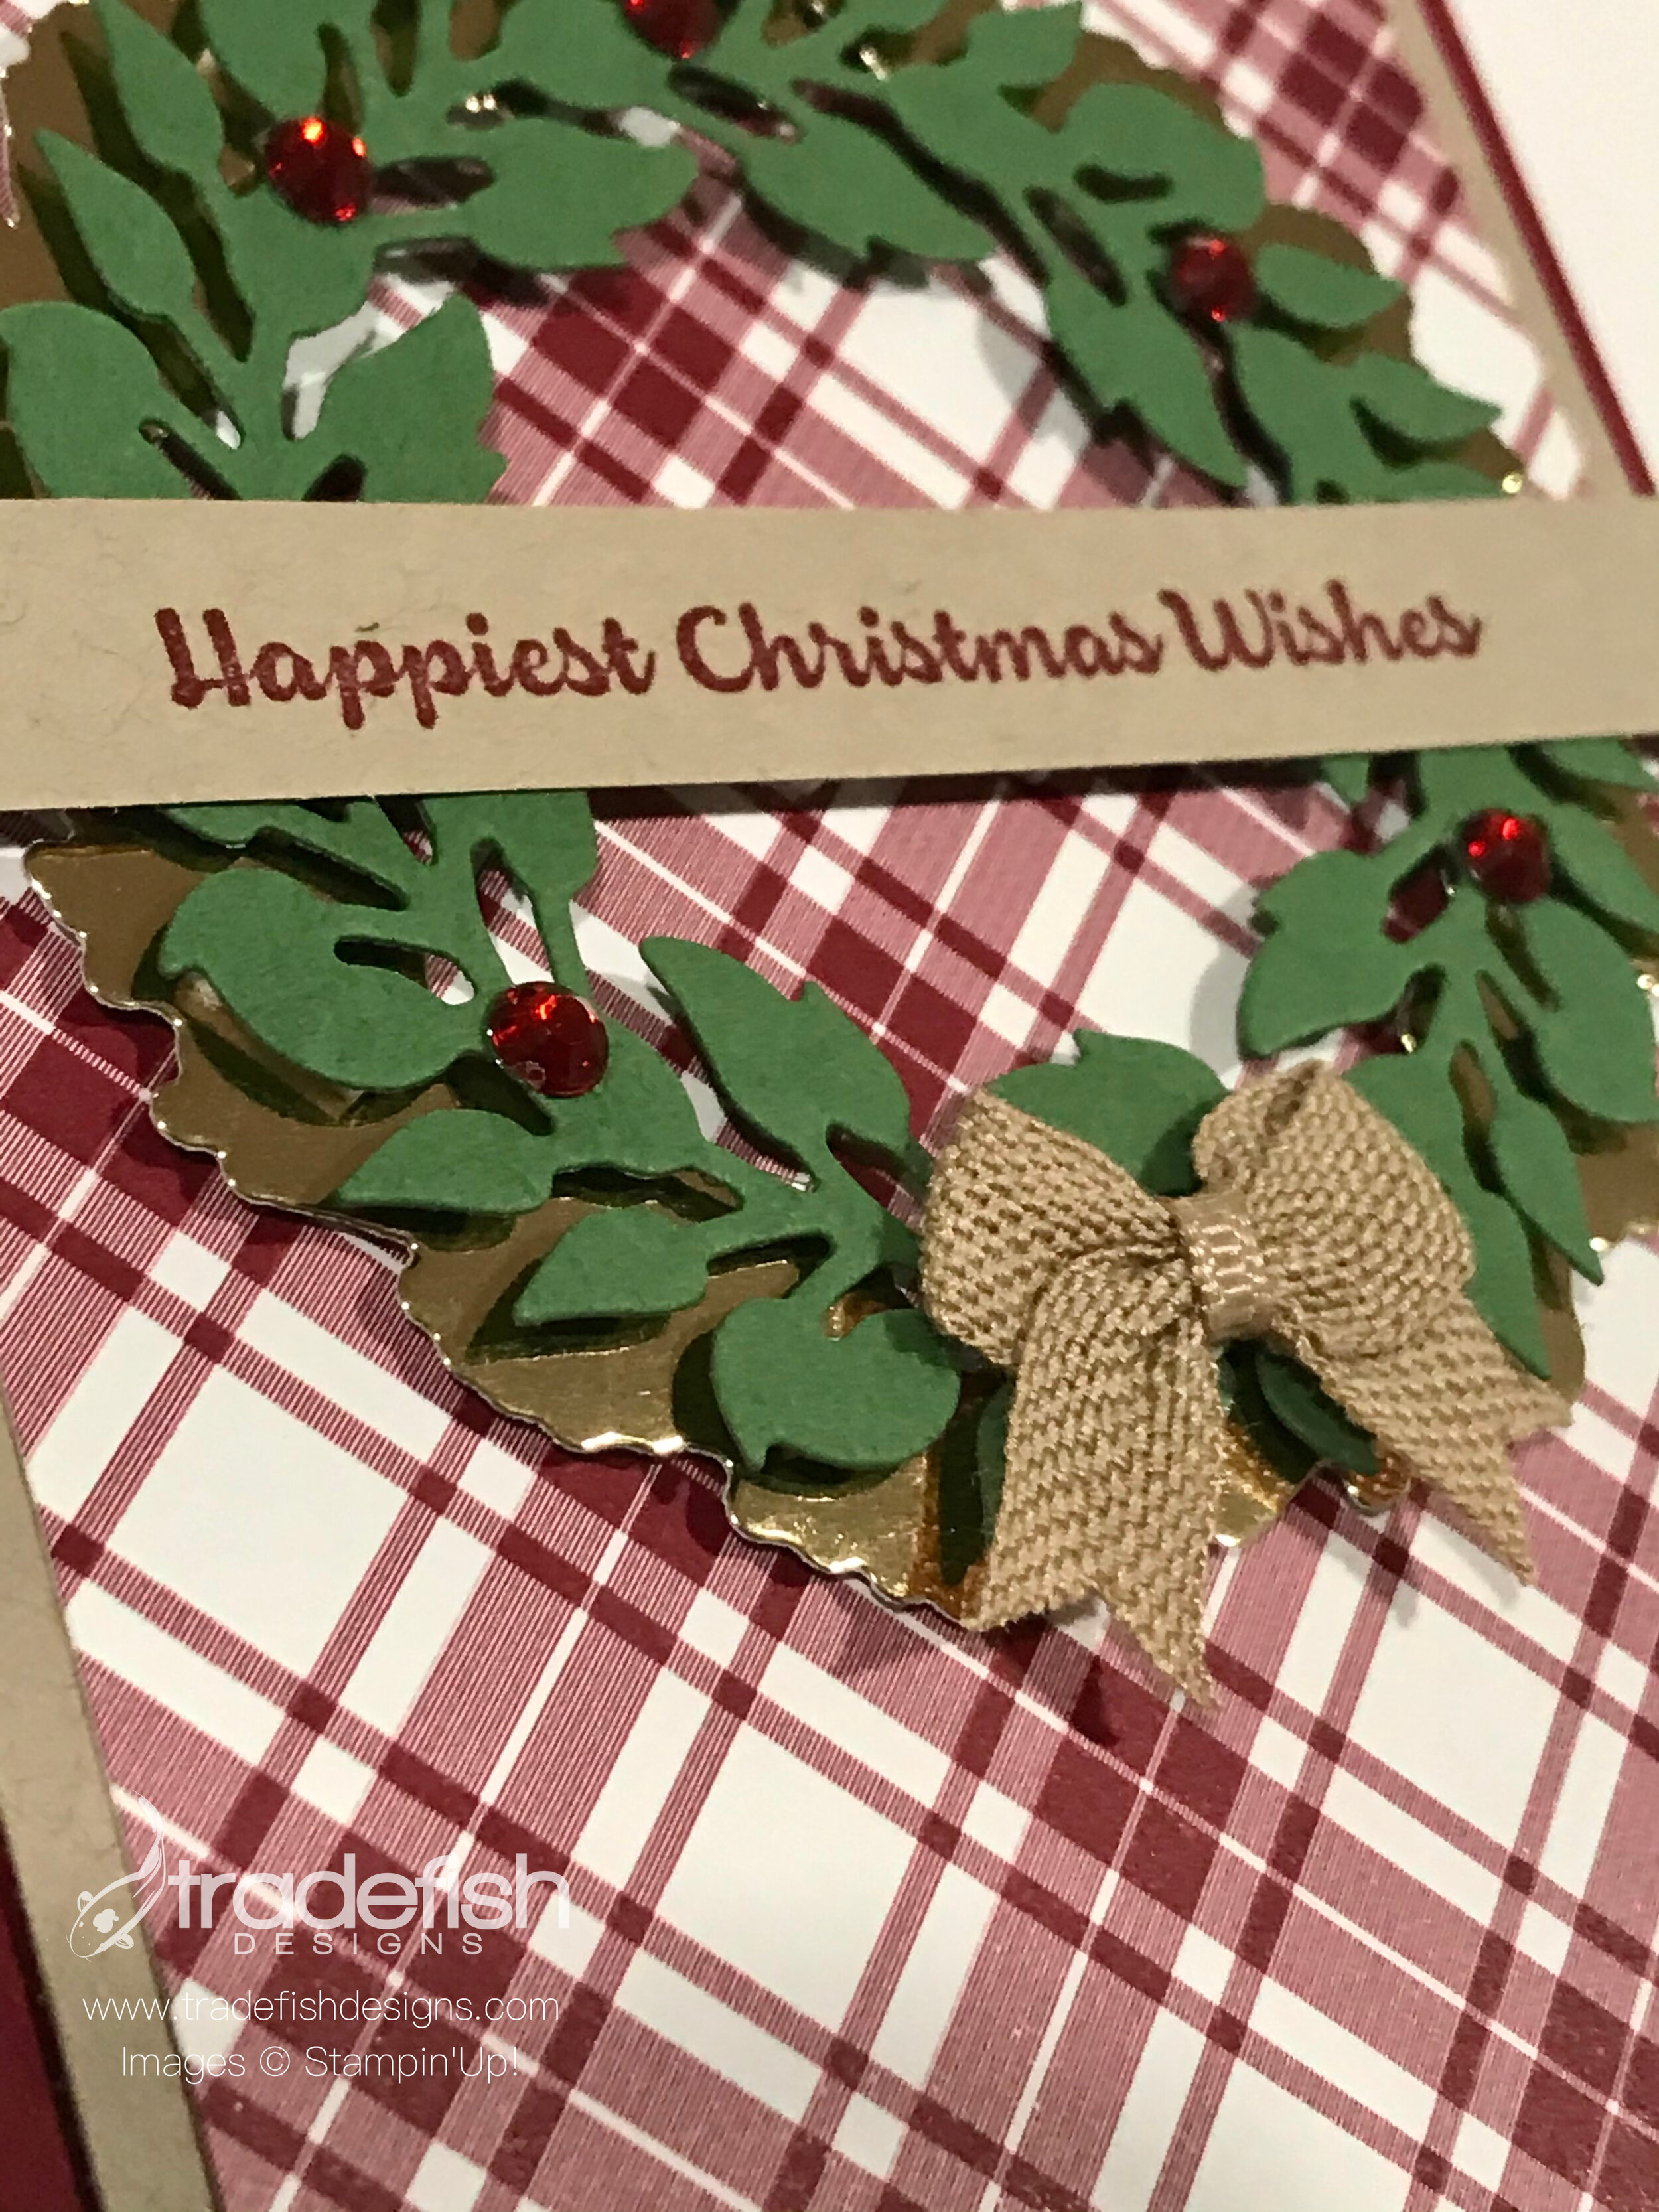
A Christmas Wreath for You!
A Christmas card and matching envelope using the All Around Wreath dies, Lots of Cheer Stamps, Plaid Tiding Designer Series Paper and the Mojo Monday Sketch #504.
Here’s a fun card using more paper from the Plaid Tidings Designer Series Paper and the All Around Wreath dies. Don’t you love a good holiday plaid?

This card layout is based on a Mojo Monday Sketch (#504). The link for this sketch is below the sketch photo.

LINK to this card sketch.
My angle photo really makes the craft ribbon bow just pop! This is a fun bow I purchased in a set of 6 from Hobby Lobby. You can also make your own if you happen to be a good bow-tier…I’m not so when I saw this pre-done and with dimensional adhesive I was in heaven.
Remember peeps, no naked envelopes! Here I just threw some extra matching paper on the envelope flap. Easy-peasy.

I hope you enjoyed my card today. If you are interested in any of the items I used in this project please check out the Product List below. Pleases note that some items may be no longer available depending upon when you see this post – if that’s the case, feel free to substitute items you may already have in your craft stash. Keep it crafty friends!

 Lots Of Cheer Cling Stamp Set [149503] $20.00 | ||||
 |  |  | ||
| |  | |


A Frosty Christmas Card for you (and it's a gift card holder too!)
A frosty Christmas card that doubles as a gift card holder using Feels Like Frost paper, Frosted Frames and Timeless Tidings stamps.
It’s another holiday card on the blog. Remember, all November posts will feature holiday/Christmas cards to inspire you to break out your stash of holiday stamps, papers and embellishments and get crafty. Today’s card uses the Feels Like Frost Designer Series Paper again and the fun Frosted Frames dies. Hint: there will be many more cards featuring the Feels Like Frost paper…you’ve be warned!
The sentiment is taken from a retired stamp set, but you can substitute anything you want. This doesn’t have to be a Christmas card either…it could be a winter thank you card…you decide. The angle shot on my cards is a way to show off the dimension of the card but it also makes you look at a card differently. You can really see the details that you often miss when putting it together. I love the stitching from the die on the Whisper White paper that contrasts with the frame in Night of Navy. And who doesn’t love a good basic rhinestone!

The inside of this card is designed with a pocket on the left hand side that can hold a gift card. I may send this to my son who will not be home for Christmas this year. He is an officer in the Coast Guard and will likely be onboard his ship somewhere in the Pacific Ocean.

I hope you enjoyed my card today. If you are interested in any of the items I used in this project please check out the Product List below. Pleases note that some items may be no longer available depending upon when you see this post – if that’s the case, feel free to substitute items you may already have in your craft stash. Keep it crafty friends!
 |  | | |  |

 Designer Series Paper")

Let's start making those holiday cards my crafty friends!
A Christmas card using the non-traditional color of Highland Heather and Feels Like Frost Designer Series Paper.
Welcome to November my crafty friends! I have to admit it does not feel like we are entering into the holiday season. It has been quite a year. In an effort to move me along toward Christmas, every post this month will feature a Christmas card. I hope to not only inspire you to create your own holiday cards but to finish up all my Christmas cards. I traditionally send them out after Thanksgiving to friends and family.
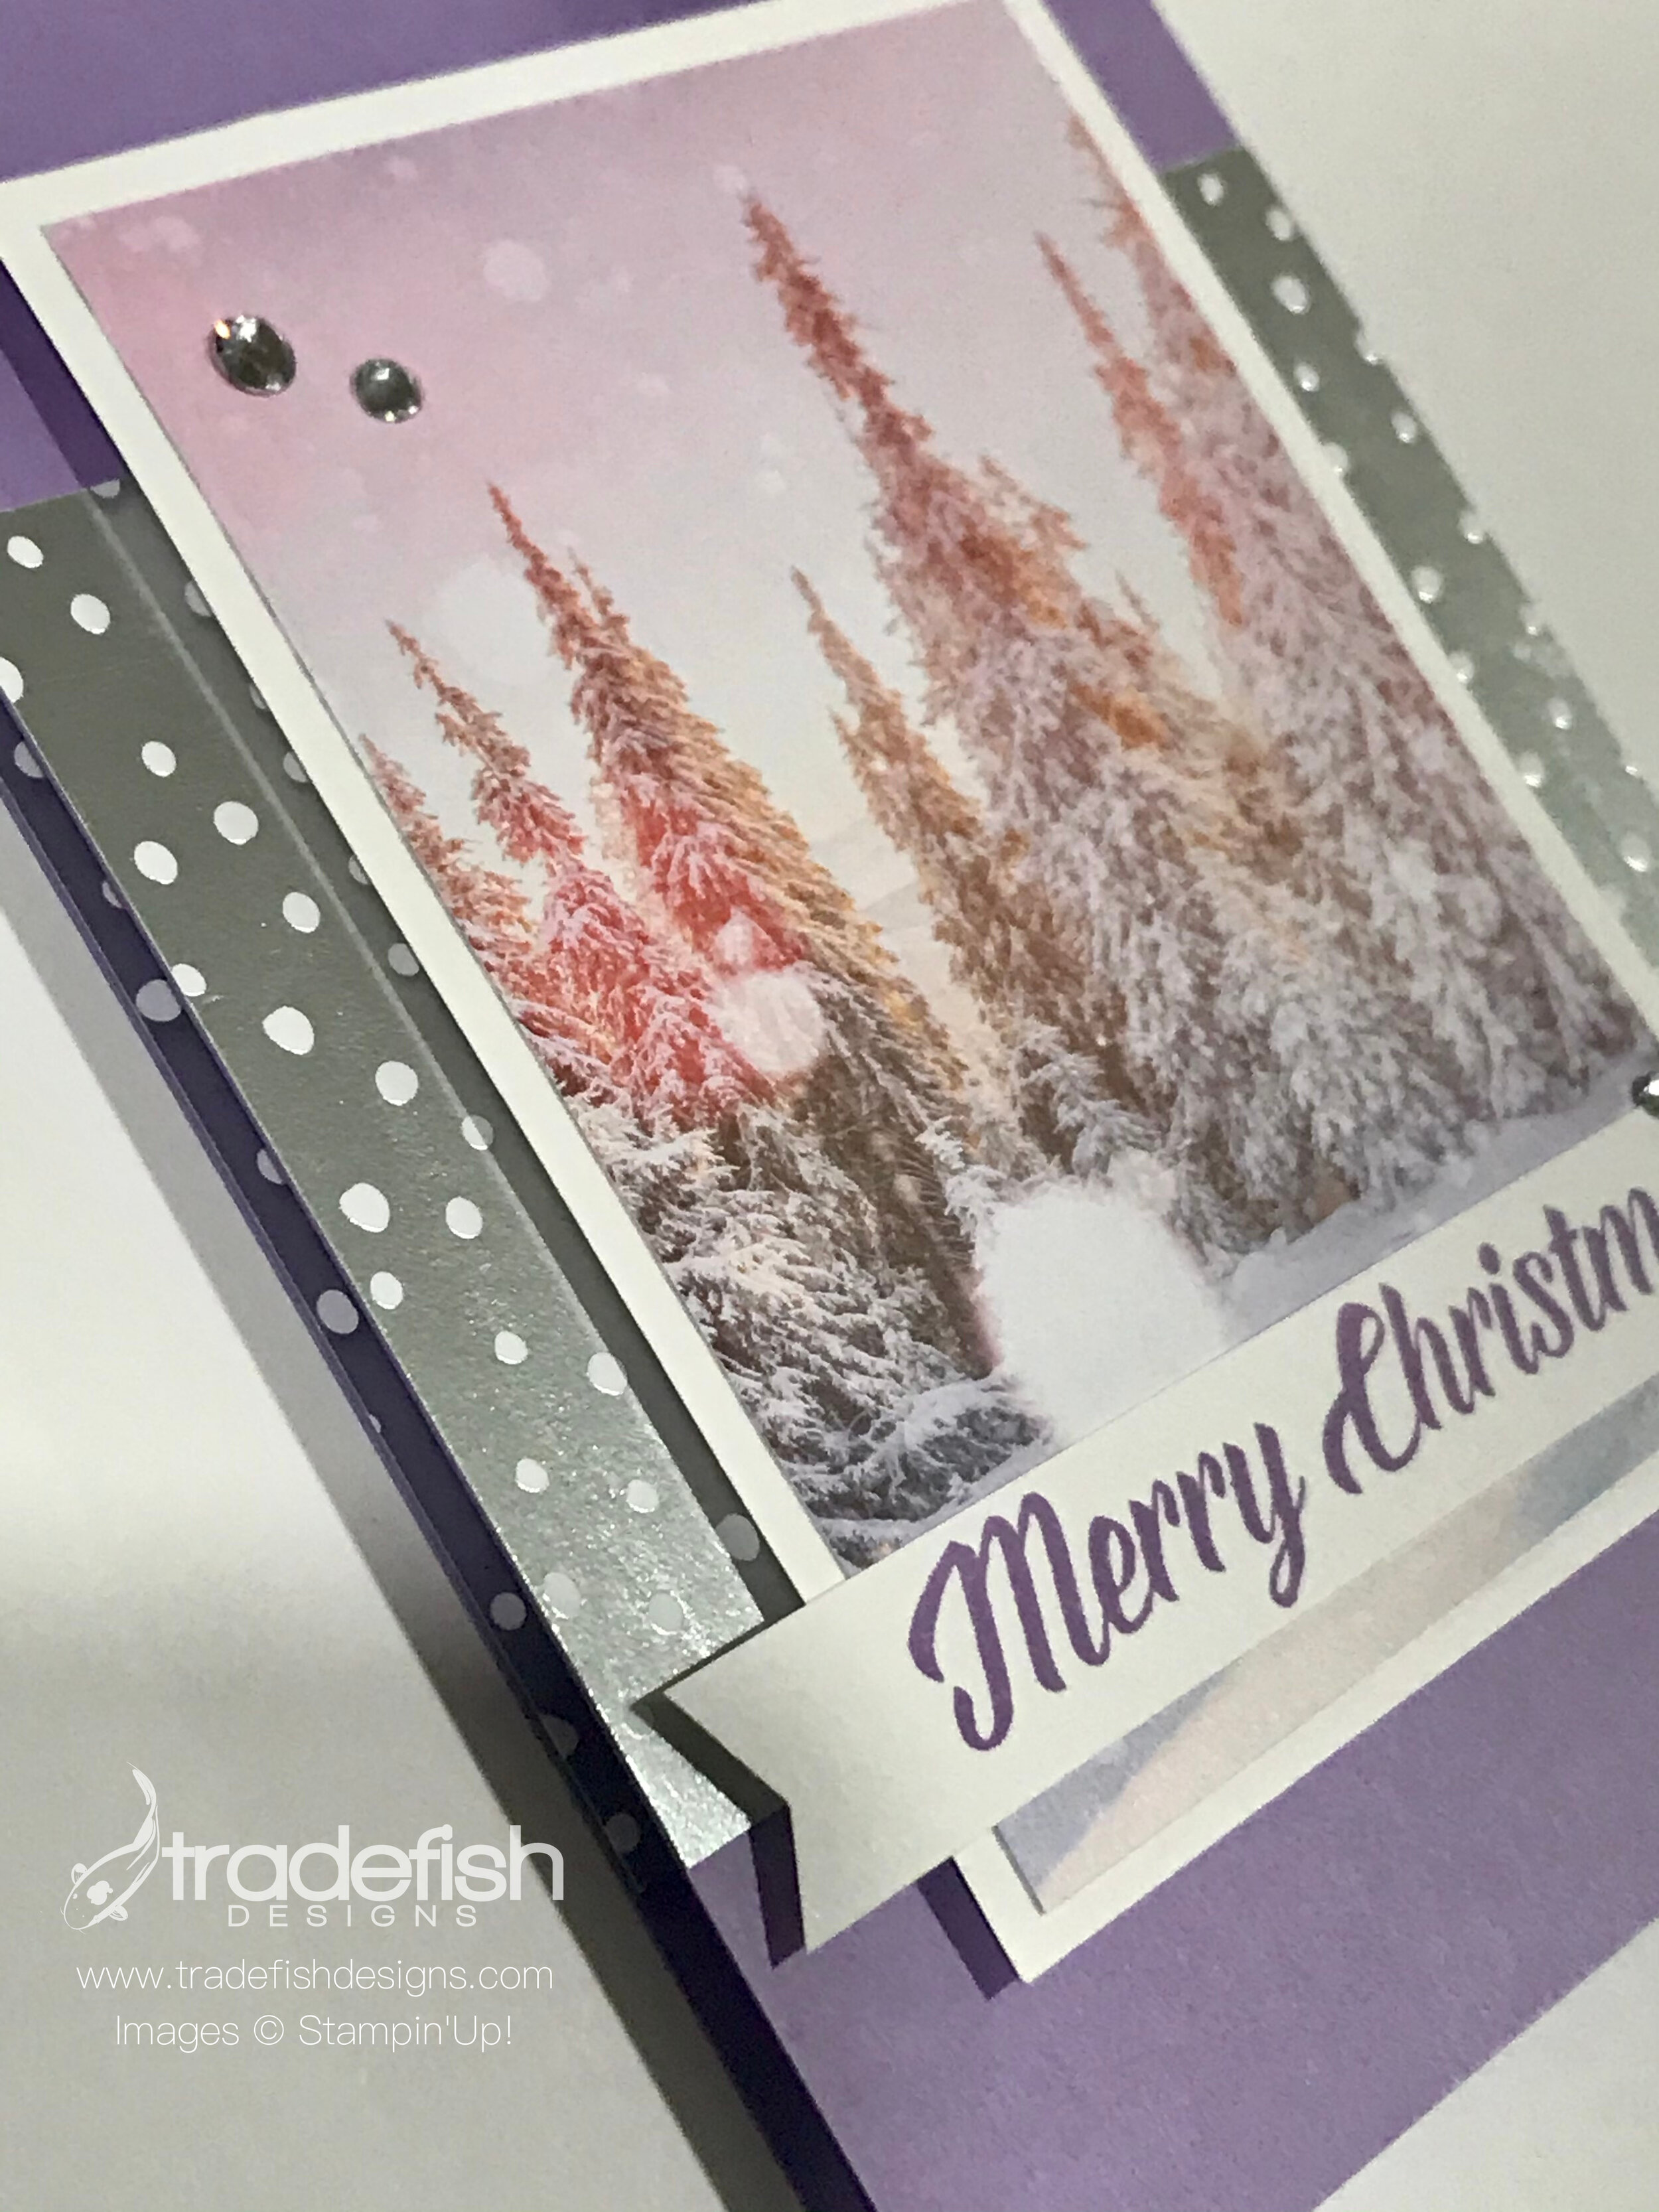
Here’s a Christmas card using the non-traditional colors of white, silver and Highland Heather. This Feels Like Frost Designer Series Speciality Paper will be highlighted throughout the month because (1) it’s just too beautiful not to share and (2) I have a bunch of it and don’t want to be a paper hoarder.

One of the best things about this speciality paper is that one side is a photo of an outdoor wintery scene while the other side features a silver and white design. I added some pretty rhinestones to mimic the snowfall and a simple sentiment in Highland Heather to finish off this super simple but beautiful card.

The inside of the card coordinates with the look of the front leaving plenty of room for a holiday message.

I hope you enjoyed my card today. If you are interested in any of the items I used in this project please check out the Product List below. Pleases note that some items may be no longer available depending upon when you see this post – if that’s the case, feel free to substitute items you may already have in your craft stash. Keep it crafty friends!
| | | |


Have a Deer Christmas!
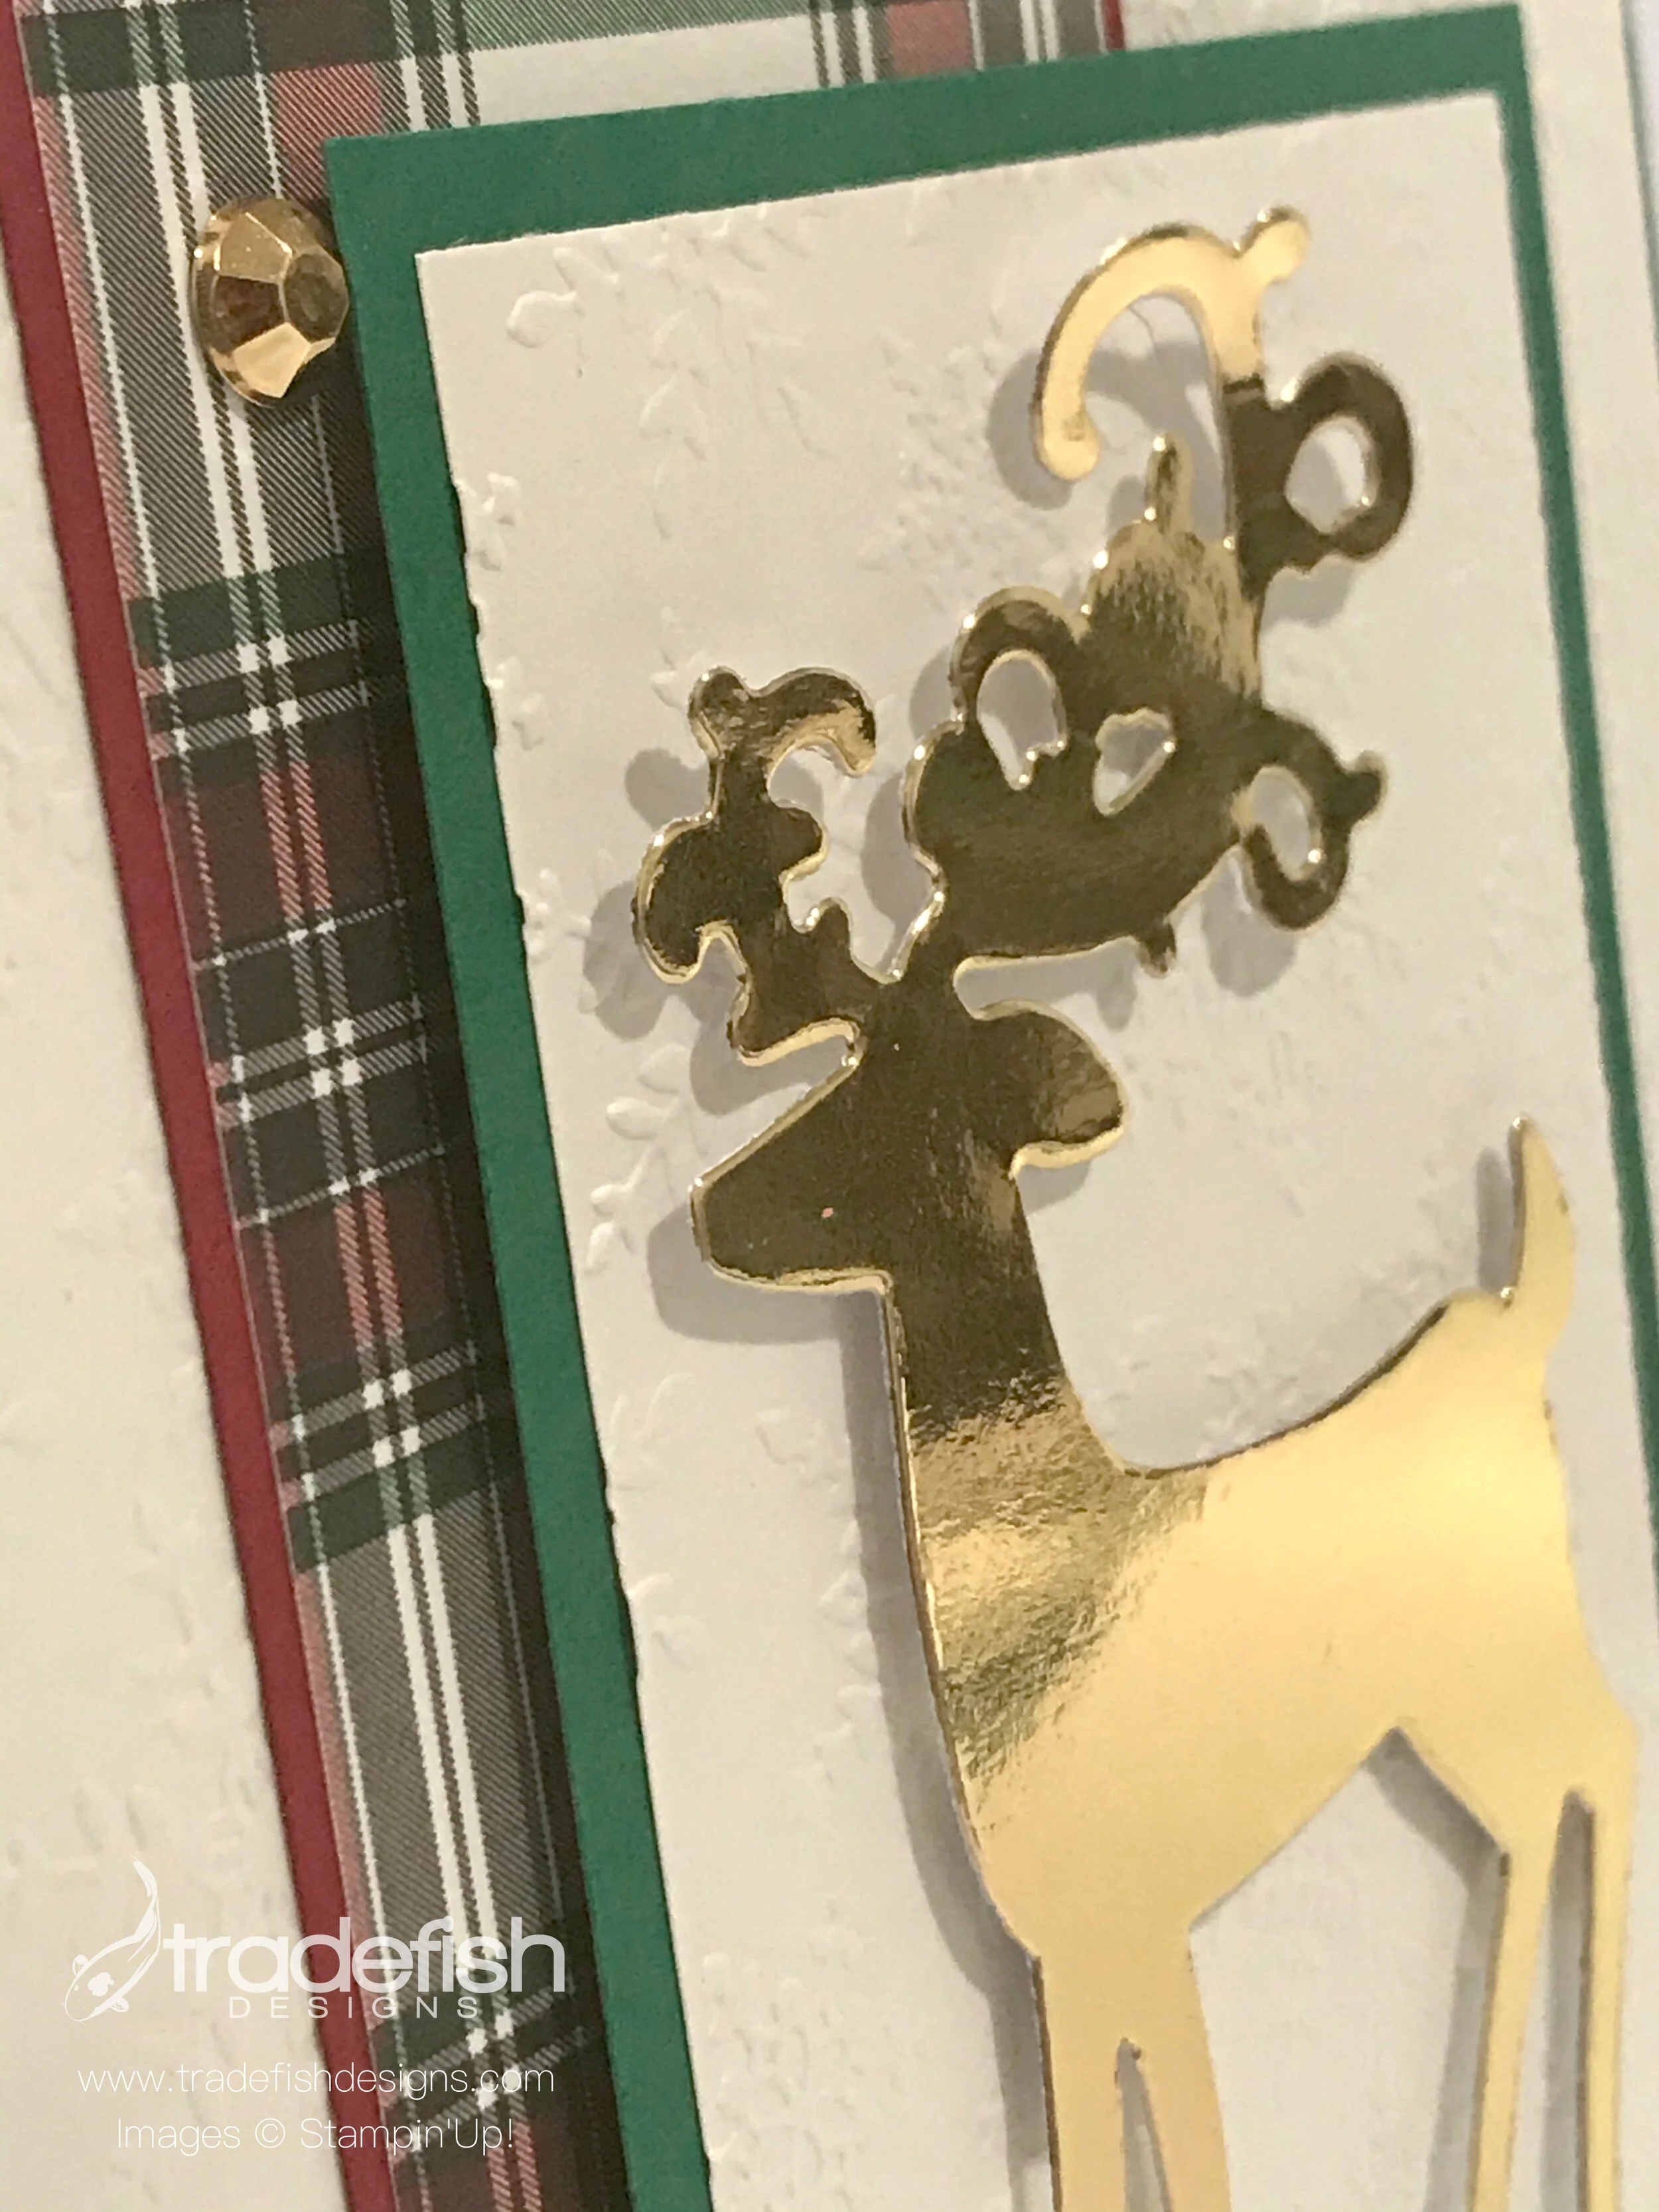
A holiday card using the Dashing Deer bundle from Stampin’ Up as well as the Plaid Tidings DSP, Winter Snow Embossing Folder and some Guilded Gems. A card highlighting a sketch from Operation Write Home.


I hope you enjoyed my card today. If you are interested in any of the items I used in this project please check out the Product List below. Pleases note that some items may be no longer available depending upon when you see this post – if that’s the case, feel free to substitute items you may already have in your craft stash. Keep it crafty friends!
 |  | |||
 |  |  | | |
| | | |


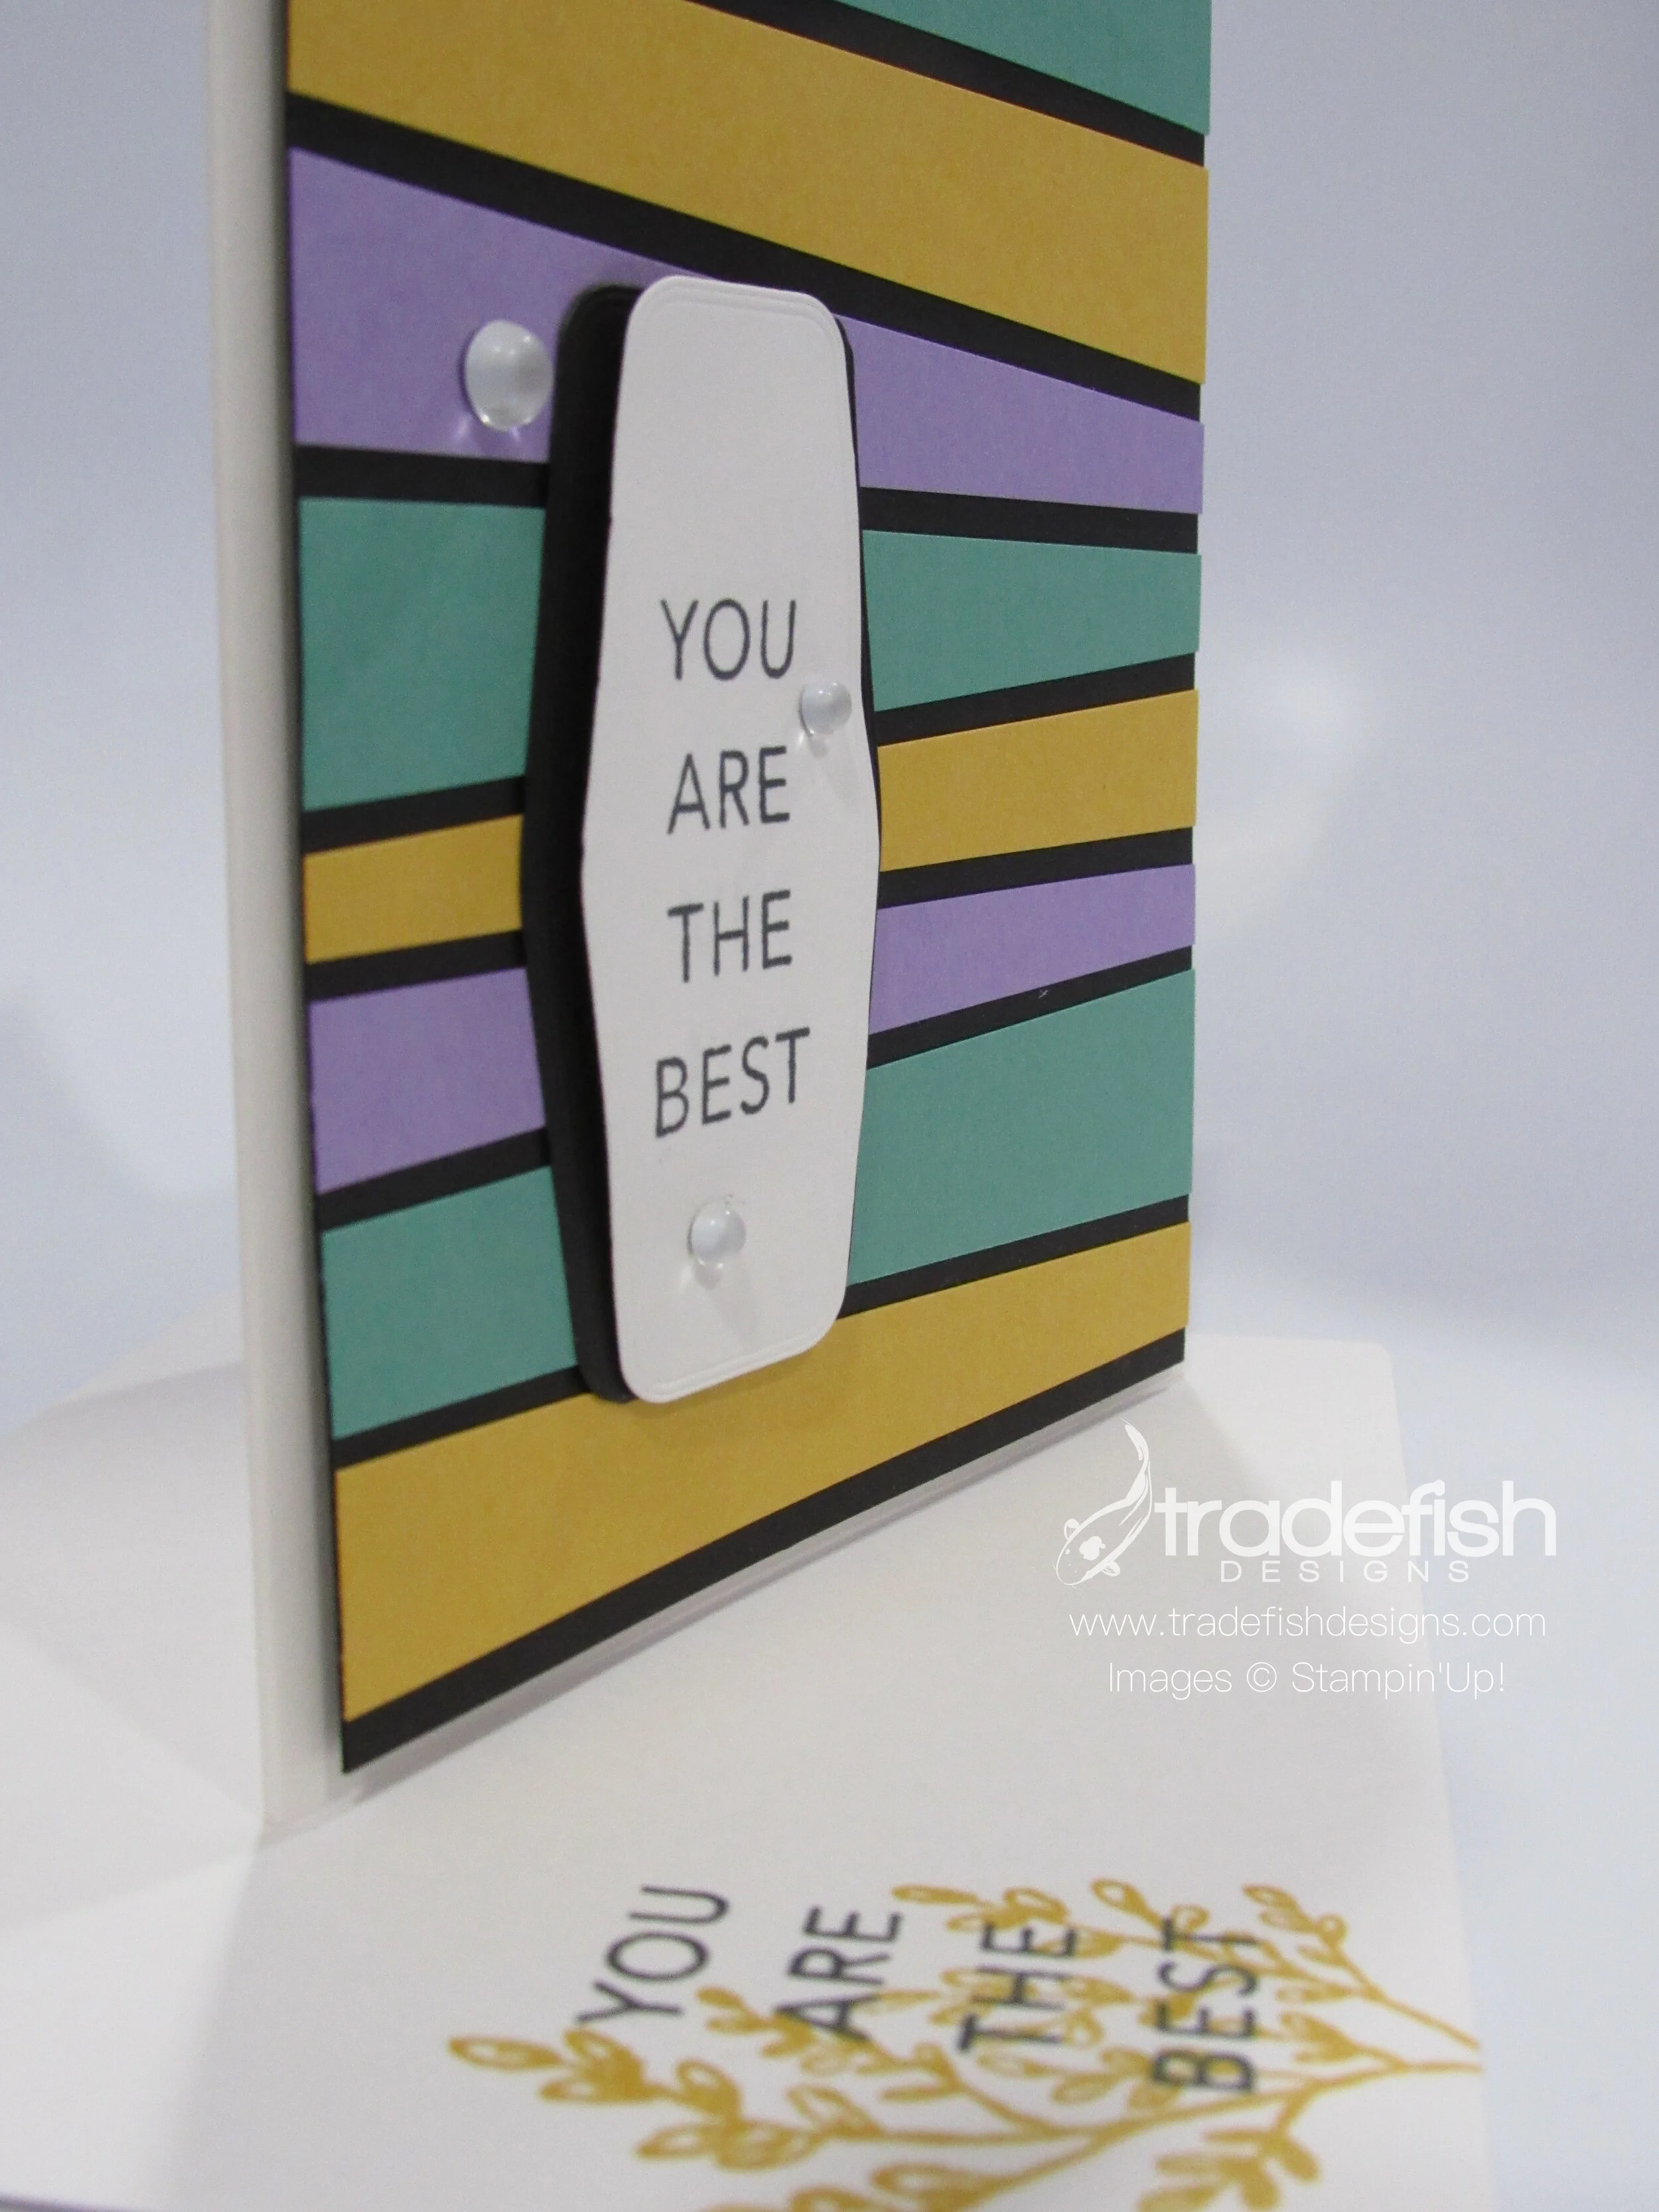
You are simply the best Bruno Bertucci! (A Scrappy Strips Technique Card)
A simple card using Bruno Bertucci’s Scrappy Strips Technique and the Tasteful Touches stamp set. #scrappystrips.
I have to admit that I made this card back in June after learning about the #ScrappyStrips technique from Bruno Bertucci - a Stampin Up Demonstrator in Australia. I realized that I never posted it on the blog and thought I better jump on it right away. This card is genius in its simplicity and will blow your mind at how easy it is to put together. If you want to see Bruno in action, check out this YouTube LINK.

The colors I used were Bumblebee, Just Jade and Highland Heater on a Basic Black background. My stamping was done on Whisper White with some Frosted Epoxy Droplets. Super simple stamping to make sure I didn’t distract from the amazing technique.

My envelope flap is covered in Bumblebee Cardstock that I stamped with an image from the Tasteful Touches stamp set.

I hope you enjoyed my card today. A special thanks for the inspiration from Bruno Bertucci! If you are interested in any of the items I used in this project please check out the Product List below. Pleases note that some items may be no longer available depending upon when you see this post – if that’s the case, feel free to substitute items you may already have in your craft stash. Keep it crafty friends!
 | ||||
| |  |  | |
")


Happy Birthday Aliza!
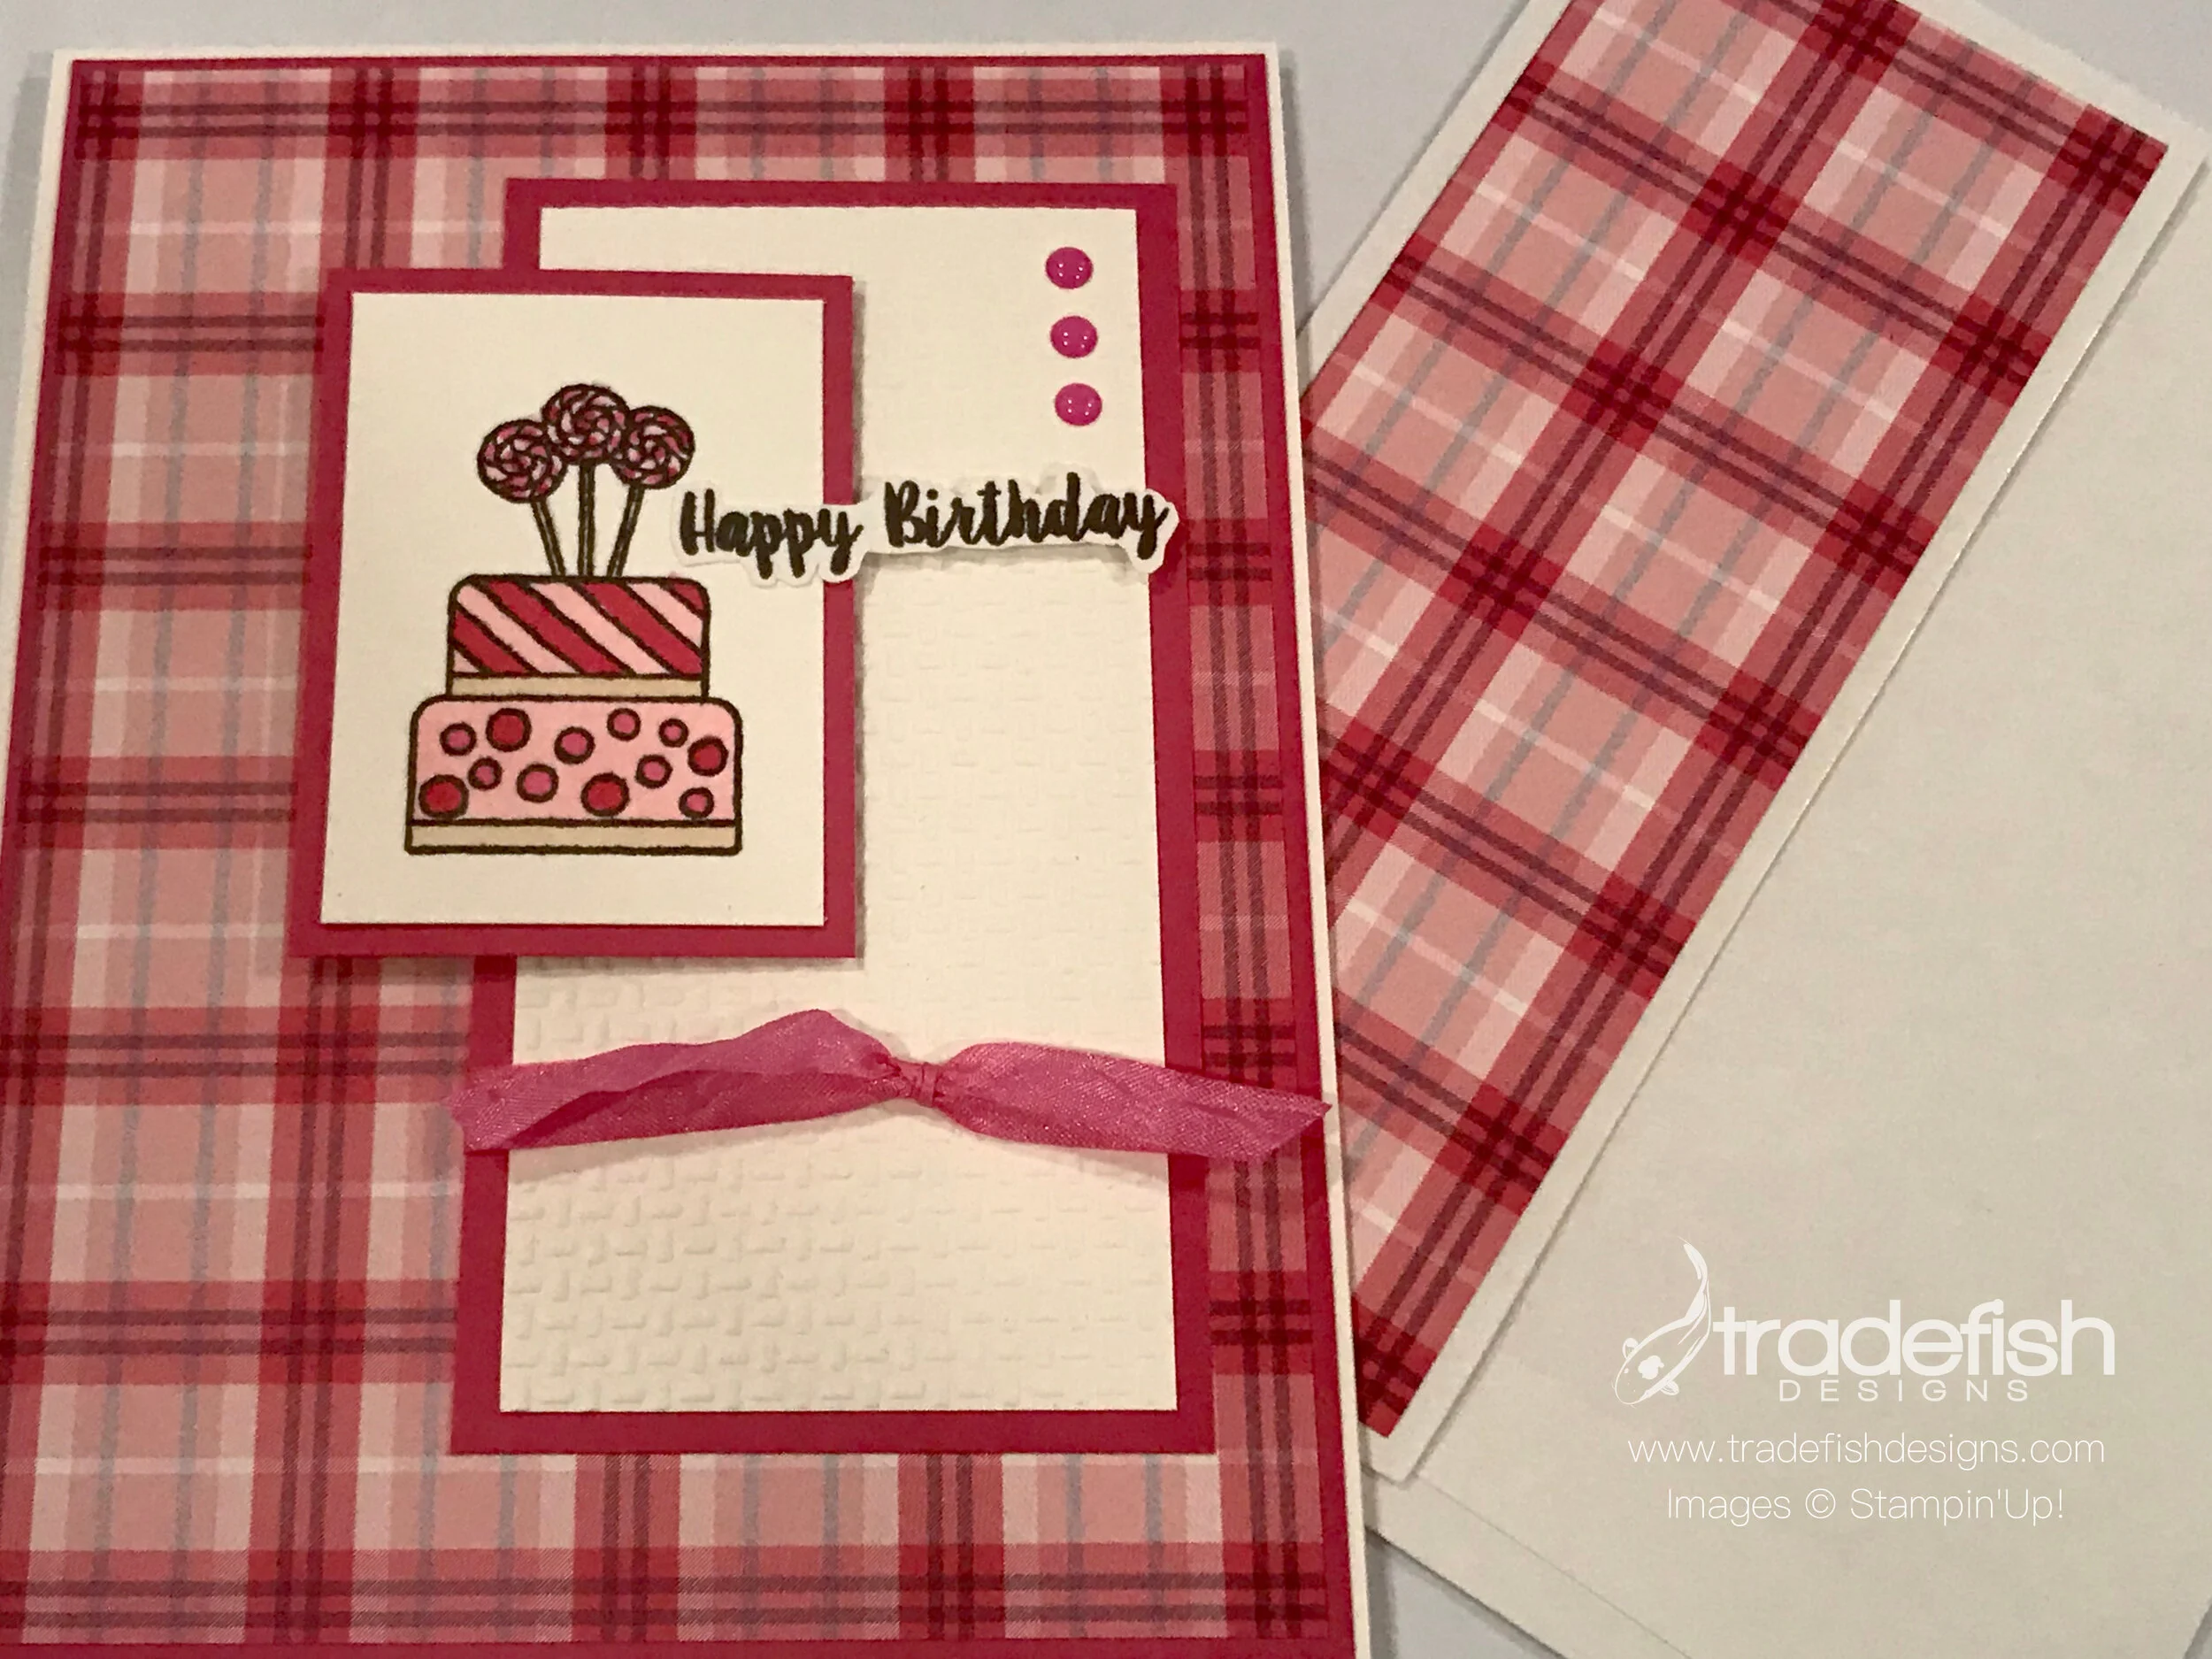
A pretty pink plaid birthday card using Stampin' Up products Plaid Tidings, Piece of Cake, Stampin' Blends, Wrapped in Texture, In Color Enamel Dots and Crinkled Seam Binding Ribbon. This card also uses a sketch from Operation Write Home.
This weekend my neighbor Aliza turned 5 years old! It has been a very exciting week leading up to the big day. It was announced every day to me in the backyard over the fence so I wouldn’t forget. She was going to the beach for the weekend to celebrate. I know she, her parents, and her big brother Trace had a wonderful time. In honor of her birthday I created this simple, but fun, card in her favorite color…PINK!

I used a sketch from Operation Write Home as a foundation but did a little free-lancing. I used some pink plaid, and why wouldn’t you for a 5 year old girl’s birthday card, and some cool enamel dots in, you guessed it, pink!

The angle in this photo highlights the dimension I achieved using one of the Wrapped in Texture embossing folders as well as shows off the coloring I did using Stampin’ Blends. Don’t forget the fussy-cutting on did on the Happy Birthday sentiment. Only the best for Aliza!

I also used my Melon Mambo Stampin’ Blend (light) to color the Whisper White Crinkled Seam Ribbon pink to coordinate with the card. And I always insist on a coordinating envelope. Here I used some of the excess designer paper and added it to the flap of the envelope. Don’t tell Aliza, but I’m adding five-one dollar bills in the card…one for each year. I can’t wait to give it to her!

I hope you enjoyed my card today. If you are interested in any of the items I used in this project please check out the Product List below. Pleases note that some items may be no longer available depending upon when you see this post – if that’s the case, feel free to substitute items you may already have in your craft stash. Keep it crafty friends!
 Piece Of Cake Photopolymer Stamp Set [148610] $17.00 | | |||
 | ||||
| | |


 Crinkled Seam Binding Ribbon")

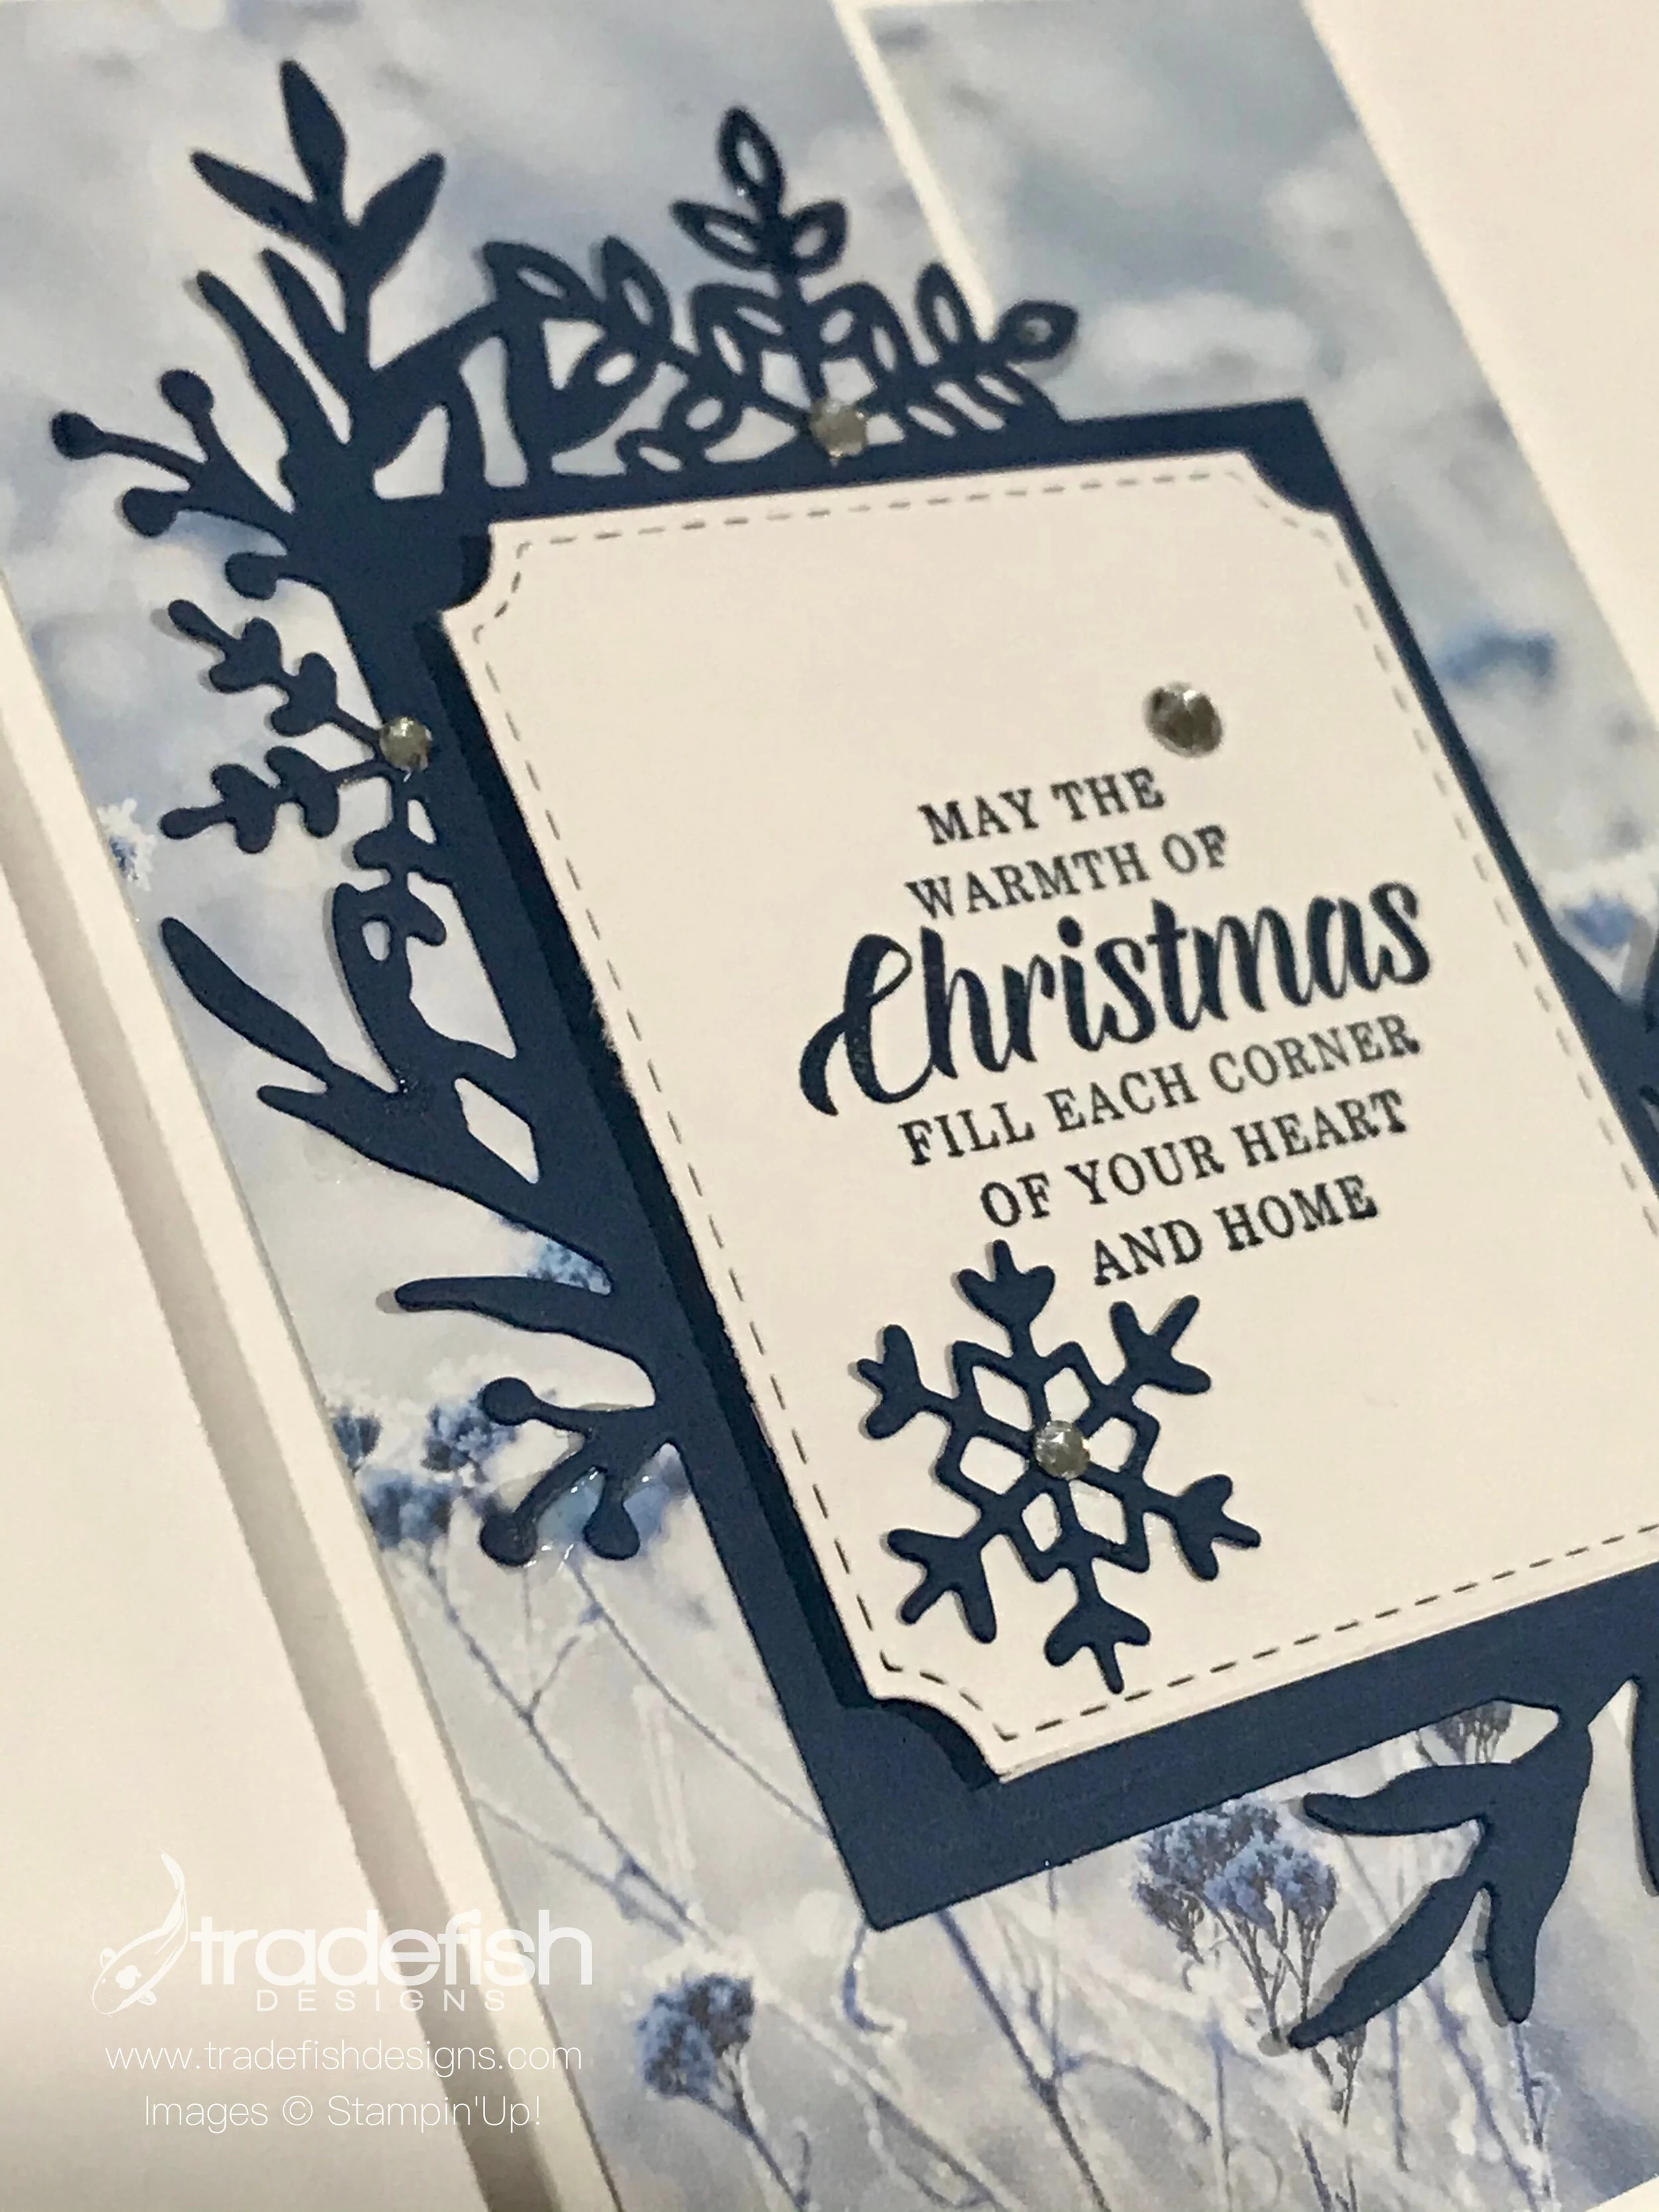
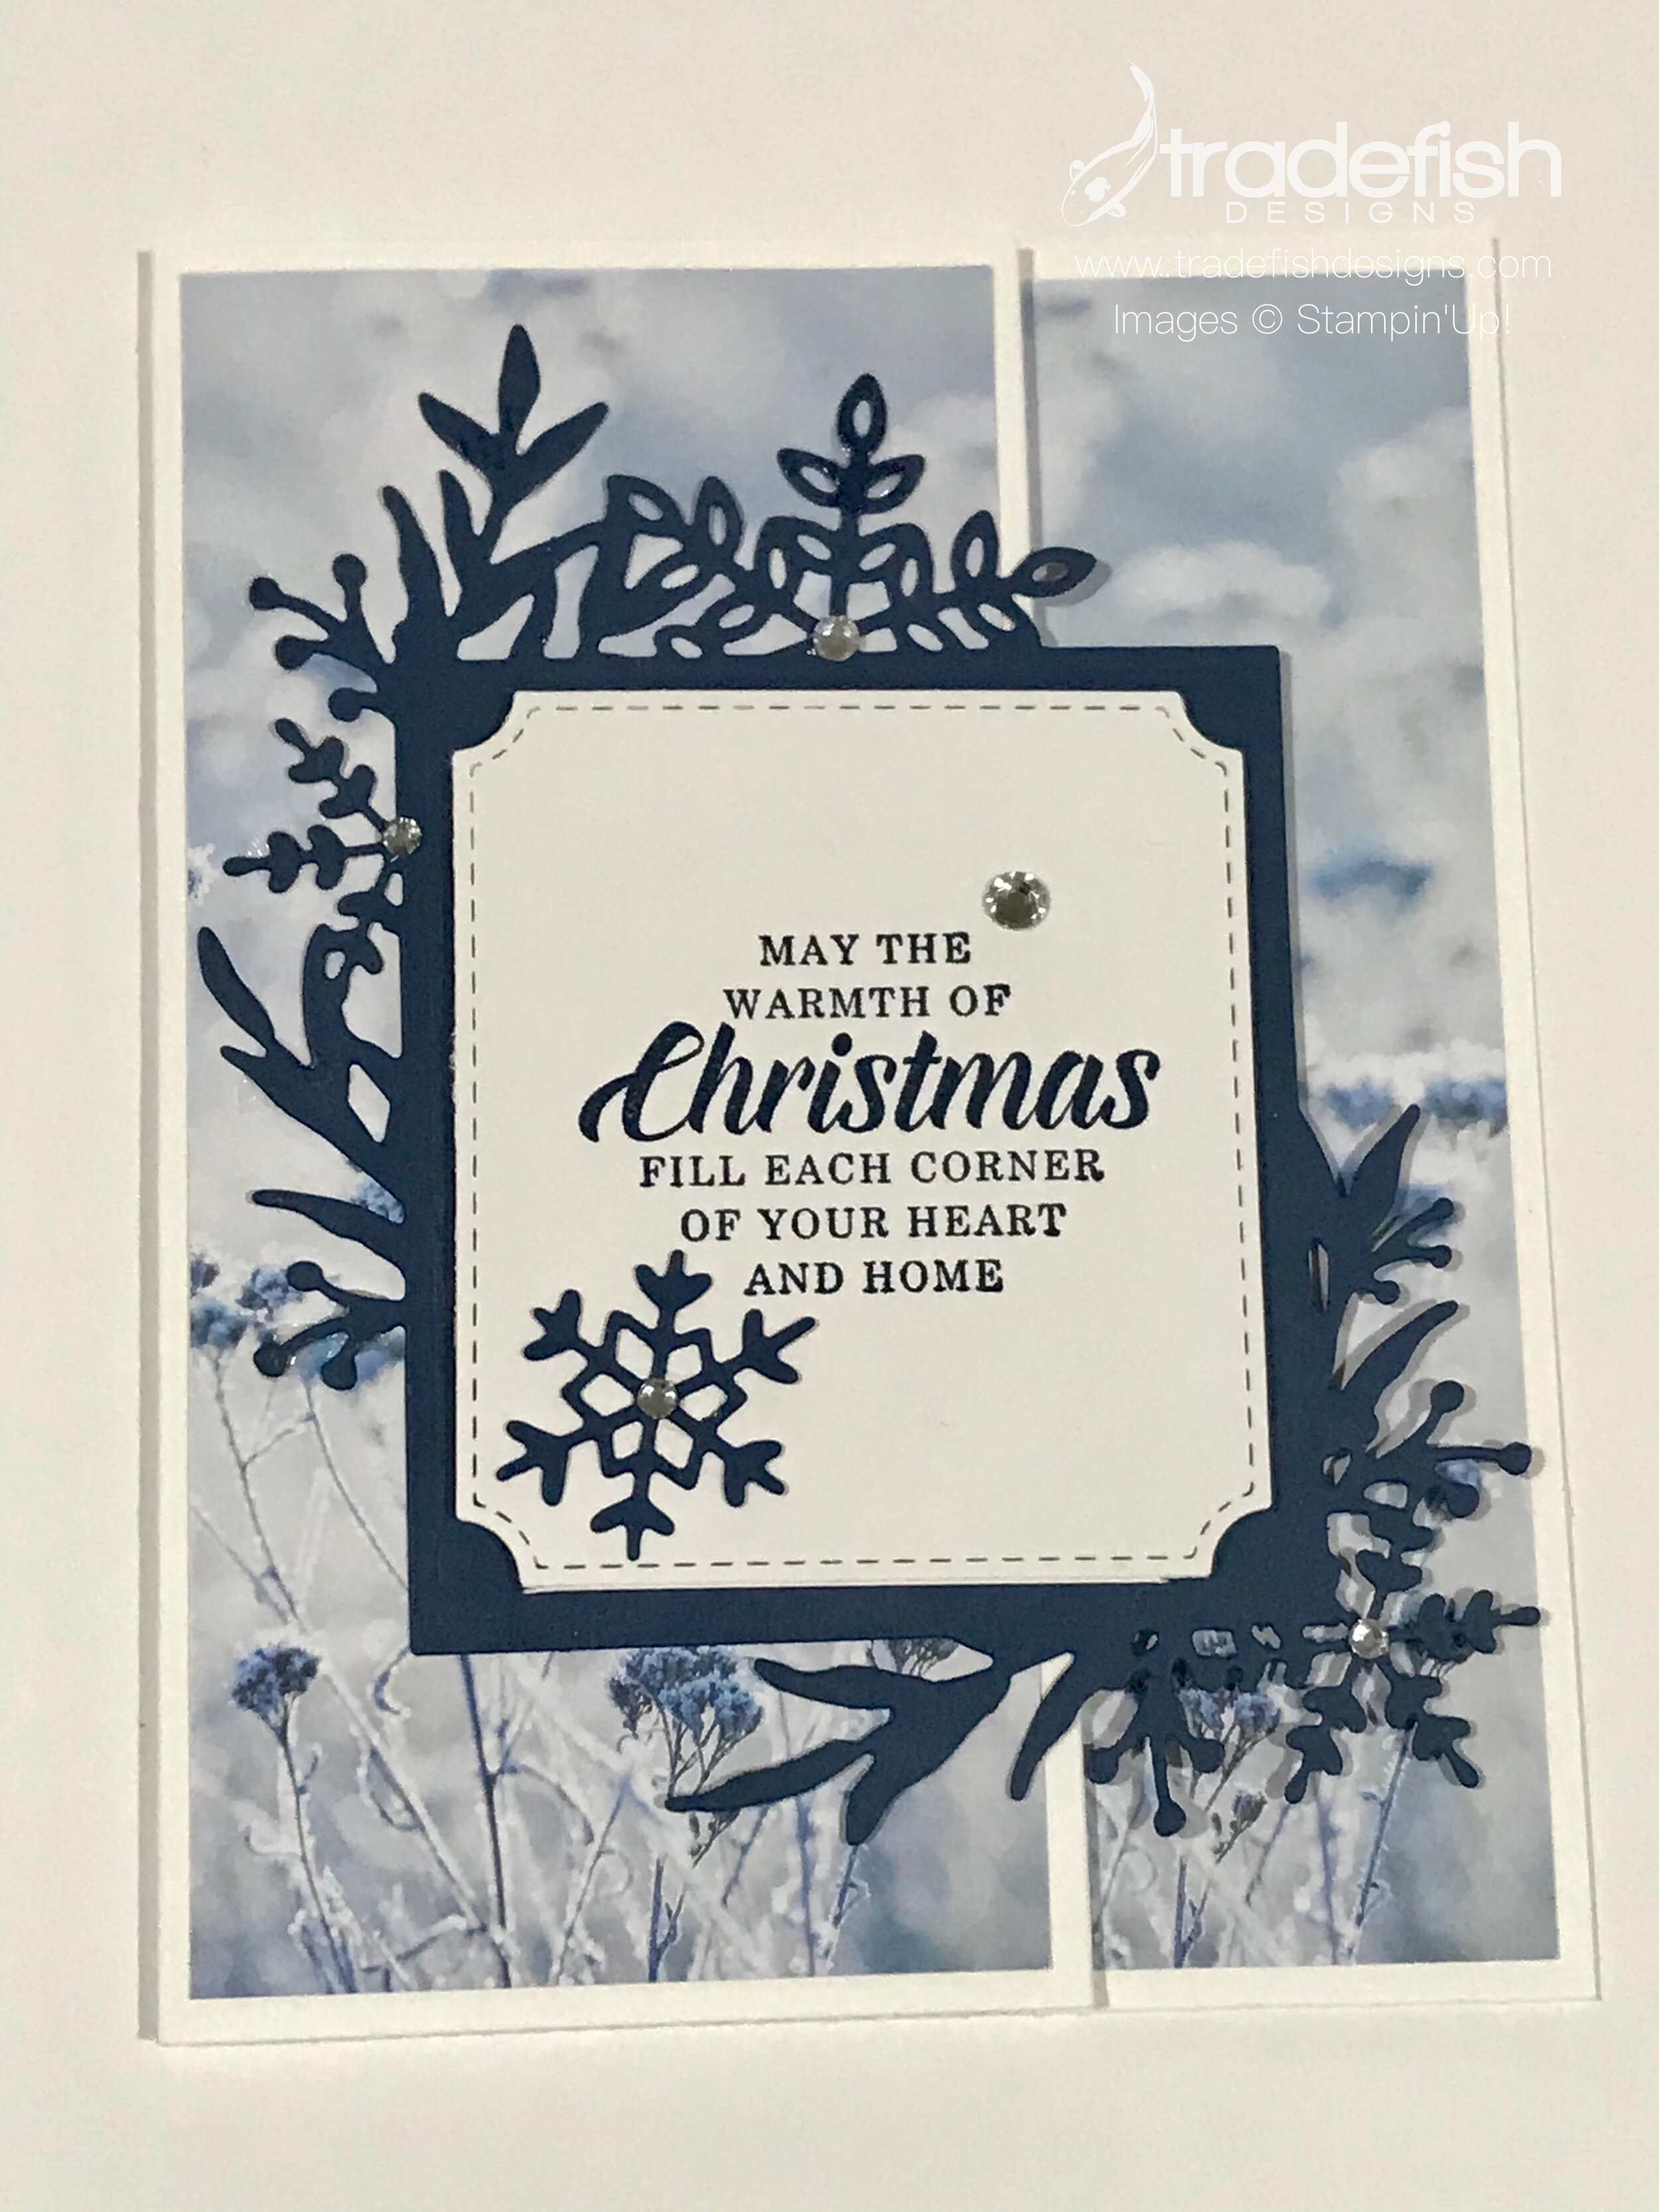
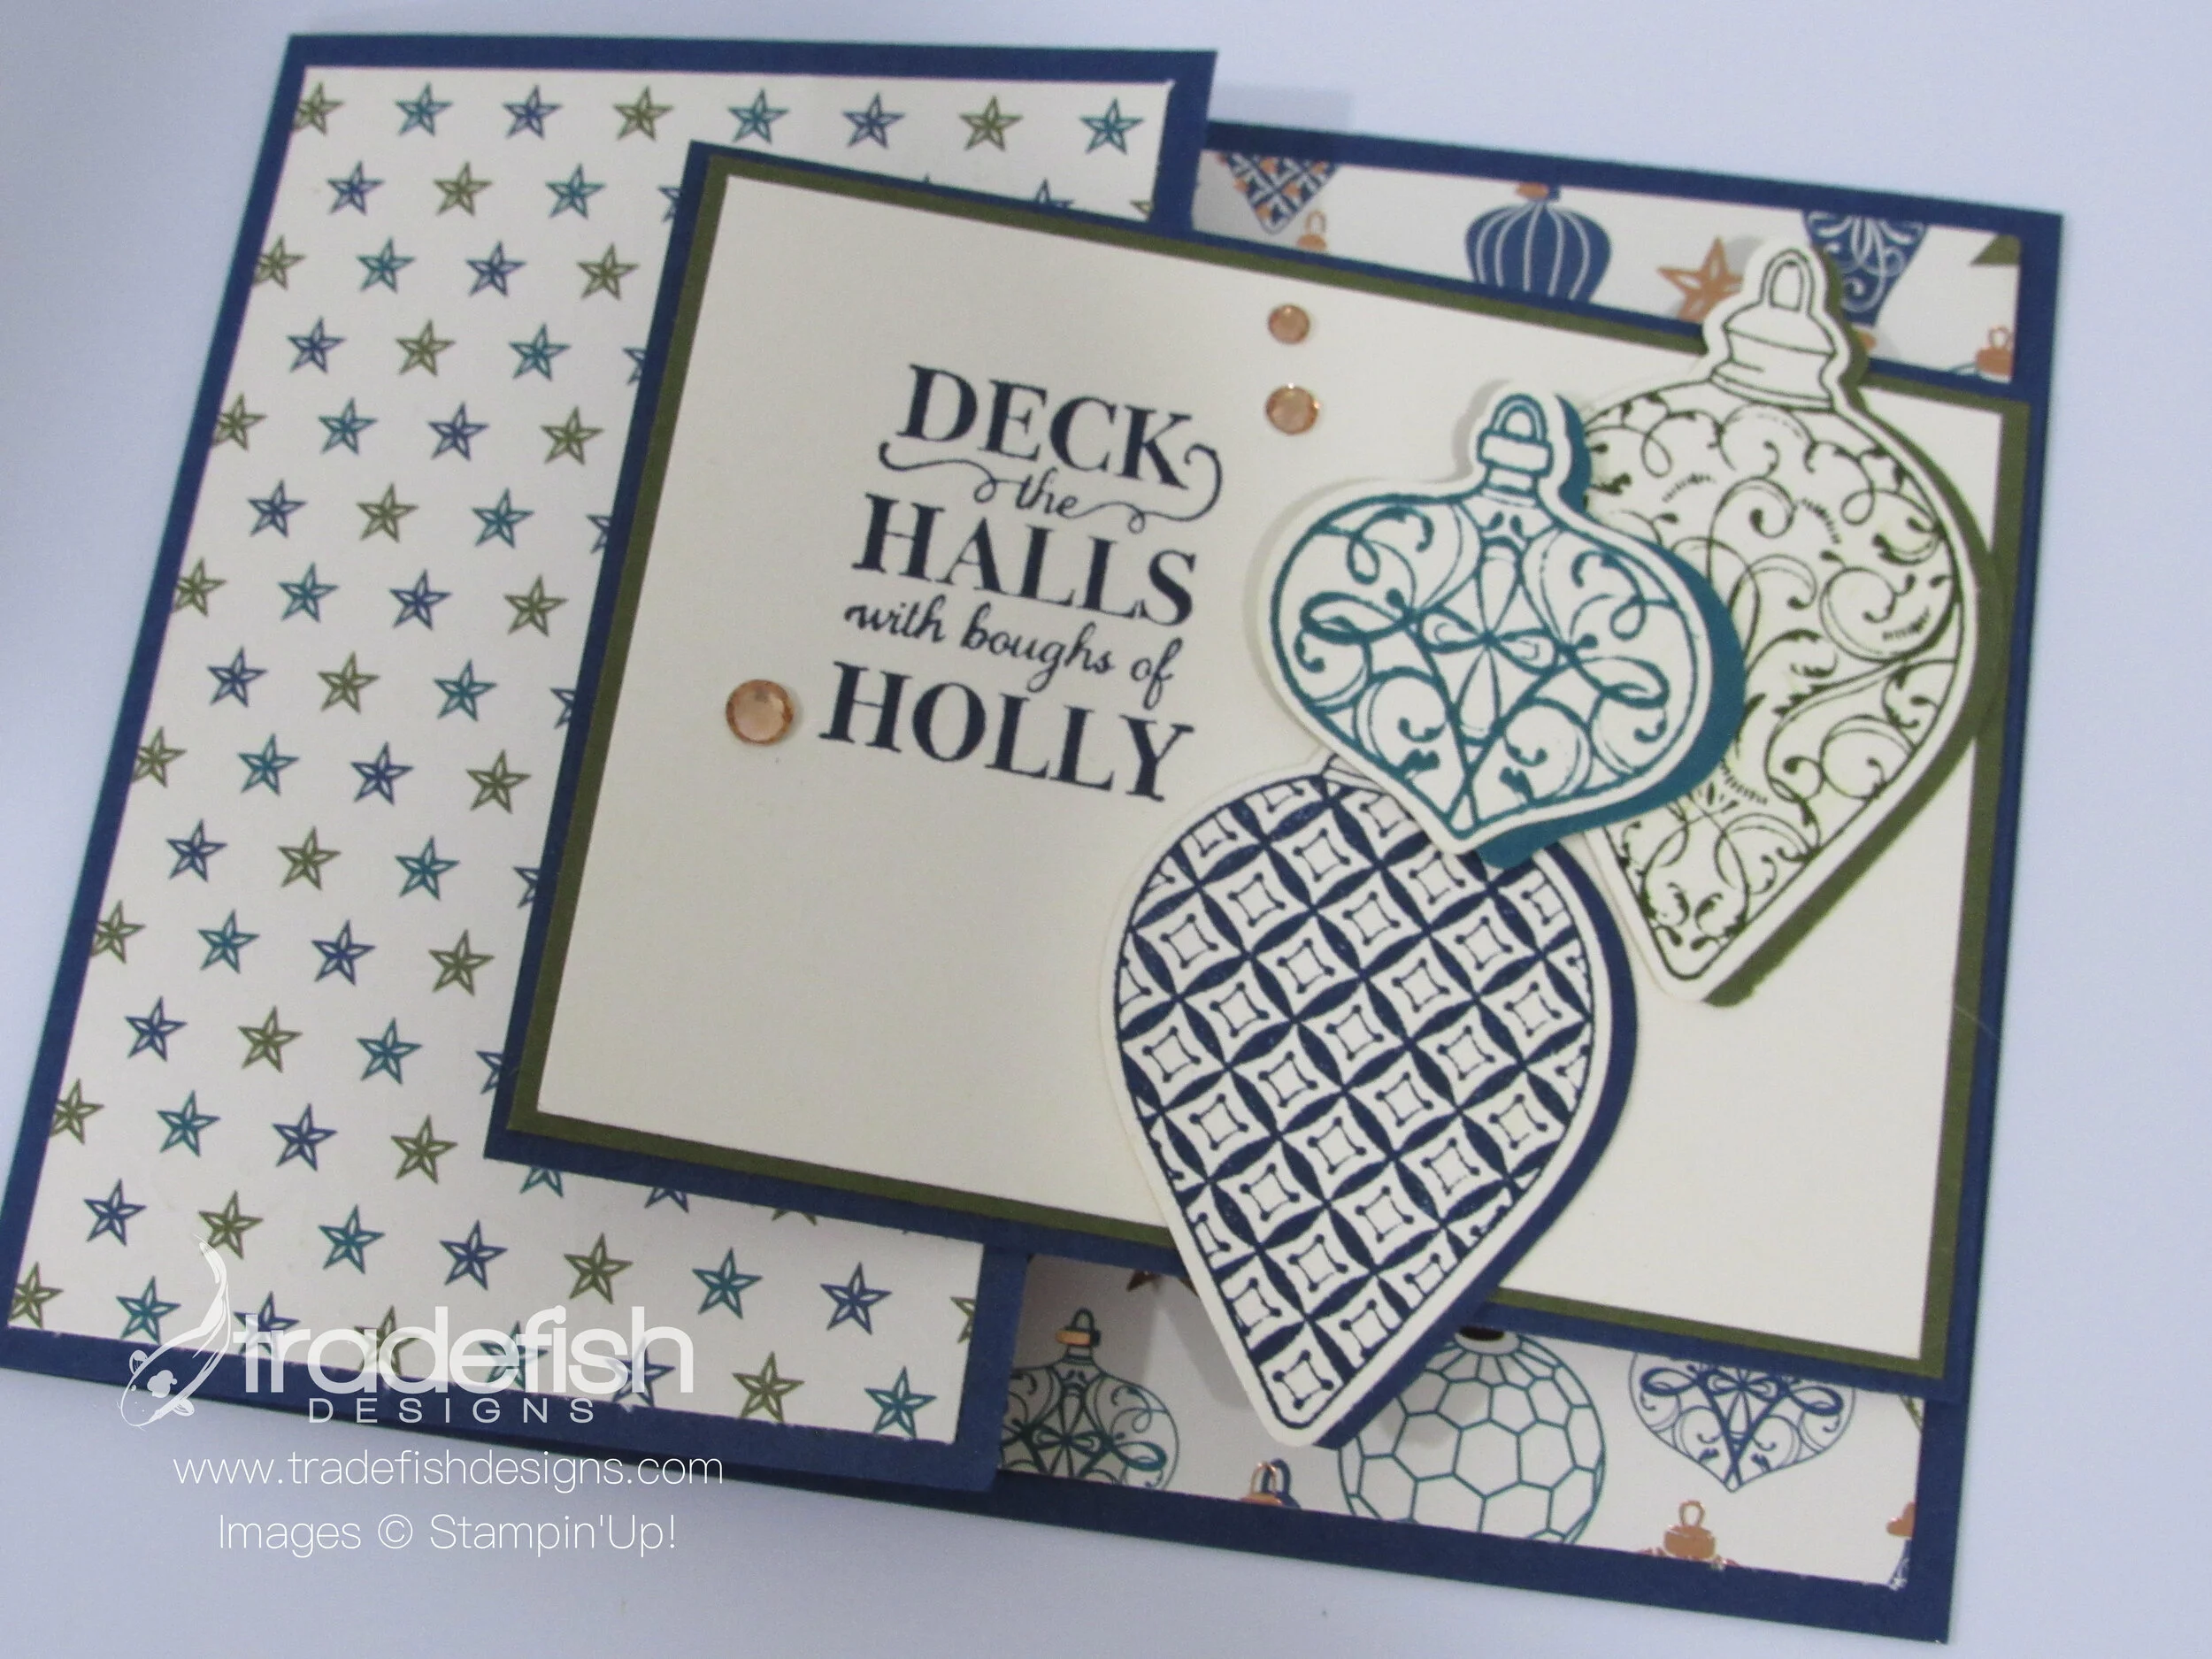
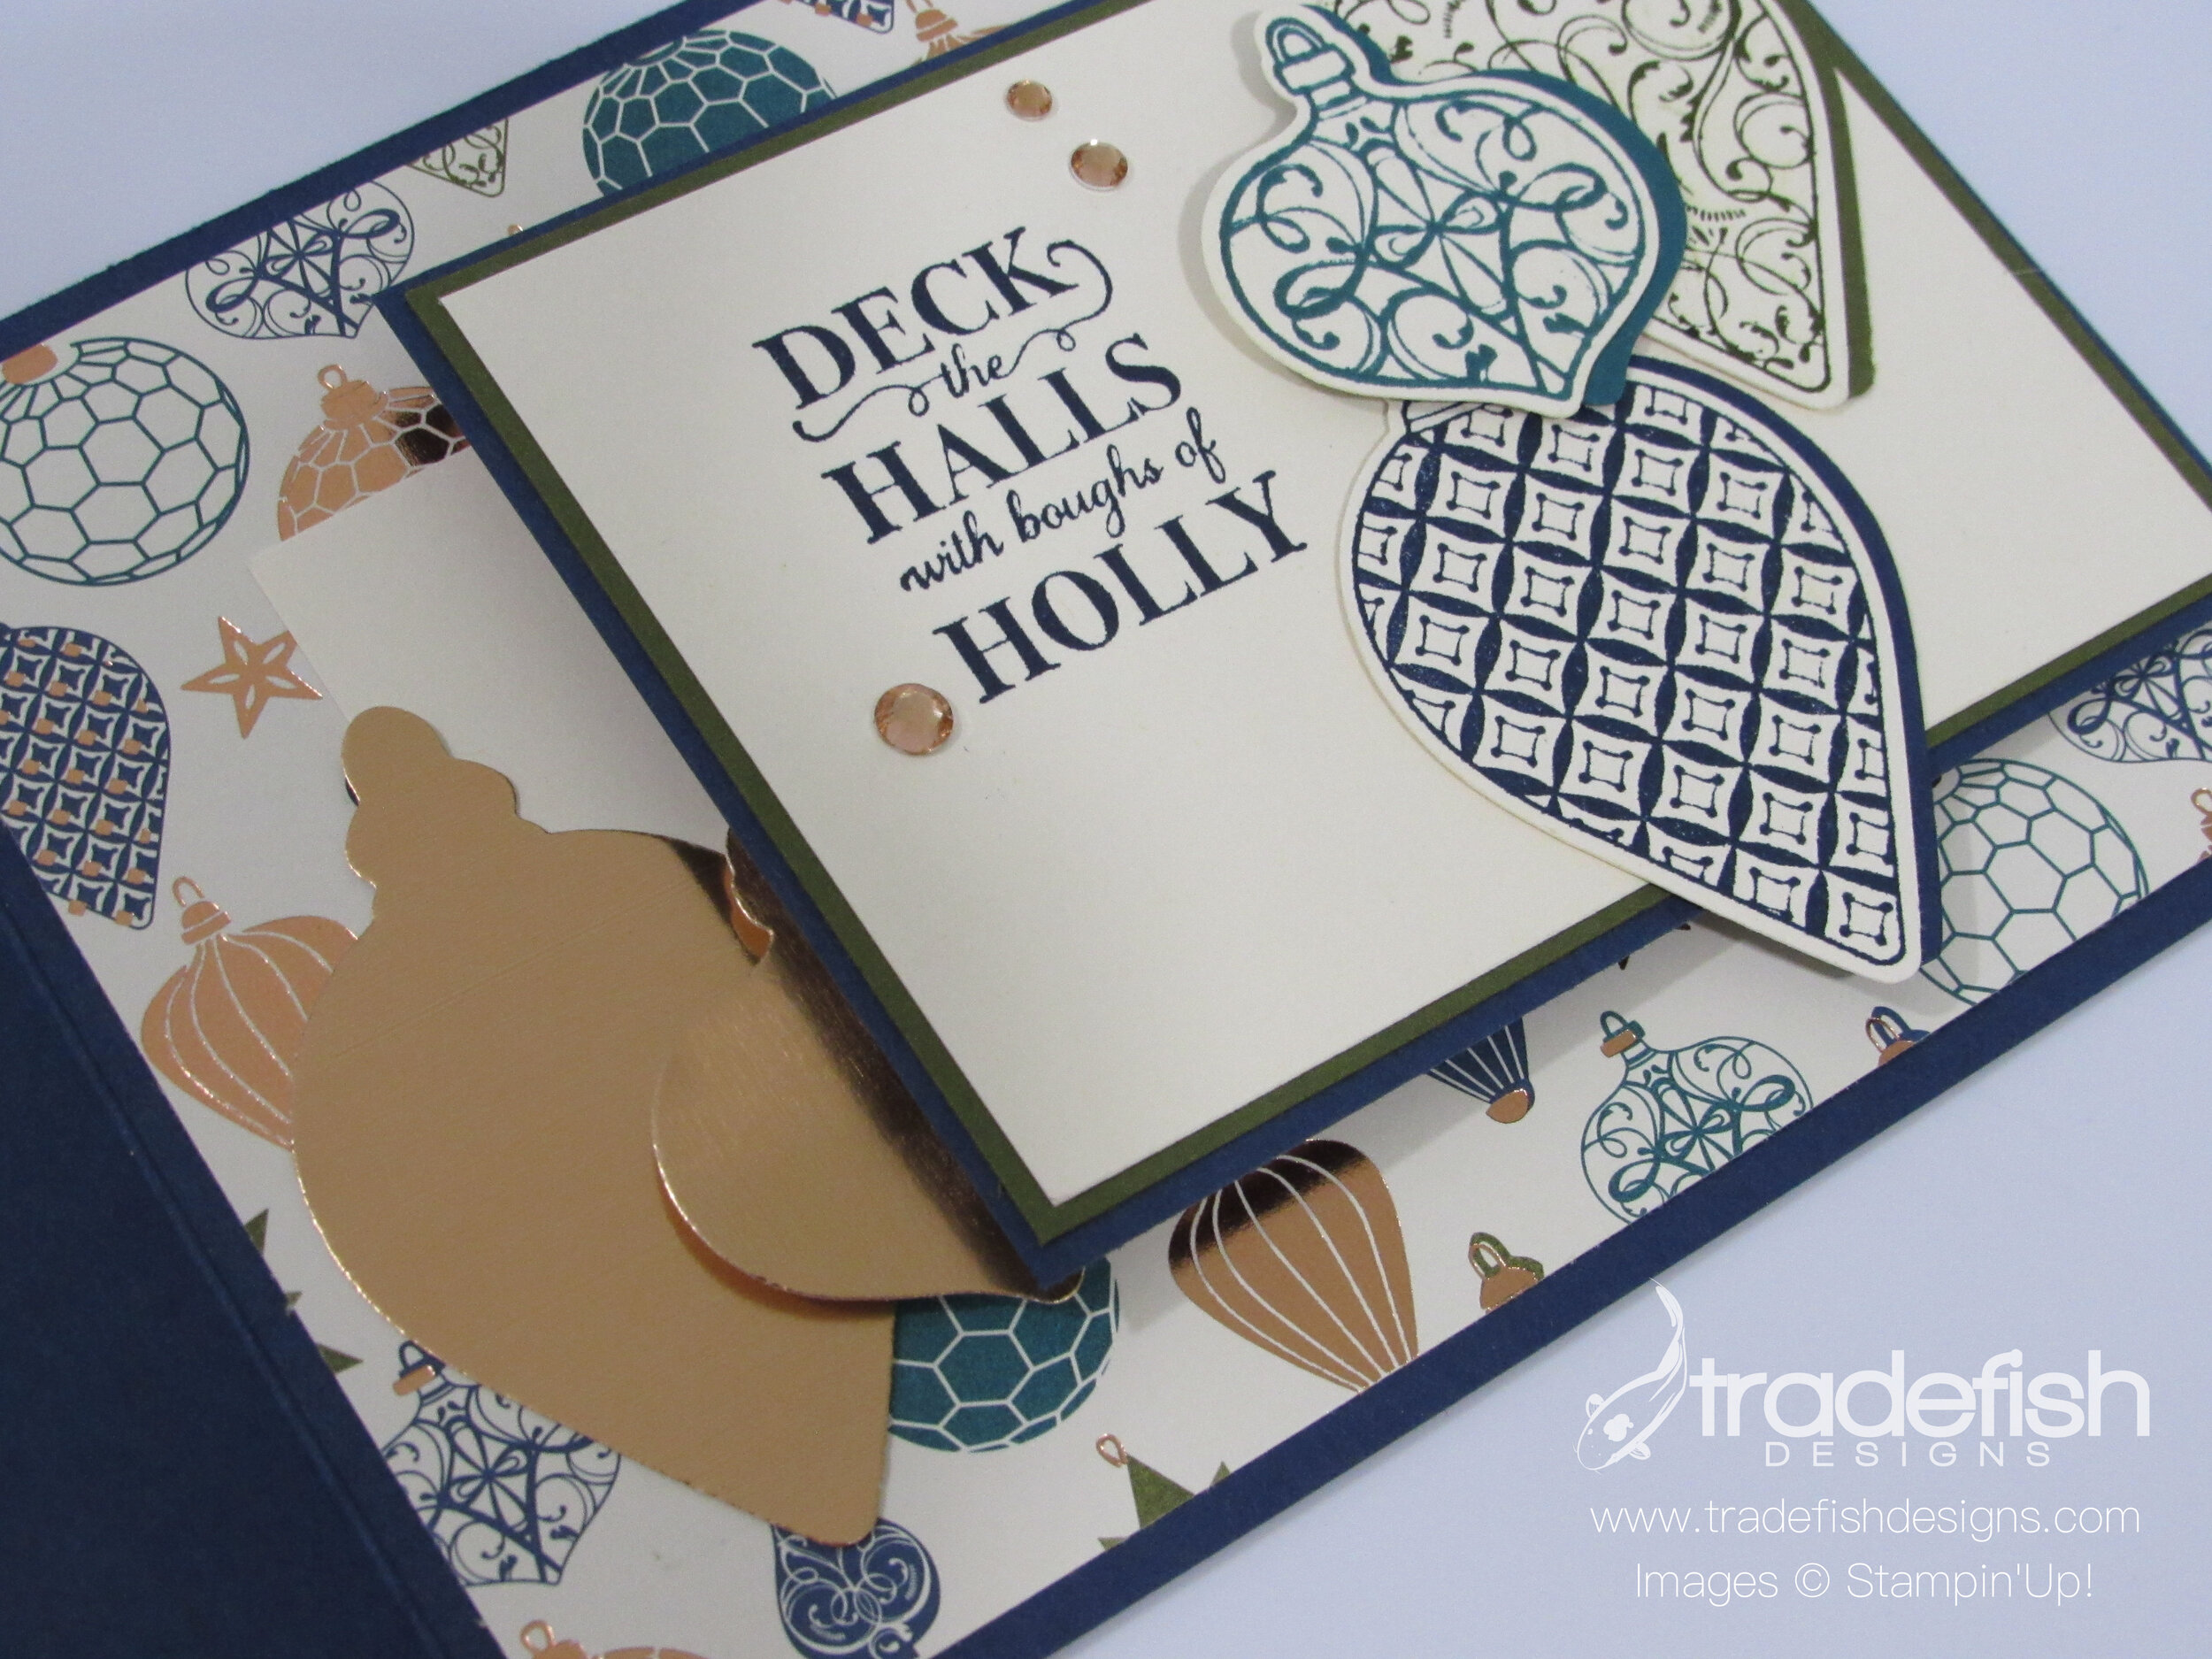
Thinking of You This Season - Holiday Card
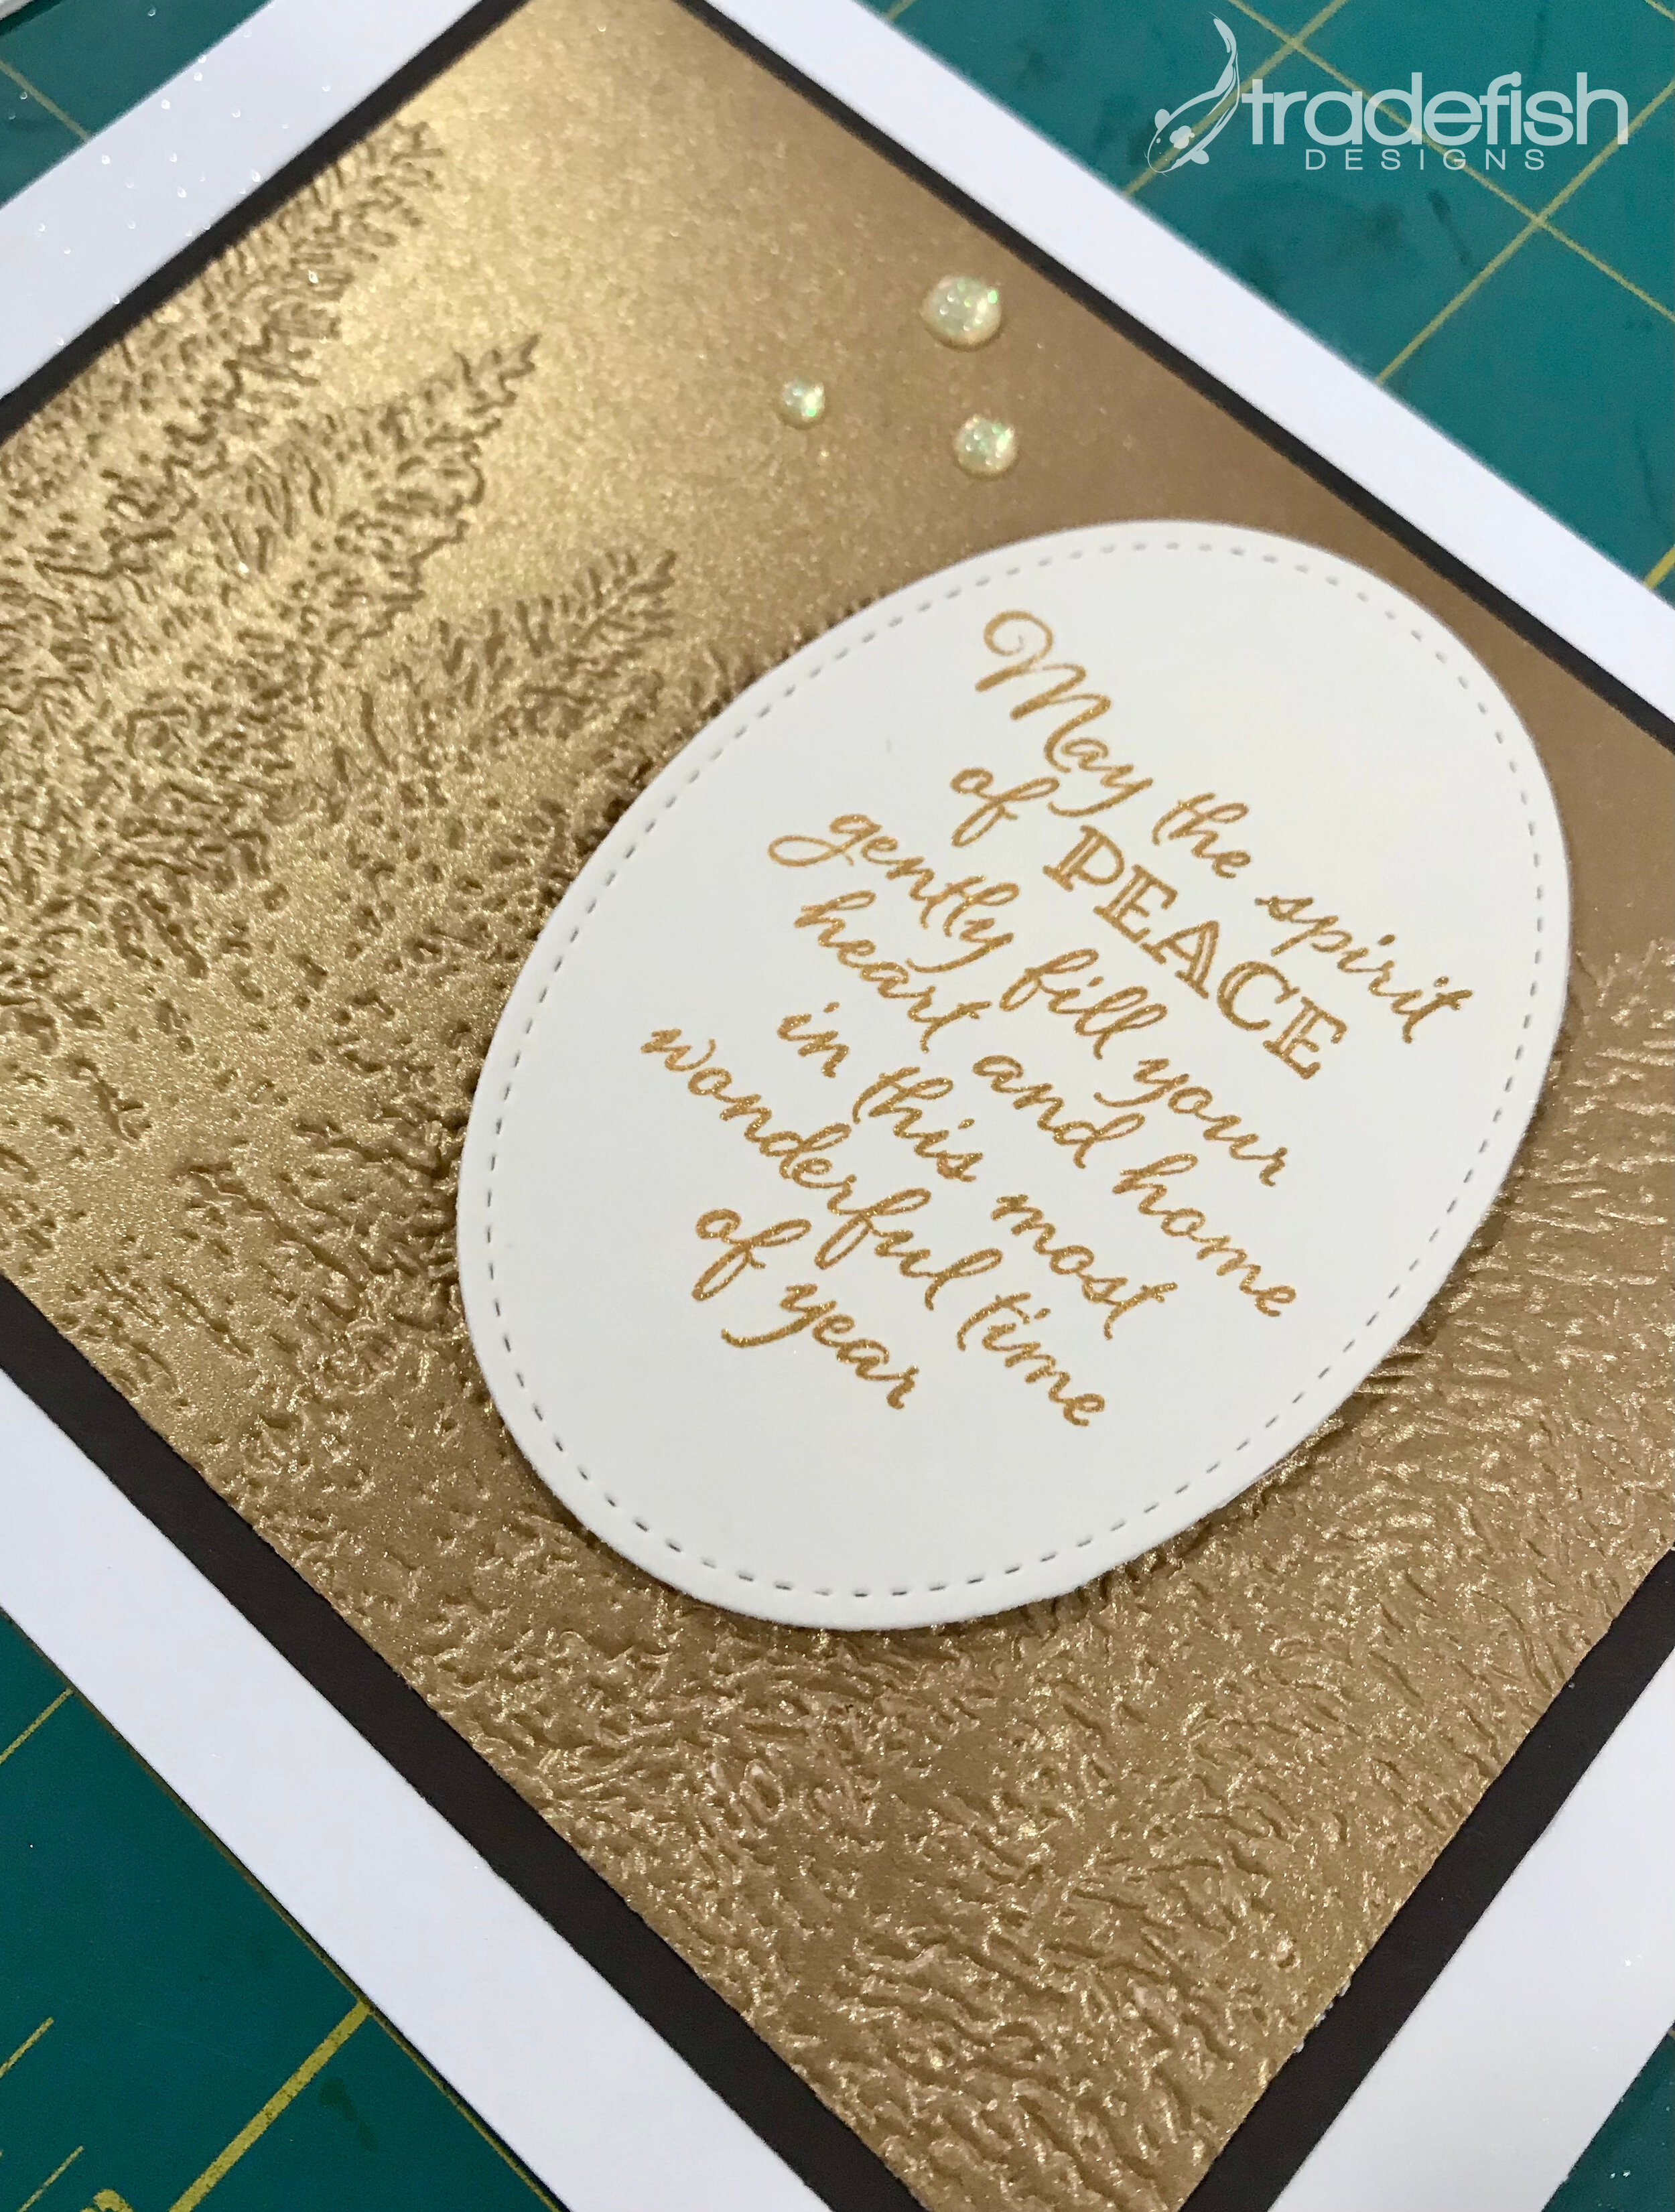
Today’s card is a Christmas card using the Winter Woods stamps and the coordinating In The Woods dies from Stampin’ Up.

The angle shows the dimension you get from the tree and the background embossing. Mixing all the layers gives the card depth. Plus I like to add a little bling with the gold glitter enamel gems,

Don’t forget to decorate the inside of the card. I used the coordinating designer series paper and stamped the pine tree off the side to allow for space for a holiday message.

I hope you enjoyed my card today. If you are interested in any of the items I used in this project please check out the Product List below. Keep it crafty friends!
| |  | ||
 | | ||
| |


Keep it crafty peeps!
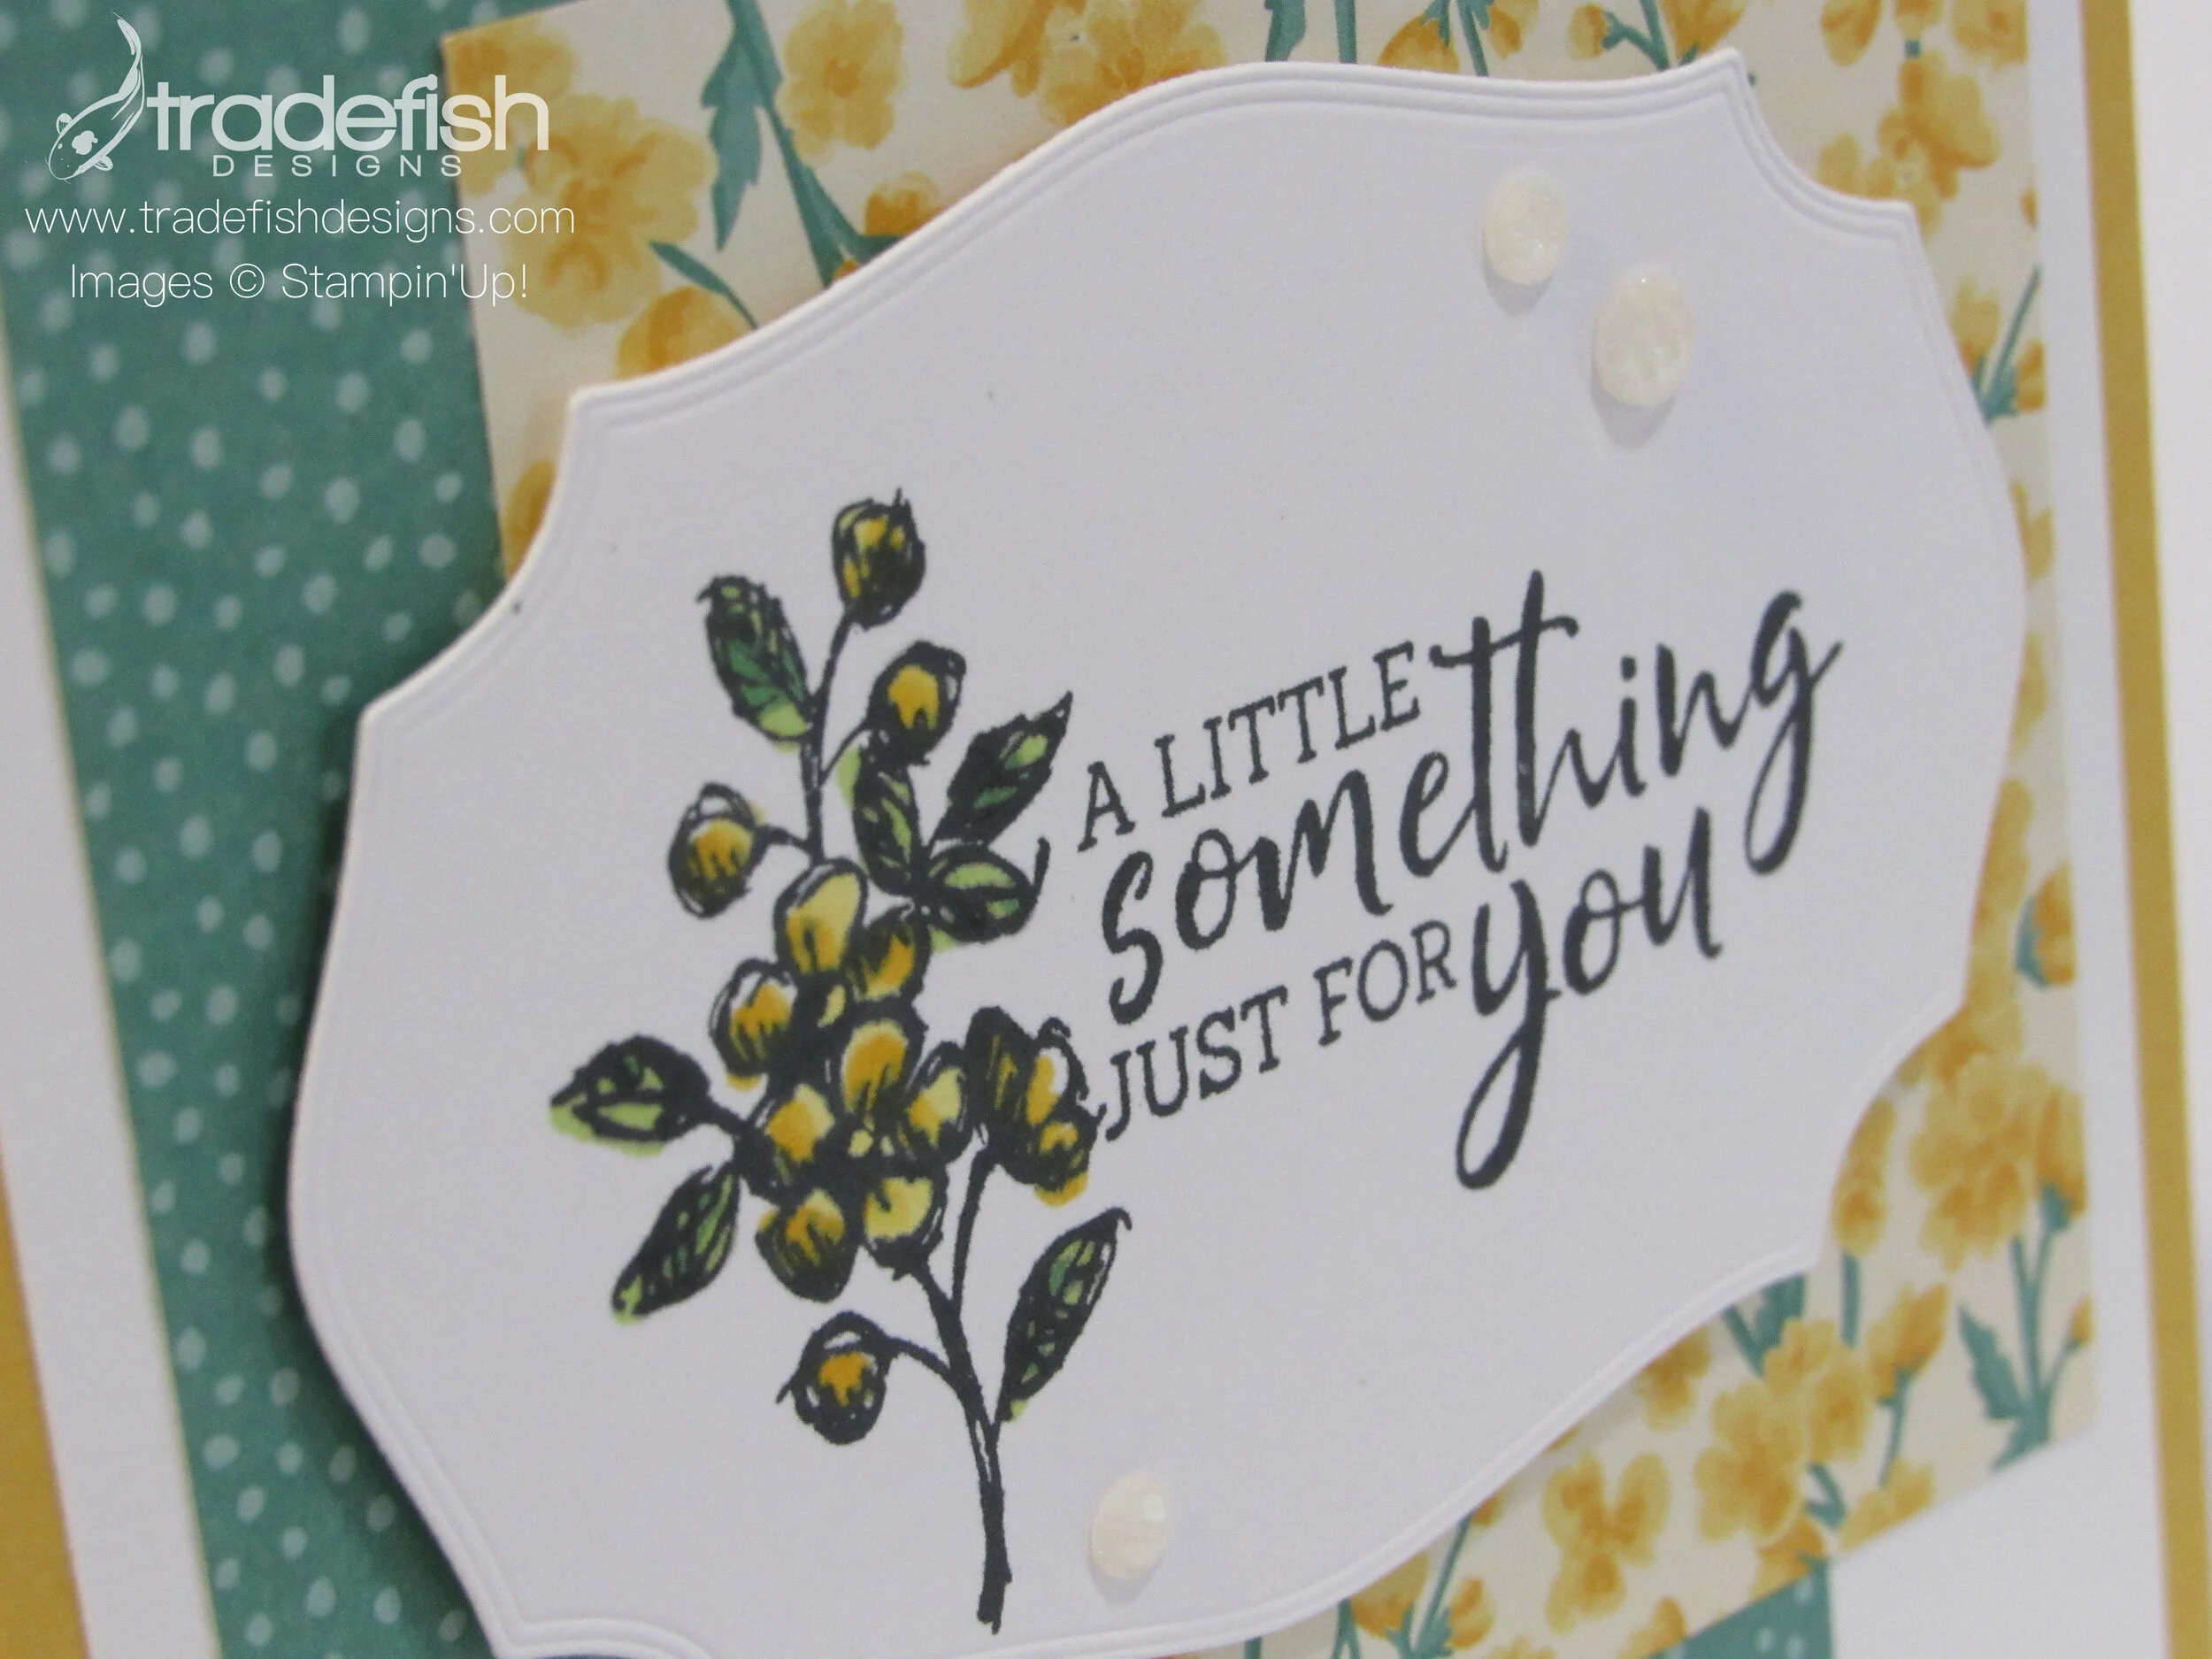
A Little Something Just For You.
Here’s another card using my favorite stamp set in the current Stampin’ Up catalog - Fancy Phrases. I’m not a girly girl and flowers aren’t normally my go to design but it’s something about the sketchy design and the sentiments that just speak to my crafty heart.

I always like to take an angled photo to give you a different perspective to the card. It also shows of the dimension is an eye-pleasing way. This photo shows off the lovely die cut from Tasteful Labels dies, the Elegant Faceted Gems and the fact that I don't always color inside the lines (which just proves it’s homemade). Isn’t this label die just gorgeous?!

Notice I added a little flower to the envelope? No reason you can’t add a smile to mail carrier’s face right?!

I hope you enjoyed my card today. If you are interested in any of the items I used in this project please check out the Product List below. Keep it crafty friends!
 | | |||
 | | |
 Designer Series Paper")


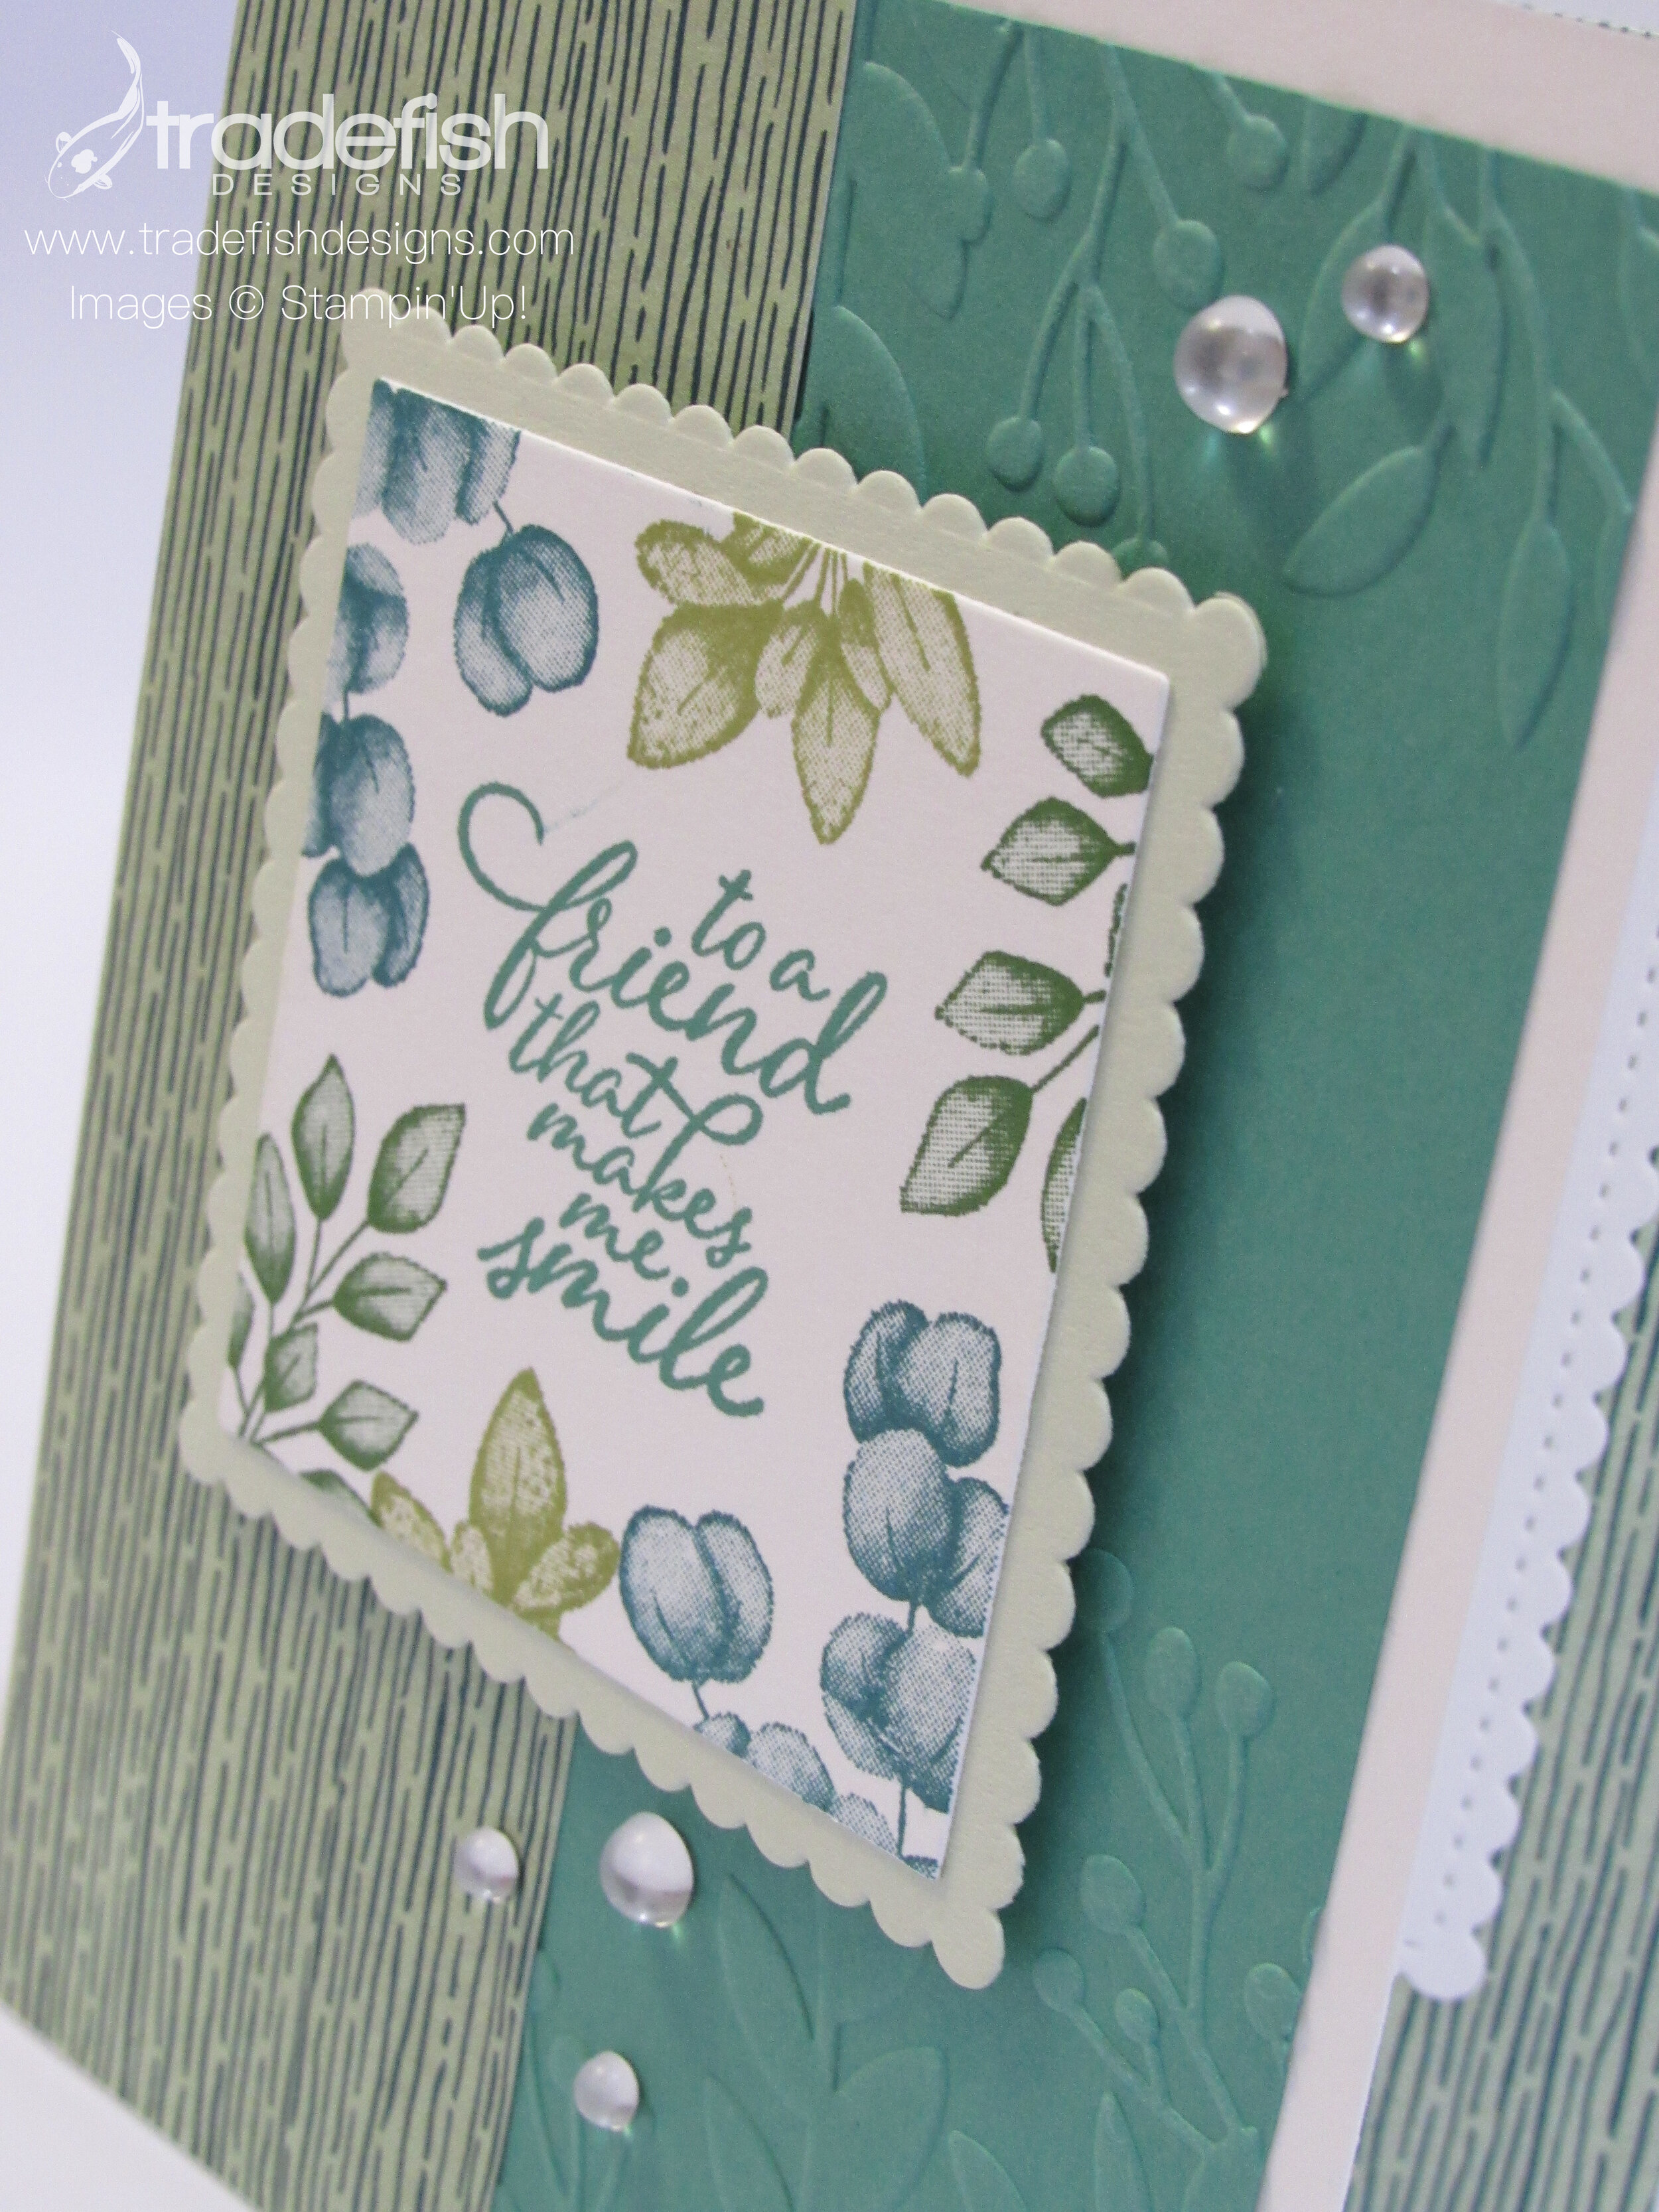
To a friend that makes me smile
The card for today was from a kit someone sent to me but I did what I call “freelancing”. This just means that I took the original design and amped it up to fit my style. This project uses one of my favorite stamps sets from Stampin’ Up…Forever Fern. The color combinations in the coordinated designer series paper is just gorgeous.

The soothing colors, textures and die cutting just make me smile. You can see the coordinating embossing folder, epoxy drops and multi colors of leaves all on display. Making this card was just so satisfying.

Remember my crafty friends, no naked envelopes!

I hope you enjoyed my card today. If you are interested in any of the items I used in this project please check out the Product List below. Keep it crafty friends!
 | ||||
 | ||||
 |  | |
")


Keepin’ it real crafty!
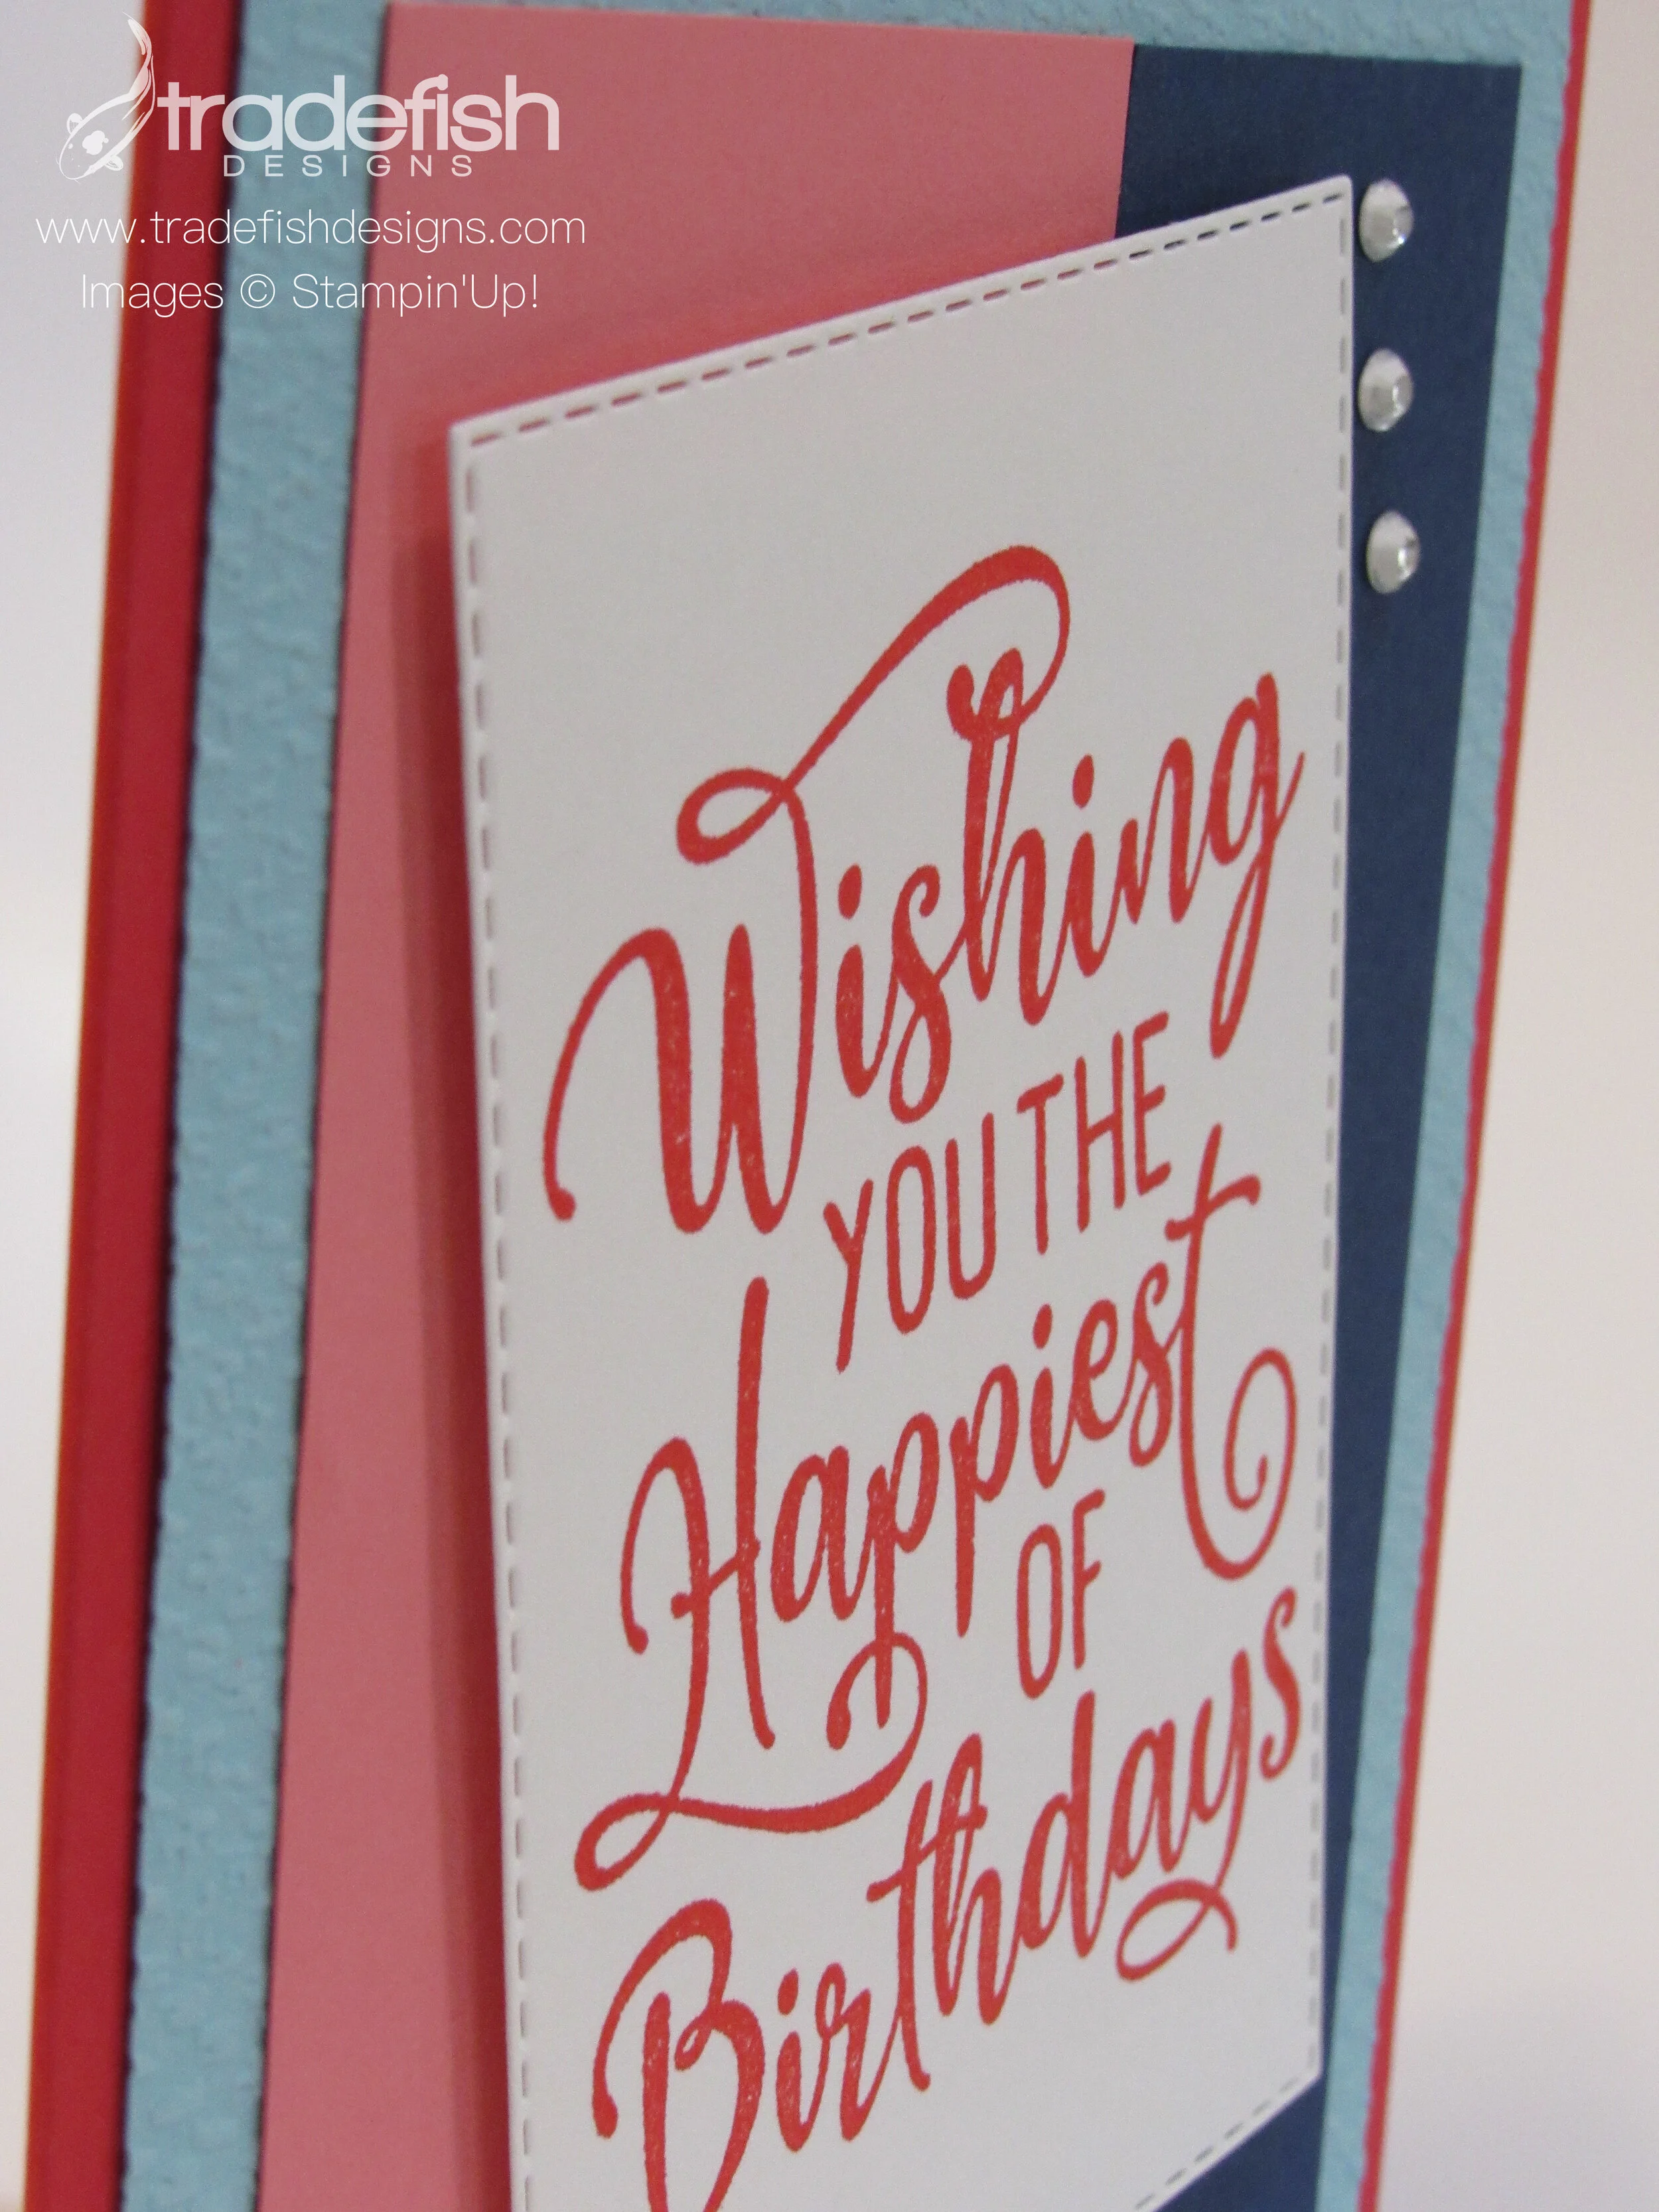
Colorsplash #3: Wishing you the happiest of birthdays.
I took part in a Colorsplash Challenge which required the use of 4 colors: Poppy Parade, Flirty Flamingo, Balmy Blue and Night of Navy. Those colors and a new stamp set led me to this fun birthday card. Loving how the design shows off the texture of the embossing done to the Balmy Blue cardstock. #colorsplash3

At this angle you can see the cool stitching on the rectangle die and the rhinestones.

I couldn’t forget the inside of my card. A simple and bright message in Poppy Parade.

I hope you enjoyed my card today. If you are interested in any of the items I used in this project please check out the Product List below. Keep it crafty friends!
 | |||
| |
")


Keepin’ it crafty!
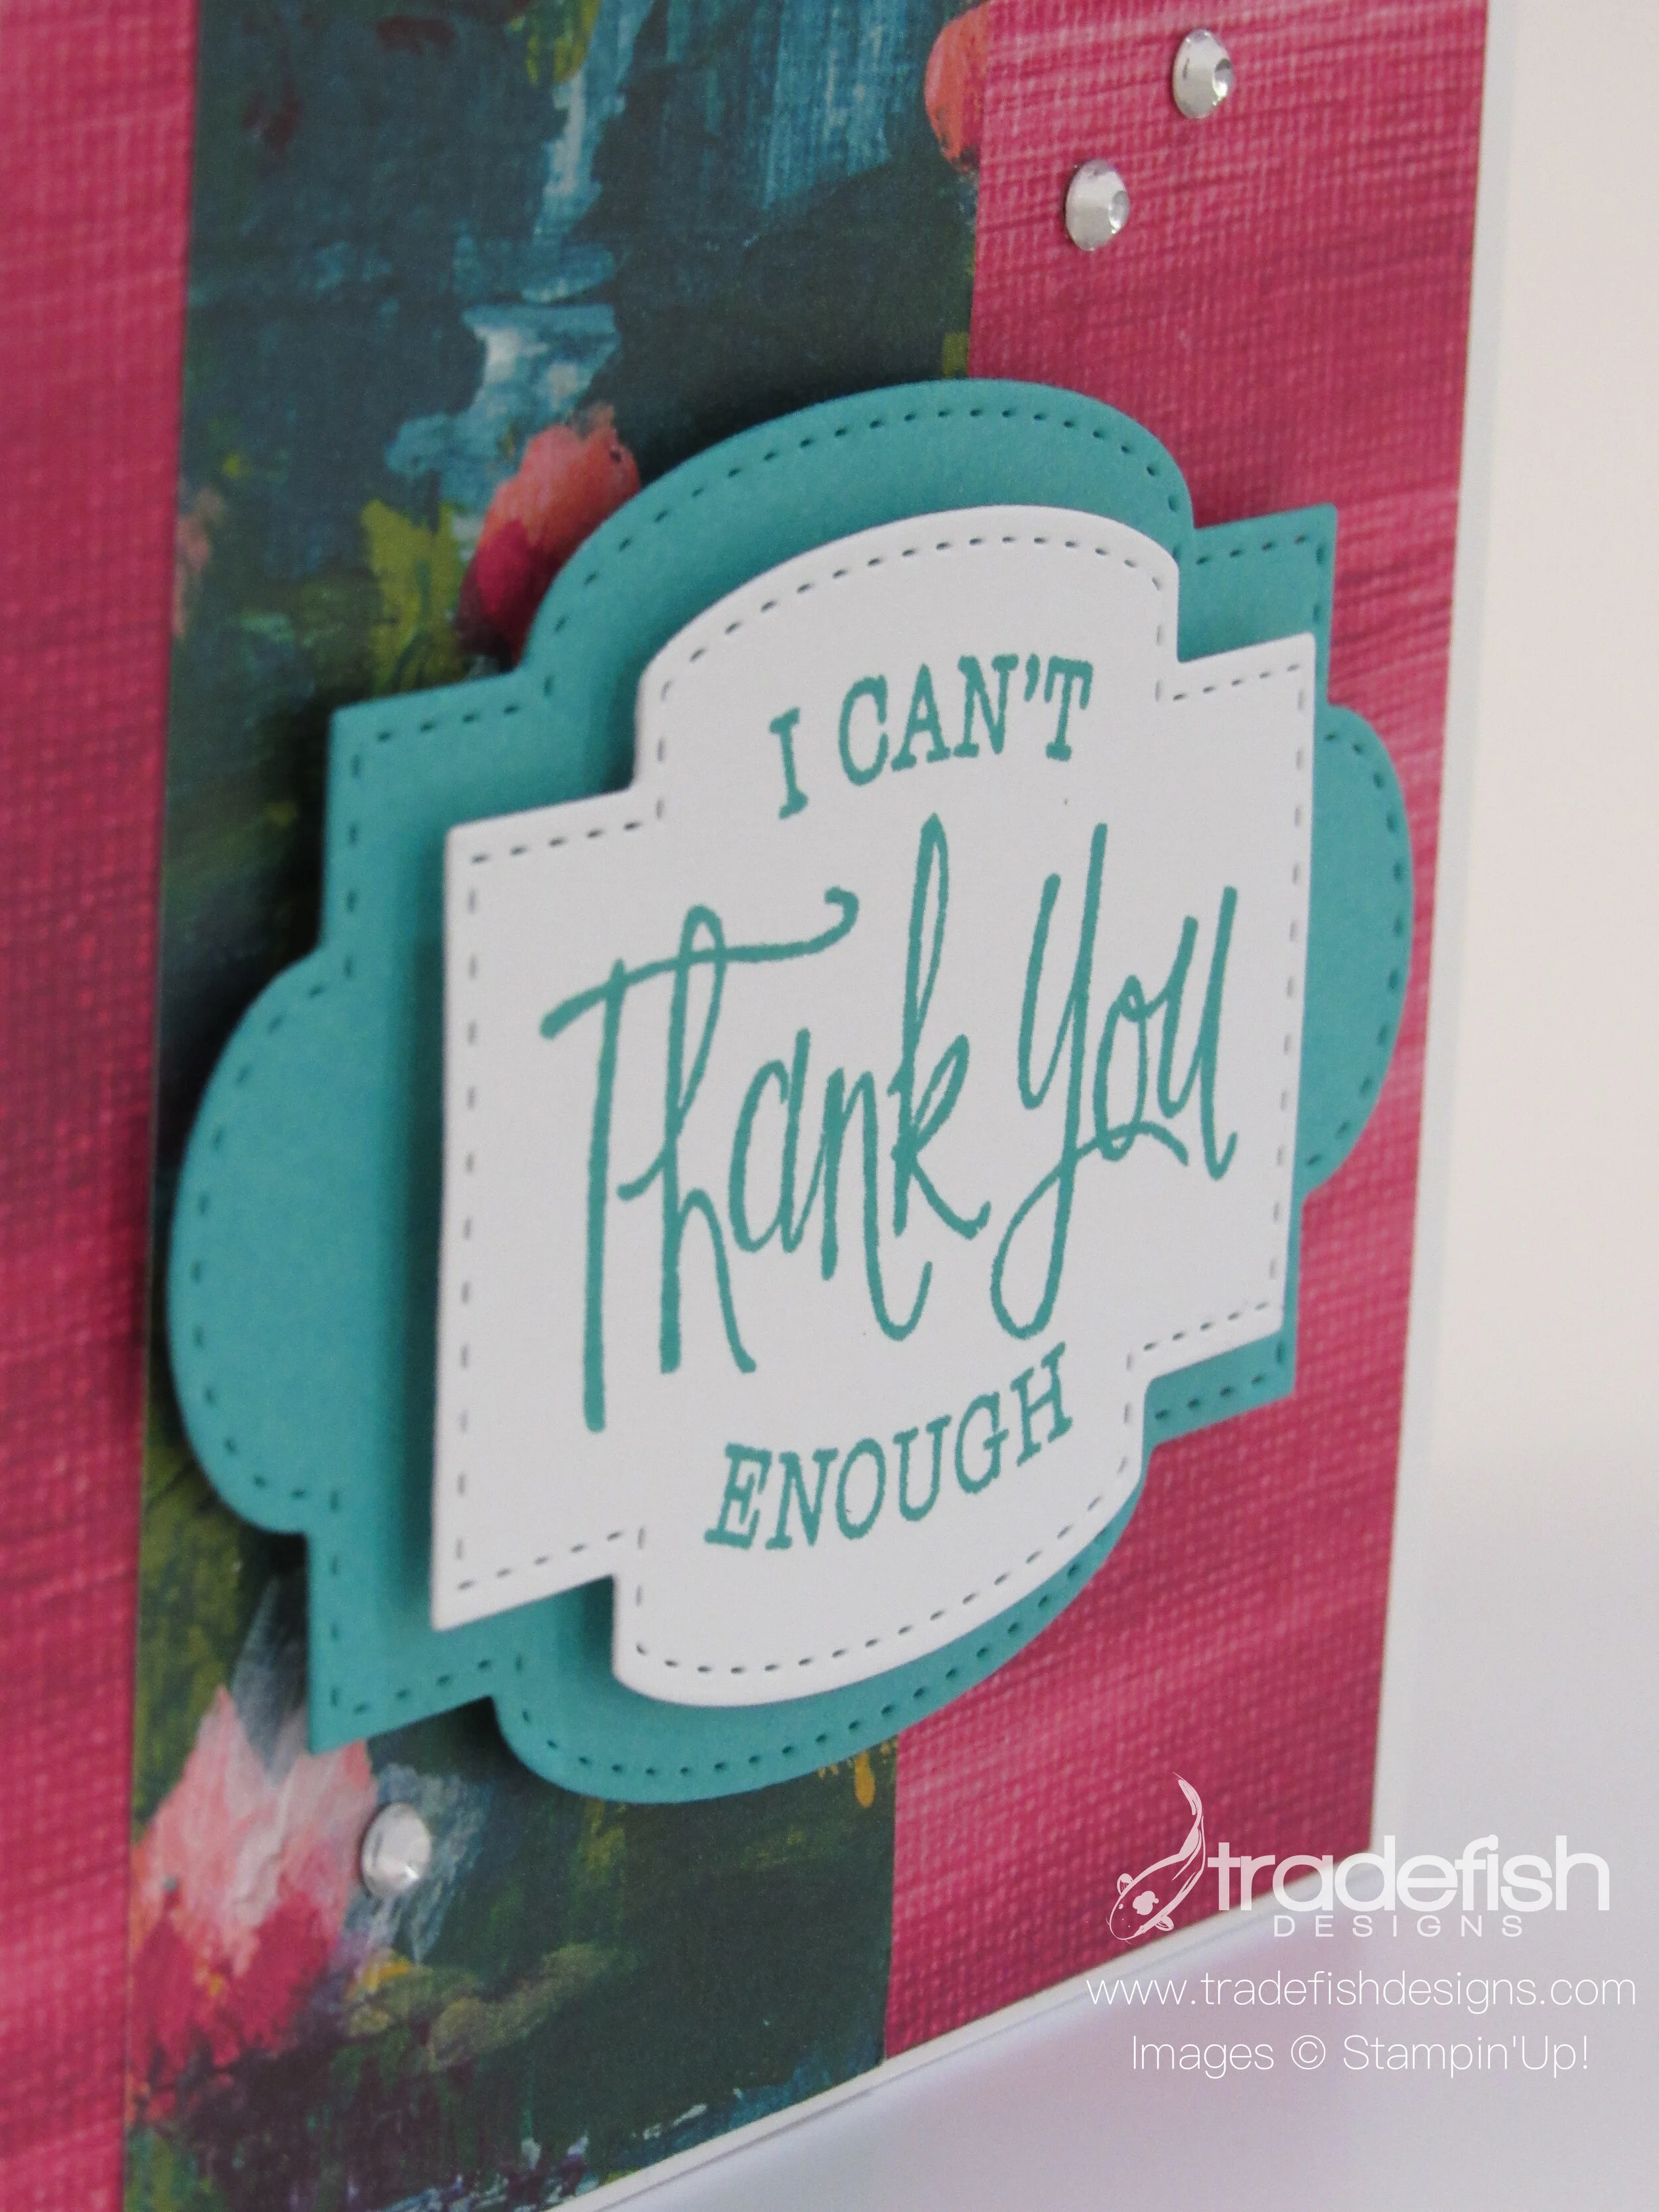
I can't thank you enough!
Not enough people send thank you cards anymore. People don’t really send letters at all but I do think a thank you card is important. Here’s a colorful one I created and I hope you enjoy it!

The angle view gives you a great look at the dimension on this card as well as the sparkly rhinestones. The stitching on the dies looks great up close too.

I brought the designer paper to the inside of the card and it will really highlight whatever message I send on the inside. Don’t forget the envelope too. I little color splash is a nice treat to the recipient and the mail carrier!

Same card using different colors. Love the bright paper that has so much texture in it.

I hope you enjoyed today’s card and if you want any of the supplies and you can find them below in the Product List.
| | |||
| |
")


Remember to send those thank you notes!
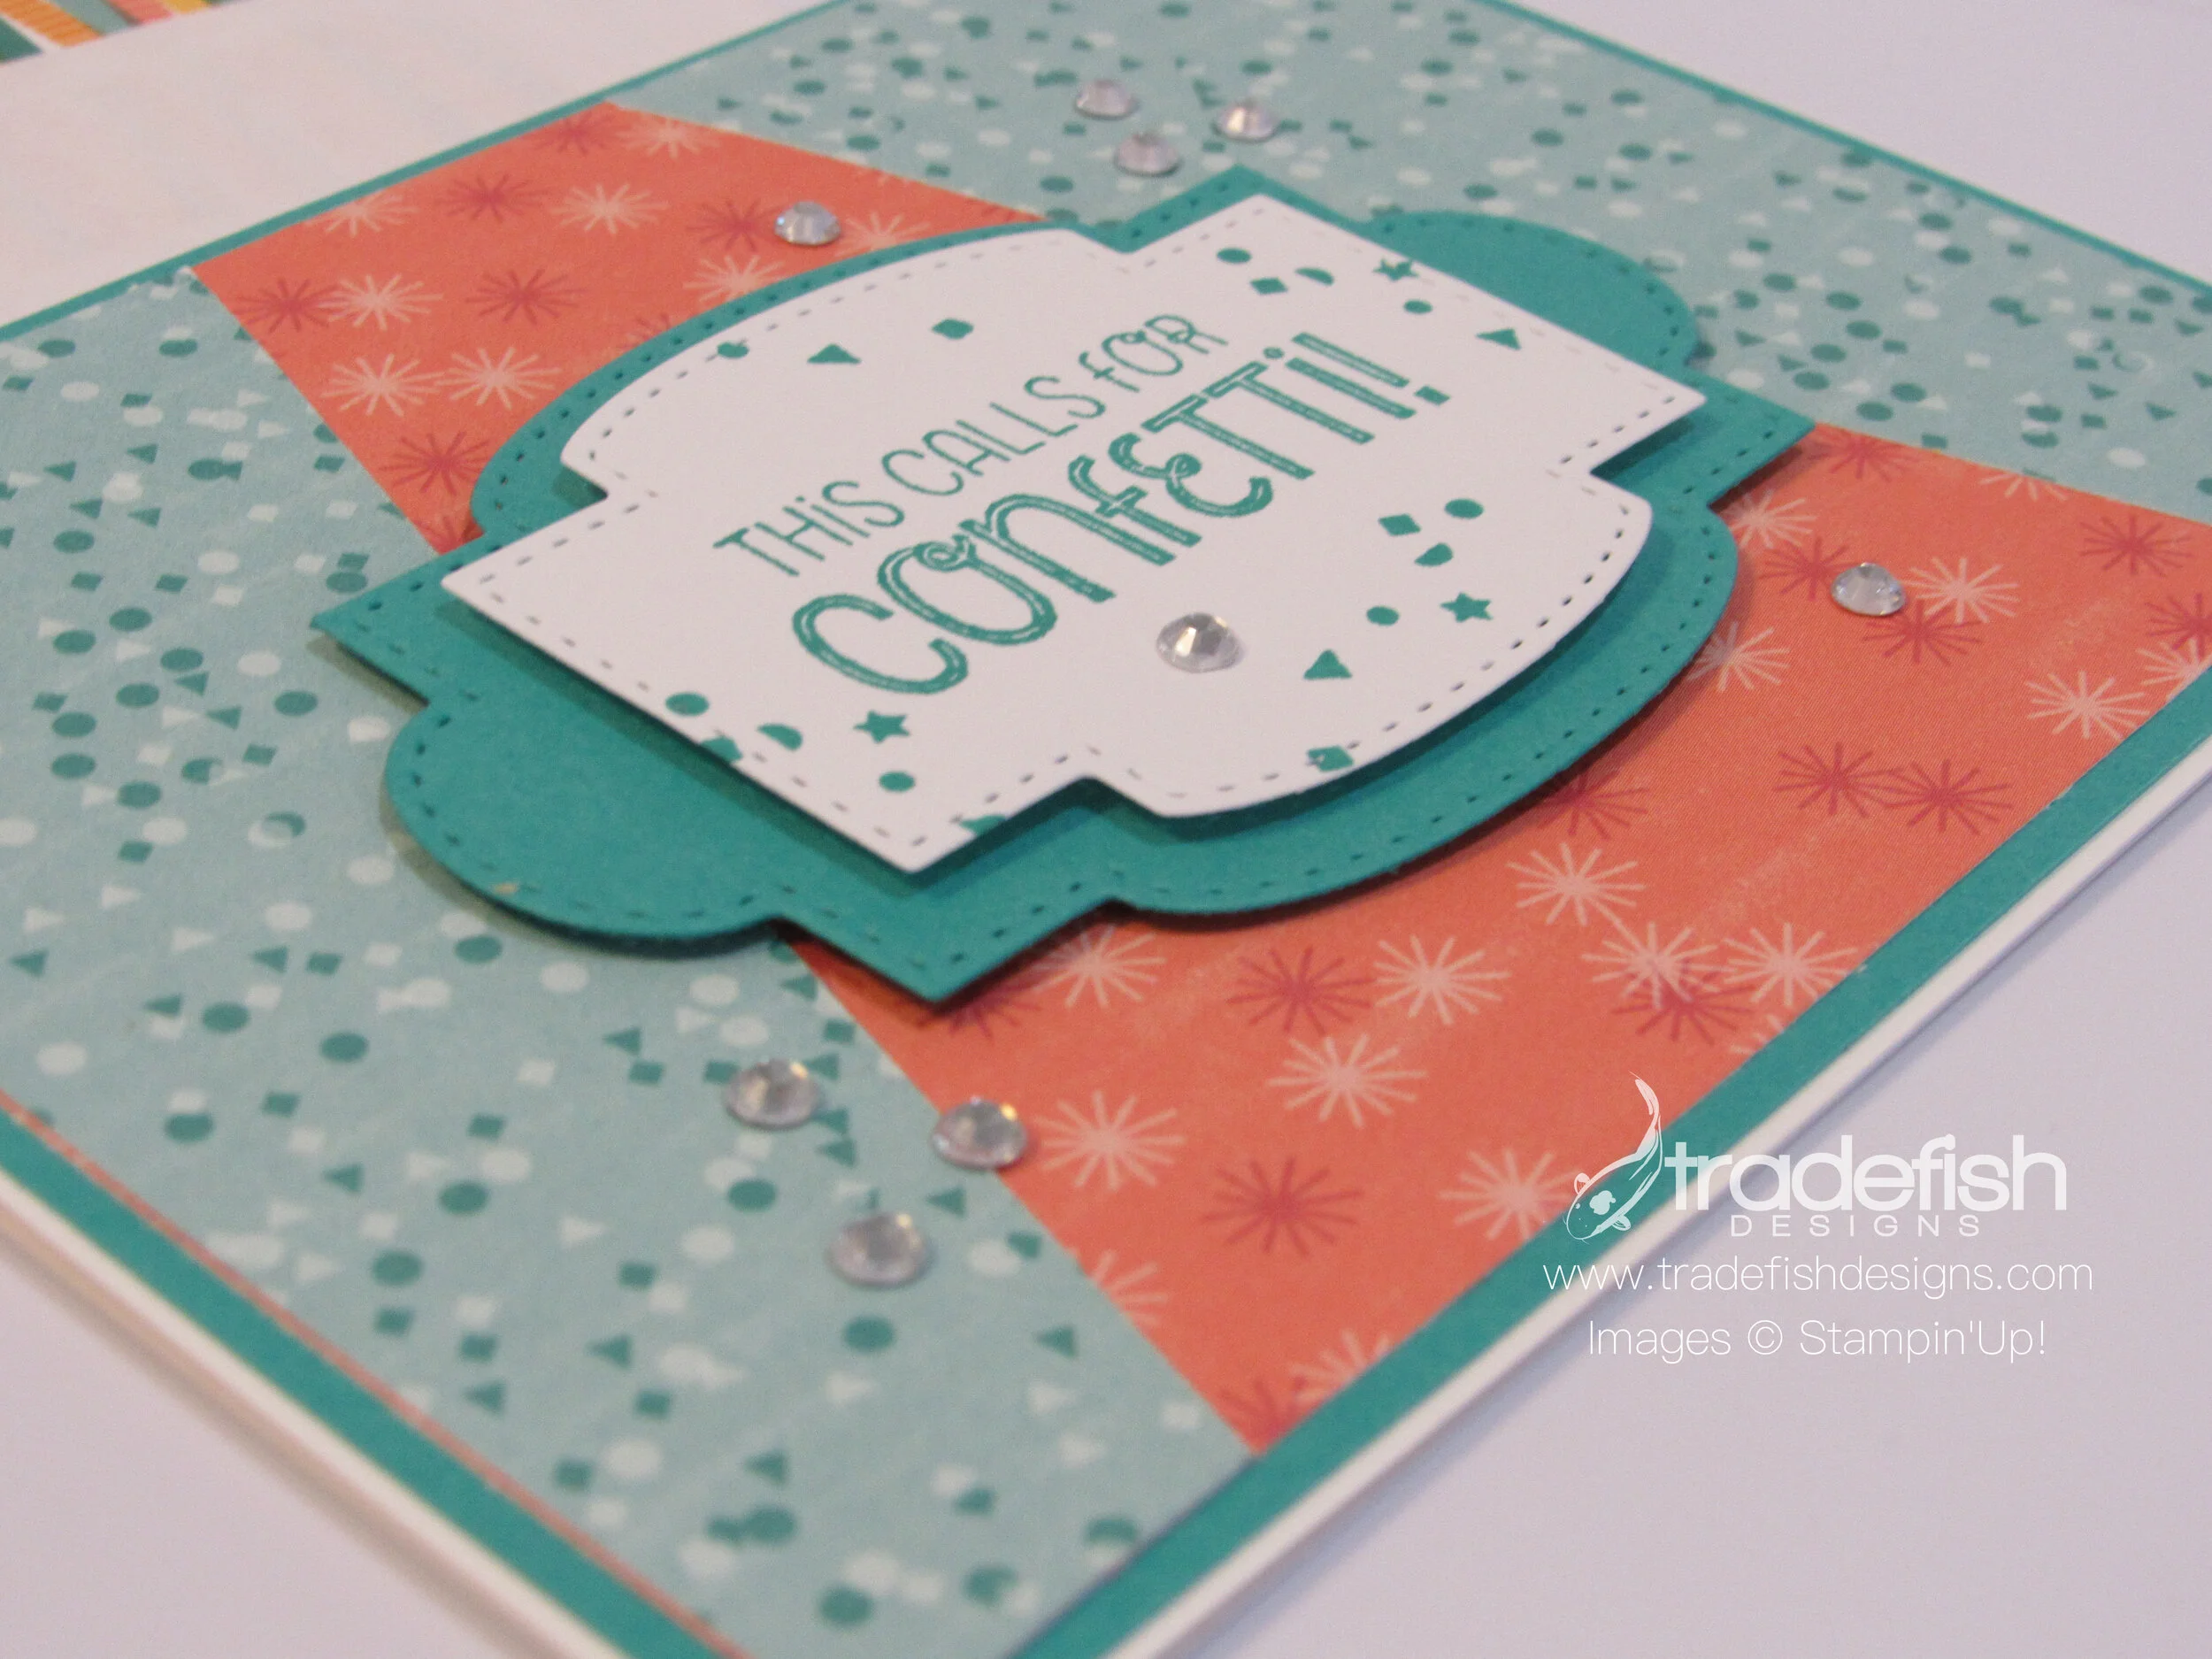
This calls for confetti!
Today I have a fun birthday card using silly and bright colors. This is a great card for kids or adults.

Here’s an angle view showing off the dimension of the layers and the pretty rhinestones.

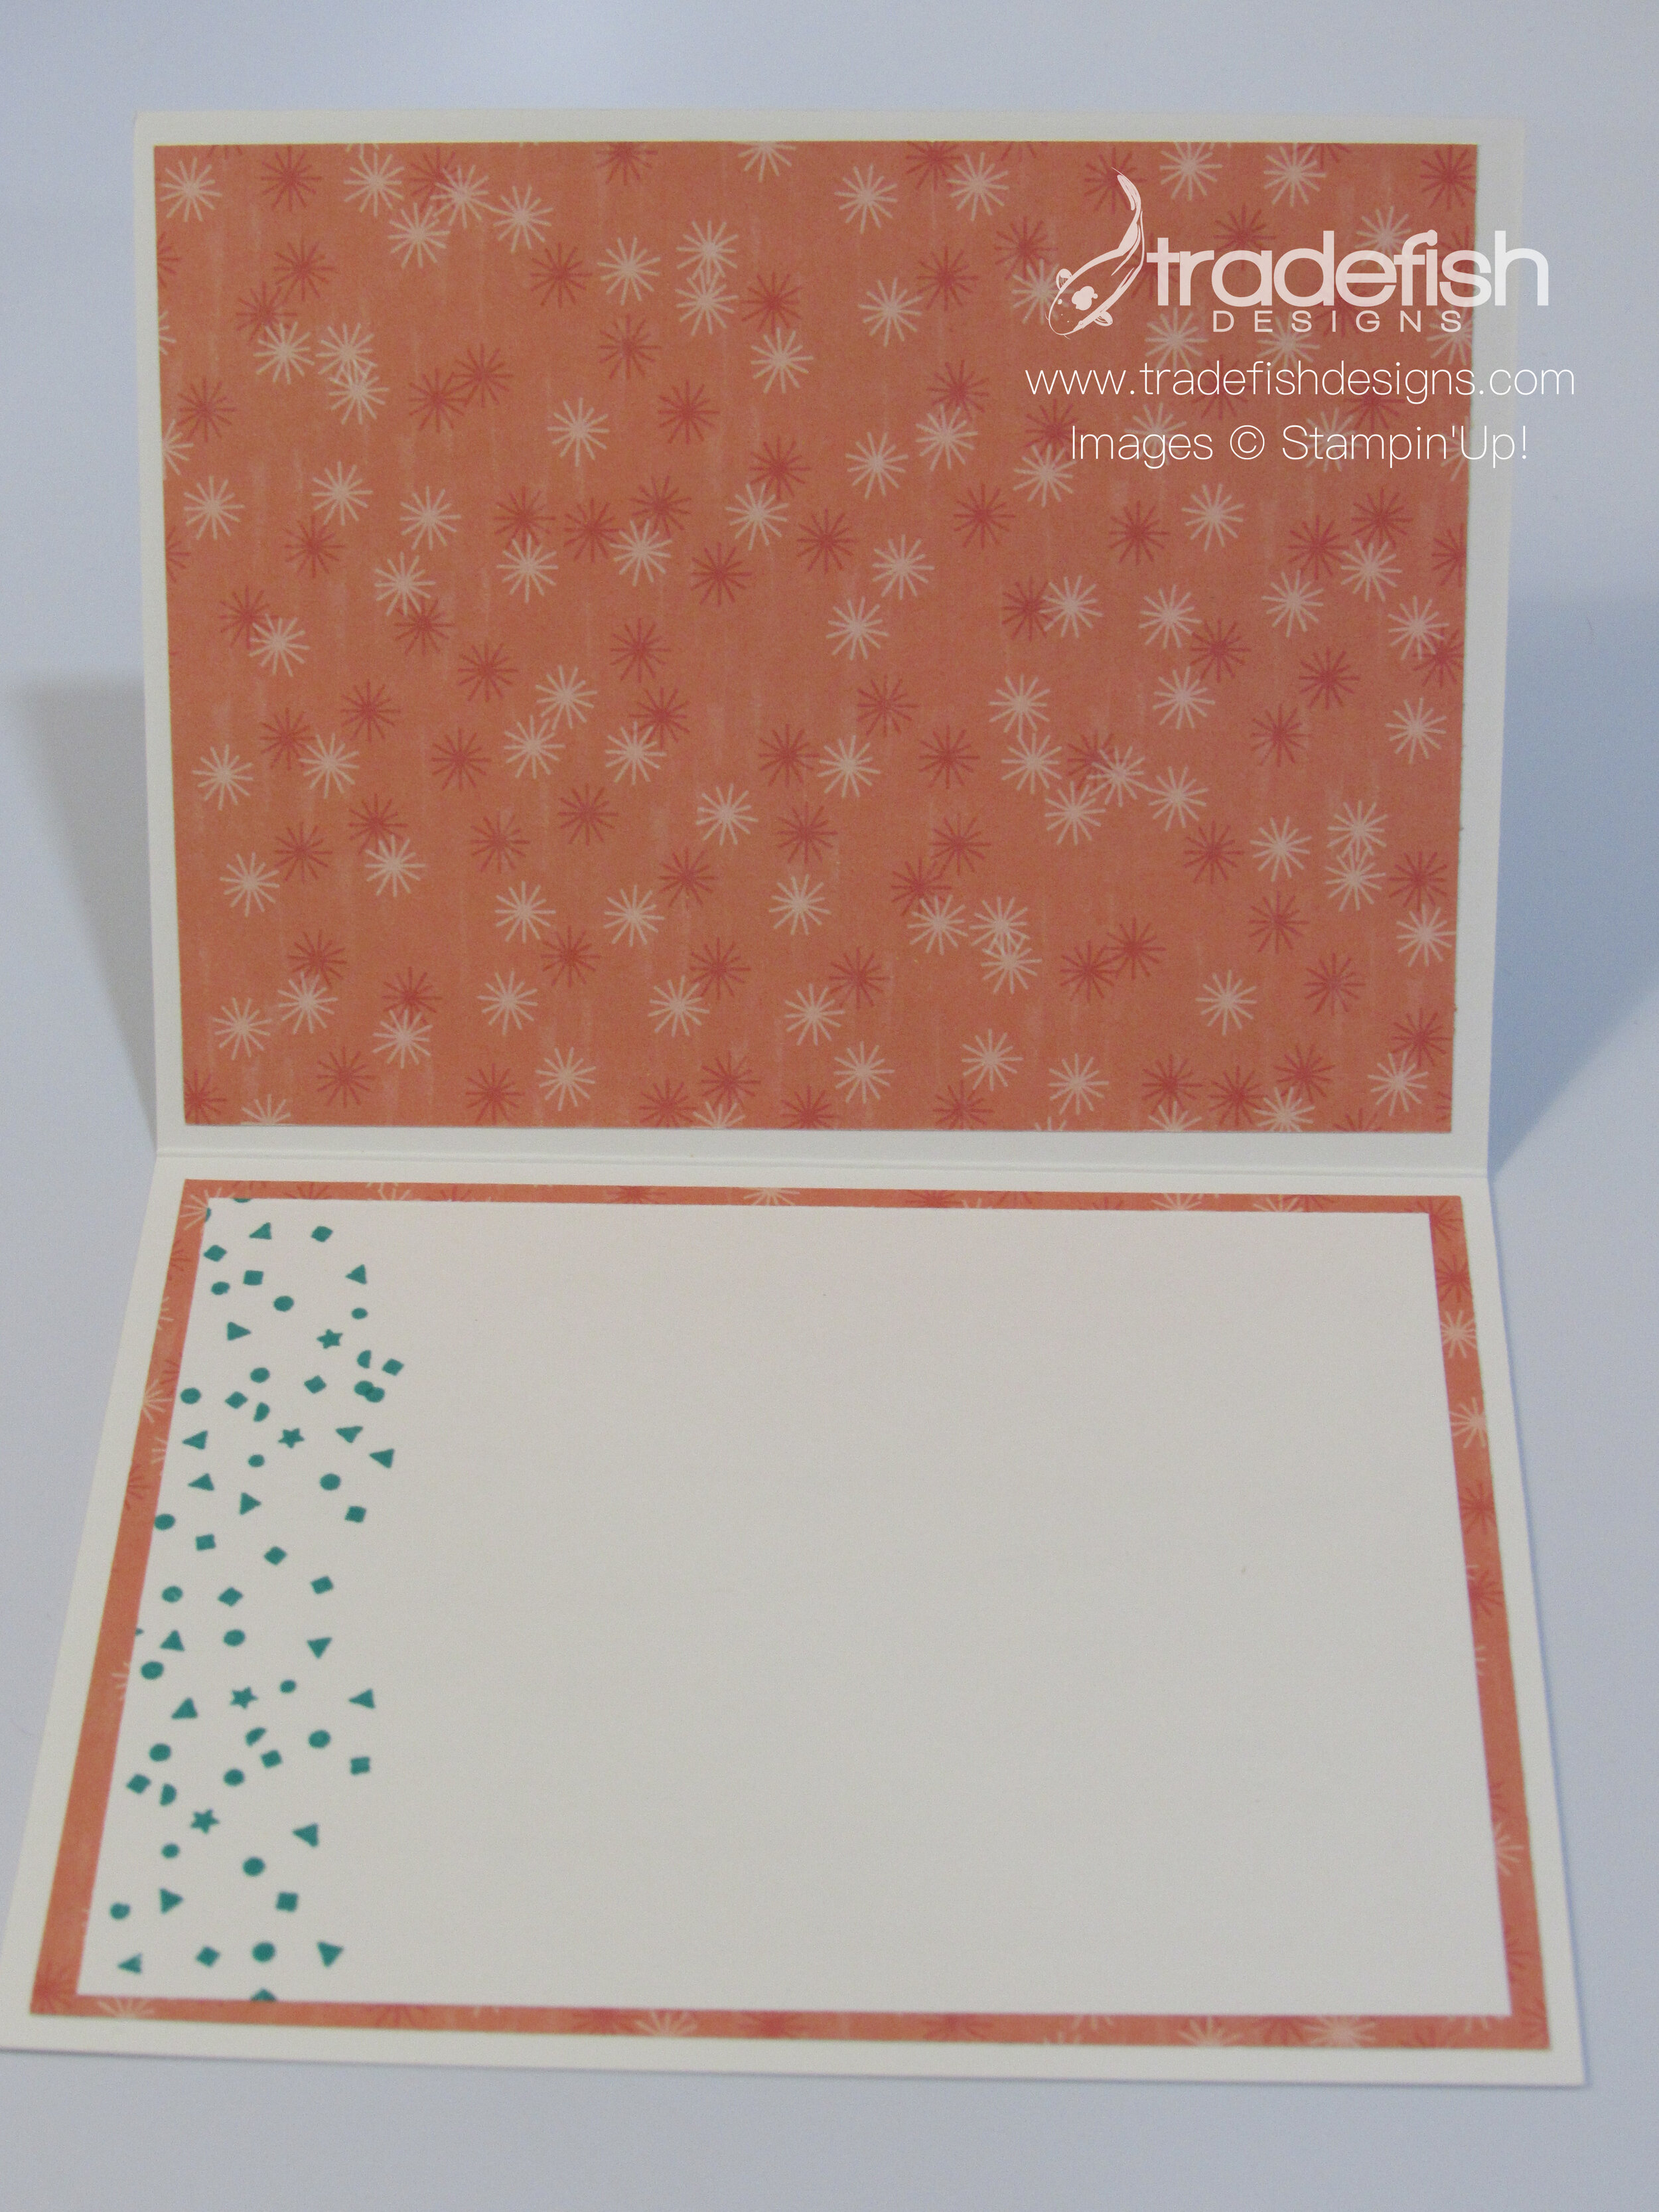
I always try to decorate the inside of my card to coordinate with the cover. This is also a great way to use up your designer paper. Let’s not hoard it but use it…to make room for the new paper when it comes out.
I also find another way to use up the extra paper is to decorate the envelope. Remember, no naked envelopes!

I hoped you enjoyed today’s card. If you are interested in getting the supplies go ahead and look at the product list below.
") | |||
| | | |


Keep it crafty peeps!
Rest & Relax...yes please.
Today’s card takes us to the tropics. I had fun coloring the hibiscus flower and leaves and enjoyed all the textures from the paper and embossing folder as well as all the paper layers.

If you are a paper hoarder, like most crafters, you know you can put some designer paper on the inside. I’ve been trying to use up my paper before it retires. Its always nice to tie the inside of the card back to the front of the card.

You can always spread the designer paper love to the envelope. It will make quite an impression when the recipient opens it.

No naked envelopes!
I hope this card makes you think of relaxing on a beach and breaking out your summer stamps and paper even though it’s now fall. These products are from Stampin Up and I have them listed below if you would like to purchase any of them. But if you have other supplies you can use that instead. Just use them and create something beautiful today.
 |  Tropical Oasis Designer Series Paper [151252] $11.50 |  | |
| | |||
 Coastal Weave 3D Embossing Folder [151503] $9.00 | |||
")


Don’t be a paper hoarder. Use it!
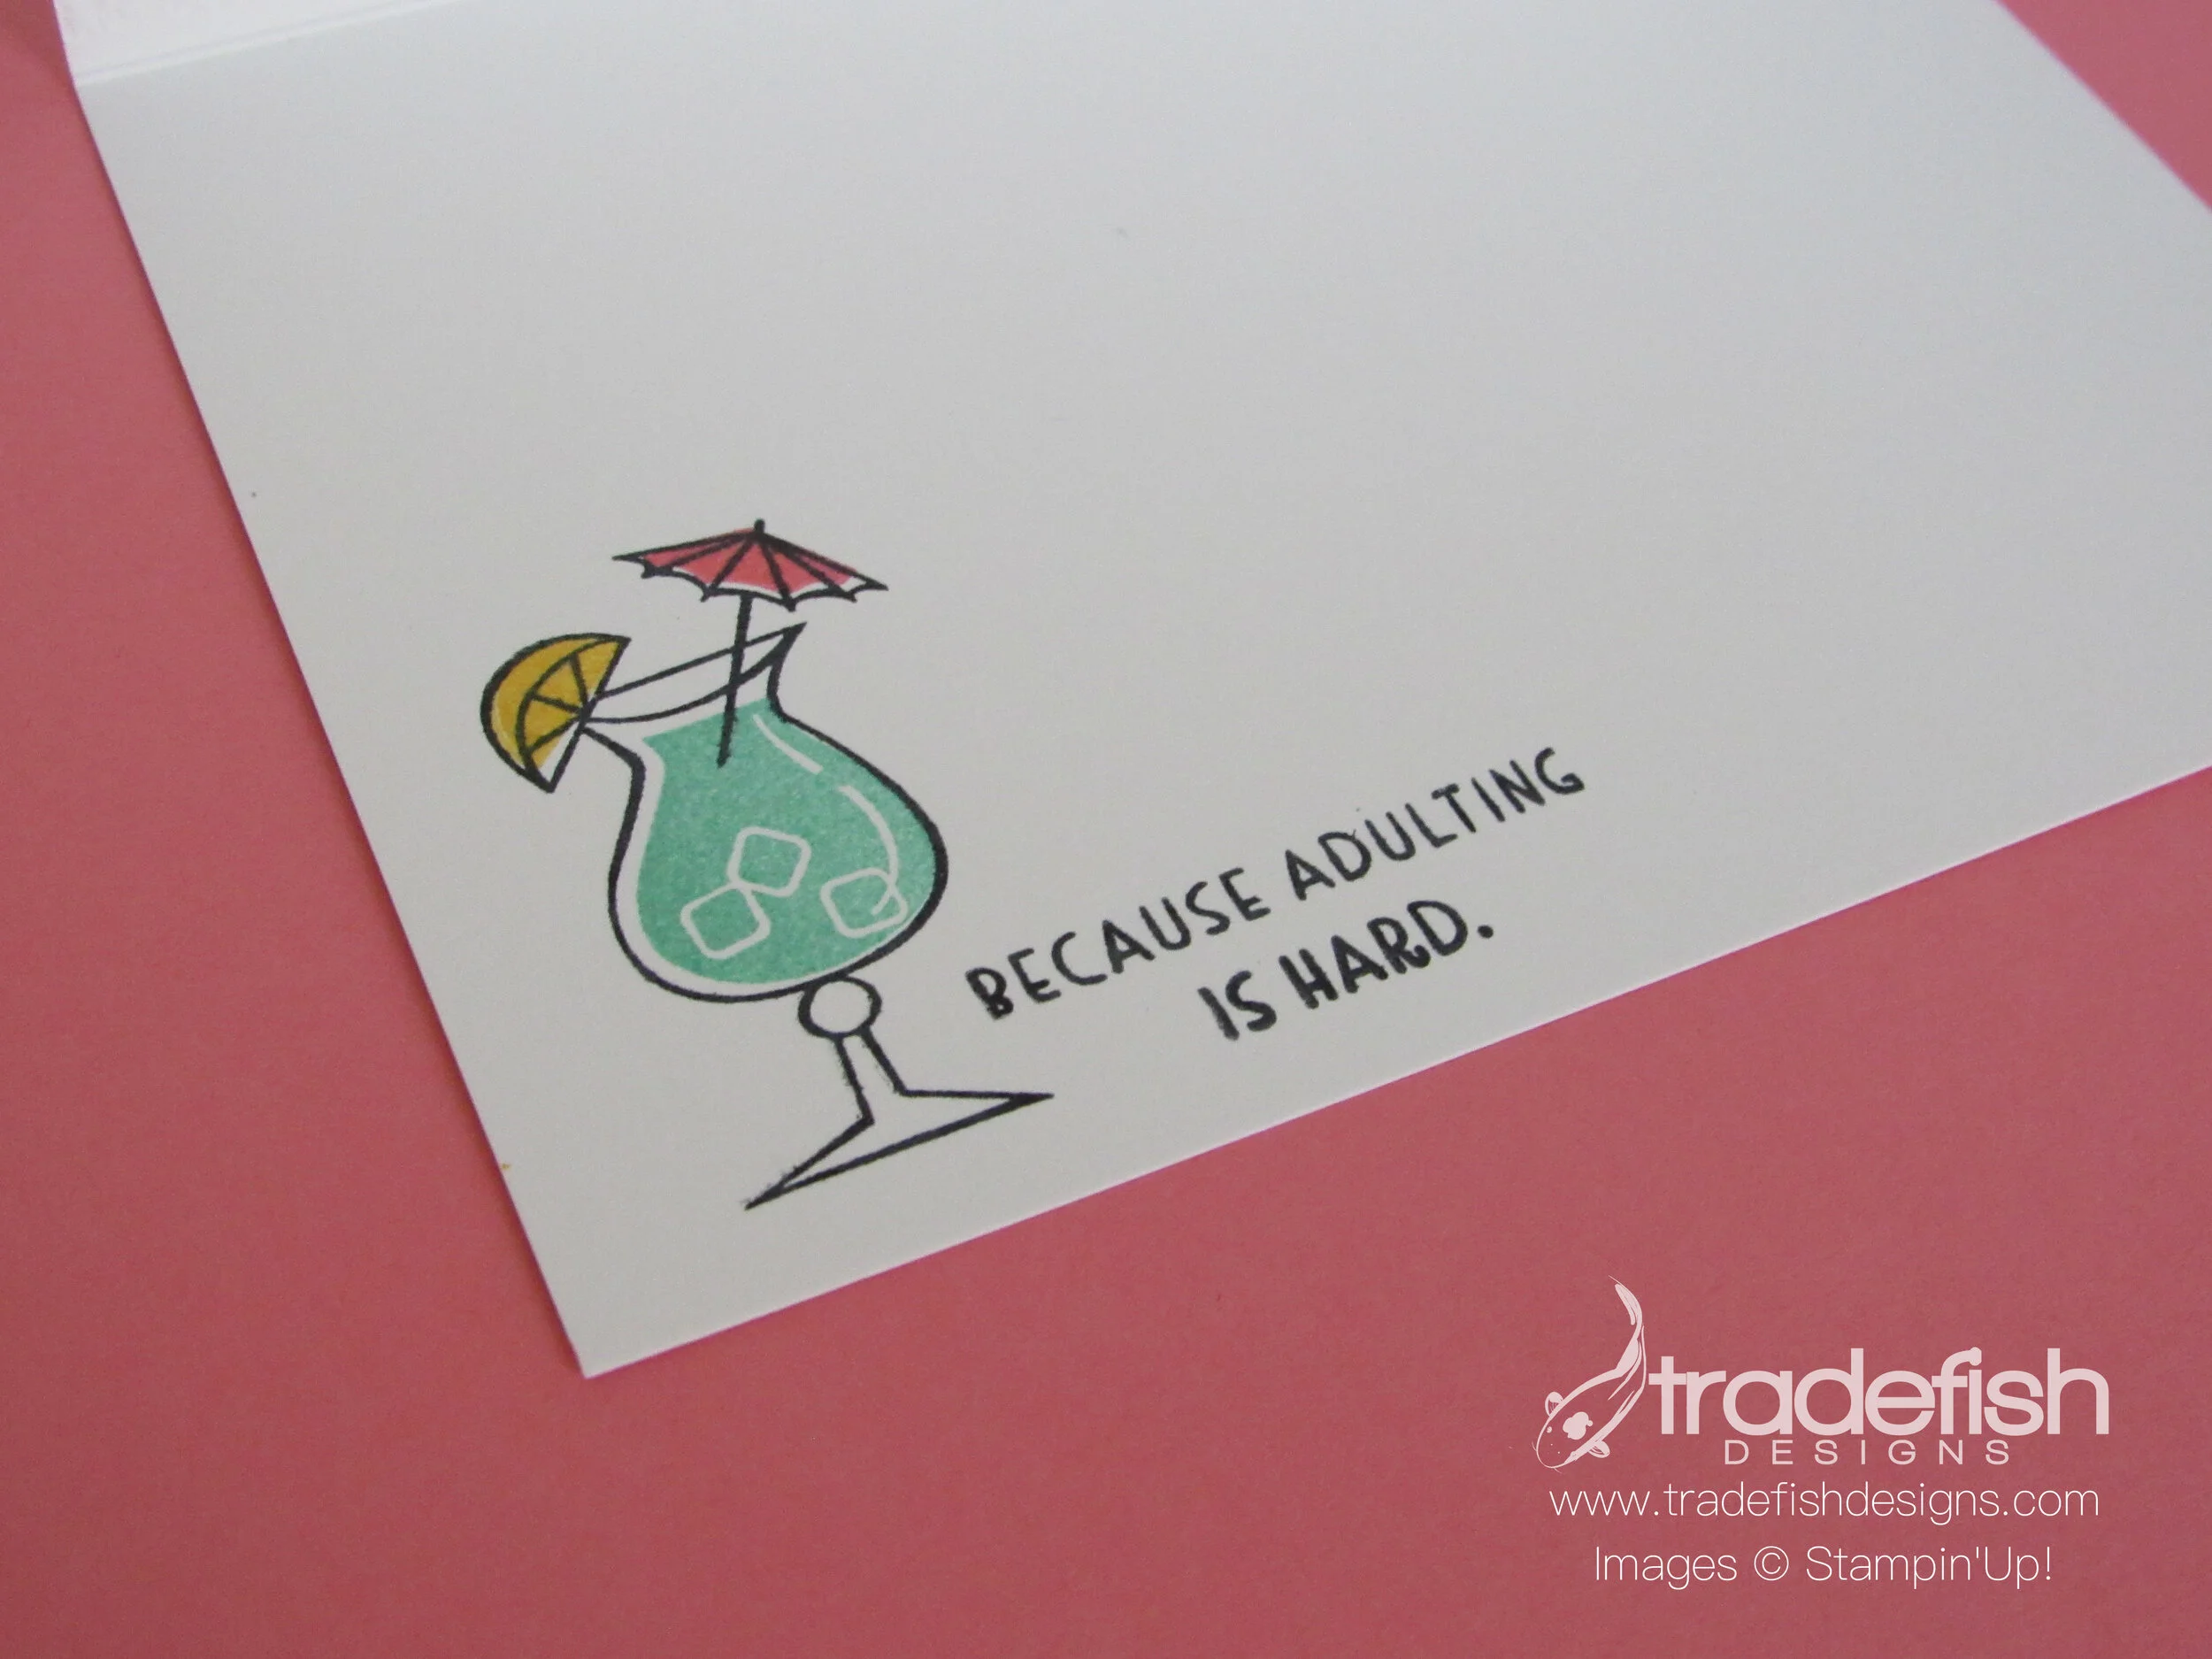
Because adulting is hard...
Today’s card is for all of those who like to enjoy the occasional cocktail at the end of the day… This is a simple but fun card. I embossed the front of the card and used the Nothings Better Than stamp set and dies to create this cute little card front.
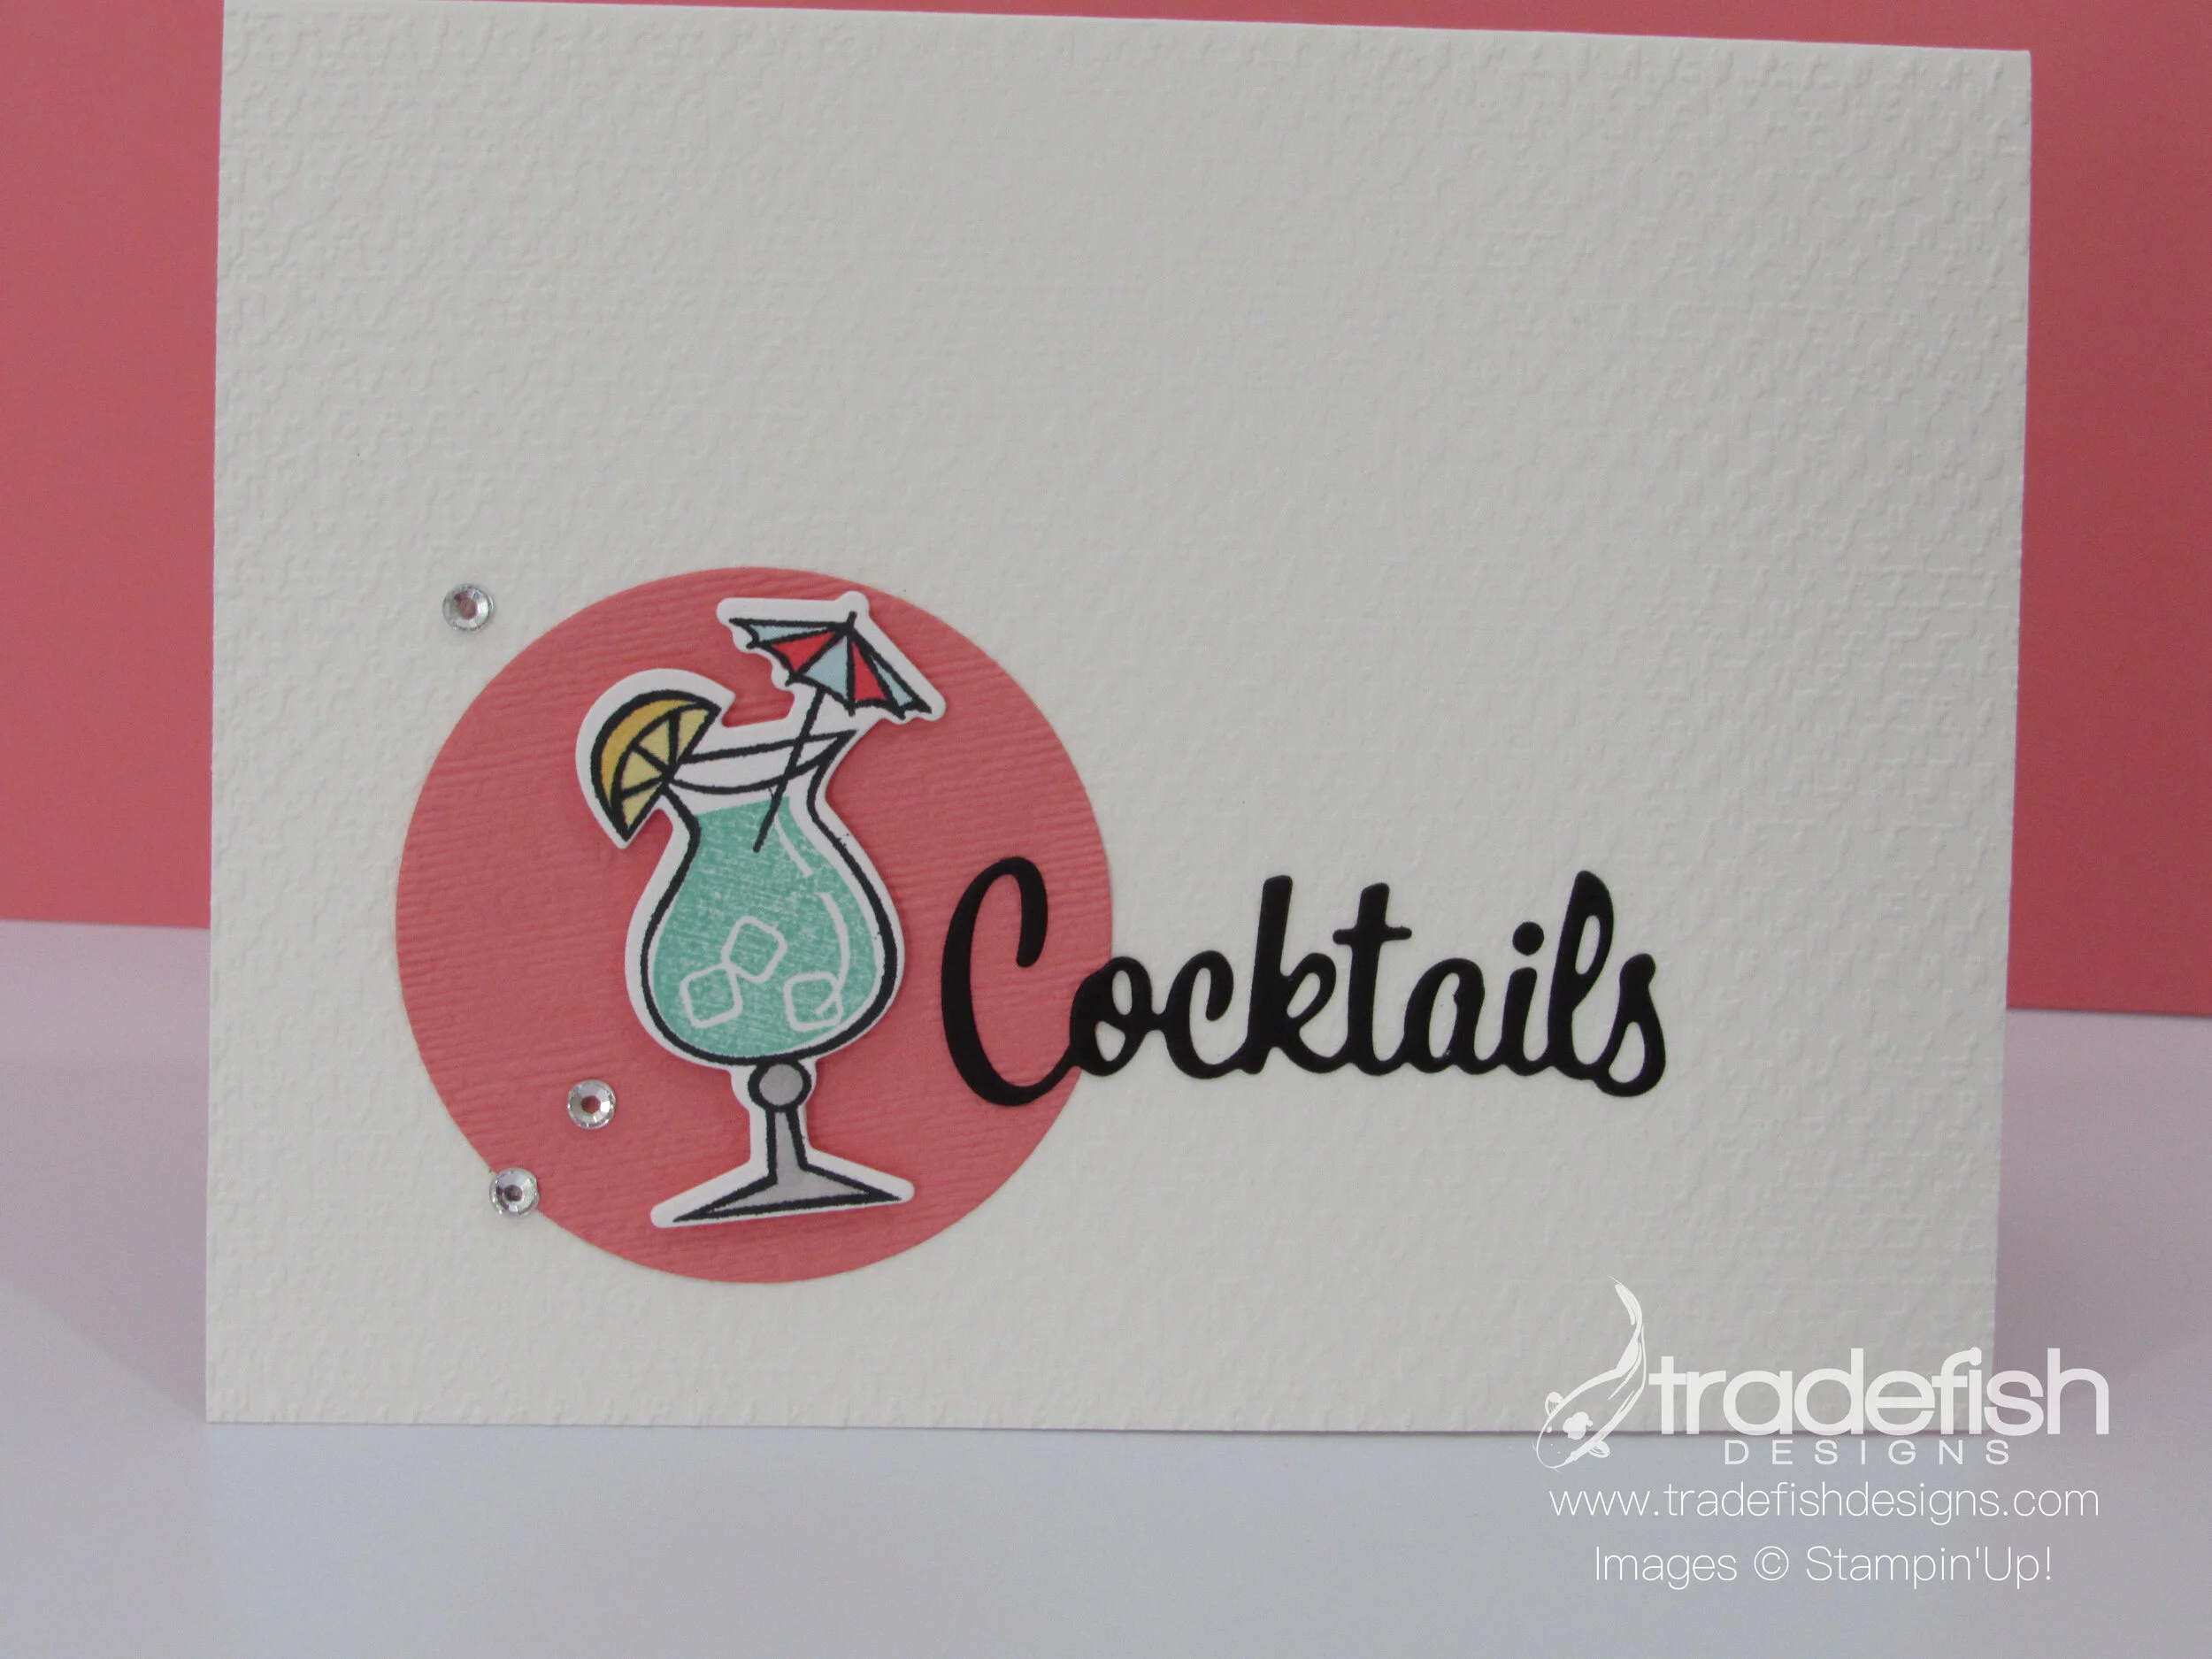
Here’s a close up of the front of the card that shows off the decorative rhinestones and the separate embossing I did on the circle die. There’s also a nice close up of the coloring of the cocktail stem.

It’s always important for me to do something on the inside of the card. I think this just makes for a happy recipient.
Don’t forget…no naked envelopes!

I hope you enjoyed today’s project. The products I used are listed below. Have a wonderful day my crafty friends!
 | |||
 |  | ||
| |


Keepin’ it crafty!
Memories & More Cards
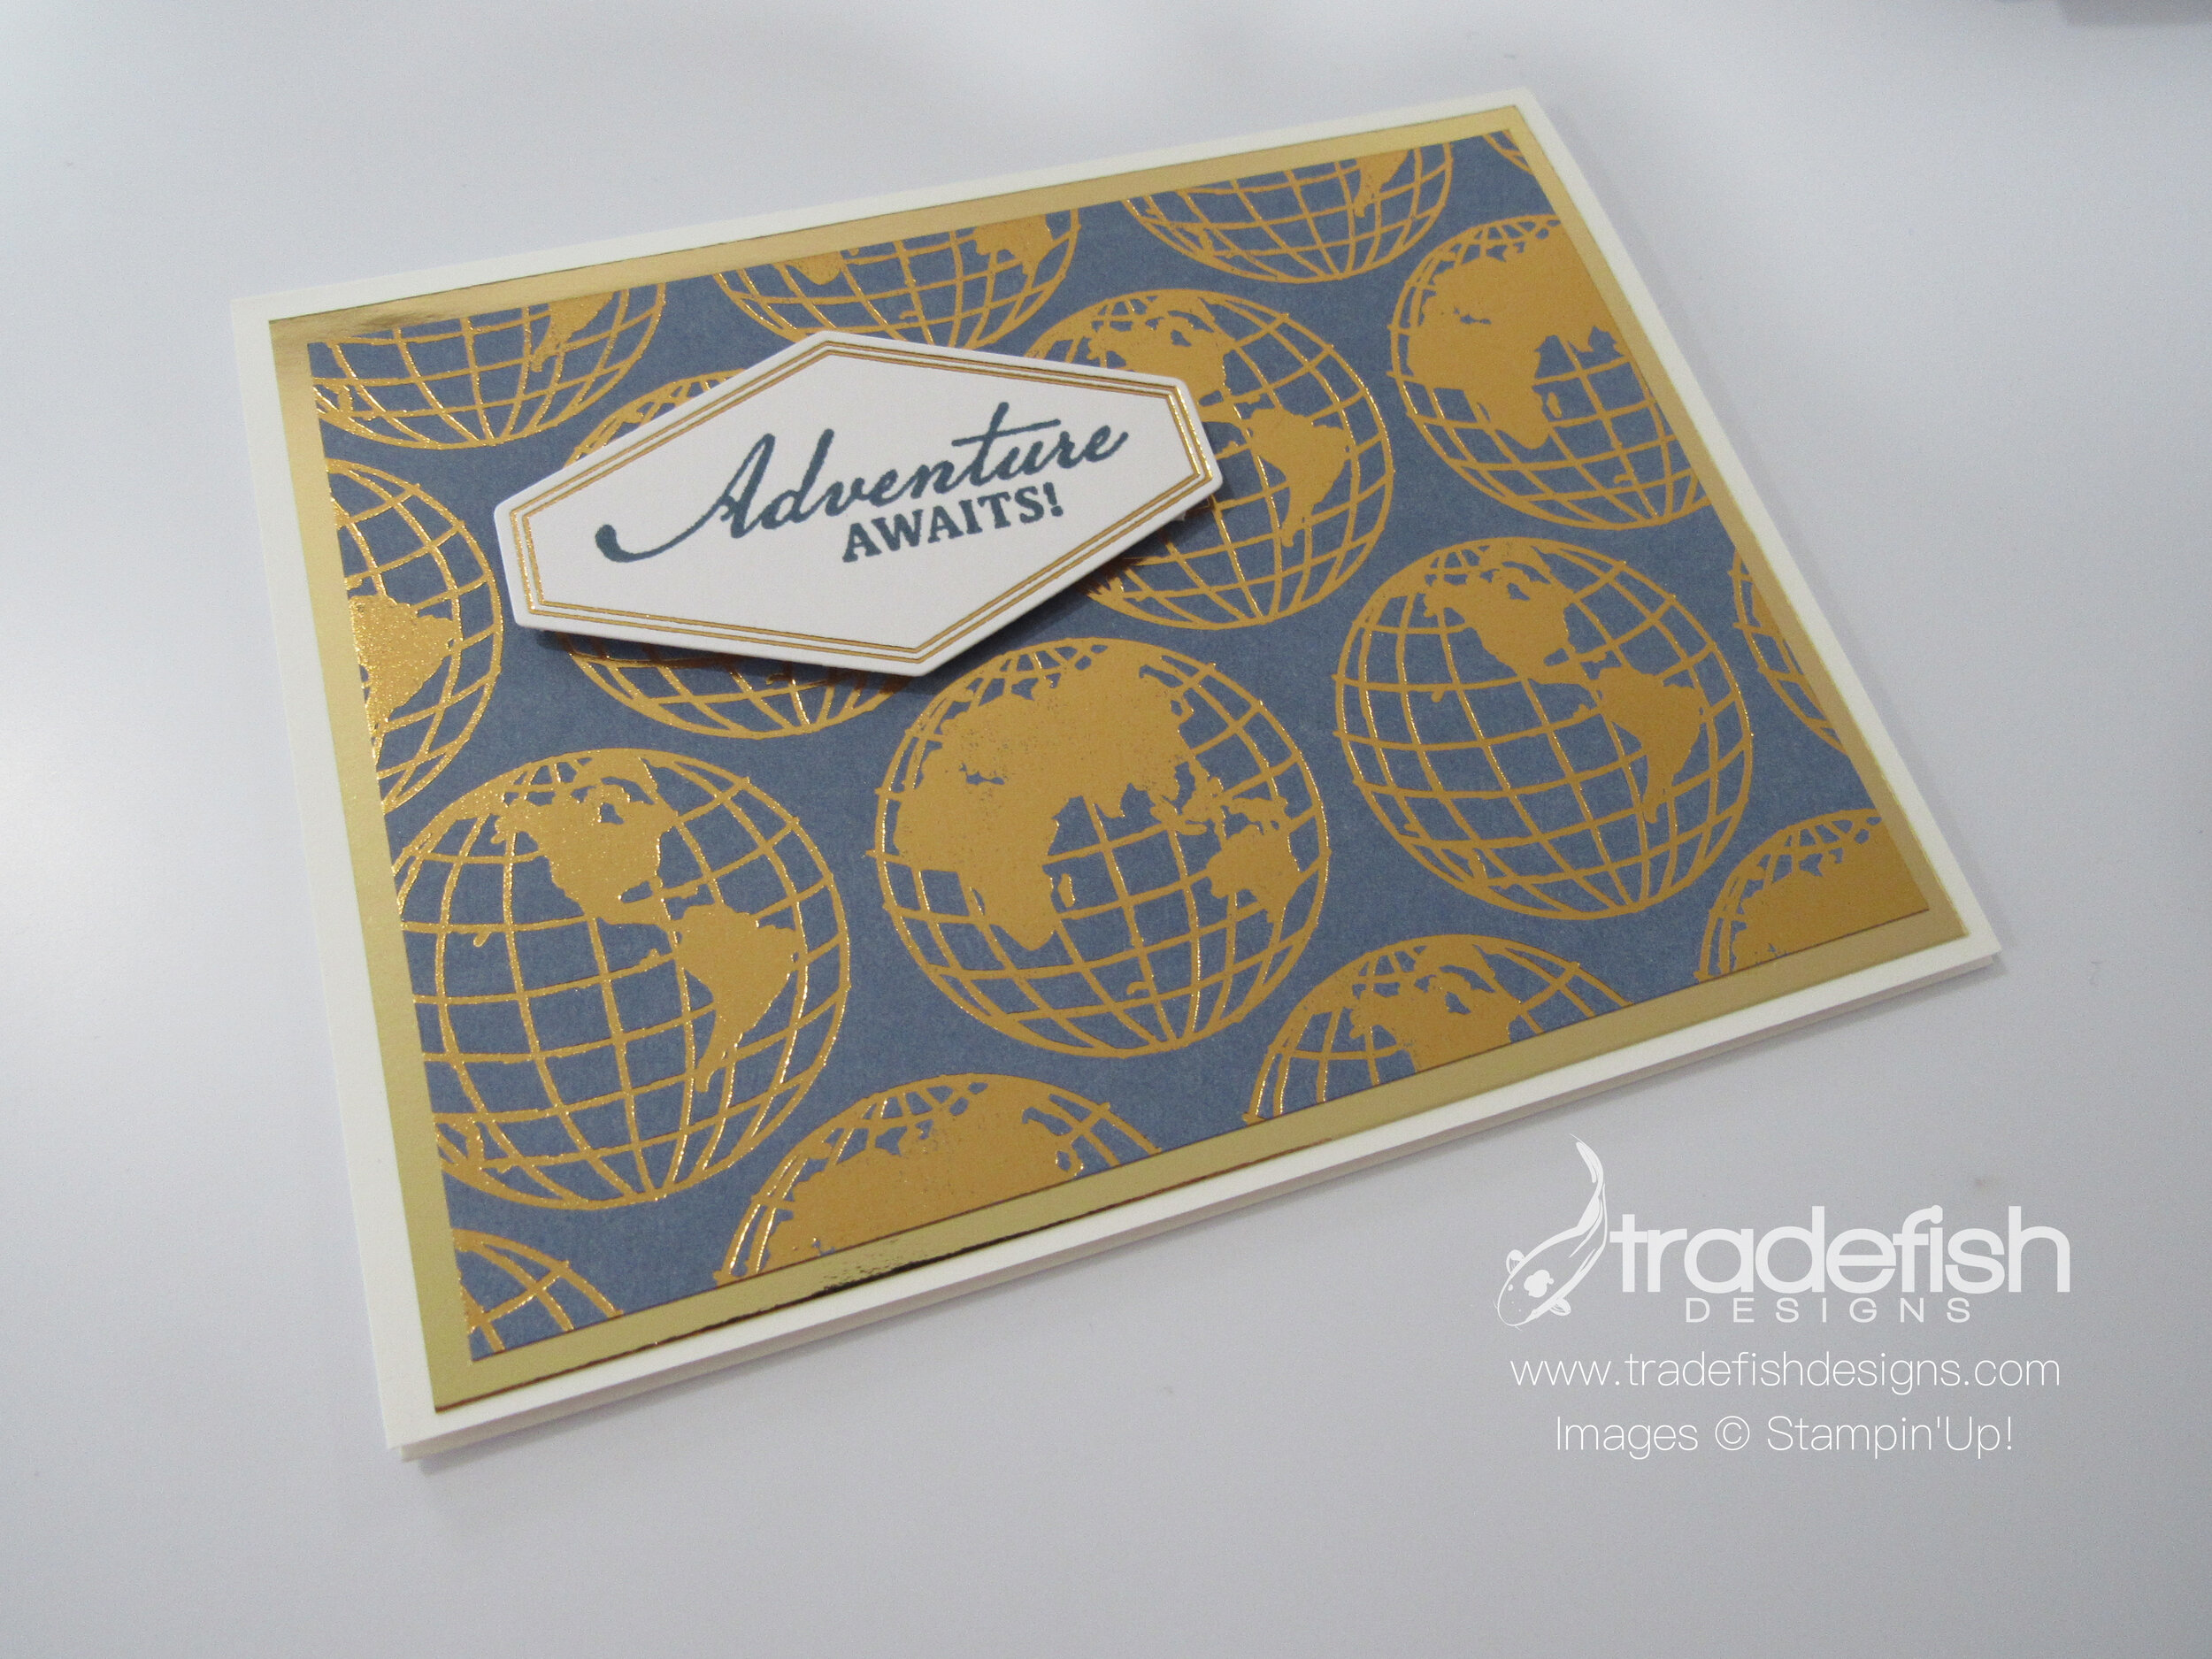
Todays’ post shows you that you can take a Memories and More pack from Stampin’ Up and make 20 cards (with leftover bits). I took my World of Good Memories & More Cards and coordinating cardstock and a few embossing folders and made 20 cards. If you are looking for cards for men this is a great option. This particular card set features travel-related themes…not a flower in sight!

Here’s a card that uses some of the stickers inside the Memories & More Card set. I stamped the Adventures Awaits from the Beautiful World Stamp Set in Misty Moonlight and popped it up.

The inside of the card has a scrap from the front and a sticker from the Memories & More Cards.

Cards in the Memories and More Card set come in two sizes. I used the larger one for the base and the smaller one popped up for the sentiment.

I used another one of the smaller cards for the inside of the card to carry through the travel theme.

For this card I incorporated some embossing for the background. I thought the Scripty embossing folder was perfect.

Here’s a close up of the embossing. It’s really a subtle touch on the Crumb Cake cardstock.

Here’s a card using the Tasteful Textile embossing folder and matted layers to add more dimension.

Again, here’s another one of the smaller cards inside with a small sticker to provide a sentiment inside the card.

I hope you enjoyed seeing what I was able to create with the World of Good Memories & More Cards. Here are all the products used in this project!
| | |||
 | | |

")


Keeping it crafty!
Creativate Mystery Card Challenge
My project from a Mystery Card Challenge.
Hello Crafty Peeps,
Today, as a part of International Card Making Day, I’m taking part in an online retreat where 2,000 of us stampers are watching 5 amazing Stampin’ Up demonstrators create a project every hour on the hour from 10am to 9pm. I’m loving it. One of the things that is happening is what is called a Mystery Card Challenge. They provide the dimensions for you to cut your paper and then you put it together. I’ve never done this before and I can’t share the dimensions as is a part of a paid event but I figure I could share what I created…


Remember, no naked envelopes!

I really enjoyed the challenge of a mystery card and hope to do it again soon. All the goodies I used are pictured below!
 |  |
")


Happy Crafting Peeps!